javascript를 이용하여 자기소개 페이지를 더 꾸며보았다.
완성한 페이지는 이곳을 통해 들어갈 수 있다!
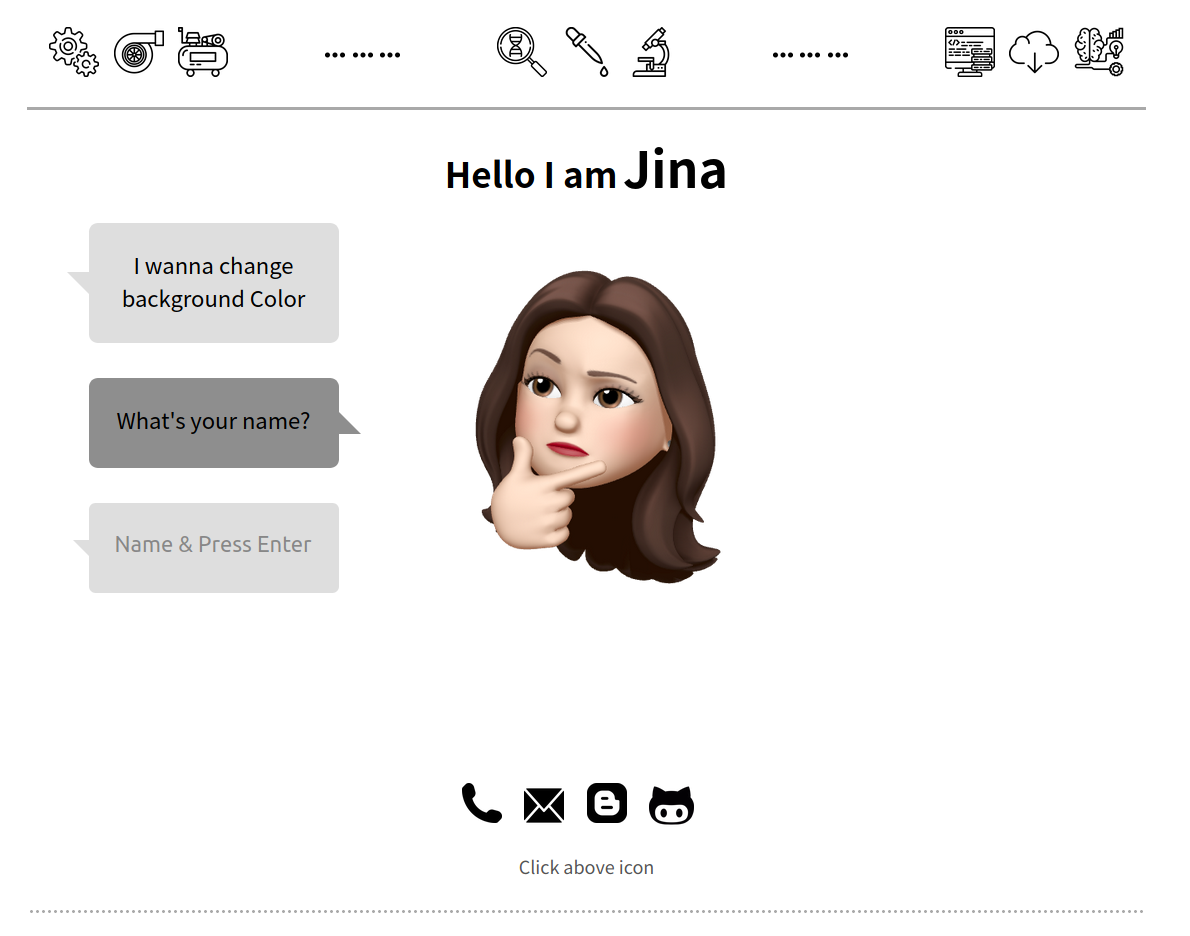
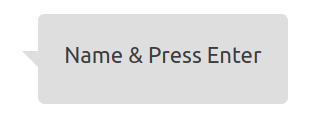
여기에 이름을 입력하면
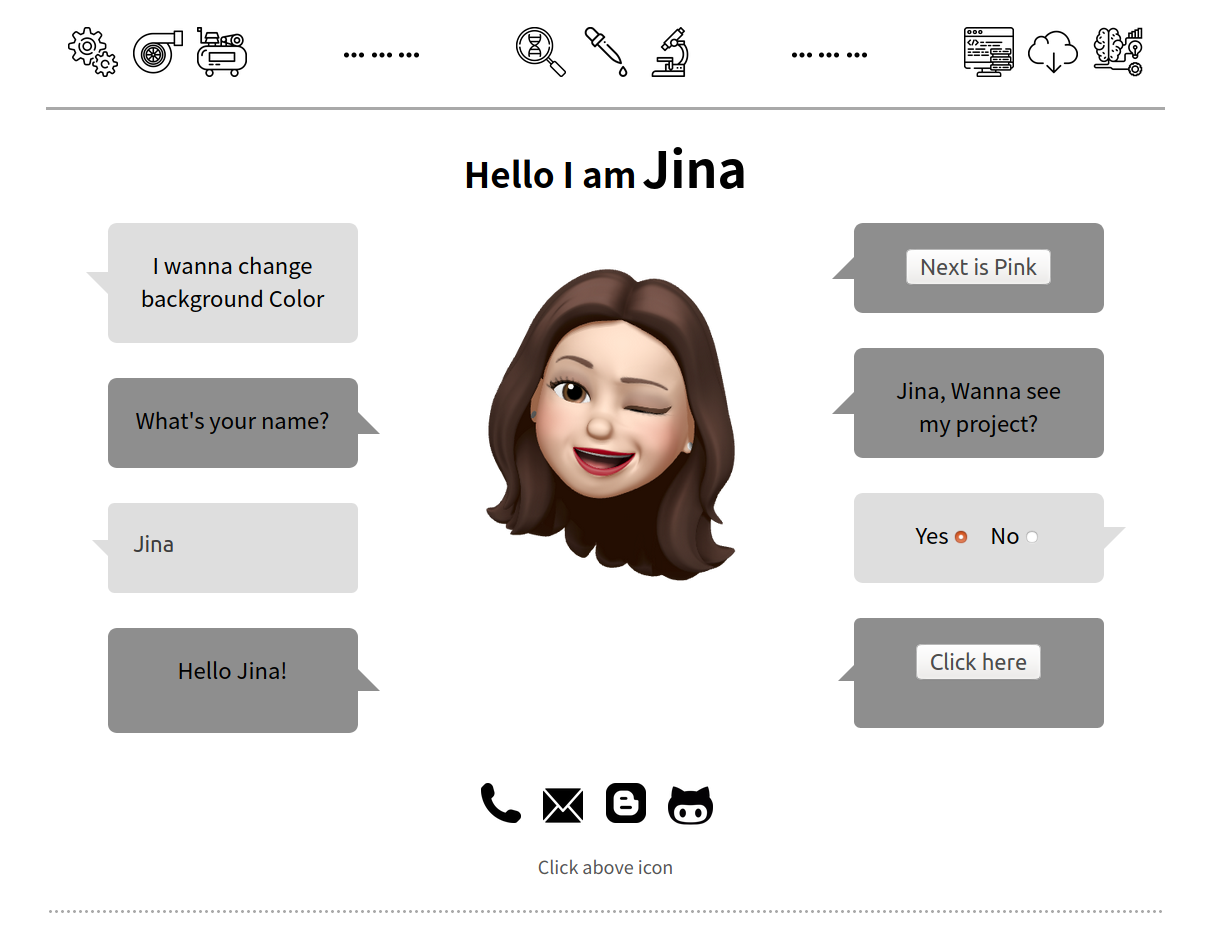
이런식으로 뜨고 yes/no 누르면 말풍선이 바뀌게 만들었다.
배경색 바꾸는 버튼도 만들었다.
1. 말풍선
아래의 링크는 원하는 말풍선 모양을 css로 만들어주는 페이지
https://leaverou.github.io/bubbly/
말풍선이 있었으면 좋겠는 곳에 id나 class등 주고 css에서 말풍선 크기 등 조절하면 된다.
2. input 박스 구성
이름을 입력하는 곳에 input박스를 만들었다.
<div id="id">
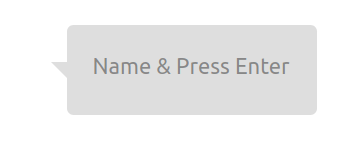
<input type="text" id="id2" placeholder="Name & Press Enter" style="width:215px; height:30px; background-color:#dedede; font-size:22px; border:none;" onkeypress="if(event.keyCode==13){myFunction();}" >
</div>div에 준 id는 말풍선 속성을 조절하기 위하여
input 준 id는 input에 text박스에 입력한 값을 가져오기 위하여
2-1) input 박스 만들기
<input type="text">위의 태그로 input box를 만들 수 있다.
input type 종류
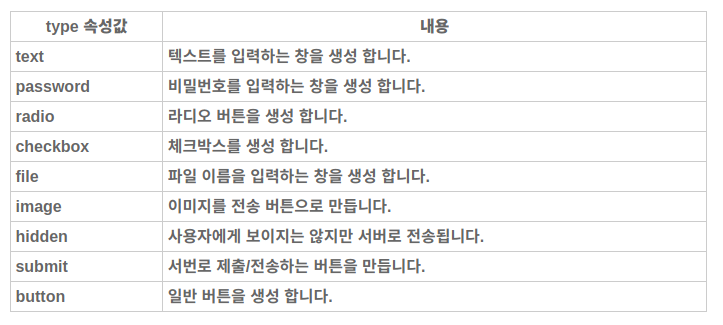
img ref) https://yangbari.tistory.com/28
2-2) input 박스 속성
<input type="text" placeholder="Name & Press Enter">텍스트 입력 폼에 안내문구를 넣어 데이터 입력에 도움을 줌
텍스트 입력 폼의 초기값
placeholer : 화면에만 보이는 안내문구
value : 초기 속성값
텍스트 입력 폼에 아무것도 입력하지 않고 전송할 때
placeholder : 빈 내용이 전송
ex) Hello !
value : value 값 전송
ex) Hello Name & Press Enter!
2-3) input 박스 스타일
input 태그 내부에 style="~"로 input box의 스타일을 바꿀 수 있다.
<input type="text" style="width:215px; height:30px; font-size:22px; background-color:#dedede; border:none;" >style="background-color:~" 를 이용한다.
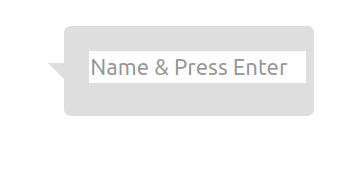
배경색을 주지않으면 아래의 그림처럼 텍스트 박스가 흰색으로 나타난다.
style="border:none" 를 이용한다.
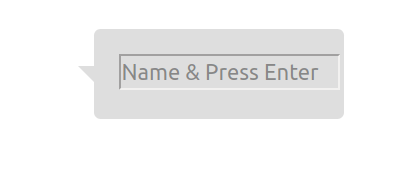
만약 style="border:none"을 주지않으면 아래의 그림처럼 테두리가 생긴다.
2-4) input 박스 event
<input type="text" onclick="{Function();}" >input 태그 안에 event 종류 = "{Function();}" 를 입력
event 종류
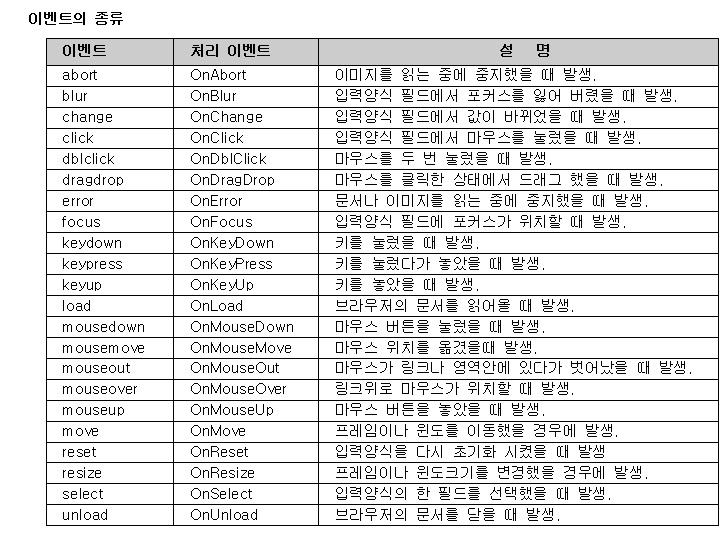
img ref) http://hongkwan.blogspot.com/2013/07/130709-12-eventtesthtml-eventtest2html.html
3. enter key로 event 발생시키기
3-1) onkeypress
onKeyDown
키를 눌렀을 때 이벤트 발생
- 이벤트 발생 후, 문자 입력
- Keycode 값을 받음
- 키보드에 있는 모든 키를 인식
onKeyPress
키를 눌렀을 때 이벤트 발생
- 이벤트 발생 후, 문자 입력
- ASCII Code 값을 받음
- ASCII Code에 해당하지 않는 shift, ctrl, backspace, tab, 한/영 등의 키는 인식하지 못함
onKeyUp
키를 눌렀다 놓았을 때 이벤트 발생
- 문자 입력 후, 이벤트 발생
ref)https://geonlee.tistory.com/20
3-2) key code
img ref) https://whiterussian.tistory.com/67
key code이용하여 event주기
enter의 key code = 13이므로
onkeypress = "if (event.keyCode == 13) {Function( );}" 이용
<input type="text" onkeypress="if(event.keyCode==13){myFunction();}">enter key에 준 event
<script>
function myFunction(){
    var who = document.getElementById('whoru').value;
    document.getElementById('hi').innerHTML = "Hello "+who+"!";
    document.getElementById("jina").src= "hello.png";
    document.getElementById("hi").setAttribute("id", "hi2");
    document.getElementById('hi4').innerHTML = who+", Wanna see my project?";
    document.getElementById("yes").style.display="inline" ;
    document.getElementById("no").style.display="inline";
    document.getElementById('hi4').setAttribute("id", "hi5");
    document.getElementById('yesno').style.color="black";
    document.getElementById('yesno').setAttribute("id", "yesno2");
    document.getElementById('chcolor2').setAttribute("id", "chcolor3");
    document.getElementById("chcol").style.display="inline" ;
}
</script>
4. input 박스에 입력한 값 얻기
Document.getElementById() 메서드를 이용
Document.getElementById() 는 주어진 문자열과 일치하는 id 속성을 가진 요소를 찾고, 이를 나타내는 Element 객체를 반환
ID가 없는 요소에 접근하려면 Document.querySelector()를 사용
<body>
<input type="text" id="id">

<script>
function myFunction(){ var who = document.getElementById('id').value;
</script>
</body>
document.getElementById()를 이용하여 input박스에 입력한 값(value)를 가져옴
이 값을 who로 지정함
ref) https://peamexx.tistory.com/36
ref) https://developer.mozilla.org/ko/docs/Web/API/Document/getElementById
5. javascript를 이용하여 글쓰기
var who = Document.getElementById().value 를 이용하여 얻은 who값을 넣어서 html 페이지에 글을 쓰려고 함
5-1) document.write()
<script>
function myFunction(){
    var who = document.getElementById('id').value;
    document.write("Hello "+who+"!");
 </script>
를 이용하면 입력은 되지만 기존의 html페이지에 작성이 되는 것이 아닌 아예 새로운 창에 Hello who! 가 입력되는 문제가 발생!
5-2) innerHTML=" "
element.innerHTML="~"은 요소(element)의 내용을 "~"로 변경
<body>
<div id="hi"> </div>
<script>
function myFunction(){
var who = document.getElementById('id').value;
document.getElementById('hi').innerHTML = "Hello "+who+"!";
</script>
</body>글을 입력하고 싶은 부분에 div태그와 띄어쓰기로 미리 자리를 만들어두기
띄어쓰기를 "Hello "+who+"!"로 변경함
ref) https://meaningone.tistory.com/316
ref) https://developer.mozilla.org/ko/docs/Web/API/Element/innerHTML
6. 사진바꾸기
이벤트 속성으로 사진 바꾸기
document.getElementById("id").src = "image경로" 이용
<body>
<img src="jina.png" id="jina">

<script>
function myFunction(){
 document.getElementById("jina").src= "hello.png";}
</script>
</body>
원래 jina.png 있던 자리의 그림을 hello.png로 바꿈
ref)https://codingbroker.tistory.com/43
7. 말풍선 배경색 바꾸기
이벤트 주기 전에는 기존 배경색과 같은 흰색으로 지정해서 말풍선이 보이지 않다가,
이벤트 주면 회색으로 색이 바뀌어 말풍선이 보이도록 설정하고 싶었음
말풍선은 위의 사이트에서 얻은 css로 따로 입력
지정한 id에 css 스타일이 입력되어있음
7-1) 배경색 바꾸기
document.getElementById("hi").style.backgroundColor=""를 이용하여 css에 적용된 색상을 변경
<body>
<div id="hi"></div>

<script>
function myFunction(){
document.getElementById("hi").style.backgroundColor="gray";}
</script>
</body>
이 방법을 사용하면 말풍선의 ㅁ칸 색상을 바꿀 수 있음
말풍선 옆의 꼬리부분은 #id:after(css의 selector)의 형식으로 이루어져 있음
css의 selector의 style을 변경하는 방법을 찾을 수 없어음 아래와 같은 방식 사용
7-2) id 바꾸기
흰 배경의 말풍선을 id="hi"로 지정 > hi의 css에서 배경색 흰색으로
바꾸고 싶은 색 말풍선 id="hi2"로 지정 > hi2의 css에서 배경색 지정
이벤트를 주면 id를 바꾸어서 색상을 변경하도록 함
document.getElementById("originalDivId").setAttribute("id", "newDivId"); 를 이용
originalDivId에 기존의 id를
nesDivId에 바꿀 id를 입력
<body>
<div id="hi"></div>

<script>
function myFunction(){
document.getElementById("hi").setAttribute("id", "hi2");}
</script>
</body>
ref) https://stackoverflow.com/questions/44894210/change-element-id-using-javascript
8. p태그 div태그
p태그는 div를 포함할 수 없음
p태그는 문자 정보를 입력하는 단락을 구성함
p태그 하위에는 다른 블록 요소가 포함되어서는 안됨
p태그 하위에는 span, a, strong 등과 같은 인라인 요소만 올 수 있음
<p><div>Hello World!</div><p>위와 같은 형태는
<div><p>Hello World!</p></div>위와 같은 형태로 변경해야함
div태그는 p태그를 포함할 수 있음
div태그는 p태그 처럼 문자 정보를 입력할 수 있지만 실제 용도는 HTML 문서의 영역별 구분
각 영역의 용도를 구분하는 기능이므로 다른 블록 요소가 하위에 포함될 수 있음
9. radio button
radio button > 체크리스트 버튼 처럼 생겼으나 하나만 선택 가능
(같은 라디오 버튼 name 중 하나의 버튼만 선택)
input type ="radio"로 지정 가능
Yes <input id="yes" type="radio" name="y_n" value="yes" onclick="{ckbutton();}">
No <input id="no" type="radio" name="y_n" value="no" onclick="{ckbutton2();}">
ref ) https://codepen.io/prasanthmj/pen/KmWmgV
10. radio button_ yes/no 선택
라디오 버튼의 yes/no 선택에 따라 다른 말풍선을 띄우는 event 만들고 싶음
하나의 이벤트로 하기 힘들어서 각 버튼에 이벤트를 따로 줌
<script>
function ckbutton(){
    document.getElementById('page').style.display='inline';
    document.getElementById('page').style.textDecoration="none";
    document.getElementById('change').style.display='none';
    if (document.getElementById('ckevent')){
    document.getElementById('ckevent').setAttribute("id", "hi5");}
}

function ckbutton2(){
    document.getElementById('page').style.display='none';
    document.getElementById('change').style.display='inline';
    if (document.getElementById('ckevent')){
    document.getElementById('ckevent').setAttribute("id", "hi5");}

}
</script>
11. event로 새로고침 하기
onclick = "window.location.reload()" 을 이용하여 새로고침 event생성
<input type="button" value= "Change Guest?" onclick="window.location.reload()">ref) https://www.thewordcracker.com/jquery-examples/refresh-current-page-using-javascript/
12. 토글 버튼을 이용하여 배경색 바꾸기
12-1) 토글 버튼 만들기
<div id="chcolor2"><input id="chcol" type="button" value="Next is Pink" onclick="{changecolor();}"></div>button을 만들고 Value로 초기값을 줌
onclick이벤트로 함수를 연결
12-2) 함수 한줄씩 입력하기
 <script>

function changecolor(){
    var colorvalue=document.getElementById('chcol').value;

    if(colorvalue === "Next is Pink"){
    document.body.style.backgroundColor="#fcf3f6";
    document.getElementById('chcol').value="Next is Blue";
}

else if(colorvalue=== "Next is Blue")
{ document.body.style.backgroundColor="#eaf5fb";
    document.getElementById('chcol').value="Next is White";
}

else if(colorvalue==="Next is White")
{document.body.style.backgroundColor="white";
    document.getElementById('chcol').value="Next is Purple";
}

else if(colorvalue==="Next is Purple")
{document.body.style.backgroundColor="#e6ddee";
    document.getElementById('chcol').value="Next is Pink";
 }
</script>
12-3) 반복문으로 입력하기
<script>

function changecolor(){
var colorvalue=document.getElementById('chcol').value;

var alist=["#fcf3f6","#eaf5fb","#e6ddee","white"];
var blist=["Next is Pink","Next is Blue","Next is Purple","Next is White"];
for(i=0;i<(blist.length-1);i++){
if( colorvalue === blist[i])
{ document.body.style.backgroundColor=alist[i];
  document.getElementById('chcol').value=blist[i+1];
}

else if (colorvalue === blist[3]){
    document.body.style.backgroundColor=alist[3];
document.getElementById('chcol').value=blist[0];
}
}
}

</script>
if ~ 까지만 list[4]부터 존재하지 않아서 보라색 이후 undefined가 되며 흰색배경으로 돌아가지 않음
따라서 보라색부터는 else if ~ 로 연결하여 다시 하얀색 번호로 돌아가도록함
(다른 곳에서는 else로만 연결해도 되는 것 같은데 왜 안되는지는 모르겠음..)
13. 자바스크립트 연결
script 부분을 따로 파일로 만들고 html에 연결하기
<script type="text/javascript" src="js.js"></script>script 파일은 head 태그 보다 페이지의 하단(body 태그의 맨 아래)에 위치시키는 것이 더 좋음 (컴파일 처리 순서때문에)

jina moetjina