
React 초급 -> 시작을 공식문서로 해보는 것 좋다. 라이브러리를 만든 사람들이 직접 만든 목적과 사용법을 정리해둔 것!
- React는
친절하고,한국어번역도 거의 되며,Tutorial도 있다.
공식문서를 보는 방법은 목적에 따라 나뉜다.
바로 써보기 vs 이해 해보기
- 써보기만 하고 이해하지 않을 수 있다.
- 써보지 않고 이해만 해볼 수도 있다.
- 써보면서 이해할 수도 있다.
- 이해 먼저하고 써볼 수도 있다.
토픽별로 훑어보며 이해해보겠다.
- 문서 + 예제 적용
- 모든 것은 연습 / 반복
1. 환경설정
개발환경 꾸리기
Visual Studio Code (aka. vscode)
Javascript(typescript)로 만들어진 IDE(통합 개발 환경)- Visual Studio Code Extensions
- IDE를 풍성하게 해주는
여러 기능들이 있음 - 구글링을 통해 필요한 목적에 따라 설정 및 설치 하면 됨.
- IDE를 풍성하게 해주는
리액트 앱 만들어보기
Create React App
- Node.js 10.16 혹은 상위버전 및 npm 5.6 혹은 상위버전이 필요
- Node 설치하면 npm(node package manager)와 npx(node package runner)도 자동 설치됨
ex)
npx create-react-app my-app
cd my-app
npm start- Node 와 npm이 다 해준다.
2. JSX
공식문서로 보는 JSX
- JSX는 Javascript를 확장한 문법
- HTML과 Javascript를 혼용해서 쓰는 모양새
- JSX는 HTML보다는 Javascript에 가깝기 때문에, ReactDOM은 camelCase 프로퍼티 명명규칙을 사용함
- class ->
clasName, tabindex ->tabIndex
- class ->
- 태그가 비어 있다면, XML처럼 /> 를 써서 바로 닫아줘야 함
JSX는 주입 공격을 방지
- ReactDOM 은 JSX에 삽입된 모든 값을 렌더링하기 전에
이스케이프하기때문에 명시적으로 작성되지 않은 내용은 주입되지 않는다. - 모든 항목은 랜덜이 되기 전에 문자열로 변환
- XSS(cross-site-scripting) 공격을 방지할 수 있습니다.
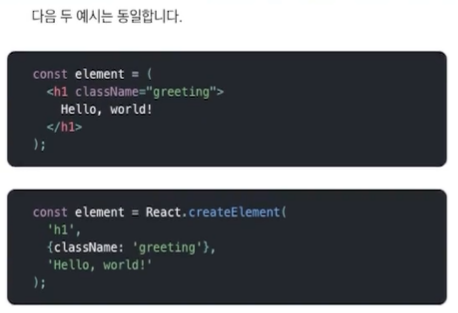
JSX는 객체를 표현
Babel은 JSX -> React.createElement() 호출로 컴파일 함
- 즉 JSX는 React.createElement()의 간편표현식이라 해도 무관함.
3. Props
공식문서로 보는 Props
- 컴포넌트에 직접 전달(주입)해주는 값
Components and Props
문서
ex)
App.js(수정)
import './App.css';
import Composition from './components/2-4.Props/Composition';
function App() {
return (
<div className="App">
<Composition />
</div>
)
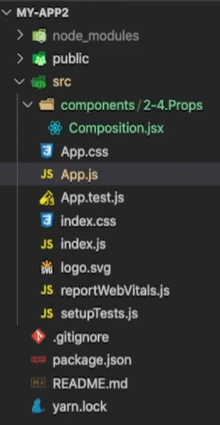
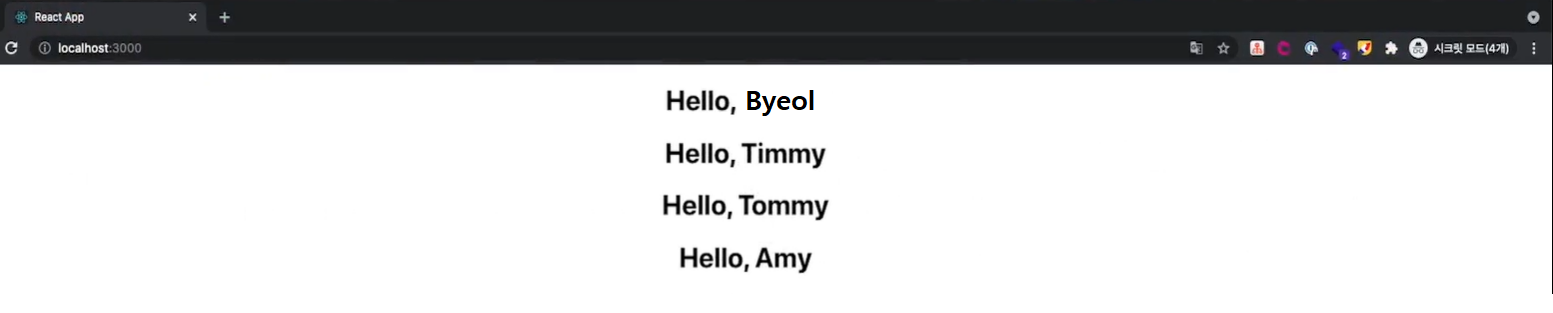
}Composition.jsx
import React from 'react'

function Welcome(props) {
  return <h1>Hello, {props.name}</h1>
}

export default function Composition() {
  return (
    <div>
      <Welcom name="Byeol"/>
      <Welcom name="Timmy"/>
      <Welcom name="Tommy"/>
      <Welcom name="Amy"/>
    </div>
  )
}
출력창
Extraction(추출)
재사용하고자 하는 부분을 추출하여 사용한다!
App.js
import './App.css';
import Composition from './components/2-4.Props/Composition';
import Extraction from './components/2-4.Props/Extraction/Extraction';

function App() {
  return (
    <div className="App">
      <Extraction />
      <Composition />
    </div>
  )
}

export default App;
Extraction.jsx(추출전 기능 구현 코드)
import React from "react";

function formatDate(date) {
  return date.toLocaleDateString();
}

function Comment(props) {
  return (
    <div className="Comment">
      <div className="UserInfo">
        <img
          className="Avatar"
          src={props.author.avatarUrl}
          alt={props.author.name}
        />
        <div className="UserInfo-name">{props.author.name}</div>
      </div>
      <div className="Comment-text">{props.text}</div>
      <div className="Comment-date">{formatDate(props.date)}</div>
    </div>
  );
}

const comment = {
  date: new Date(),
  text: "I hope you enjoy learning React!",
  author: {
    name: "Hello Kitty",
    avatarUrl: "http://placekitten.com/g/64/64",
  },
};

export default function Extraction(props) {
  return (
    <Comment date={comment.date} text={comment.text} author={comment.author} />
  );
}
- Avatar, UserInfo 부분을 추출해 보겠다.
import React from "react";

function formatDate(date) {
  return date.toLocaleDateString();
}

function Avatar(props) {
  return (
    <img
      className="Avatar"
      src={props.user.avatarUrl}
      alt={props.user.name}
    />
  );
}

function UserInfo(props) {
  return (
    <div className="UserInfo">
      <Avatar user={props.user} />
      <div className="UserInfo-name">{props.user.name}</div>
    </div>
  );
}

function Comment(props) {
  return (
    <div className="Comment">
      <UserInfo user={props.author} />
      <div className="Comment-text">{props.text}</div>
      <div className="Comment-date">{formatDate(props.date)}</div>
    </div>
  );
}

const comment = {
  date: new Date(),
  text: "I hope you enjoy learning React!",
  author: {
    name: "Hello Kitty",
    avatarUrl: "http://placekitten.com/g/64/64",
  },
};

export default function Extraction(props) {
  return (
    <Comment date={comment.date} text={comment.text} author={comment.author} />
  );
}- props는 읽기 전용이다!
- 수정해 사용하고 싶을 때는 State를 사용하게 될 것.
4. State
상태조절 예시로 시간 컴포넌트를 사용해 보겠다.
App.js
import './App.css';

import Composition from './components/2-4.Props/Composition';
import Extraction from './components/2-4.Props/Extraction/Extraction';
import ClassComponent from './components/2-5.State/ClassComponent';

function App() {
  return (
    <div className="App">
      <ClassComponent />
      <Extraction />
      <Composition />
    </div>
  )
}

export default App;
ClassComponent.jsx
import React, { Component } from "react";

export default class extends Component {
  constructor(props) {
    super(props);
    this.state = { date: new Date() };
  }

  componentDidMount() {   // 그려지자마자 호출됨
    this.timerID = setInterval(() => this.tick(), 1000);
  }

  componentWillUnmount() {   // 사라지기 직전에 호출됨
    clearInterval(this.timerID);
  }

  tick() {
    this.setState({
      date: new Date(),
    });
  }

  render() {
    return (
      <div>
        <h1>Hello, world!</h1>
        <h2>It is {this.state.date.toLocaleTimeString()}.</h2>
      </div>
    );
  }
}- FuctionalComponent.jsx
import React, { useEffect, useState } from "react";

export default function FunctionalComponent() {
  const [date, setDate] = useState(new Date());

  const tick = () => {
    setDate(new Date());
  }

  useEffect(() => {
    const interval = setInterval(() => tick(), 1000);

    return () => {
      clearInterval(interval);
    };
  }, [] );

  return (
    <div>
      <h1>Hello, world! It's Functional</h1>
      <h2>It is {date.toLocaleTimeString()}.</h2>
    </div>
  );
}- 각각 대응 부분 찾아보면
- class에서 tick으로 초기화 시켰던 것을 useState 만들때 이미 초기화부분을 넣는다.
- tick의 갱신부분은 setDate로 진행된다.
- 그려지고 난 뒤에 사이드 이펙트는 useEffect 안에 그려지며, 그려지자 마자 호출되는 Didmount내용은 useEffect에 바로 넣으면 동일하게 작동.
- Willunmount 부분은 useEffect의 return부분에 기입하면 동일한 기능!
- 순차적이지 않을 수 있다. (비동기적)
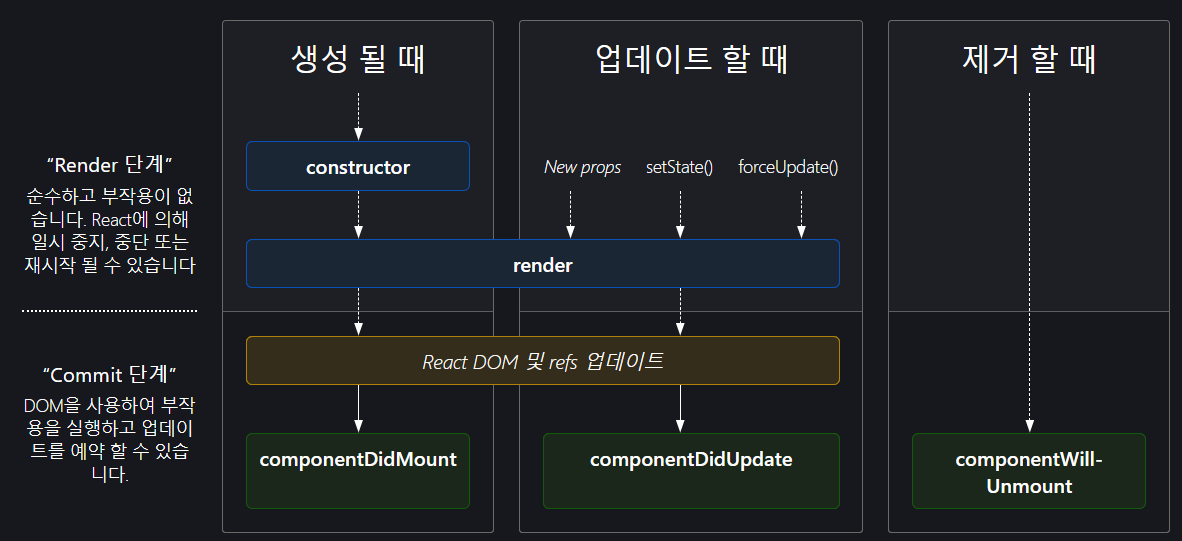
5.컴포넌트 생명주기
공식문서로 보는 컴포넌트 생명주기
- 마운트 (다음 순서로 호출됨)
constructor()render()componentDidMount()
- 업데이트
render()componentDidUpdate()
- 마운트 해제
componentWillUnmount()
import React, { Component } from 'react'

export default class ClassComponent extends Component {
  constructor(props) {
    super(props);
    console.log('constructor');
    this.state = { date: new Date() };
    this.handleClick = this.handleClick.bind(this);
  }

  componentDidMount() {
    console.log('componentDidMount');
    this.timerID = setInterval(() => this.tick(), 1000);
  }

  componentDidUpdate() {
    console.log('componentDidUpdate');
  }

  componentWillUnmount() {
    console.log('componentWillUnmount');
    clearInterval(this.timerID);
  }

  tick() {
    //console.log('tick');
    this.setState({date: new Date()});
  }

  handleClick() {
    alert(this.state.date);
  }

  render() {
    console.log('render');
    return (
      <div>
        <h1 onClick={this.handleClick}>Hello, world!</h1>
        <h2>{this.state.date.toLocaleTimeString()}</h2>
      </div>
    )
  }
}- this를 잘 사용해야 한다.
- handleClick = () => 에로우 펑션으로 만들면 위의 선언해줬던 this 구문 안해도 됨.
this.handleClick = this.handleClick.bind(this);
6. Event
syntheticEvent(합성이벤트)
지원하는 이벤트
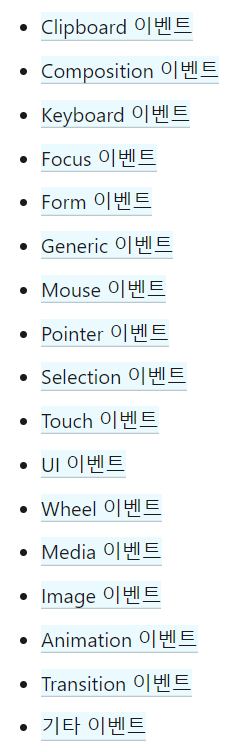
- 합성 이벤트 -> 인터페이스 유사, 직접 대응되지는 X
- Bubble / Capture
- 순서 : Capture > target > Bubble
- return false ->
e.preventDefault(): 리액트는 이렇게 디폴트 기능 꺼줘야..
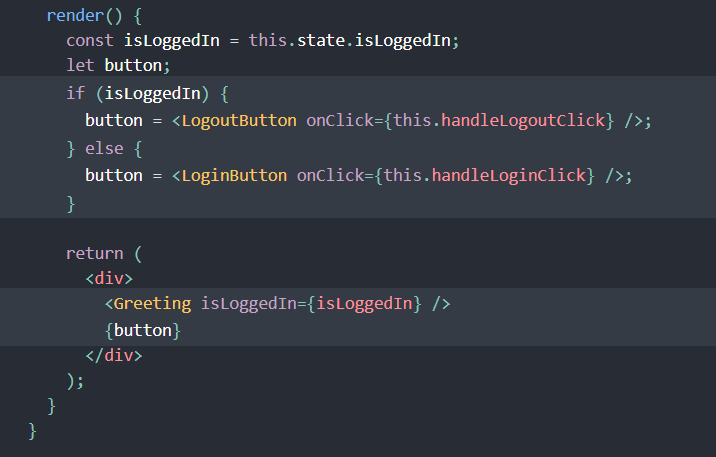
7. 조건부 랜더링
-
if else 문 사용
- if (
조건부분) {조건부분이 true 이면 리턴} else {false면 리턴}
- if (
-
논리 && 연산자로 If를 인라인으로 표현하기
조건&& A -> 조건이 TRUE이면 A가 그려지고, 아니면 안그려짐- [주의] -> 조건이
falsy한 표현일 경우 조건 값이 그려져버릴 수 있다. - 조건을 boolean 씌워서 명확한 false로 만들거나 아래의 삼항연산써라!
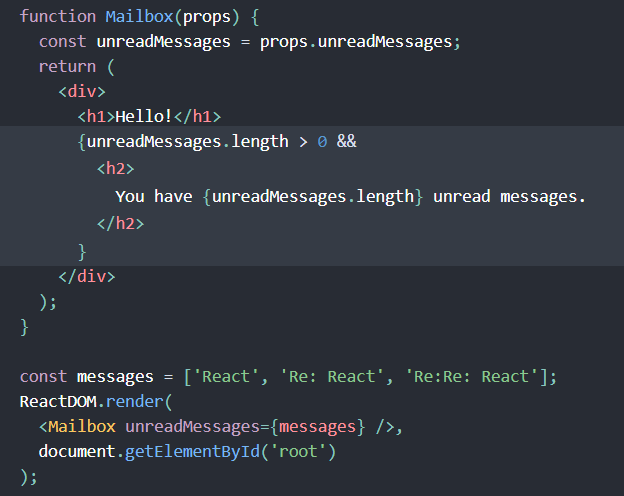
- true && expression은 항상 expression 출력
&&뒤의 엘리먼트는조건이 true일 때 출력.
- false && expression은 항상 false 출력
- 조건이
false라면 React는 무시한다.
- 조건이
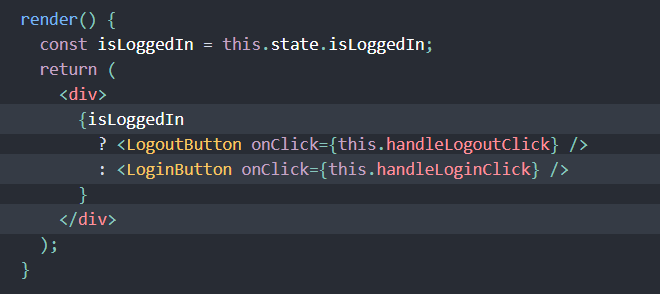
-
조건부 연산자로 If-Else구문 인라인으로 표현하기
[조건부분]?[true일때 실행될 부분]:[false일때 실행될 부분]
- 아예 안그리고 싶은 경우
return null;해라!
- 아예 안그리고 싶은 경우
8. List & key
- 한번 읽어보면 이해 가능 할 것
- Key의 중요성 : 리스트 아이템들 구분을 위해 유일한 key지정이 필요하다.
- 아무것도 안주면 디폴트값으로 index로 부여해주며, warning은 뜬다.
- 최대한 고유한 값으로 써야하며, index는 위치가 변할 경우 고유하지 못할 수 있으므로 사용을 자제한다.
- 고유성은 형제 사이에서만 고유하면 문제없다.
- key는 props로 넘어가지 않는다 !!
기억해둘것!
- Key의 중요성 : 리스트 아이템들 구분을 위해 유일한 key지정이 필요하다.
9. Form
Controlled Component vs Uncontrolled Component
제어 컴포넌트(Controlled Component)
: 컴포넌트 자체에 value를 주고 state로 관리 하는 것
- 다양한 폼을 사용하기에는 문제가 있다.
- 완벽한 대안으로 Fomik 이 있으나 나중에 알아보기로..
- 일단 대안으로 비제어 컴포넌트(uncontrolled component) 사용!
App.js
import './App.css';

import ControlledComponent from './components/2-10.Form/ControlledComponent';


function App() {
  return (
    <div className="App">
      <ControlledComponent />
    </div>
  )
}

export default App;
ControlledComponent.jsx
import React, { useState } from "react";

export default function ControlledComponent() {

  const [name, setName] = useState("");
  const [flavor, setFlavor] = useState("coconut");
  const [essay, setEssay] = useState("Please write an essay about your favorite DOM element.");


  function handleChange(event) {
    setName(event.target.value);
  }

  function handleEssayChange(event) {
    setEssay(event.target.value);
  }

  function handleFlavorChange(event) {
    setFlavor(event.target.value);
  }

  function handleSubmit(event) {
    alert(`name: ${name}, essay: ${essay}, flavor: ${flavor} `);
    event.preventDefault();
  }

  return (
    <form onSubmit={handleSubmit}>
      <label>
        Name:
        <input type="text" value={name} onChange={handleChange} />
      </label>
      <br />
      <br />
      <label>
        Essay:
        <textarea value={essay} onChange={handleEssayChange} />
      </label>
      <br />
      <br />
      <label>
          Pick your favorite flavor:
          <select value={flavor} onChange={handleFlavorChange}>
            <option value="grapefruit">Grapefruit</option>
            <option value="lime">Lime</option>
            <option value="coconut">Coconut</option>
            <option value="mango">Mango</option>
          </select>
        </label>
      <input type="submit" value="Submit" />
    </form>
  );
}
Uncontrolled Component
App.js
import './App.css';

import ControlledComponent from './components/2-10.Form/ControlledComponent';
import UncontrolledComponent from './components/2-10.Form/UncontrolledComponent';

function App() {
  return (
    <div className="App">
      <ControlledComponent />
      <br />
      <br />
      <UncontrolledComponent />
    </div>
  )
}

export default App;
UncontrolledComponent.jsx
import React, { useRef } from "react";

export default function UncontrolledComponent() {
  const fileInputRef = useRef(null);

  function handleSubmit(event) {
    event.preventDefault();
    alert(
      `Selected file - ${fileInputRef.current.files[0].name}`
    );
  }


  return (
    <form onSubmit={handleSubmit}>
      <label>
        Upload file:
        <input type="file" ref={fileInputRef} />
      </label>
      <br />
      <button type="submit">Submit</button>
    </form>
  );
}- value가 어떤지 모르지만 Ref안에 담겨 잘 작동한다.
다중 입력 제어
- ControlledComponent에 있던 핸들러들을 합쳐서 하나에서 제어가능하도록!
import React, { useState } from "react";

export default function ControlledComponent() {

  const [name, setName] = useState("");
  const [flavor, setFlavor] = useState("coconut");
  const [essay, setEssay] = useState(
    "Please write an essay about your favorite DOM element.");


  function handleChange(event) {
    const name = event.target.name;
    if (name === "name") {
      setName(event.target.value);
    }
    if (name === "essay") {
      setEssay(event.target.value);
    }
    if (name === "flavor") {
      setFlavor(event.target.value);
    }
  }

  // function handleEssayChange(event) {
  //   setEssay(event.target.value);
  // }

  // function handleFlavorChange(event) {
  //   setFlavor(event.target.value);
  // }

  function handleSubmit(event) {
    alert(`name: ${name}, essay: ${essay}, flavor: ${flavor} `);
    event.preventDefault();
  }

  return (
    <form onSubmit={handleSubmit}>
      <label>
        Name:
        <input name = "name" type="text" value={name} onChange={handleChange} />
      </label>
      <br />
      <br />
      <label>
        Essay:
        <textarea name = "essay" value={essay} onChange={handleChange} />
      </label>
      <br />
      <br />
      <label>
          Pick your favorite flavor:
          <select name = "flavor" value={flavor} onChange={handleChange}>
            <option value="grapefruit">Grapefruit</option>
            <option value="lime">Lime</option>
            <option value="coconut">Coconut</option>
            <option value="mango">Mango</option>
          </select>
        </label>
      <input type="submit" value="Submit" />
    </form>
  );
}- 다중 입력 제어에서
name,type등으로 사용 가능하다.
출처 : fastcampus_React & Redux로 시작하는 웹 프로그래밍

이것저것 합니다.