[Spring] SpringBoot 3.X + OAuth2 Client + Spring Security + JWT 소셜로그인 구현(애플, 카카오, 구글) - 2
Spring Security OAuth2 JWT 소셜로그인
이번 포스트에서는 Spring OAuth2 Client를 활용한 애플로그인을 구현해보려고 합니다. 정말 우여곡절들이 있었습니다.. 레퍼런스들도 많지 않고 공식문서도 불친절하다보니 삽질을 여러번 한 기분입니다. 차분히 기록해보도록하겠습니다.
💡application.yml
spring:
  security:
    oauth2:
      client:
        registration:
          kakao:
            client-id: {kakao-client-id}
            redirect-uri: "https://{domain}/login/oauth2/code/kakao"
            client-authentication-method: client_secret_post
            authorization-grant-type: authorization_code
          google:
            client-id: {google-client-id}
            client-secret: {google-client-secret}
            redirect-uri: "https://{domain}/login/oauth2/code/google"
            scope:
              - email
              - profile
          apple:
            client-id: {Sevice Identifier}
            client-secret: AuthKey_{keyId}.p8
            redirect-uri: "https://{domain}/login/oauth2/code/apple"
            authorization-grant-type: authorization_code
            client-authentication-method: POST
            client-name: Apple
            scope:
              - name
              - email

        provider:
          kakao:
            authorization-uri: https://kauth.kakao.com/oauth/authorize
            token-uri: https://kauth.kakao.com/oauth/token
            user-info-uri: https://kapi.kakao.com/v2/user/me
            user_name_attribute: id
          apple:
            authorizationUri: https://appleid.apple.com/auth/authorize?scope=name%20email&response_mode=form_post
            tokenUri: https://appleid.apple.com/auth/token
apple:
  url: https://appleid.apple.com
  path: static/apple/AuthKey_{keyId}.p8
  cid: {Service Identifier}
  tid: {애플 개발자 팀아이디}
  kid: {keyId}
이전 포스트에서 구글, 카카오에 대한 설명은 드렸으니 애플에 관련된 부분만 말씀드리도록 하겠습니다.
- client-id : 애플 개발자 계정의 Service Identifier (앱의 번들아이디 아님에 주의❗️)
- client-secret : 애플 인증키 .p8파일(key Id와 확장자명까지 적어야합니다.)
- redirect-uri : 인가코드 리다이렉트 uri(oauth2 client를 사용하므로 사용자지정 uri가 아닌 위 형식을 지켜주어야 합니다.) 이때 추가로 주의할 사항은 이 uri가 https가 적용된 도메인이어야합니다. localhost를 사용할 수 없습니다.(애플의 보안부심 덕분)
기존 소셜로그인과의 차이점
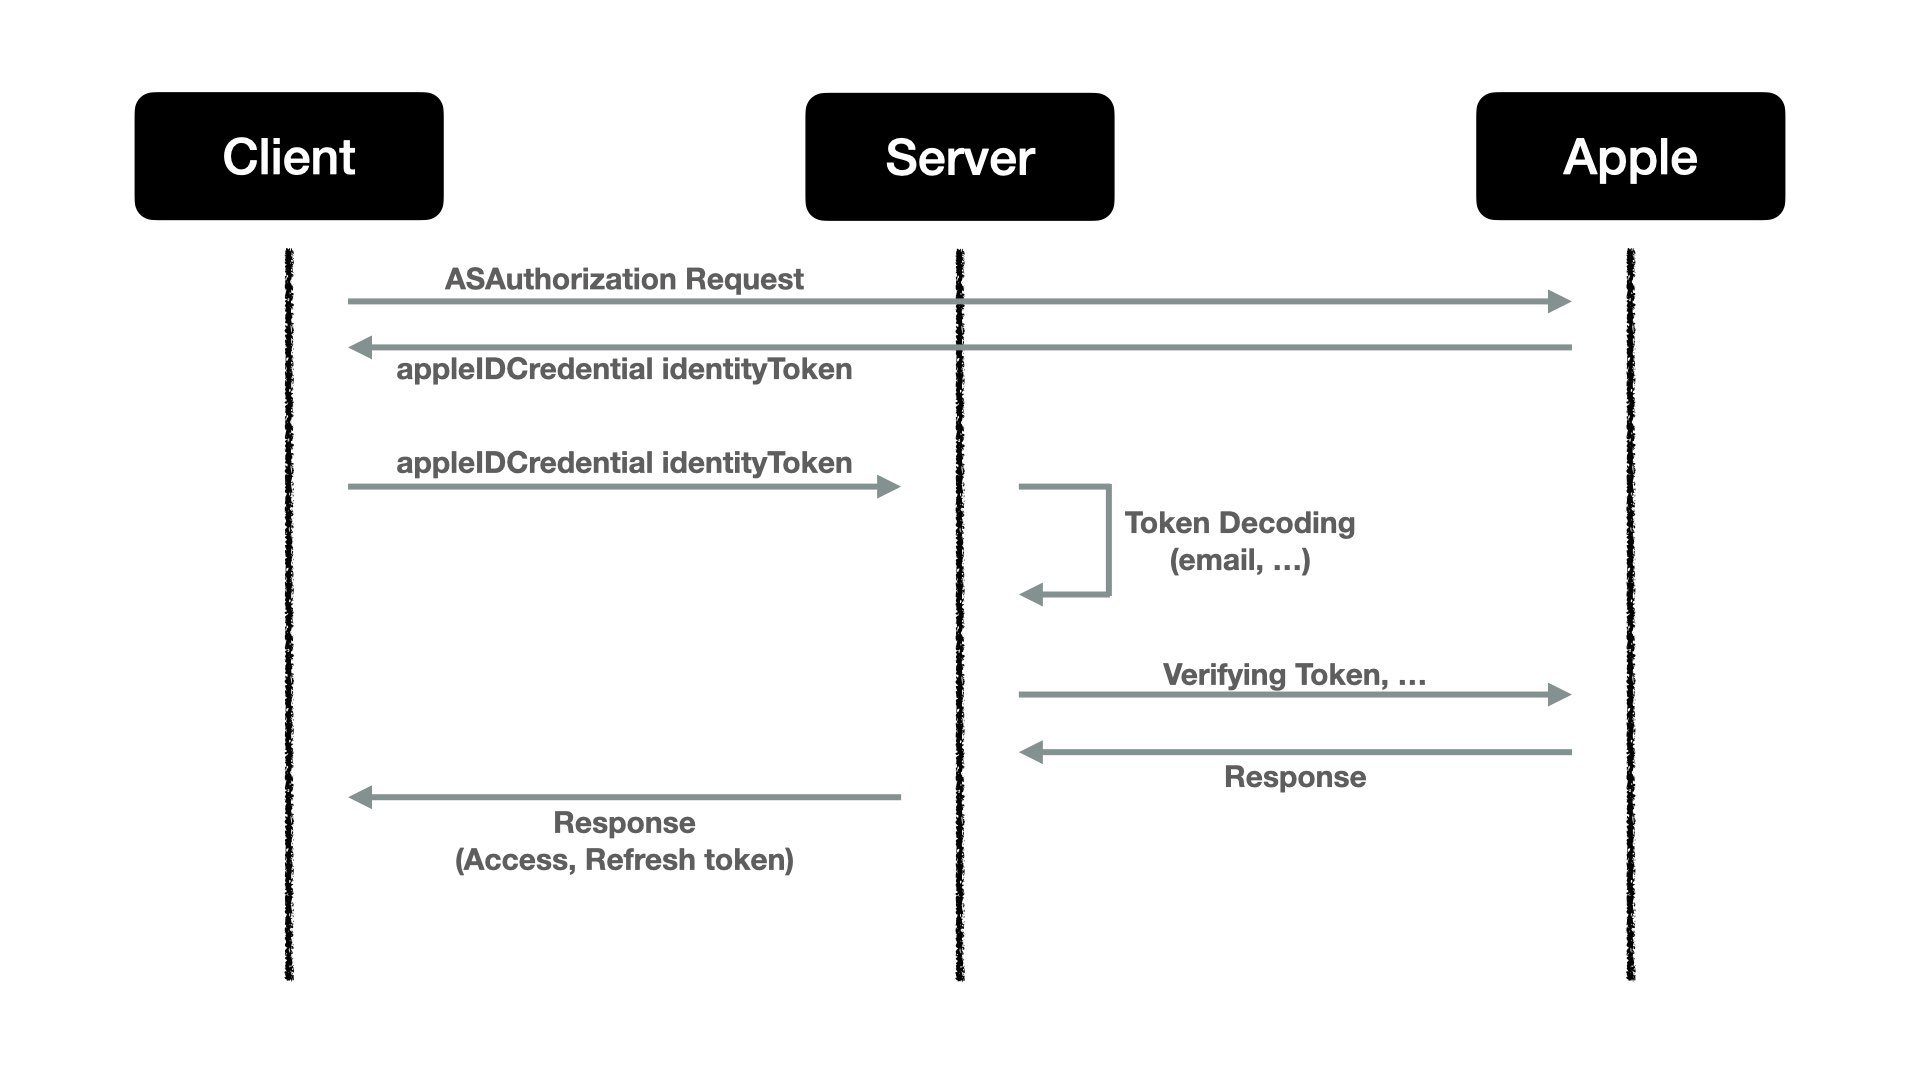
- client단에서 Resource Server(애플)로부터 인가코드를 받아 Authorization Server(애플리케이션 서버)로 전송 후 바로 그 인가코드를 애플에게 넘겨 identityToken을 받는것이 아닌 인가코드 + client_secret 이라는 JWT를 Authorization Server가 직접 생성해서 추가하여 보내야합니다. 이 후에 응답을 identityToken으로 받습니다.
- 전달받은 JWT형식의 identityToken을 애플에게 보내 사용자 정보를 추출해내는 것이 아닌 우리 서버에서 직접 이 토큰을 디코딩하여 사용자 정보를 알아내야 합니다.
✍🏻 애플로그인 플로우 정리
- 사용자가 웹 화면의 애플로그인 버튼 클릭합니다.
- 사용자가 애플 아이디와 비밀번호를 입력 후 로그인합니다.
- Resource Server(애플)가 쿼리파라미터에 인가코드를 담아 redirect URL로 리다이렉트합니다.
- Authorization Server(어플리케이션 서버)는 인가코드와 더불어 Client-Secret을 추가하여 애플에게 IdentityToken을 요청합니다.
- Authorization Server는 IdentityToken을 디코딩하여 사용자 정보를 추출합니다.
- 추출한 사용자 정보로 Authorization Server의 자체 엑세스/리프레쉬 토큰 Client(어플리케이션 프론트)에게 응답합니다.
💡 AppProperties
@Component
@ConfigurationProperties(prefix = "apple")
@Getter
@Setter
public class AppleProperties {
    private String path;
    private String url;
    private String cid;
    private String tid;
    private String kid;
}
AppProperties라는 객체를 생성하여 application.yml파일 내 apple이라는 접두어 필드의 애플 서비스 관련 정보들을 스프링 빈을 통해 다른 객체에서 주입 받을 수 있게 합니다.
💡CustomRequestEntityConvertor
@Getter
@Component
public class CustomRequestEntityConverter implements Converter<OAuth2AuthorizationCodeGrantRequest, RequestEntity<?>> {
    private final OAuth2AuthorizationCodeGrantRequestEntityConverter defaultConverter;
    private final String path;
    private final String keyId;
    private final String teamId;
    private final String clientId;
    private final String url;

    public CustomRequestEntityConverter(AppleProperties properties) {
        this.defaultConverter = new OAuth2AuthorizationCodeGrantRequestEntityConverter();
        this.path = properties.getPath();
        this.keyId = properties.getKid();
        this.teamId = properties.getTid();
        this.clientId = properties.getCid();
        this.url = properties.getUrl();
    }
    @Override
    public RequestEntity<?> convert(OAuth2AuthorizationCodeGrantRequest req) {
        RequestEntity<?> entity = defaultConverter.convert(req);
        String registrationId = req.getClientRegistration().getRegistrationId();
        MultiValueMap<String, String> params = (MultiValueMap<String, String>) entity.getBody();

        if (registrationId.contains("apple")) {
            try {
                params.set("client_secret", createClientSecret());
            } catch (IOException e) {
                throw new RuntimeException(e);
            }
        }
        return new RequestEntity<>(params, entity.getHeaders(),
                entity.getMethod(), entity.getUrl());
    }
    public PrivateKey getPrivateKey() throws IOException {

        ClassPathResource resource = new ClassPathResource(path);

        InputStream in = resource.getInputStream();
        PEMParser pemParser = new PEMParser(new StringReader(IOUtils.toString(in, StandardCharsets.UTF_8)));
        PrivateKeyInfo object = (PrivateKeyInfo) pemParser.readObject();
        JcaPEMKeyConverter converter = new JcaPEMKeyConverter();
        return converter.getPrivateKey(object);
    }

    public String createClientSecret() throws IOException {
        Map<String, Object> jwtHeader = new HashMap<>();
        jwtHeader.put("kid", keyId);
        jwtHeader.put("alg", "ES256");

        return Jwts.builder()
                .setHeaderParams(jwtHeader)
                .setIssuer(teamId)
                .setIssuedAt(new Date(System.currentTimeMillis())) // 발행 시간 - UNIX 시간
                .setExpiration(new Date(System.currentTimeMillis() + (1000 * 60 * 5)))// 만료 시간
                .setAudience(url)
                .setSubject(clientId)
                .signWith(getPrivateKey(), SignatureAlgorithm.ES256)
                .compact();
    }
}
자.... 그 전 소셜로그인들과는 다른 난잡해보이는 코드들을 보니 여기서부터 머리가 아파옵니다. 컨버터라는게 뭔지부터 알아야할 것 같습니다. 위에서 설명했듯이 다른 소셜로그인 로직은 Resource Server에서 응답받은 인가코드를 그대로 요청하여 엑세스토큰을 얻을 수 있었기에 위와 같은 커스텀한 컨버터 과정이 필요가 없었습니다. 하지만 애플로그인은 Client_Secret이라는 JWT를 만들어 요청본문에 넣어주어야 하기 때문에 그 과정을 코딩한것입니다. 매서드별로 살펴보겠습니다.
🔗 CustomRequestEntityConverter(AppleProperties properties)
- CustomRequestEntityConverter객체는 Converter<OAuth2AuthorizationCodeGrantRequest, RequestEntity<?>> 객체를 상속받습니다.
- CustomRequestEntityConverter 속성들에는 인가코드를 RequestEntity로 변환시켜주는 OAuth2AuthorizationCodeGrantRequestEntityConverter객체와 애플 개발자 서비스 관련 정보들이 존재합니다.
- 바로 위에서 정의한 AppProperties와 컨버터를 주입하여 해당 클래스내에서 사용할 수 있게합니다.
🔗 convert(OAuth2AuthorizationCodeGrantRequest req)
- defaultConverter를 이용하여 인가코드를 담고있는 객체를 RequestEntity로 변환합니다.
- 인가코드 객체에서 provider가 어디인지 찾은 후 분기합니다.
- provider가 apple일 경우에만 client_secret을 생성하는 로직이적용 되고 그렇지 않은 경우 인가코드를 담고 있는객체만 RequestEntity로 변환되어 Resource서버에 엑세스토큰을 요청하게 됩니다.
🔗 createClientSecret()
- client_secret을 생성하는 매서드입니다.
- 헤더에는 AppProperties에 존재하는 keyId와 JWT 서명 알고리즘을 명시합니다.
- 발행인, 발행시간, 만료시간, 요청url, Client_id, privateKey를 담은 JWT를 생성합니다.
🔗 getPrivateKey()
- client_secret 생성시 서명에 사용되는 privateKey를 생성하는 로직입니다.
- PemParser와 JcaPEMKeyConverter를 활용하여 -----BEGIN PRIVATE KEY----- 과 같은 부분과 공백을 제거 후 리턴합니다. 위 두 객체를 활용하기 위해서는 build.gradle에 아래와 같이 추가해주어야합니다.
gradle
dependencies {
	implementation 'org.bouncycastle:bcpkix-jdk18on:1.72'
}
💡 PrincipalOauth2UserService
@Service
@RequiredArgsConstructor
public class PrincipalOauth2UserService extends DefaultOAuth2UserService {
    private final MemberRepository memberRepository;

    @Override
    public OAuth2User loadUser(OAuth2UserRequest userRequest) throws OAuth2AuthenticationException {
        OAuth2UserInfo oAuth2UserInfo = null;
        OAuth2User oAuth2User;

        if(userRequest.getClientRegistration().getRegistrationId().equals("apple"))
        {
            String idToken = userRequest.getAdditionalParameters().get("id_token").toString();
            oAuth2UserInfo = new AppleUserInfo(decodeJwtTokenPayload(idToken));
        }
        else {
            oAuth2User = super.loadUser(userRequest);
            if (userRequest.getClientRegistration().getRegistrationId().equals("google"))
                oAuth2UserInfo = new GoogleUserInfo(oAuth2User.getAttributes());
            else if (userRequest.getClientRegistration().getRegistrationId().equals("kakao"))
                oAuth2UserInfo = new KakaoUserInfo(oAuth2User.getAttributes());
        }
        String provider = oAuth2UserInfo.getProvider().toUpperCase();
        String providerId = oAuth2UserInfo.getProviderId();

        Member member = memberRepository.findByProviderAndProviderId(Provider.valueOf(provider),providerId);

        if(member == null)
        {
            String authority = "ROLE_GUEST";
            String nickName = provider + "_" + providerId;
            member = Member.builder()
                    .authority(Authority.valueOf(authority))
                    .nickName(nickName)
                    .provider(Provider.valueOf(provider))
                    .providerId(providerId)
                    .build();
            memberRepository.save(member);
            return new PrincipalDetails(member,oAuth2UserInfo.getAttributes());
        }
        return new PrincipalDetails(member, oAuth2UserInfo.getAttributes());
    }


    public Map<String, Object> decodeJwtTokenPayload(String jwtToken) {
        Map<String, Object> jwtClaims = new HashMap<>();
        try {
            String[] parts = jwtToken.split("\\.");
            Base64.Decoder decoder = Base64.getUrlDecoder();

            byte[] decodedBytes = decoder.decode(parts[1].getBytes(StandardCharsets.UTF_8));
            String decodedString = new String(decodedBytes, StandardCharsets.UTF_8);
            ObjectMapper mapper = new ObjectMapper();

            Map<String, Object> map = mapper.readValue(decodedString, Map.class);
            jwtClaims.putAll(map);

        } catch (JsonProcessingException e) {
//        logger.error("decodeJwtToken: {}-{} / jwtToken : {}", e.getMessage(), e.getCause(), jwtToken);
        }
        return jwtClaims;
}
이 포스트 초반에 설명 드렸던대로 애플로그인은 인가코드를 통해 받아온 엑세스토큰으로 다시 Resource Server에 사용자 정보를 요청하는 것이 아닌, 인가코드를 통해 받아온 identityToken을 직접 디코딩하여 사용자 정보를 추출해야합니다. 이렇기에 Provider별로 분기처리를 하지않는다면
oAuth2User = super.loadUser(userRequest);이 코드에서 런타임 에러가 발생하게 됩니다. 분기 처리 후 decodeJwtTokenPayload 매서드를 구현해주었습니다.
💡 SecurityConfig
@Configuration
@RequiredArgsConstructor
@EnableMethodSecurity
public class SecurityConfig {

    private final PrincipalOauth2UserService principalOauth2UserService;
    private final AppleProperties appleProperties;
    @Bean
    public OAuth2AccessTokenResponseClient<OAuth2AuthorizationCodeGrantRequest> accessTokenResponseClient(CustomRequestEntityConverter customRequestEntityConverter) {
        DefaultAuthorizationCodeTokenResponseClient accessTokenResponseClient = new DefaultAuthorizationCodeTokenResponseClient();
        accessTokenResponseClient.setRequestEntityConverter(customRequestEntityConverter);

        return accessTokenResponseClient;
    }
    @Bean
    public CustomRequestEntityConverter customRequestEntityConverter() {
        return new CustomRequestEntityConverter(appleProperties);
    }

    @Bean
    public SecurityFilterChain filterChain(HttpSecurity http) throws Exception {

        http
                .csrf((auth) -> auth.disable())
                .headers(h -> h.frameOptions(f -> f.sameOrigin()))
                .cors((co)->co.configurationSource(configurationSource()))
                .formLogin((auth) -> auth.disable())
                .httpBasic((auth)->auth.disable())
                .authorizeHttpRequests((auth) -> auth
                        .requestMatchers("/swagger", "/swagger-ui.html", "/swagger-ui/**", "/api-docs", "/api-docs/**", "/v3/api-docs/**").permitAll()
                        .requestMatchers("/api/auth/**").permitAll()
                        .anyRequest().authenticated())
                .oauth2Login(oauth2Login -> oauth2Login
                        .tokenEndpoint(tokenEndpointConfig -> tokenEndpointConfig.accessTokenResponseClient(accessTokenResponseClient(customRequestEntityConverter())))
                        .userInfoEndpoint(userInfoEndpointConfig -> userInfoEndpointConfig.userService(principalOauth2UserService))
                .sessionManagement(sm->sm.sessionCreationPolicy(SessionCreationPolicy.STATELESS));

        return http.build();
    }
    @Bean
    public CorsConfigurationSource configurationSource() {
        CorsConfiguration configuration = new CorsConfiguration();
        configuration.addAllowedOriginPattern("*"); // 모든 IP 주소 허용
        configuration.addAllowedHeader("*");
        configuration.addAllowedMethod("*"); // GET, POST, PUT, DELETE (Javascript 요청 허용)
        configuration.setAllowCredentials(true); // 클라이언트에서 쿠키 요청 허용
        configuration.addExposedHeader("Authorization");
        UrlBasedCorsConfigurationSource source = new UrlBasedCorsConfigurationSource();
        source.registerCorsConfiguration("/**", configuration);
        return source;
    }

}
Security Config에서 spring bean등록을 진행하였습니다. 이전 포스트와 다른 점은 아래부분 뿐이고 나머지는 빈등록을 위한 매서드들입니다.
  .oauth2Login(oauth2Login -> oauth2Login
                        .tokenEndpoint(tokenEndpointConfig -> tokenEndpointConfig.accessTokenResponseClient(accessTokenResponseClient(customRequestEntityConverter())))
                        .userInfoEndpoint(userInfoEndpointConfig -> userInfoEndpointConfig.userService(principalOauth2UserService))
tokenEndpoint를 정의하기 위해 커스텀하게 구현한 customRequestEntityConverter()를 AppProperties를 주입받아 빈등록을 하고 이를 다시 accessTokenResponseClient에 주입시켜 빈 등록을 한다. 이게 끝이다. 애플로그인 끝~
이번 포스트에서는 OAuth2 Client를 활용하여 애플로그인 구현을 진행해 보았습니다. 정리를 하고 나니 뭔가 별거 없는거 같기도 하면서 뿌듯합니다. 다음 포스트에서는 소셜로그인이 완료된 후 서버 자체의 JWT발급하는 과정을 설명하도록하겠습니다. 감사합니다!