1. Password Encoder
- 일단 패스워드는 무조건
단방향 암호화/해싱을 사용해야 한다. 한번 encode된 패스워드는 다시 복호화를 할 수 없도록 해야 하고, 이를 비교하는 로직만 같은지 아닌지만 판단할 수 있게 만들어야 한다.
1-1 BCryptPasswordEncoder
- BCrypt 라는 해시 함수를 사용한 구현체이다. 단순히 해시를 하는것 뿐만 아니라
Salt를 넣는 작업까지 하므로, 입력값이 같음에도 불구하고 매번 다른 encoded된 값을 return 해주게 된다. 따라서 equal로 비교하면 패스워드가 매번 일치하지 않을 수 있다.
1-2 DelegatingPasswordEncoder
-
PasswordEncoder를 여러개 선언한 뒤, 상황에 맞게 골라쓸 수 있도록 지원하는 Encoder이다.
-
PasswordEncoderFactories.createDelegatingPasswordEncoder()
로 생성하면BCryptPasswordEncoder가 사용된다
설정하지 않으면 이것과 동일하다.
    @Bean
    public PasswordEncoder passwordEncoder(){
        return new BCryptPasswordEncoder();
    }

    passwordEncoder.encode(accountDto.getPassword());
@Bean
protected SecurityFilterChain filterChain(AuthenticationManagerBuilder am) throws Exception {
String password = passwordEncoder().encode("1111");
// 메모리에 회원 저장
am.inMemoryAuthentication().withUser("user").password(password).roles("USER");
am.inMemoryAuthentication().withUser("manager").password(password).roles("MANAGER");
am.inMemoryAuthentication().withUser("admin").password(password).roles("ADMIN");
}
@Bean
public PasswordEncoder passwordEncoder(){
return PasswordEncoderFactories.createDelegatingPasswordEncoder();
}2. WebIgnore
- 정적 리소스가 필터를 거치지 않는 설정 @Bean으로 등록하는 방법을 권장
1. @Override
    public void configure(WebSecurity web) throws Exception {
        web.ignoring().requestMatchers(
        PathRequest.toStaticResources().atCommonLocations());
    }

 2. @Bean
    protected WebSecurityCustomizer webSecurity(){
        return (web) -> web.ignoring().requestMatchers(
        PathRequest.toStaticResources().atCommonLocations());
    }
3. UserDetailsService, AccountContext
-
UserDetails: Spring Security에서 사용자의 정보를 담는 인터페이스로 스프링 시큐리티는 UserDetails로 반환하도록 강제한다.
UserDetailsService: Spring Security에서 유저의 정보를 가져오는 인터페이스로 인증을 시도하는 사용자의 정보가 존재하는지 확인
~Context: 엔티티와 일반 객체를 분리하여, Context안에 엔티티를 담아 놓고 필요할 때 꺼내 쓰기위해 만든 것이다. -
과정
로그인 시 스프링 시큐리티가 User 클래스로 리턴하고 UserDetailsService가 사용자의 정보를 DB와 비교하고 권한부여
UserDetailsService 에서 로그인을 시도하는 유저의 정보가 DB에 있는지 확인(Repository에서 확인)
가지고 온 유저에 권한을 설정 :GrantedAuthority,SimpleGrantedAuthority
Context를 생성 후, 유저를 Context에 저장
AuthenticationProvider 에서 아이디, 비밀번호 인증
@Getter
public class AccountContext extends User {

    private Account account; // 입력받은 조건에 맞는 객체로 설정됨

    public AccountContext(Account account, Collection<? extends GrantedAuthority> authorities) {
        super(account.getUsername(), account.getPassword(), authorities);
        this.account = account;
    }
}
@RequiredArgsConstructor
@Service("userDetailService")
public class CustomUserDetailService implements UserDetailsService {
private final AccountRepository repository;
@Override
public UserDetails loadUserByUsername(String username) throws UsernameNotFoundException {
// 로그인을 시도하는 유저의 정보가 DB에 있는지 확인
Account account = repository.findByUsername(username);
if (account == null){
throw new UsernameNotFoundException("Username Not found");
}
List<GrantedAuthority> roles = new ArrayList<>();
roles.add(new SimpleGrantedAuthority(account.getRole()));
AccountContext accountContext = new AccountContext(account, roles);
return accountContext; // 객체를 담고 있는 context
}
}4. AuthenticationProvider
- 실제 사용자의 인증 처리를 위한 비즈니스 로직을 구현하는 곳
DaoAuthenticationProvider가 기본적인 인증방법이다. 다른 특별한 인증방법이 필요하거나 추가된다면 Provider를 새로 만들어서 진행한다. Provider에서는 생성자주입이 안되는 듯
일단 여기서는 아이디, 패스워드, 타입 검증을 한다.
- 사용자가 입력한 아이디와 비밀번호를 가지고온다.
UserDetailsService로 Context를 가지고 온다. 여기서 아이디 검증이 이루어진다.- PasswordEncoder로 비밀번호를 검증한다.
new UsernamePasswordAuthenticationToken로 인증에 성공한 인증객체를 만든다isAssignableFrom로 타입을 검증한다.
@NoArgsConstructor
public class CustomAuthenticationProvider implements AuthenticationProvider {
    @Autowired
    private UserDetailsService userDetailsService;
    @Autowired
    private PasswordEncoder encoder;

    @Override
    public Authentication authenticate(Authentication authentication) throws AuthenticationException {
        //인증에 관한 검증처리 / authentication에는 사용자가 입력한 아이디와 비밀번호가 들어있다
        String username = authentication.getName();
        String password = authentication.getCredentials().toString();

        AccountContext accountContext = (AccountContext) userDetailsService.loadUserByUsername(username);
        // 추가 검정을 위해 DB에 저장된 account를 가져온다 (아이디 검증)

        if (!encoder.matches(password, accountContext.getAccount().getPassword())) {
            throw new BadCredentialsException("BadCredentialsException");
        }

        FormWebAuthenticationDetails details = (FormWebAuthenticationDetails) authentication.getDetails();
        String secretKey = details.getSecretKey();
        if (secretKey == null || !"secret".equals(secretKey)) {
            throw new InsufficientAuthenticationException("InsufficientAuthenticationException");
        }

        UsernamePasswordAuthenticationToken authenticationToken =
                new UsernamePasswordAuthenticationToken(accountContext.getAccount(), null, accountContext.getAuthorities());
        // 모든 인증에 성공한 인증객체를 만들어서 authenticationManager에 반환

        return authenticationToken;
    }

    @Override
    public boolean supports(Class<?> authentication) {
        // 파라미터로 전달되는 authentication 타입과 CustomAuthenticationProvider 타입이 일치하는지 조건 확인
        return UsernamePasswordAuthenticationToken.class.isAssignableFrom(authentication);
    }
}
5. 로그인 기능 및 페이지
- Authentication객체는 인증받기 전과 후 두 번 만들어진다. 처음에는 Authentication, 인증이 완료된건 authenticationToken이다.
-
아이디와 비밀번호를 입력
-
AnPath필터에서 URL 요청이 loginProcessingUrl과 매칭되는지 확인
-
매칭되면 인증객체(Authentication) 객체 생성(입력받은 Username과 password를 담음)
-
위에서 만든 객체를 이용해 AuthenticationManager에서 인증처리 (내부적으로 AuthenticationProvider에게 인증 위임)
-> DB에 저장된 값을 가져오기 위해UserDetailsService를 사용하고 입력받은 값과 비교
->인증 실패시 AuthenticationExcepion
->인증 성공시 Authentication객체를 만들어서 AuthenticationManager에게 리턴 (User 정보와 권한 정보 등을 담음)
=> managerBuilder와 Provider를 모두 Bean으로 등록한다.
@AuthenticationPrincipal컨트롤러에서 이 어노테이션을 사용하면 현재 로그인한 객체의 값을 provider에서 알아서 가져온다. 즉 위에서 말한 managerBuilder와 Provider를 모두 Bean으로 등록하는 것도 필요없어진다.
	@Bean
    public AuthenticationManagerBuilder authenticationManagerBuilder(AuthenticationManagerBuilder auth){
        return auth.authenticationProvider(authenticationProvider());
    }

    @Bean
    public AuthenticationProvider authenticationProvider(){
        return new AuthProvider();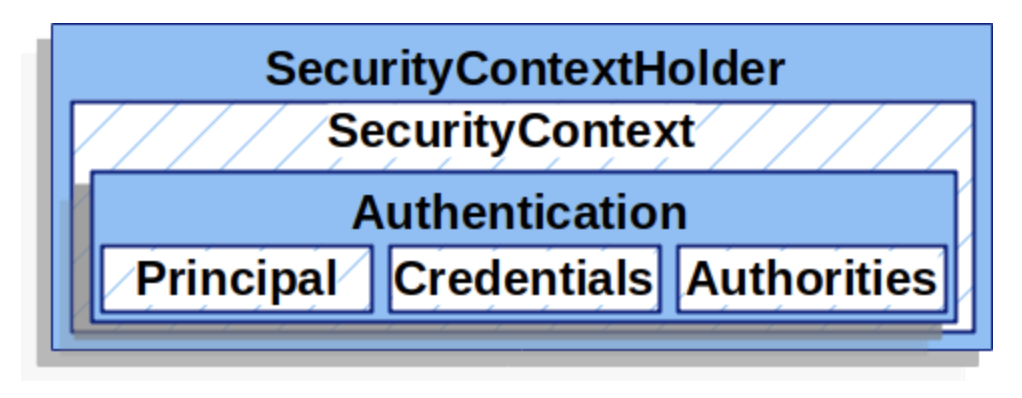
}- Authentication객체를 SecurityContext에 저장(인증을 받은 객체를 저장하는 곳) -> Session에 저장(전역으로 사용 가능하게 함)
- SuccessHandler 실행
FilterSecurityInterceptor클래스가 사용자가 인증을 받았는지와 인증을 받았다면 사용자의 권한이 무엇인지를 검증하는 역할을 담당하고 있다.
보통 SecurityContext 에 Authentication 객체가 존재하는지 판단하고 존재할 경우 AnonymousAuthenticationToken 이 아니라면 인증된 사용자라고 판단한다. 따라서 페이지를 이동할 때, 다시 로그인을 할 필요가 없다.
6. 로그아웃 및 보안처리
- 로그인 했을 때와 안했을 때 로그인, 로그아웃 버튼을 처리하려면 다음이 필요하다
sec:authorize="isAnonymous()/sec:authorize="isAuthenticated()
-의존성 추가
implementation 'org.thymeleaf.extras:thymeleaf-extras-springsecurity5'

-html 파일
xmlns:sec="org.thymeleaf.extras:thymeleaf-extras-springsecurity5"


- 모든 사용자에게 보여야하는 버튼과 로그인한 사용자에게 보이는 버튼에 따라
sec:authorize="isAnonymous()  / sec:authorize="isAuthenticated() 사용

 <ul class="nav justify-content-end">
   <li class="nav-item" sec:authorize="isAnonymous()"><a class="nav-link text-light" th:href="@{/login}">로그인</a></li>
   <li class="nav-item" sec:authorize="isAnonymous()"><a class="nav-link text-light" th:href="@{/users}">회원가입</a></li>
   <li class="nav-item" sec:authorize="isAuthenticated()"><a class="nav-link text-light" th:href="@{/logout}">로그아웃</a></li>
   <li class="nav-item" ><a class="nav-link text-light" href="/">HOME</a></li>
</ul>- 로그아웃 처리 :
SecurityContextHolder,SecurityContextLogoutHandler
- 로그아웃을 하기 위해서 로그인한 인증객체를 가지고 온다.
- 인증객체를 가지고 온 후 로그아웃 핸들러로 처리한다.
@GetMapping("/logout")
    public String logout(HttpServletRequest request, HttpServletResponse response){

        Authentication authentication = SecurityContextHolder.getContext().getAuthentication();
        // 로그아웃을 하기위해서 로그인한 인증객체를 가지고 온다.

        if (authentication != null){
            new SecurityContextLogoutHandler().logout(request, response, authentication);
            // 인증객체를 가지고 온 후 로그아웃 핸들러로 처리
        }
        return "redirect:/login";
    }
7. WebAuthenticationDetails, AuthenticationDetailsSource
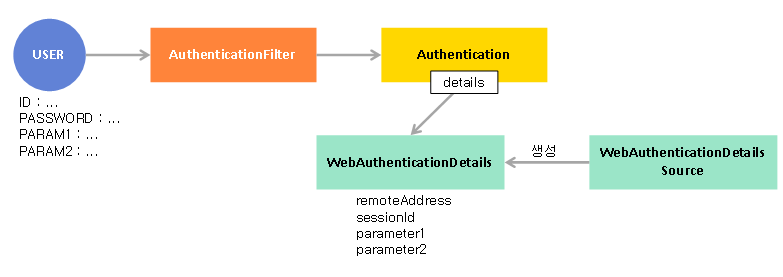
-
아이디와 비밀번호 이외에 추가로 파라미터를 전달하여 인증에 활용하거나 인증 이후에 사용자가 서버에 접근할 수 있도록 하고 싶을 때 사용하는 인증 부가기능이다.
-
AuthenticationDetailsSource는 WebAuthenticationDetails를 생성하며,WebAuthenticationDetails는 authentication 이 가지고 있는 details 속성에 아이디와 비밀번호를 제외한 HttpServletRequest로 전달된 데이터들을 저장하도록 작동한다. 다시 말하면,
HttpServletRequest로 전달된 데이터들이 WebAuthenticationDetails 에 저장되고 그 데이터들은 authentication 이 가지고 있는 details 속성에 저장된다.
- 먼저 (Web X)AuthenticationDetailsSource를 implement해서 WebAuthenticationDetails를 만든다
@Component
public class FormWebAuthenticationDetailsSource
        implements AuthenticationDetailsSource<HttpServletRequest, WebAuthenticationDetails> {

    @Override
    public WebAuthenticationDetails buildDetails(HttpServletRequest context) {
        return new FormWebAuthenticationDetails(context);
        //커스텀한 WebAuthenticationDetails를 만들고 request값들을 넘겨준다
    }
}- WebAuthenticationDetails을 extends해서 authentication에 저장할 details를 만든다
@Getter
public class FormWebAuthenticationDetails extends WebAuthenticationDetails {  // 파라미터를 저장하는 클래스

    private String secretKey;

    public FormWebAuthenticationDetails(HttpServletRequest request) {
        super(request);
        secretKey = request.getParameter("secret_key");
    }
}- 화면에서 secret_key를 넘겨받는다.
 <form th:action="@{/login_proc}" class="form-signin" method="post">
        <input th:type="hidden" th:value="secret" name="secret_key">
        <div class="form-group">
          <input type="text" class="form-control" name="username" placeholder="아이디" required="required" autofocus="autofocus">
        </div>
        <div class="form-group">
          <input type="password" class="form-control" name="password" placeholder="비밀번호" required="required">
</div>- Provider에서 details 값을 검증한다.
 FormWebAuthenticationDetails details =
 (FormWebAuthenticationDetails) authentication.getDetails();

        String secretKey = details.getSecretKey();

        if (secretKey == null || !"secret".equals(secretKey)){
            throw new InsufficientAuthenticationException("
            InsufficientAuthenticationException");
}- config에서 사용
.authenticationDetailsSource(authenticationDetailsSource)8. 인증성공 핸들러
- 인증을 성공한 후 후속처리를 하는 핸들러로 여기서는
SimpleUrlAuthenticationSuccessHandler를 상속해서 사용한다. 구현 기능은 로그인 이전에 요청받은 request를 저장했다가 로그인 했을 때 다시 호출하는 기능
페이지로 이동했는데 로그인이 필요 - 로그인 시도 - 실패 - 다시 시도해서 성공 후 원래 가려고 했던 페이지 호출
HttpSessionRequestCache,DefaultRedirectStrategy를 선언한다.- getRequest()로 로그인 전에 사용자의 요청 정보를 가져오고 redirect 해준다.
   @Override
    public void onAuthenticationSuccess(HttpServletRequest request, HttpServletResponse response, Authentication authentication) throws IOException, ServletException {
        SavedRequest cacheRequest = requestCache.getRequest(request, response);
        // 로그인 전 사용자의 요청을 저장한 것

        if (cacheRequest != null){
            String targetUrl = cacheRequest.getRedirectUrl();
            redirectStrategy.sendRedirect(request,response,targetUrl);
        }else {
            redirectStrategy.sendRedirect(request,response,getDefaultTargetUrl());
            // 요청 정보가 없으면 DefaultPage로 보낸다.
        }
}- Config에 등록한다.
 private final AuthenticationSuccessHandler successHandler;

 .successHandler(successHandler)
9. 인증실패 핸들러
- 여기서는 로그인 실패시 후속처리를 하는 핸들러를 만들어 본다.
SimpleUrlAuthenticationFailureHandler를 상속받는다.
exception이 발생하면 모두 여기서 받는다..?- 각각의 예외가 발생했을 때의 처리를 한다
instanceof - 예외가 발생했을 때 메시지를 보여준다.
setDefaultFailureUrl
super.onAuthenticationFailure(request, response, exception);
 @Override
    public void onAuthenticationFailure(HttpServletRequest request, HttpServletResponse response, AuthenticationException exception) throws IOException, ServletException {
        String errorMessage = "Invalid Id or Password";

        if (exception instanceof BadCredentialsException){
            errorMessage = "Invalid Id or Password";
        }else if (exception instanceof InsufficientAuthenticationException){
            errorMessage = "Invalid Secret Key";
        }

        setDefaultFailureUrl("/login?error=true&exception=" + exception.getMessage());
        // /login?뒤의 값들을 url로 인식하기 때문에 config에서 뒤에 나오는 파라미터까지 url로 인식할 수 있게 설정을 "/login*" 이렇게 바꾸어야 한다.

        super.onAuthenticationFailure(request, response, exception);
        // 로그인 실패시 해당 url로 이동하고 파라미터를 전달한다.
        파라미터를 받기위해서는 controller가 필요하다
}- controller에서 값을 받고 model로 전달한다.
@GetMapping("/login")
    public String login(
      @RequestParam String error,
      @RequestParam String exception, Model model) {
        model.addAttribute("error", error);
        model.addAttribute("exception", exception);
        	return "user/login/login";
}- login.html에서 설정
- config에 설정
10. 인가 거부 처리
- 로그인 등 인증에는 성공했지만 자원에 접근할 권한이 없는 경우 접근을 거부하는 처리
AccessDeniedHandler를 implement하고 handle 메서드로 AccessDenied가 발생했을 때, 이동할 Url을 처리한다.
@Component
public class CustomAccessDeniedHandler implements AccessDeniedHandler {
    private String errorPage;

    @Override
    public void handle(HttpServletRequest request, HttpServletResponse response, AccessDeniedException accessDeniedException) throws IOException, ServletException {
        String deniedUrl = errorPage + "?exception=" + accessDeniedException.getMessage();
        response.sendRedirect(deniedUrl);
    }

    public void setErrorPag(String errorPage) {
        this.errorPage = errorPage;
}- 인가예외가 발생했을 때 이동하는 errorPage는 config에서 @Bean으로 등록한다
@Bean
    public AccessDeniedHandler accessDeniedHandler() {
        CustomAccessDeniedHandler accessDeniedHandler
        = new CustomAccessDeniedHandler();
        accessDeniedHandler.setErrorPag("/denied");
return accessDeniedHandler;- config에 hadler를 등록한다
 .and()
    .exceptionHandling()  //인가예외를 처리하는 경우 사용
    .accessDeniedHandler(accessDeniedHandler());
// 빈으로 등록한 accessDeniedHandler() 를 넣어준다- controller를 만들어준다.
@GetMapping("/denied")
    public String accessDenied(@RequestParam String exception , Model model){
        Authentication authentication = SecurityContextHolder.getContext().getAuthentication();
        Account account = (Account) authentication.getPrincipal();
        //현재 로그인한 사용자의 정보 가져오기
        model.addAttribute("username", account.getUsername());
        model.addAttribute("exception", exception);

        return "user/login/denied";
    }