React 입문(10) : Loading Screen - Conditional Rendering based on state also componentWillMount API (last update: 2020.12.29.)
0
React.js & JavaScript
목록 보기
11/11
2-3. Loading-Screen : componentWillMount also Conditional Rendering based on state
Notion의 Theory & Technique: React.js 페이지 바로가기
0. References
React - Display loading screen while DOM is rendering? -stackoverflow
1. Introduction
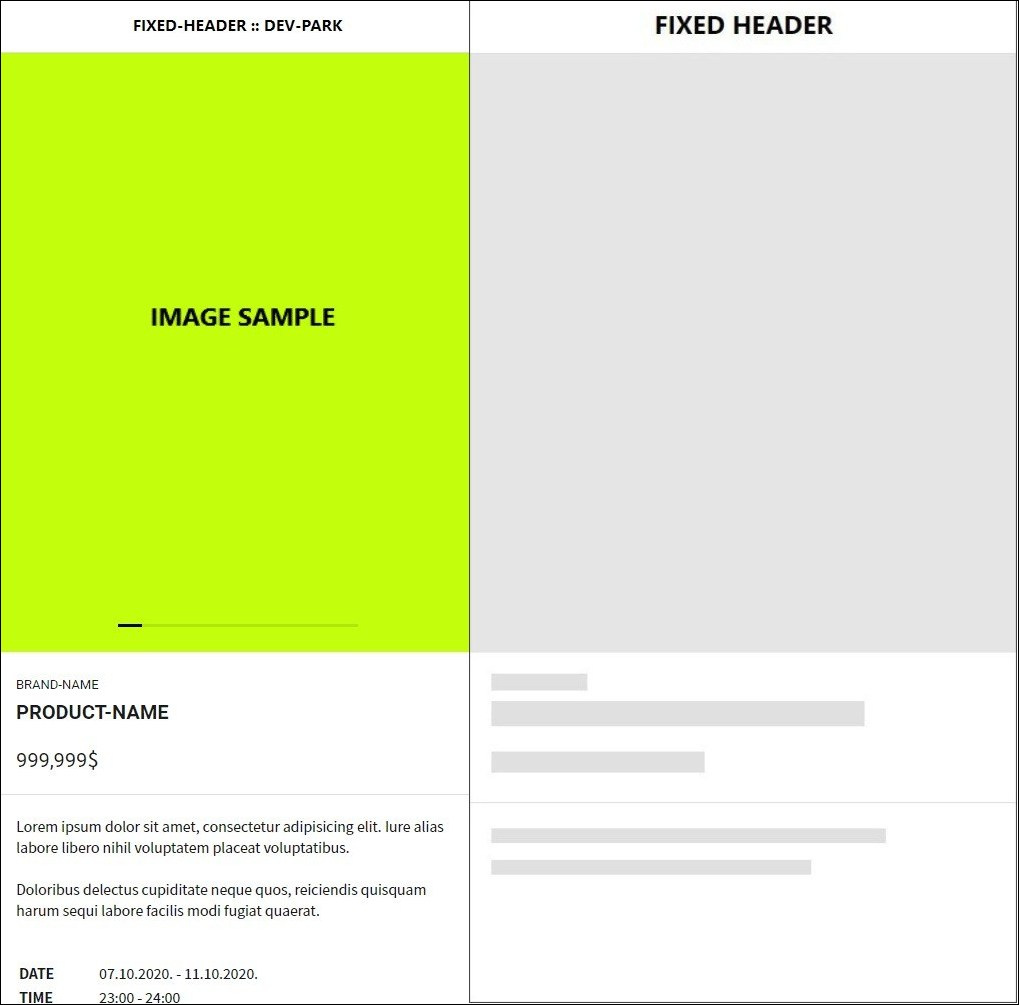
실무에서 React를 이용한 페이지 구현 작업 중 zeplin으로 넘겨 받은 디자인대로 오른쪽 이미지와 같은 로딩 화면도 함께 구현하게 되었다. 이는 LifeCycle API를 사용하면 아주 쉽게 구현할 수 있었다. 자세한 방법은 다음과 같다:
2. Syntax
먼저, 위와 같은 화면을 구현하기 위해서는 다음과 같은 요소들을 고려할 필요가 있었다:
- 전체적인 레이아웃 디자인은 실제 페이지와 동일하다. 따라서 별도의 페이지를 생성하여 대입하지 않고, 최대한 재 사용하는 것이 불필요한 중복 코드를 줄일 수 있다.
- 이 중 Header는 유지, Footer는 감춘다.
- 슬라이더 구역의 뒷 배경을 지정 색으로 대입한 후 이미지를 감추고, hr 또한 유지한다.
- 각 텍스트 요소는 감춘 후, 같은 영역에 지정 색상의 도형을 대입하여 자동으로 간격을 맞춘다.
- 따라서 별도의 로딩 페이지를 작성하지 않고, 한 페이지 내에서 로딩 여부에 따라 조건부 렌더링 하여 처리한다.
- 로딩 여부는 boolean 타입 state로 설정한 후 true/false에 따라 판별한다.
- 로딩 여부는 componentWillMount / componentDidMount로 변경한다.
이전에도 화살표 함수를 활용하여 Conditional Rendering 구문을 작성한 적이 있다. 이번에는 보다 간략한 조건문을 다루고 있으므로, (로딩 중이거나/아니거나) Ternary Operator를 사용하여 처리하기로 한다. 또한 기존에 작성한 조건문과 겹치는 영역이 있다면 if문의 조건에 로딩 여부를 함께 넣어주면 쉽게 처리할 수 있다.
또한 state를 통해 선언할 boolean 타입 로딩 여부 변수는 constructor 내부에 로딩 중임을 기본 값으로 선언해 둔다. 이 후 컴포넌트가 화면에 올려짐에 따라 componentDidMount가 호출되면 이 boolean값을 로딩 상태가 아님을 나타내는 값으로 바꿔주면 된다.
// 1. declare state
constructor(props){
	super(props);
	this.state = {
		NotLoading: false
		||
		Loading: true
	}
}
// 2. setState for notify that the loading has been completed
componentDidMount(){
	this.setState({ NotLoading: true })
	||
	this.setState({ Loading: false })
}
// 3. conditional rendering with ternary operator
{ this.state.NotLoading ? <div>Not Loading</div> : <div>Loading</div> }
3. Examples & Usages
JavaScript Componentclass App extends Component{ constructor(props){ super(props); // state로 NotLoading을 선언해 두되, 기본 값을 false로 선언한다. this.state={ NotLoading: false }; } componentDidMount(){ // component가 화면에 출력되면 로딩이 끝난 것으로 간주한다. this.setState({ NotLoading: true }) } ... render(){ return( ... // 구성 요소들 중간에 조건부 렌더링을 진행하는 경우 반드시 braces로 먼저 감싸준다. { // 현재 NotLoading state가 true라면 this.state.NotLoading // 실제 데이터(brand name)을 화면에 표시하고 ? (<span> Brand-Name : </span> <p>on here </p>) // 그렇지 않다면 로딩 화면에 노출할 빈 사각형을 화면에 표시한다. : <div className="loading-rectangle1"></div> } ... { // 현재 NotLoading state가 true라면 this.state.NotLoading // footer를 화면에 노출하고 ? (<div className="footer"> ... </div>) // 그렇지 않다면 그 자리를 비운다(빈 div를 위치시킨다.) // 참고로 리턴할 요소들이 복수가 아니라면 parentheses()는 생략해도 된다. : <div></div> } ... ); } } export default SharePage;
CSS.loading-rectangle1{ width: 370px; max-width: 450px; height: 14px; margin: 24px 80px 16px 20px; background-color: #e0e0e0; }
4. Remark
로딩 시간이 너무 짧아 작성한 로딩 화면의 확인 및 테스트를 위한 시간이 부족하다면 다음과 같은 예시 코드를 활용할 수 있다.
// the loading should be completed after 5sec
componentWillMount(){
	setTimeout(()=>{
		this.setState({ NotLoading:true });
	}, 5000)
}

아! 응응애에요!