React 입문(3) : LifeCycle API(2), html to JSX, favicon in React (last update: 2020.12.16.)
React.js & JavaScript
Introduction
어제에 이어, 오늘은 직접 에러 처리를 가능하게 해 주는 componentDidCatch와 LifeCycle API의 전반적인 호출 흐름, 그리고 html to JSX로의 직접 변환을 시도해 보았다. 아직 React와 ES6에 대해 기초적인 공부가 많이 필요하지만, 잠시 멈추고 기존의 html/css 실무 코드를 직접 JSX(JavaScript XML)로 변환해 봤는데 생각보다 많이 어렵진 않았다. 자세한 내용은 아래와 같다.
Notion의 React.js 기초 학습 통합 페이지 바로가기
6. componentDidUpdate
componentDidUpdate(prevProps, prevState, snapshot){
}
Component에서 render(){}를 호출하고 난 다음에 발생하는 함수로, 이 시점에선 this.props와 this.state가 바뀌게 된다. 함수명을 생각 해 보자. componentDidUpdate, 즉 'component가 update를 했다'는 매우 직관적인 이름을 갖고 있다. 즉, component를 업데이트 한 이후 시점에서, 호출되는 함수인 것이다. 따라서 this.props와 this.state의 '현재' 상태 역시 component의 업데이트 이후 시점을 뜻하므로 값이 변하게 되는 것이다. 또한, parameters(인자)를 통해 (업데이트)이 전의 값인 prevProps와 prevState를 조회할 수 있다. 그리고, getSnapshotBeforeUpdate에서 반환한 snapshot을 세 번째 값으로 받아오게 된다.
3-3. Component 제거시
Component가 더 이상 필요하지 않게 되면 단 하나의 API가 호출된다:
componentWillMount(){
}
이 함수로는 주로 등록했었던 이벤트를 제거하고, setTimeout은 clearTimeout을 통해 제거한다. 추가적으로 외부 라이브러리를 사용한 것이 있고 해당 라이브러리에 dispose(현재의 프레임을 종료하는 메소드) 기능이 있다면 여기에서 호출해 주면 된다.
3-4. Component에 에러 발생
1. componentDidCatch
componentDidCatch(error, info){
this.setState({
	error: true
	});
}
render 함수에서 에러가 발생한다면, react App이 crash된다. 이러한 상황에서 유용하게 사용할 수 있는 API가 바로 componentDidCatch(){}이다. 이는 Component가 렌더링 되는 도중 런타임 에러가 발생하면 호출되는 콜백 함수이며, 첫 번째 인자로 발생한 에러의 내용, 두 번째 인자로 에러가 발생한 위치를 알려준다. 에러가 발생하면 위와 같이 componentDidCatch('컴포넌트가 캐치했다')가 실행되게 하고, render 함수 쪽에서 이에 따라: if(this.state.error) 조건문을 사용하는 등으로 에러를 띄워주면 java에서 개발자 정의의 에러 페이지를 작성하고 띄울 때 처럼 작동시킬 수 있다!
요컨대, componentDidCatch(error, info){ this.setState({error: true;}) } 한다는 것은
- state로 선언한 error를 false로 초기 선언하고 (기본 상태는 에러가 발생하지 않음을 가정),
- 컴포넌트가 렌더링 될 때 런타임 에러가 발생하면
componentDidCatch가 호출되고, - 이 this.state error를 componentDidCatch 내부에서 true로 setState 해준다.
render(){}함수에 이 this.state.error의 값에 따라 if절 분기처리 함으로써,- error가 발생한 상황에 클라이언트 단에 노출할 에러 페이지 또는 메세지를 출력할 수 있다!
보다 자세한 예제 코드는 다음과 같다:
import React, { Component } from 'react';
// const Problematic을 화살표 함수로 선언하는데,
// 이는 'THE BUG APPEARS!' 라는 에러메세지를 가진 새 에러 객체를 던진다.
// 이 에러 객체는 개발자에게 보여지는 화면이며,
// 사용자에게는 내용물이 빈 div만 보여지게 된다.
const Problematic = () => {
  throw (new Error('THE BUG APPEARS!'));
  return(
    <div>
    </div>
  );
};
class Counter extends Component {
  state = {
    number: 0
  }
  handleIncrease = () => {
    const { number } = this.state;
    this.setState({
      number: number + 1
    });
  }
  handleDecrease = () => {
    this.setState(
      ({ number }) => ({
        number: number - 1
      })
    );
  }
// state의 number 값이 4가 되면 위에서 선언한 const 화살표 함수 Problematic이 호출된다.
  render(){
    return(
      <React.Fragment>
        <div>
          <h1>COUNTER</h1>
          <div> VAL : { this.state.number }</div>
          { this.state.number === 4 && <Problematic /> }
          <button onClick={ this.handleIncrease }>+</button>
          <button onClick={ this.handleDecrease }>-</button>
        </div>
      </React.Fragment>
    );
  }
}
export default Counter;
위에서 작성한 코드는 의도적으로 새 에러 객체 Problematic을 발생시키며, 이는 웹 상에서 개발자 모드를 켜 보면 다음과 같이 Uncaught Error: THE BUG APPEARS!라는 메세지를 확인 할 수 있다.
이 에러가 발생하였을 때 별도의 에러 메세지를 클라이언트 단에 노출하려면, 다음과 같은 코드를 작성하여 해결할 수 있다:
class Counter extends Component{
	state = {
		number: 0,
		error: false
	}
...
componentDidCatch(error, info){
	this.setState({
		error: true
		});
	}
...
}
render(){
if(this.state.error) return (<div>ERROR!</div>);
return(){
...
 }
}
위에서 에러를 발생시킨 class Problematic 코드에서 추가된 부분들은 다음과 같다:
- state로 number 뿐만 아니라 error라는 state를 추가
componentDidCatch(){}에 error 객체를 true로 setStaterender(){}에서 if 분기 처리: state.error의 값이 true라면 별도의 컴포넌트로 render, returnrender(){}에서 if 분기 처리: state.error 값이 false라면 기존 작성한 내용으로 render, return
3-5. LifeCycle API의 흐름 : 예제 코드와 해석
여기까지 내용을 쉽게 이해할 수 있는 예제 코드는 다음과 같다:
또한 내가 이 예제 코드를 통해 이해한 내용들은 주석으로 첨부한다.
// Component를 사용하기 위해
// 'react' 경로에서 React, 그 중 key값 Component의 value를 import한다.
import React, { Component } from 'react';
// import한 Component를 상속하여 class Counter를 선언한다.
class Counter extends Component{
	// state, 즉 동적인(쓸 수 있는) 자체적인 값으로 number를 선언하며,
	// 초기값은 0이다.
	state = {
		number: 0
	}
// 생성자(constructor)를 선언하며 인자로 props를 갖는다.
// props는 부모 Component가 자식 Component에 전달하는 데이터로,
// 자식 컴포넌트 입장에서는 읽기 전용이다.
// 참고로, super는 부모 클래스 생성자의 참조이며, js의 언어적 제약 사항으로
// 생성자에서 super를 호출하기 전에는 this의 사용이 불가하다.
constructor(props){
	super(props);
	console.log( 'constructor' );
	}
// '컴포넌트가 올려질거다 (deprecated)'
componentWillMount(){
	console.log( 'componentWillMount (deprecated)' );
	}
// '컴포넌트가 올려졌다'
componentDidMount(){
	console.log( 'componentDidMount' );
	}
// '컴포넌트 업데이트해야됨(다음Props, 다음State)'
shouldComponentUpdate(nextProps, nextState){
	console.log( 'shouldComponentUpdate' );
// 단, 다음 State(자식 컴포넌트의 동적 값)이 5의 배수(5로 나뉘었을 때 나머지가 없다면)
// return false, 즉 업데이트하지 않는다.
	if(nextState.number % 5 === 0) return false;
// 그 외의 경우는 업데이트 한다.
	return true;
	}
// '컴포넌트 업데이트 할거임(다음Props, 다음State)'
componentWillUpdate(nextProps, nextState){
	console.log('componentWillUpdate');
	}
// '컴포넌트 업데이트 했음(현재-즉 다음 값이 반영된-Props, 현재State)'
componentDidUpdate(prevProps, prevState){
	console.log( 'componentDidUpdate' );
	}
// 값 증가를 핸들링할 화살표 함수 선언
handleIncrease = () => {
// const number를 현재 state로 선언
	const { number } = this.state;
// const number의 값에 1을 더하는 것으로 setState 한다.
	this.setState({
		number: number + 1
		});
	}
// 값 감소를 핸들링할 화살표 함수 선언
handleDecrease = () => {
// *setState에 인자로 const number를 받는 화살표 함수 선언 후,
	this.setState(
		({ number }) => ({
// 인자인 number에서 1을 뺀 값으로 setState 한다.
		number: number - 1
		})
	);
}
// re-rendering을 위한 render 함수 호출
render(){
	console.log('render');
// return, 즉 화면에 내보낼 값을 선언할 return 호출
// 값으로 표시할 내용은 현재 state의 number(const) 값이다.
// 각 button에 onClick 이벤트로 handleIncrease와 handleDecrease 함수를 달아준다.
// 따라서, 각 button을 클릭하면 이에 할당된 이벤트가 호출되어 setState가 진행된다.
return(
	<React.Fragment>
		<div>
			<h1>COUNTER</h1>
			<div>VAL : { this.state.number }</div>
			<button onClick={ this.handleIncrease }>+</button>
			<button onClick={ this.handleDecrease }>-</button>
		</div>
	</React.Fragment>
		);
	}
}
// 여기까지, Component를 상속하여 작성한 클래스 Counter를 default로 export한다.
export default Counter;
4. HTML to JSX
4-1. from HTML to JSX
HTML로 기존에 작성한 코드를 react의 Component로 옮기는 과정에서, render(){ return(); }에 있는 그대로 복사 붙여넣기 하는 경우 몇 가지 에러들을 만나게 된다. html 코드를 JSX의 문법에 따라 수정할 내용들은 다음과 같았다:
input,br,hr등 종료 태그 없이 사용하는 단일 태그를 < TAG />의 형식으로 변환- 상대 주소를 경로로 사용하고 있는 svg, img 태그의 src를 CDN 절대 경로로 수정
- img 태그의 alt="" attribute에 alt 메세지 등을 추가
React.Fragment태그로 본문을 감싸고, 한 번 더 outermost div 감싼 후 내용 작성- 모든 태그의 class="" attribute를 className="" 으로 수정
- input:radio의 checked attribute를 defaultChecked로 수정
- <a> 태그의 disable, 즉 비 활성화 설정을 위해 작성한
<a href="javascript: void(0)>를<a href="{void(0)}">으로 수정 <label>의 for="" attribute를 htmlFor=""로 수정
e.g.
...
<input type="radio" name="slide" id="Slide1" className="control" defaultChecked/>
      <label htmlFor="Slide1" id="sl1"></label>
...
<a href="{void(0)}" className="slide"><img src="https://cdn-dev.filepath.png"
	 alt="Failed to load Image"/></a>
4-2. React.js에서의 favicon, Page Title 설정
favicon, 즉 페이지 탭에서의 미리보기 아이콘과 탭 제목을 설정하는 일은 생각보다 아주 쉽다.
나는 말로만 듣던 favicon이 페이지 탭 아이콘을 부르는 단어인 줄 오늘 처음 알았다.
방법은 다음과 같다:
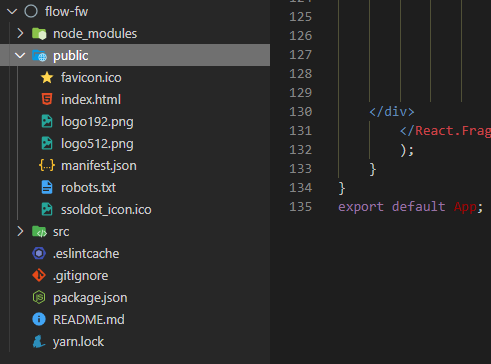
- favicon과 페이지 탭 제목을 바꿀 프로젝트의 경로에서 public 폴더를 찾는다.
- public 폴더에 .ico 확장자의 favicon 파일을 저장한다.
- public 폴더의 index.html 파일을 열어서 아래의 부분을 수정한다:
<!DOCTYPE html>
<html lang="en">
  <head>
    <meta charset="utf-8" />
    <link rel="icon" href="%PUBLIC_URL%/FAVICON-FILE-NAME.ico" />
    <meta name="viewport" content="width=device-width, initial-scale=1" />
    <meta name="theme-color" content="#000000" />
    <meta
      name="description"
      content="Web site created using create-react-app"
    />
    <link rel="apple-touch-icon" href="%PUBLIC_URL%/logo192.png" />
    <!--
      manifest.json provides metadata used when your web app is installed on a
      user's mobile device or desktop. See https://developers.google.com/web/fundamentals/web-app-manifest/
    -->
    <link rel="manifest" href="%PUBLIC_URL%/manifest.json" />
    <!--
      Notice the use of %PUBLIC_URL% in the tags above.
      It will be replaced with the URL of the `public` folder during the build.
      Only files inside the `public` folder can be referenced from the HTML.
      Unlike "/favicon.ico" or "favicon.ico", "%PUBLIC_URL%/favicon.ico" will
      work correctly both with client-side routing and a non-root public URL.
      Learn how to configure a non-root public URL by running `npm run build`.
    -->
    <title>PAGE TITLE</title>
  </head>
위의 코드에서 <link rel="icon" href="%PUBLIC_URL%/FAVICON-FILE-NAME.ico" />의 FAVICON-FILE-NAME.ico 부분을 2에서 저장한 파일명으로 수정하고 (확장자 포함), <title>PAGE TITLE</title>의 PAGE TITLE 부분을 원하는 제목으로 바꿔주고 저장하면 된다!