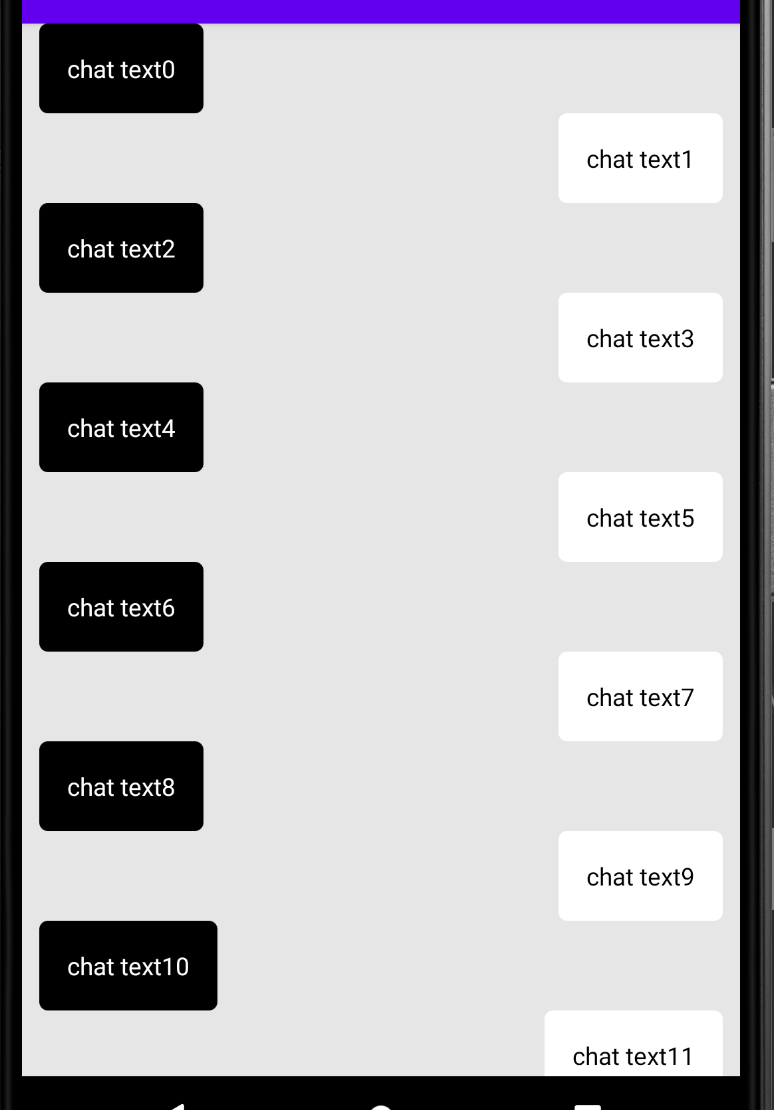
리사이클러뷰 아이템에 뷰 타입을 지정하여 다른 뷰 모양을 보여줄 수 있다. 흔히 볼 수 있는 채팅 레이아웃을 만들어보자.
Model
data class ChatBubble(
    val chatText: String, // 채팅 텍스트
    val viewType: Int, // 중요!
)
리사이클러뷰를 만들 때 데이터 모델을 만드는데, 여기서 viewType을 가지고 있어야 한다.
이 viewType을 가지고 나중에 Adapter에서 구분하여 ViewHolder를 지정하기 때문이다.
Item Layout
(1) 왼쪽 채팅과 (2) 오른쪽 채팅 레이아웃을 만든다.
(1) 왼쪽 채팅 (item_bubble_left.xml)
<?xml version="1.0" encoding="utf-8"?>
<androidx.constraintlayout.widget.ConstraintLayout xmlns:android="http://schemas.android.com/apk/res/android"
    xmlns:app="http://schemas.android.com/apk/res-auto"
    xmlns:tools="http://schemas.android.com/tools"
    android:layout_width="match_parent"
    android:layout_height="wrap_content">

    <TextView
        android:id="@+id/tv_chat_text"
        android:padding="16dp"
        android:background="@drawable/bubble_left_background"
        android:textColor="@color/white"
        android:layout_width="wrap_content"
        android:layout_marginStart="10dp"
        android:layout_height="wrap_content"
        app:layout_constraintBottom_toBottomOf="parent"
        app:layout_constraintStart_toStartOf="parent"
        app:layout_constraintTop_toTopOf="parent"
        tools:text="왼쪽 채팅 메시지 입니다." />

</androidx.constraintlayout.widget.ConstraintLayout>
(2) 오른쪽 채팅 (item_bubble_right.xml)
<?xml version="1.0" encoding="utf-8"?>
<androidx.constraintlayout.widget.ConstraintLayout xmlns:android="http://schemas.android.com/apk/res/android"
    xmlns:app="http://schemas.android.com/apk/res-auto"
    xmlns:tools="http://schemas.android.com/tools"
    android:layout_width="match_parent"
    android:layout_height="wrap_content">

    <TextView
        android:id="@+id/tv_chat_text"
        android:padding="16dp"
        android:background="@drawable/bubble_right_background"
        android:textColor="@color/black"
        android:layout_width="wrap_content"
        android:layout_marginEnd="10dp"
        android:layout_height="wrap_content"
        app:layout_constraintBottom_toBottomOf="parent"
        app:layout_constraintEnd_toEndOf="parent"
        app:layout_constraintTop_toTopOf="parent"
        tools:text="오른쪽 채팅 메시지 입니다." />

</androidx.constraintlayout.widget.ConstraintLayout>
ViewHolder
왼쪽, 오른쪽 채팅에 대해 각각 만들어준다.
class BubbleLeftViewHolder(binding: ItemBubbleLeftBinding) : RecyclerView.ViewHolder(binding.root) {

    private val chatText = binding.tvChatText

    // Adapter onBindViewHolder() 에서 사용할 예정
    fun bind(item: ChatBubble) {
        chatText.text = item.chatText
    }
}
class BubbleRightViewHolder(binding: ItemBubbleRightBinding) : RecyclerView.ViewHolder(binding.root) {
private val chatText = binding.tvChatText
// Adapter onBindViewHolder() 에서 사용할 예정
fun bind(item: ChatBubble) {
chatText.text = item.chatText
}
}ViewType 상수 선언
adapter에서 뷰타입을 구분해줄 때 사용한다
// Constants.kt
object BubbleViewType {
    const val LEFT = 1
    const val RIGHT = 2
}
Adapter
Adapter에서 Item의 view type에 따라 다른 뷰홀더로 매칭해주는게 뽀인트다
class ChatAdapter : RecyclerView.Adapter<RecyclerView.ViewHolder>() {

    private var items = ArrayList<ChatBubble>()

    // 뷰타입에 따라 다른 뷰홀더 연결
    override fun onCreateViewHolder(parent: ViewGroup, viewType: Int): RecyclerView.ViewHolder {
        if (viewType == BubbleViewType.LEFT) {
            return BubbleLeftViewHolder(
                ItemBubbleLeftBinding.inflate(
                    LayoutInflater.from(parent.context),
                    parent,
                    false
                )
            )
        }
        return BubbleRightViewHolder(
            ItemBubbleRightBinding.inflate(
                LayoutInflater.from(parent.context),
                parent,
                false
            )
        )
    }

    // 뷰홀더 안에 있는 bind() 함수도 뷰타입에 따라 다르게 연결
    override fun onBindViewHolder(holder: RecyclerView.ViewHolder, position: Int) {
        when (items[position].viewType) {
            BubbleViewType.LEFT -> {
                (holder as BubbleLeftViewHolder).bind(items[position])
            }
            BubbleViewType.RIGHT -> {
                (holder as BubbleRightViewHolder).bind(items[position])
            }
        }
    }

    override fun getItemCount(): Int {
        return items.size
    }


    // 이 부분을 꼭 구현해주어야 내가 설정한 뷰타입대로 적용된다.
    override fun getItemViewType(position: Int): Int {
        return items[position].viewType
    }


    @SuppressLint("NotifyDataSetChanged")
    fun setData(list: ArrayList<ChatBubble>) {
        items = list
        notifyDataSetChanged()
    }
}
activity_main.xml
<?xml version="1.0" encoding="utf-8"?>
<androidx.constraintlayout.widget.ConstraintLayout xmlns:android="http://schemas.android.com/apk/res/android"
    xmlns:app="http://schemas.android.com/apk/res-auto"
    xmlns:tools="http://schemas.android.com/tools"
    android:layout_width="match_parent"
    android:layout_height="match_parent"
    android:background="#e6e6e6"
    tools:context=".MainActivity">

    <androidx.recyclerview.widget.RecyclerView
        android:id="@+id/recyclerview_chat"
        android:layout_width="0dp"
        android:layout_height="0dp"
        app:layout_constraintBottom_toBottomOf="parent"
        app:layout_constraintEnd_toEndOf="parent"
        app:layout_constraintStart_toStartOf="parent"
        app:layout_constraintTop_toTopOf="parent" />

</androidx.constraintlayout.widget.ConstraintLayout>
MainActivity
class MainActivity : AppCompatActivity() {
    private lateinit var binding: ActivityMainBinding


    private lateinit var chatAdapter: ChatAdapter
    private val data = ArrayList<ChatBubble>()

    override fun onCreate(savedInstanceState: Bundle?) {
        super.onCreate(savedInstanceState)
        binding = ActivityMainBinding.inflate(layoutInflater)
        setContentView(binding.root)


        // recyclerview adapter
        chatAdapter = ChatAdapter()

        // set up recyclerview
        binding.recyclerviewChat.apply {
            setHasFixedSize(true)
            layoutManager =
                LinearLayoutManager(this@MainActivity, LinearLayoutManager.VERTICAL, false)
            adapter = chatAdapter

        }

        // set data
        for (i in 0..15) {
            val item = ChatBubble(
                chatText = "chat text$i",
                viewType = if (i % 2 == 0) BubbleViewType.LEFT else BubbleViewType.RIGHT
            )
            data.add(item)
        }
        chatAdapter.setData(list = data)
    }
}
결과