Okhttp
안드로이드 개발에서 HTTP 통신을 위한 오픈소스 클라이언트 라이브러리
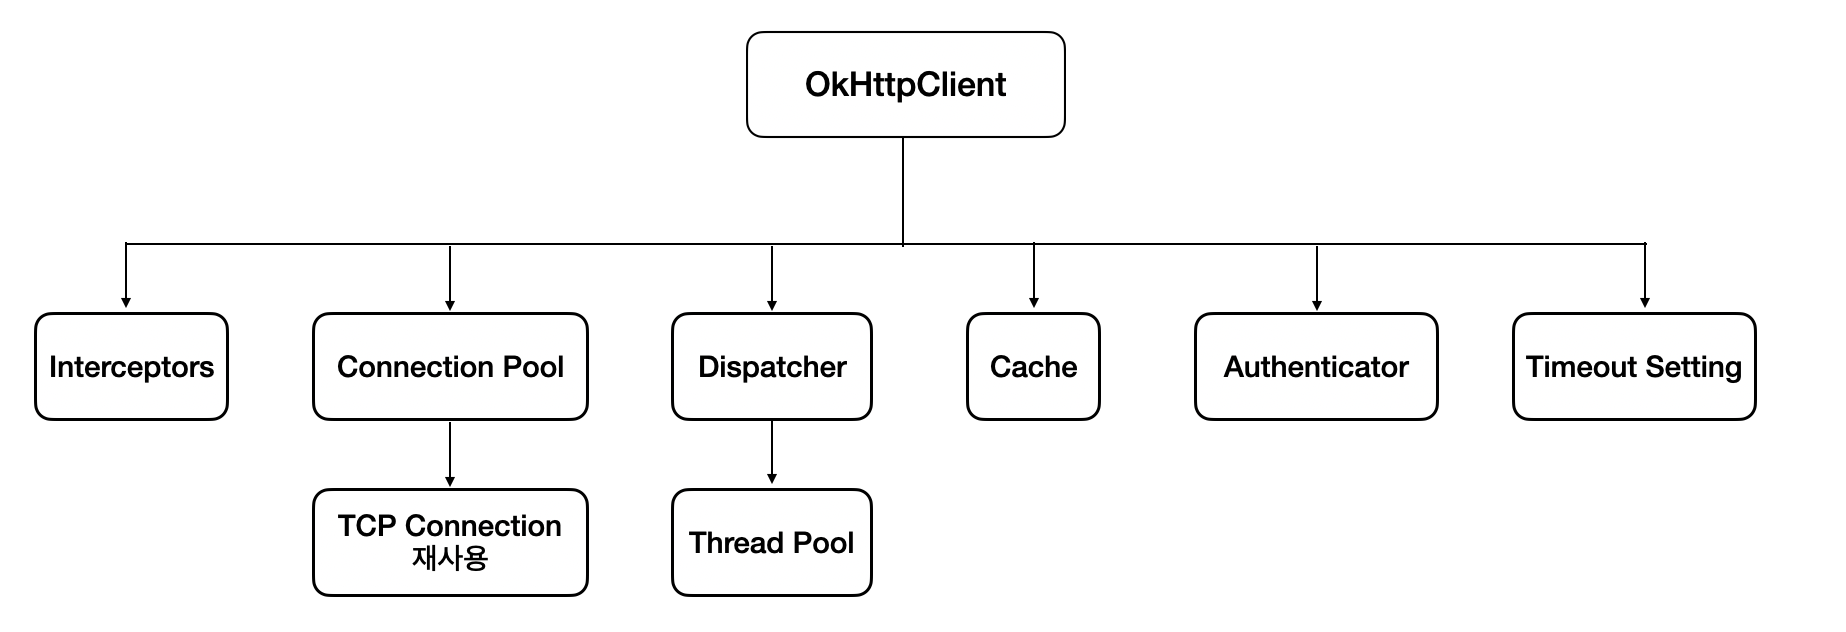
OkhttpClient
HTTP 요청을 보내고, 응답을 받는 모든 네트워크 통신의 설정 주체
특징
-
비동기 요청을 지원하여 네트워크 통신 중 UI 스레드를 블로킹하지 않음 (비동기로 처리하기 위한
ThreadPool존재) -
Connection Pool
Keep-Alive제공 (서버에 한 번 연결된 TCP 커넥션을 재사용해서 다음 요청 때 재연결 안 하고 바로 사용) -
Intercepter 제공 (요청 / 응답을 가로채서 가공 가능)
-
Authenticator 제공 (서버로부터
401 UnAuthroized을 받는 경우에 대해 핸들링 가능) -
Timeout 제공 (연결, 읽기, 쓰기 제한 시간 설정)
-
Cache 제공 ( 응답 캐싱)
이러한 특징으로 OkHttpClient 는 Singleton으로 생성 후 재사용 해야 효율적임
네트워크 요청마다 OkHttpClient 생성 시 Connection Pool 의 연결 재사용이 되지 않고 ThreadPool 또한 계속 생성하기 때문에 성능저하 + 메모리 낭비를 가져오게 됨
커스텀 OKHttpClient 생성
OkHttpClient.Builder()
            .addInterceptor(loggingInterceptor)
            .addInterceptor(interceptor)
            .authenticator(authenticator)
            .build()
Builder()를 통해서 커스텀 OkHttpClient를 생성할 수 있음
Interceptor
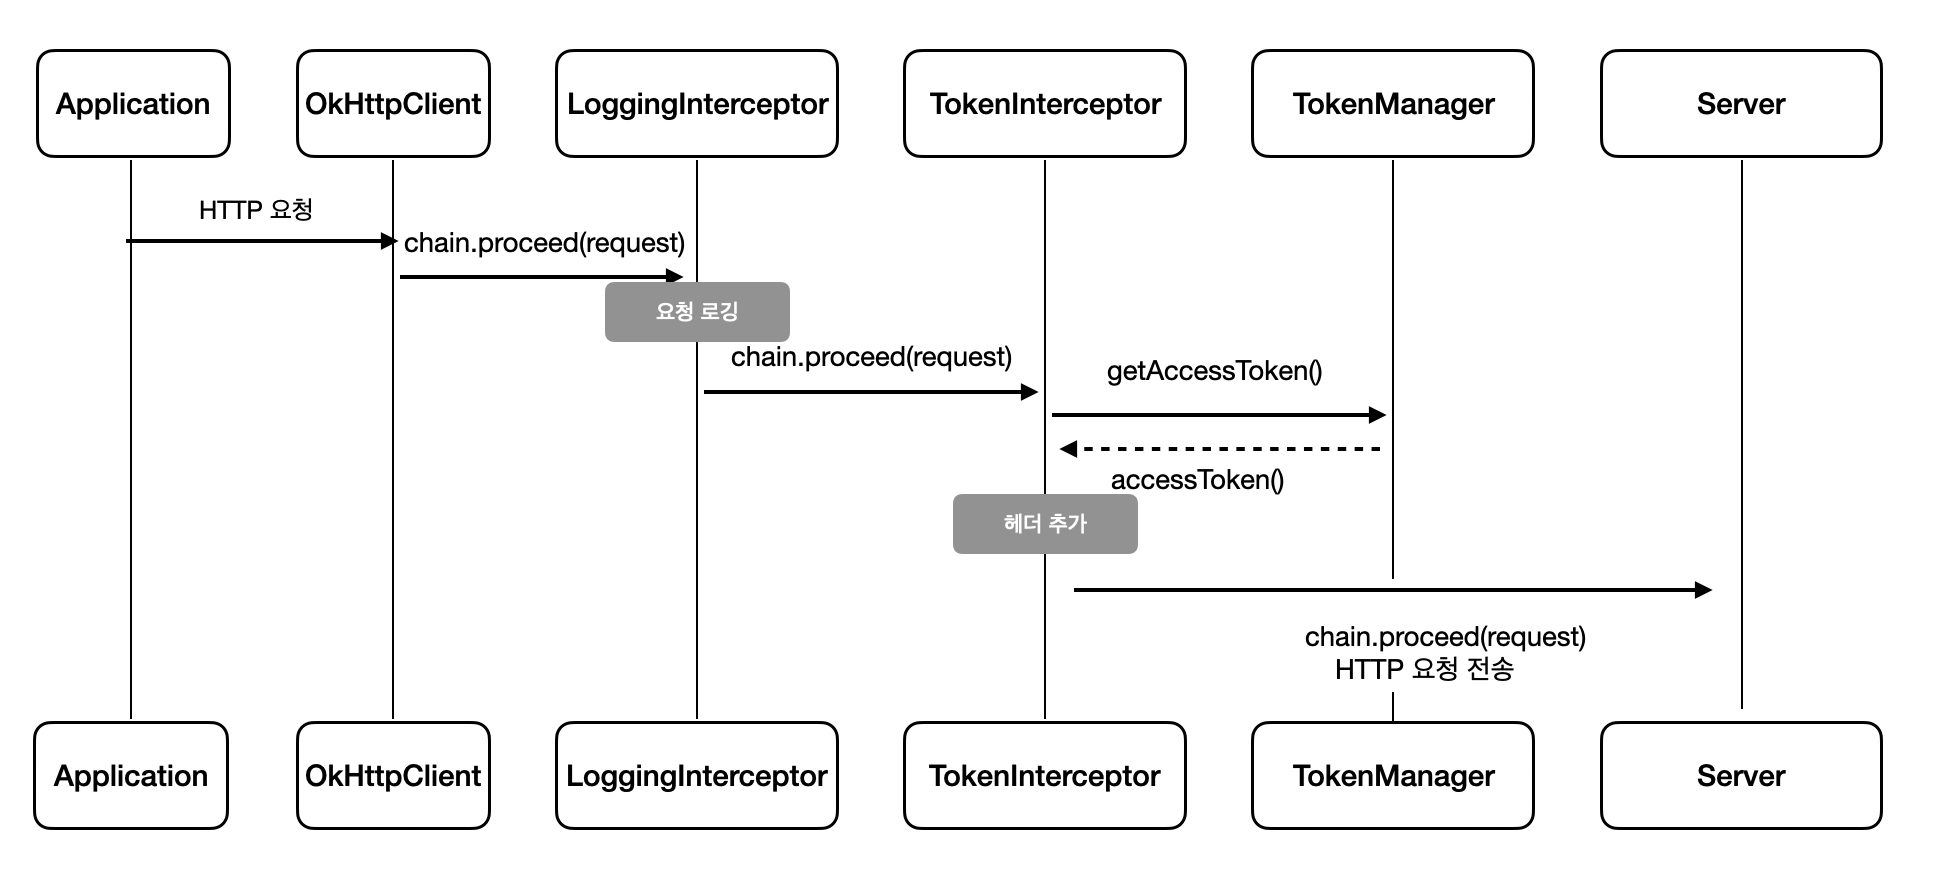
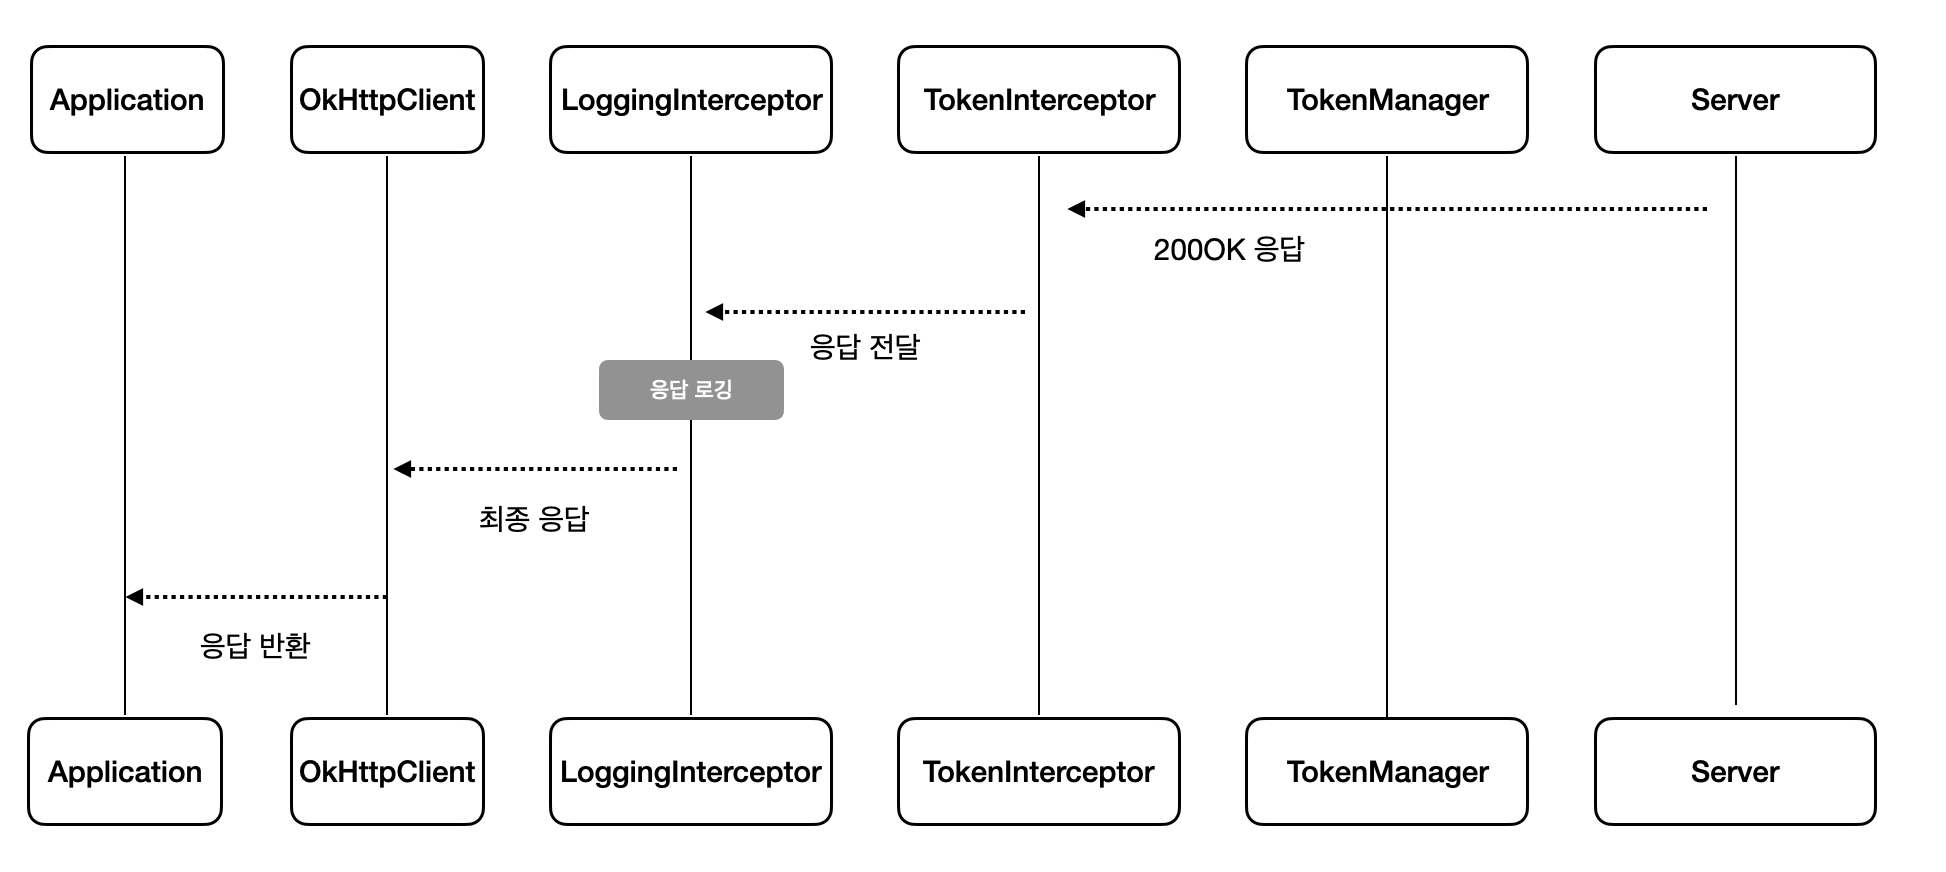
요청(request)과 응답(response)을 가로채서 조작하거나 관찰할 수 있는 인터페이스
-
요청 전에 헤더를 추가하는 경우
-
응답 후에 로그를 찍는 경우
-
조건에 따라 요청을 취소하는 경우
-
응답을 가짜로 만들어 반환할 수도 있음
fun interface Interceptor {
    fun intercept(chain: Chain): Response

    interface Chain {
    fun request(): Request
    @Throws(IOException::class)
    fun proceed(request: Request): Response
    ...
}
Chain
OkHttp에서 요청과 관련된 처리를 수행할 수 있는 인터셉터(Interceptor)의 매개변수
인터셉터를 순차적으로 연결하여 요청과 응답이 처리되는 파이프라인을 형성
class TokenIntercepter @Inject constructor(
    private val tokenManager: TokenManager
) : Interceptor {
    override fun intercept(chain: Interceptor.Chain): Response {
        val accessToken = runBlocking { tokenManager.getAccessToken() }
        val request = chain.request().newBuilder().apply { //현재 요청에서 헤더 토큰 추가
            if (!accessToken.isNullOrBlank()) {
                header("Authorization", "Bearer $accessToken")
            }
        }.build()

        return chain.proceed(request) //다음 체인 또는 서버로 넘김
    }
}

 return OkHttpClient.Builder()
            .addInterceptor(loggingInterceptor)
            .addInterceptor(interceptor)
.build()| 용어 | 설명 |
|---|---|
| Interceptor | 요청과 응답을 중간에서 가로채는 인터페이스 |
| Chain | 요청 흐름을 이어주는 체인 객체. 이전 요청, 다음 요청으로 연결됨 |
| chain.request() | 현재 요청(Request)을 가져옴 |
| chain.proceed(request) | 수정한 요청을 다음 체인 또는 서버로 넘김 |
| Response | 서버로부터의 응답 또는 직접 생성한 응답 |
요청
응답
Authenticator
서버 또는 프록시 서버로부터 인증 요청(예: 401, 407)을 받았을 때
자동으로 새 요청을 구성해 재요청하는 역할을 하는 인터페이스.
주로 AccessToken 만료 → RefreshToken으로 재발급 후 재요청 시 활용
class TokenAuthenticator @Inject constructor(
    private val tokenManager: TokenManager,
    private val authService: AuthService,
): Authenticator  {
    override fun authenticate(route: Route?, response: Response): Request? {
        // 무한 루프 방지
        if (responseCount(response) >= 2) return null
        return runBlocking {
            runCatching {
                val refreshToken = tokenManager.getRefreshToken() ?: throw IllegalStateException("Refresh token is null")

                val tokenResponse = authService.refreshToken(refreshToken)
                if (tokenResponse.code != 200 && tokenResponse.data == null) {
                    throw IllegalStateException("refreshtokenRequest 발급 실패")
                }

                val tokenData = tokenResponse.data
                    ?: throw IllegalStateException("Token data is null")

                tokenManager.saveTokens(tokenData.accessToken, tokenData.refreshToken)

                response.request.newBuilder()
                    .header("Authorization", "Bearer ${tokenData.accessToken}")
                    .build()
            }.getOrElse {
                tokenManager.clear()
                null
            }
        }
    }

    private fun responseCount(response: Response): Int {
        var count = 1
        var r = response.priorResponse
        while (r != null) {
            count++
            r = r.priorResponse
        }
        return count
    }
}[작동방식]
| 서버가 401 응답 | Authenticator.authenticate() 자동 호출됨 |
|---|---|
| 새 AccessToken 발급 성공 | 기존 요청을 복제해서 새 토큰 헤더 추가 후 재요청 |
| 발급 실패 | null 반환 → 최종 401 에러 응답 반환됨 |
- 401 → 재시도 → 또 실패 → 또 재시도 ... 이런 루프 막기 위해 responseCount가 2 이상이면 null 반환
- refresh 토큰으로 accessToken을 다시 발급받고 기존 요청에 새 토큰 붙여 재요청
요청

응답
Retrofit 과의 사용
 	@Provides
    @Singleton
    fun provideOkHttpClient(
        interceptor: Interceptor,
        authenticator: Authenticator,
        loggingInterceptor: HttpLoggingInterceptor
    ): OkHttpClient {
        return OkHttpClient.Builder()
            .addInterceptor(loggingInterceptor)
            .addInterceptor(interceptor)
            .authenticator(authenticator)
            .build()
    }

    @Provides
    @Singleton
    fun provideAuthRetrofit(
        json: Json,
        client: OkHttpClient
    ): Retrofit {
        return Retrofit.Builder()
            .baseUrl(BASE_URL)
            .client(client)
            .addConverterFactory(json.asConverterFactory("application/json".toMediaType()))
            .build()
    }
마무리
공부를 하면서 사실 서버가 데이터를 내려주는 방법에 따라 Authenticator를 사용할 수도 있고 Intercepter에서 다 처리되게 할 수도 있구나를 알게 되었습니다.
Authenticator 는 401, 407을 응답을 받았을 때 요청된다. 만약 서버에서 인증권한이 없어도 status 는 200으로 내리고 내부 데이터에 상태를 나타내는 code에 401 형태로 내려줄 수도 있기 때문에 요구사항에 맞춰서 개발을 하면 되겠다 라고 생각하게 되었습니다.