이번 글에서는 카카오로그인 후 로그아웃 버튼과 회원 탈퇴 버튼을 생성해보려합니다.
💡 먼저 로그아웃 버튼, 회원 탈퇴 버튼 생성하기
로그인 후 이동되는 액티비티에 로그아웃 버튼과 회원 탈퇴 버튼을 만들어 줍니다.
<?xml version="1.0" encoding="utf-8"?>
<androidx.constraintlayout.widget.ConstraintLayout
    xmlns:android="http://schemas.android.com/apk/res/android"
    xmlns:app="http://schemas.android.com/apk/res-auto"
    xmlns:tools="http://schemas.android.com/tools"
    android:layout_width="match_parent"
    android:layout_height="match_parent"
    tools:context=".SecondActivity">

    <Button
        android:id="@+id/kakao_logout_button"
        android:layout_width="match_parent"
        android:layout_height="wrap_content"
        android:text="로그아웃"
        android:textSize="20sp"
        app:layout_constraintBottom_toTopOf="@+id/kakao_unlink_button"
        app:layout_constraintLeft_toLeftOf="parent"
        app:layout_constraintRight_toRightOf="parent" />

    <Button
        android:id="@+id/kakao_unlink_button"
        android:layout_width="match_parent"
        android:layout_height="wrap_content"
        android:text="회원 탈퇴"
        android:textSize="20sp"
        app:layout_constraintBottom_toBottomOf="parent"
        app:layout_constraintLeft_toLeftOf="parent"
        app:layout_constraintRight_toRightOf="parent" />

</androidx.constraintlayout.widget.ConstraintLayout>
위 코드를 로그인 후 이동되는 레이아웃에 작성해줍니다.
그 다음 activity에는 아래 코드를 작성하여 줍니다:)
import android.content.Intent
import android.content.Intent.FLAG_ACTIVITY_CLEAR_TOP
import androidx.appcompat.app.AppCompatActivity
import android.os.Bundle
import android.widget.Button
import android.widget.Toast
import com.kakao.sdk.user.UserApiClient

class SecondActivity : AppCompatActivity() {
    override fun onCreate(savedInstanceState: Bundle?) {
        super.onCreate(savedInstanceState)
        setContentView(R.layout.activity_second)

        val kakao_logout_button = findViewById<Button>(R.id.kakao_logout_button) //로그아웃 버튼

        kakao_logout_button.setOnClickListener {
            UserApiClient.instance.logout { error ->
                if (error != null) {
                    Toast.makeText(this, "로그아웃 실패 $error", Toast.LENGTH_SHORT).show()
                }else {
                    Toast.makeText(this, "로그아웃 성공", Toast.LENGTH_SHORT).show()
                }
                val intent = Intent(this, MainActivity::class.java)
                startActivity(intent.addFlags(FLAG_ACTIVITY_CLEAR_TOP))
                finish()
            }
        }

        val kakao_unlink_button = findViewById<Button> (R.id.kakao_unlink_button)//회원 탈퇴 버튼

        kakao_unlink_button.setOnClickListener {
            UserApiClient.instance.unlink { error ->
                if (error != null) {
                    Toast.makeText(this, "회원 탈퇴 실패 $error", Toast.LENGTH_SHORT).show()
                }else {
                    Toast.makeText(this, "회원 탈퇴 성공", Toast.LENGTH_SHORT).show()
                    val intent = Intent(this, MainActivity::class.java)
                    startActivity(intent.addFlags(FLAG_ACTIVITY_CLEAR_TOP))
                    finish()
                }
            }
        }
    }
}
이제 다음으로 앱을 실행하기 전 해야할 일이 있습니다‼️
💡 카카오 로그인 on, 사용자 정보 조회 설정
위 링크로 들어가 카카오 로그인 부분에서 카카오 로그인상태를 on으로 바꿔주어야 합니다.
다음으로는 카카오 로그인 아래 동의항목 부분에서 가져올 사용자 정보들을 설정해 줍니다.
여기서는 테스트용으로 간단하게 닉네임 정도만 필수동의로 받아보겠습니다
(동의 항목 설정에서 동의 목적은 아무렇게나 작성하셔도 됩니다😀 ex)테스트)
💡 카카오 닉네임 받아오기
자 이제 설정을 했으니 정보를 받아올 코드를 추가해 주어야 합니다.
activity에 on Create안에 아래 코드를 추가해 줍니다.
val nickname = findViewById<TextView>(R.id.nickname) // 로그인 버튼

        UserApiClient.instance.me { user, error ->
            nickname.text = "닉네임: ${user?.kakaoAccount?.profile?.nickname}"
        }
레이아웃에도 아래 코드를 버튼코드 위에 추가해 줍니다.
<TextView
        android:id="@+id/nickname"
        android:layout_width="match_parent"
        android:layout_height="wrap_content"
        android:text="닉네임: "
        android:textSize="20sp"
        app:layout_constraintLeft_toLeftOf="parent"
        app:layout_constraintRight_toRightOf="parent"
        app:layout_constraintTop_toTopOf="parent" />
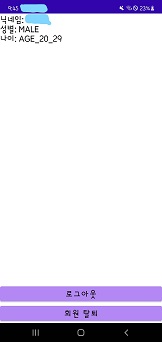
고생하셨습니다😊 이제 실행을 한 다음 로그인 후에 아래와 비슷한 화면을 보실 수 있습니다👍🏻
(저는 성별과 연령대를 추가해서 저렇게 나온답니다)
카카오로그인api 정리는 이렇게 마무리 하겠습니다✌🏻
# HoHo.log :)