
ch15-1 입출력과 스트림
I/O란 Input과 Output의 약자로 입력과 출력, 입출력을 의미
입출력이란 컴퓨터 내부 또는 외부의 장치와 프로그램간의 데이터를 주고받는 것을 의미
스트림이란 데이터를 운반하는데 사용하는 연결 통로
스트림은 단방향통신만 가능하기 때문에 하나의 스트림으로 입력과 출력을 동시에 처리할 수 없다.
그러므로 입력과 출력을 동시에 수행하려면 입력을 위한 입력스트림(input stream)과 출력을 위한 출력스트림(output stream), 모두 2개의 스트림이 필요하다.
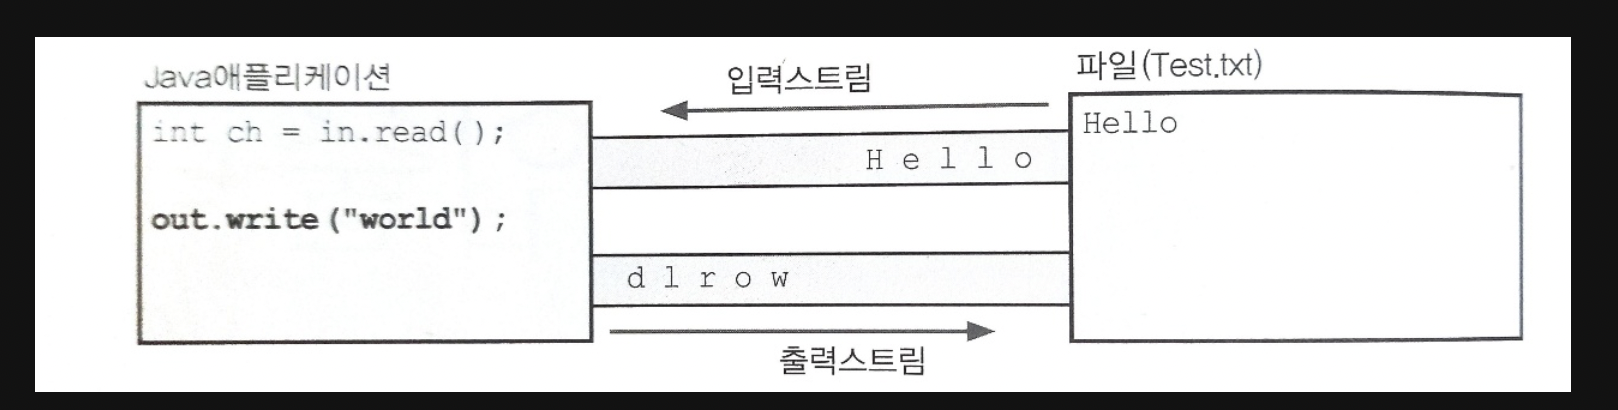
스트림은 먼저 보낸 데이터를 먼저 받게 되어 있으며 중간에 건너뜀 없이 연속적으로 데이터를 주고받는다.
큐(queue)와 같은 FIFO(First In First Out)구조로 되어 있다고 볼 수 있다.
ch15-2 바이트기반 스트림 - InputStream, OutputStream
스트림은 바이트 단위로 데이터 전송
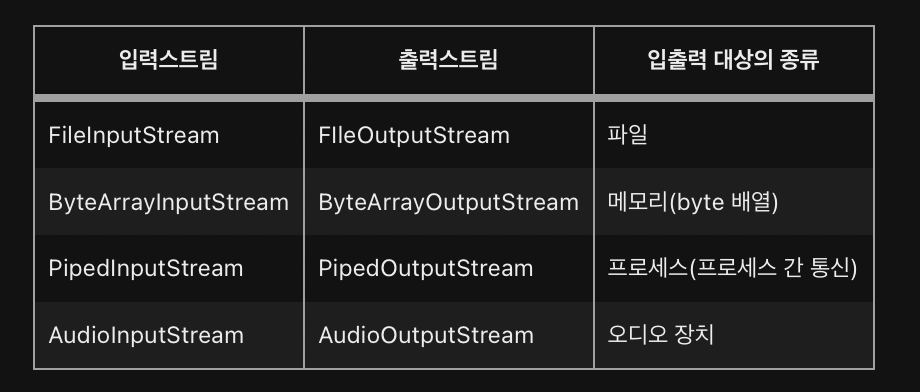
대상에 맞게 스트림을 선택하여 작업을 하면 됨!!
각각 InputStream 과 OutputStream의 자손
자바에서는 java.io 패키지를 통해서 많은 종류의 입출력관련 클래스들을 제공하고 있으며, 입출력을 처리할 수 있는 표준화된 방법을 제공함으로써 입출력의 대상이 달라져도 동일한 방법으로 입출력이 가능하기 때문에 프로그래밍을 하기에 편리하다.
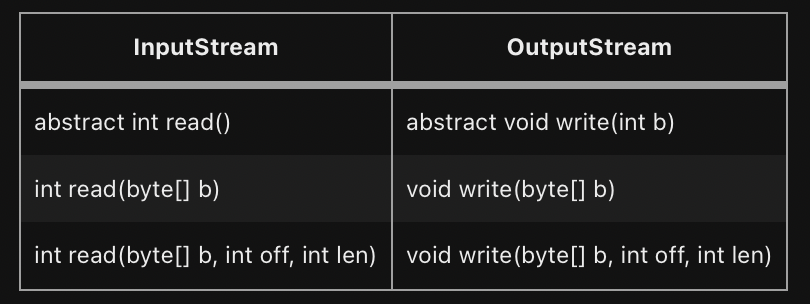
입출력 대상에 따라 읽고 쓰는 방법이 다를 것이기 때문에 각 상황에 알맞게 구현하라는 의미에서 추상메서드로 정의
read()의 반환타입이 Int -> 반한값의 범위가 0~255와 -1이기 때문
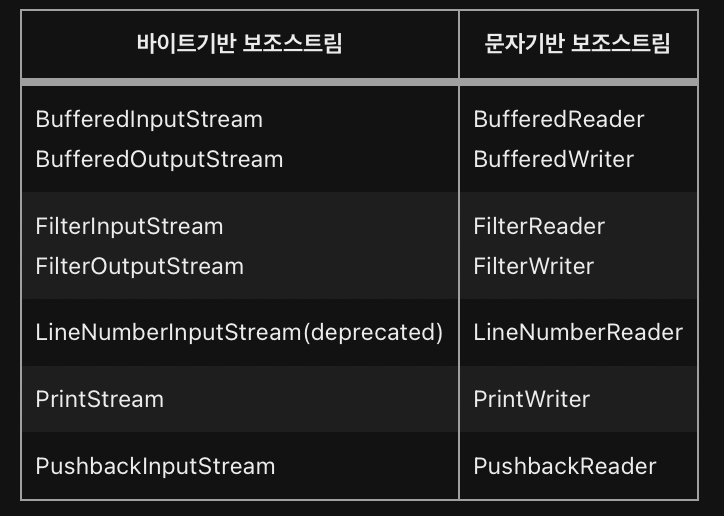
ch15-3 보조 스트림
- 실제 스트림X -> 데이터 입출력 기능 X
- 스트림의 기능을 향상 or 새로운 기능 추가 -> 스트림 생성 후 보조 스트림 생성 해야함
FileInputStream fis = new FileInputStream("test.txt");

// 기반 스트림을 이용하여 보조 스트림 생성
BufferedInputStream bis = new BufferedInputStream(fis);
bis.read() // 보조 스트림으로 부터 데이터 읽음
코드 상으론 보조 스트림이 입력기능을 수행하는 것 처럼 보이지만 FileInputStream이 수행
ch15-4,5 문자기반 스트림-Reader, Writer
이전에 확인했던 스트림은 모두 바이트기반 스트림
-> 바이트기반이므로 입출력의 단위가 1byte가 된다
여기서 자바는 한 문자를 의미하는 char형이 1byte가 아닌 2byte이기 때문에 바이트기반 스트림으로는 2byte인 문자를 처리하는데 어려움이 있다.
->이를 보완하기 위해 문자 기반의 스트림이 제공된다.
inputStream -> Reader
OutputStream -> Writer
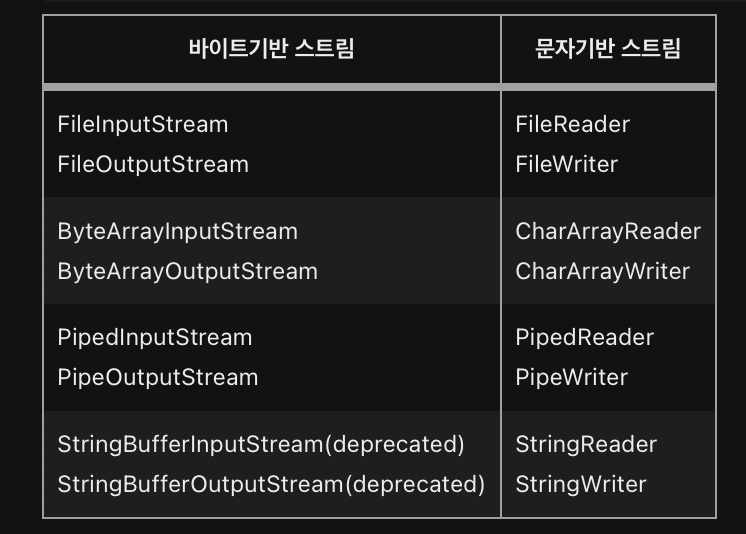
바이트 기반 스트림 vs 문자 기반 스트림
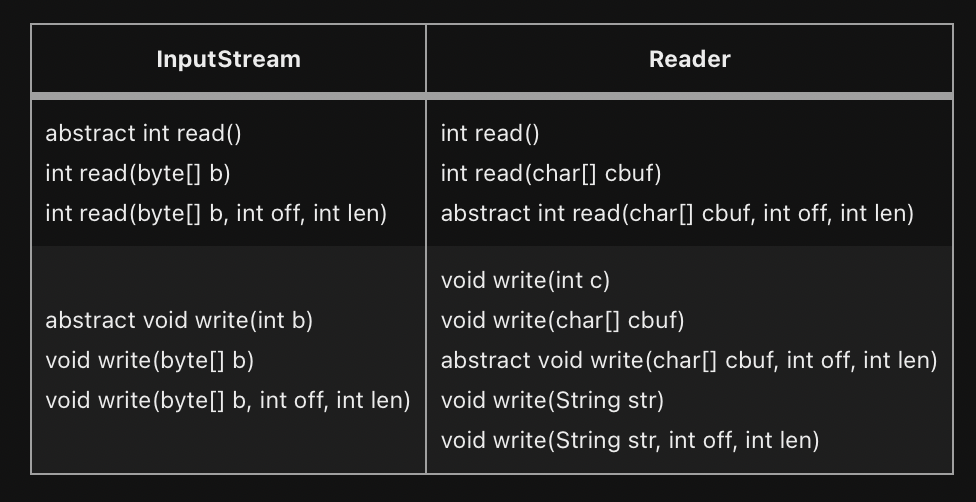
ch15-6~9 InputStream과 OutputStream
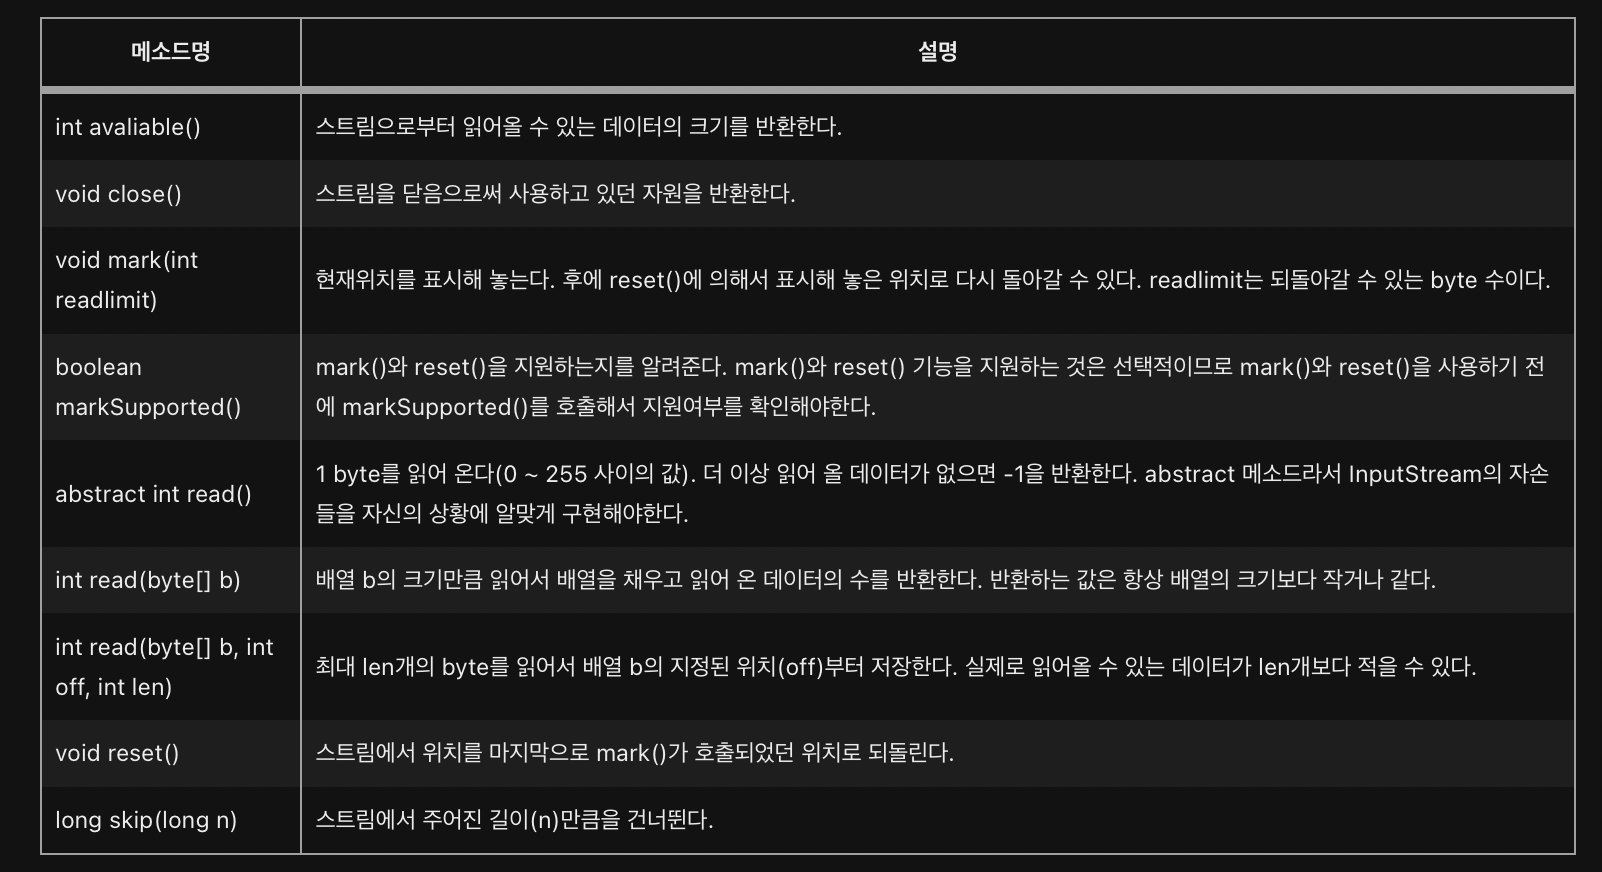
InputStream과 OutputStream은 모든 바이트기반의 스트림의 조상이며 다음과 같은 메소드가 선언되어 있다.
OutputStream의 메서드
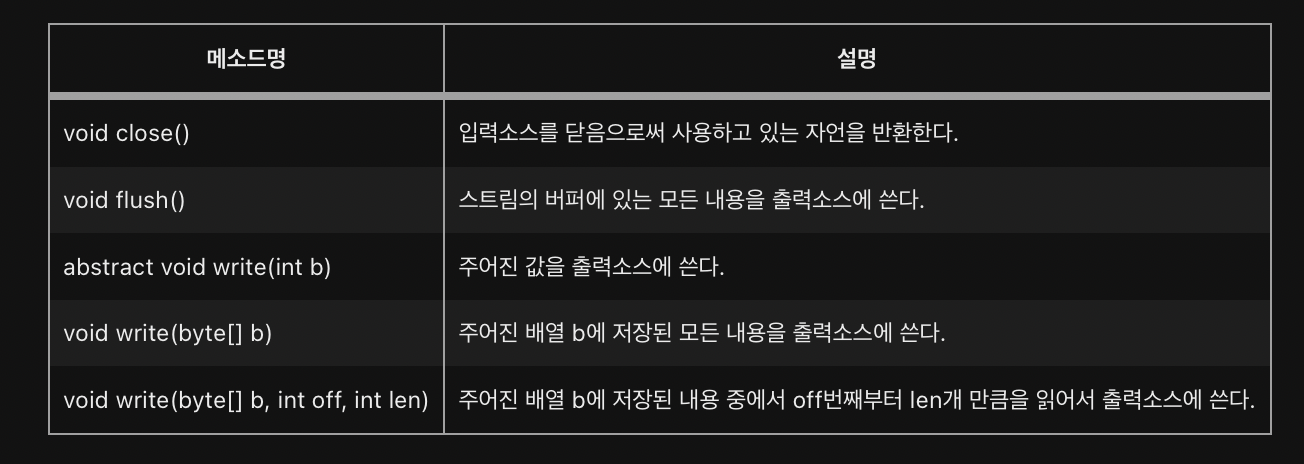
flush는 버퍼가 있는 출력스트림의 경우에만 의미가 있다
프로그램이 종료될 때, 사용하고 닫지 않은 스트림을 JVM이 자동적으로 닫아 주지만, 스트림을 사용해서 모든 작업을 마치고 난 후에는 close()를 호출해서 반드시 닫아주어야 한다.
그러나 ByteArrayInputStream과 같이 메모리를 사용하는 스트림과 System.in, System.out과 같은 표준 입출력 스트림은 닫아 주지 않아도 된다.
ByteArrayInputStream과 ByteArrayOutputStream
ByteArrayInputStream/ByteArrayOutputStream은 메모리, 즉 바이트배열에 데이터를 입출력하는데 사용되는 스트림
-> 주로 다른 곳에 입출력하기 전에 데이터를 임시로 바이트배열에 담아서 변환 등의 작업을 하는데 사용된다.
package ch15;

import java.io.*;
import java.util.Arrays;

public class Ex15_1 {

	public static void main(String[] args) {
		byte[] inSrc = {0,1,2,3,4,5,6,7,8,9};
		byte[] outSrc = null;

		ByteArrayInputStream input = null;
		ByteArrayOutputStream output = null;

		input = new ByteArrayInputStream(inSrc);
		output = new ByteArrayOutputStream();

		int data = 0;

        // read의 반환값을 data에 저장후 -1인지 아닌지 비교
		while((data = input.read())!=-1)
			output.write(data); // void write(int b)

		outSrc = output.toByteArray(); // 스트림의 내용은 byte배열로 변환.

		System.out.println("Input Source : " +Arrays.toString(inSrc));
		System.out.println("Output Source:" +Arrays.toString(outSrc));

	}

}
Input Source : [0, 1, 2, 3, 4, 5, 6, 7, 8, 9]
Output Source:[0, 1, 2, 3, 4, 5, 6, 7, 8, 9]
read()와 write(int b)는 한번에 1byte만 읽고 쓰므로 작업효율이 떨어짐
package ch15;

import java.io.*;
import java.util.Arrays;

public class Ex15_2 {

	public static void main(String[] args) {
		byte[] inSrc = {0,1,2,3,4,5,6,7,8,9};
		byte[] outSrc = null;
		byte[] temp = new byte[10];

		ByteArrayInputStream input = null;
		ByteArrayOutputStream output = null;

		input = new ByteArrayInputStream(inSrc);
		output = new ByteArrayOutputStream();

		input.read(temp,0,temp.length); // 읽어온 데이터를 배열 temp에 담음
		output.write(temp, 5, 5); // temp[5]부터 5개의 데이터를 write

		outSrc = output.toByteArray();

		System.out.println("Input Source:" + Arrays.toString(inSrc));
		System.out.println("temp:" + Arrays.toString(temp));
		System.out.println("Output Source:" + Arrays.toString(outSrc));


	}

}
Input Source:[0, 1, 2, 3, 4, 5, 6, 7, 8, 9]
temp:[0, 1, 2, 3, 4, 5, 6, 7, 8, 9]
Output Source:[5, 6, 7, 8, 9]Byte 배열을 이용한 입출력은 작업 효율을 증가시킴
package ch15;

import java.io.*;
import java.util.Arrays;

public class Ex15_3 {

	public static void main(String[] args) {
		byte[] inSrc = {0,1,2,3,4,5,6,7,8,9};
		byte[] outSrc = null;
		byte[] temp = new byte[4];

		ByteArrayInputStream input = null;
		ByteArrayOutputStream output = null;

		input = new ByteArrayInputStream(inSrc);
		output = new ByteArrayOutputStream();

		System.out.println("Input Source: "+ Arrays.toString(inSrc));

		try {
			while(input.available() > 0) {
				input.read(temp);
				output.write(temp);

				outSrc = output.toByteArray();
				printArrays(temp, outSrc);
			}
		} catch(IOException e) {}
	}

	static void printArrays(byte[] temp, byte[] outSrc) {
		System.out.println("temp :" + Arrays.toString(temp));
		System.out.println("Output Source: " + Arrays.toString(outSrc));
	}

}
Input Source: [0, 1, 2, 3, 4, 5, 6, 7, 8, 9]
temp :[0, 1, 2, 3]
Output Source: [0, 1, 2, 3]
temp :[4, 5, 6, 7]
Output Source: [0, 1, 2, 3, 4, 5, 6, 7]
temp :[8, 9, 6, 7]
Output Source: [0, 1, 2, 3, 4, 5, 6, 7, 8, 9, 6, 7]
read()나 write()가 IOException을 발생시킬 수 있기 때문에 try-catch문으로 감싸주었다.
available()은 블락킹(blocking) 없이 읽어올 수 있는 바이트의 수를 반환한다.
마지막 결과같은 경우 배열 temp에 담긴 내용을 지우고 쓰는 것이 아니라 기존의 내용 위에 넢어쓰므로 [4, 5, 6, 7]에서 8과 9를 읽고 [8, 9, 6, 7]이 되었기 때문이다.
// 예상한 결과 내기 위한 코드
try {
while(input.available() > 0) {
int len = input.read(temp);
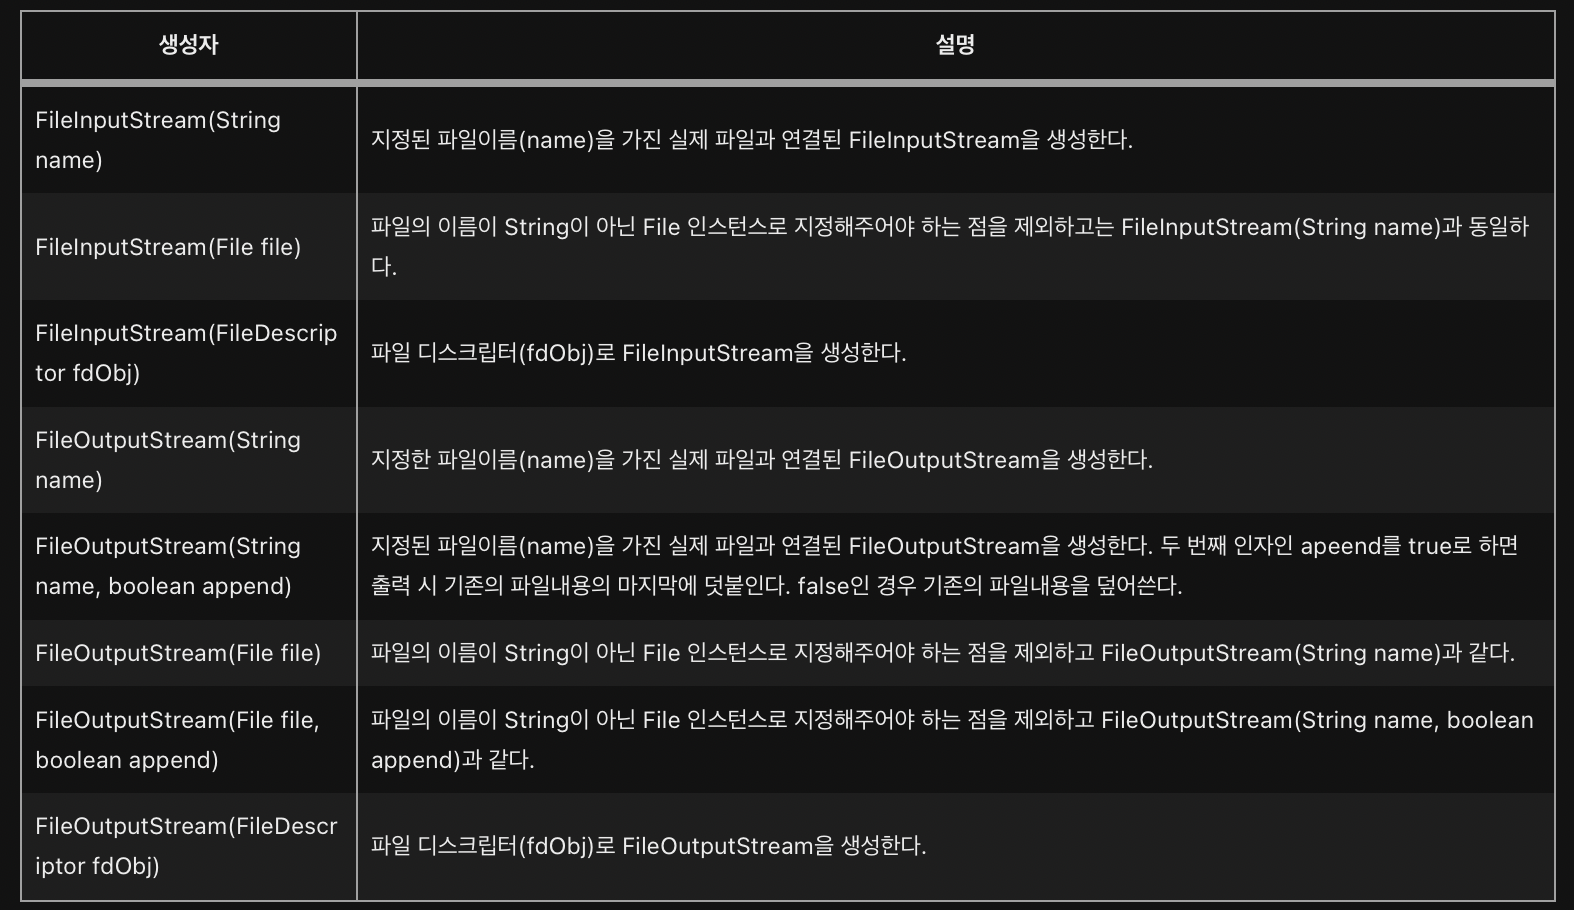
output.write(temp, 0, len);ch15-10~12 FileInputStream & FileOutputStream
파일의 입출력을 하기 위한 스트림
package ch15;

import java.io.*;

public class FileViewer {

	public static void main(String[] args) throws IOException{
		FileInputStream fis = new FileInputStream(args[0]);
		// FileInputStream fis = new FileInputStream("/java_exercise/src/ch15/FileViewer.java");

		int data = 0;

		// 1byte 반환값을 2byte로 바꾸는 것은 손실 X
		while((data = fis.read())!= -1) {
			char c = (char)data;
			System.out.print(c);
		}
	}

}
위 예제는 단순히 파일을 읽는 예제이며, 실행 결과는 FileViewer의 내용과 동일하다.
package ch15;
import java.io.*;
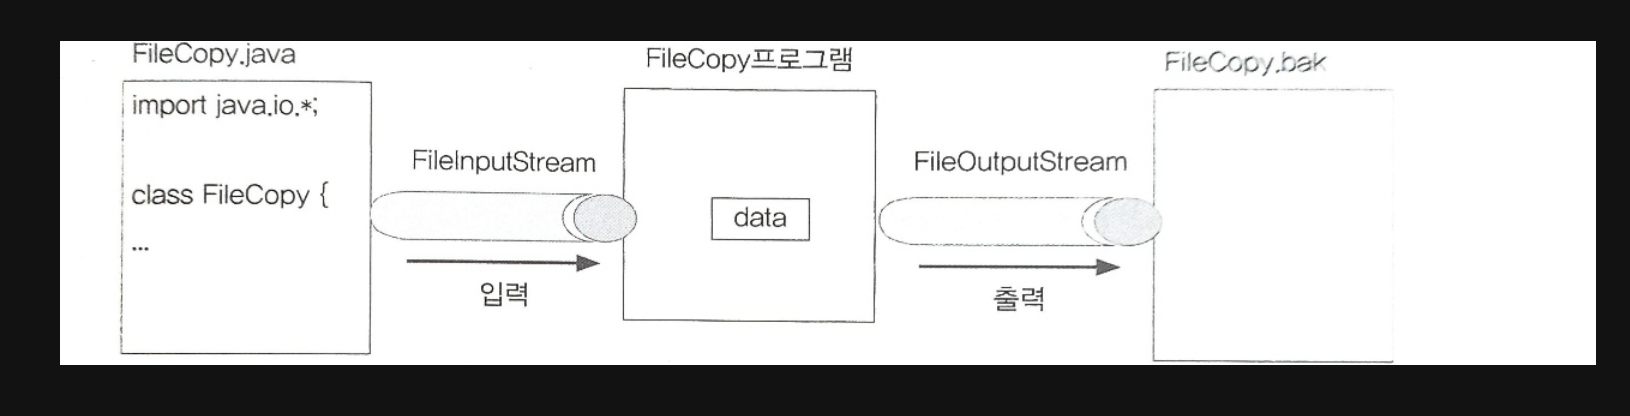
public class FileCopy {
public static void main(String[] args) {
try {
FileInputStream fis = new FileInputStream(args[0]);
FileOutputStream fos = new FileOutputStream(args[1]);
int data = 0;
while((data=fis.read()) != -1)
fos.write(data); // void write(int b)
fis.close();
fos.close();
}catch(IOException e) {
e.printStackTrace();
}
}
}
단순히 FIleCopy.java의 내용을 read()로 읽어서 write(int b)로 FIleCopy.bak에 출력한다.
이처럼 텍스트파일을 다루는 경우에는 FileInputStream/FileOutputStream 대신 문자기반의 스트림인 FileReader/FileWriter를 사용하는 것이 더 좋다.
ch15-13 FilterInputStream & FilterOutputStream
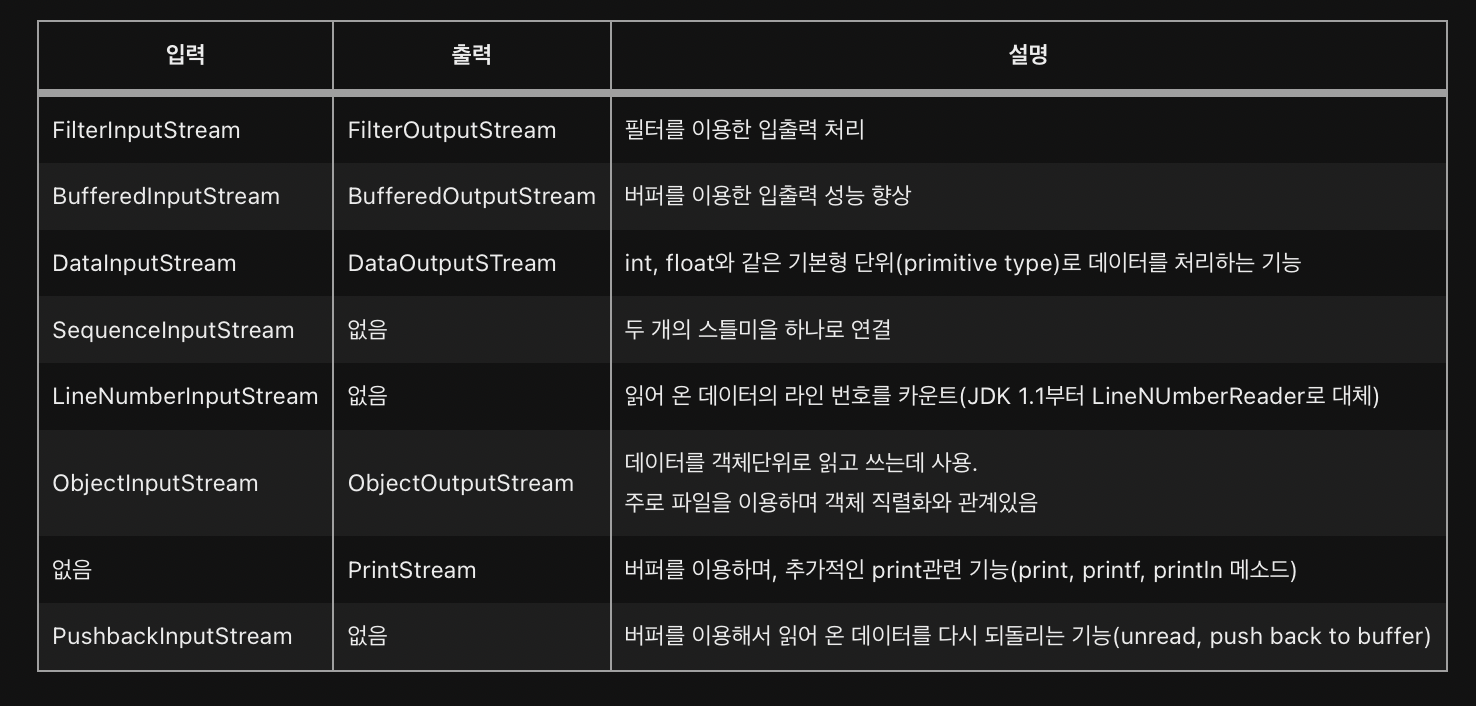
FilterInputStream/FilterOutputStream은 InputStream/OutputStream의 자손이면서 모든 보조스트림의 조상이다.
보조스트림은 자체적으로 입출력을 수행할 수 없기 때문에 기반스트림을 필요로 한다.
생성자
protected FilterInputStream(InputStream in)
public FilterOutputStream(OutputStream out)
FilterInputStream/FilterOutputStream의 모든 메소드는 단순히 기반스트림의 메소드를 그대로 호출
-> FilterInputStream/FilterOutputStream 자체로는 아무런 일도 하지 않음을 의미
FilterInputStream/FilterOutputStream은 상속을 통해 원하는 작업을 수행하도록 읽고 쓰는 메소드를 오버라이딩 해야 한다.
public class FilterInputStream extends InputStream {
    protected volatile InputStream in;

    protected FilterInputStream(InputStream in) {
        this.in = in;
    }

    public int read() throws IOException {
        return in.read();
    }
    ...
}
생성자 FilterInputStream(InputStream in)는 접근 제어자가 protected이기 때문에 Filter InputStream의 인스턴스를 생성해서 사용할 수 없고 상속을 통해서 오버라이딩되어야 한다.
FilterInputStream/FilterOutputStream을 상속받아서 기반스트림에 보조기능을 추가한 보조스트림 클래스는 다음과 같다.
FilterInputStream의 자손 : BufferedInputStream, DataInputStream, PushbackInputStream 등
FilterOutputStream의 자손 : BufferedOutputStream, DataOutputStream, PrintStream 등
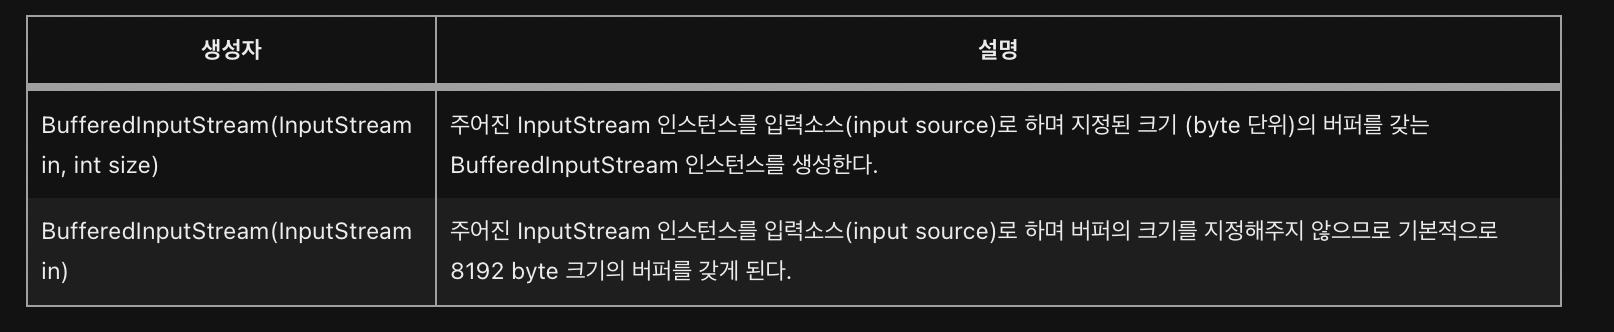
ch15-14~16 BufferedInputStream & BufferedOutputStream
스트림의 입출력 효율은 높이기 위해 버퍼를 사용하는 보조스트림
한 바이트씩 입출력하는 것 보다는 버퍼(바이트배열)를 이용해서 한 번에 여러 바이트를 입출력하는 것이 빠르기 때문에 대부분의 입출력 작업에 사용
BufferedInputStream의 버퍼크기는 입력소스로부터 한 번에 가져올 수 있는 데이터의 크기로 저장하면 좋다
-
프로그램에서 입력소스로부터 데이터를 읽기 위해 처음으로
read메소드를 호출하면, BufferedInputStream은 입력소스로부터 버퍼 크기만큼의 데이터를 읽어다 자신의내부 버퍼에 저장 -
프로그램에서는 BufferedInputStream의 버퍼에 저장된 데이터를 읽으면 됨
외부의 입력소스로부터 읽는 것보다 내부의 버퍼로부터 읽는 것이 훨씬 빠르기 때문에 그만큼 작업 효율이 높아진다. -
프로그램에서 버퍼에 저장된 모든 데이터를 다 읽고 그 다음 데이터를 읽기 위해 read메소드가 호출되면 BufferedInputStream은 입력소스로부터 다시
버퍼크기 만큼의 데이터를 읽어다 버퍼에 저장해 놓는다.
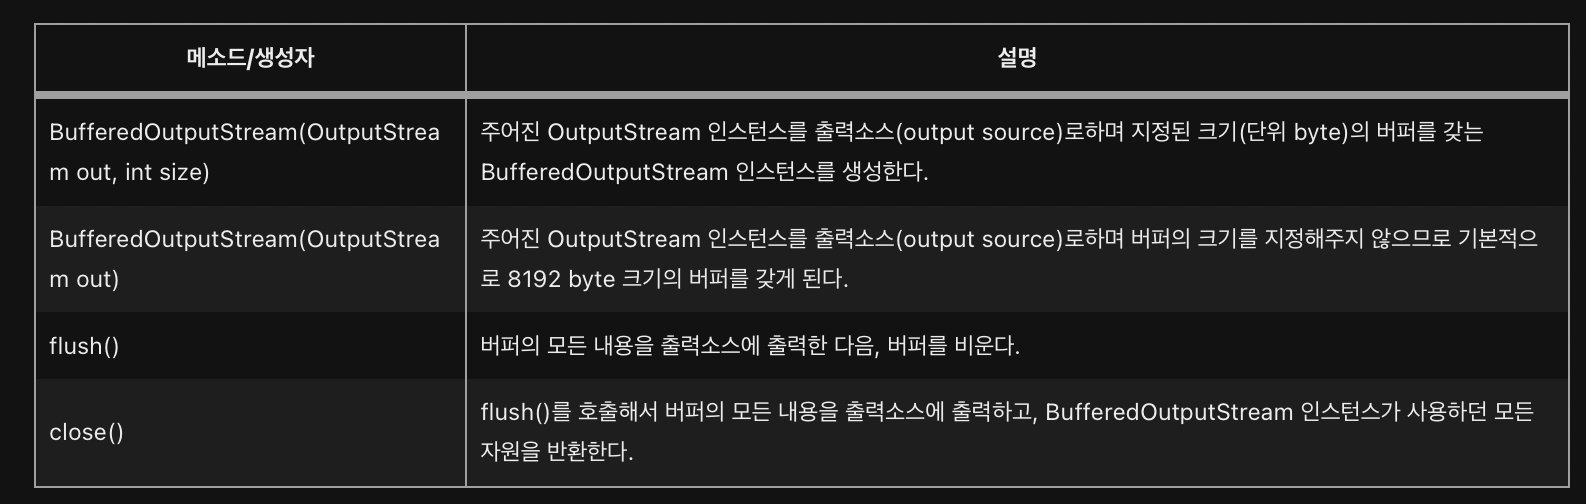
BufferedOutputStream 역시 버퍼를 이용해서 출력소스와 작업을 하게 되는데, 입력 소스로부터 데이터를 읽을 때와는 반대로, 프로그램에서 write 메소드를 이용한 출력이 BufferedOutputStream의 버퍼에 저장된다
버퍼가 가득 차면, 그 때 버퍼의 모든 내용을 출력소스에 출력하고 이후 버퍼를 비우고 다시 프로그램으로부터의 출력을 저장할 준비를 한다
버퍼가 가득 찼을 때만 출력소스에 출력을 하기 때문에, 마지막 출력부분이 출력소스에 쓰이지 못하고 BufferedOutputStream에 남아있는 채로 프로그램이 종료될 수 있다는 점을 주의
-> 모든 프로그램에서 모든 출력작업을 마친 후 BufferedOutputStream에 close()나 flush()를 호출해서 마지막에 버퍼에 있는 모든 내용이 출력소스에 출력되도록 해야한다.
package ch15;

import java.io.*;

public class Ex15_6 {

	public static void main(String[] args) {
		try {
			FileOutputStream fos = new FileOutputStream("123.txt");
			// BufferedOutputStream의 버퍼 크기를 5로 함
			BufferedOutputStream bos = new BufferedOutputStream(fos, 5);
			// 파일 123.txt에 1부터 9까지 출력한다
			for(int i = '1' ; i <= '9'; i++) {
				bos.write(1);
			}
			fos.close(); //FileOutputStream을 닫음.
		} catch(IOException e) {
			e.printStackTrace();
		}

	}

}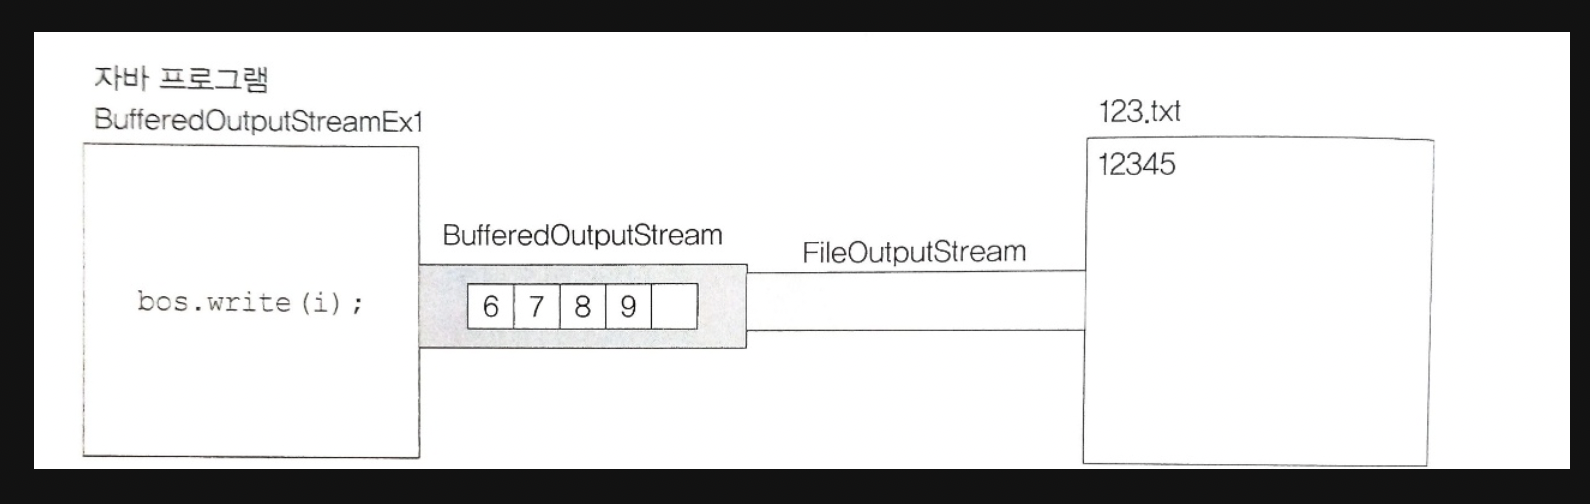
위 예제로 생성된 123.txt에는 12345만 저장되는데, 버퍼에 남아있는 데이터가 출력되지 못한 상태로 프로그램이 종료되었기 때문
모든 보조 스트림의 조상인 FilterOutStream의 close() 메서드는 flush()를 호출한다음 기반 스트림의 close()를 호출
-> 따라서 위 코드의 fos.close()를 bos.close()로 호출하면 나머지 숫자도 출력
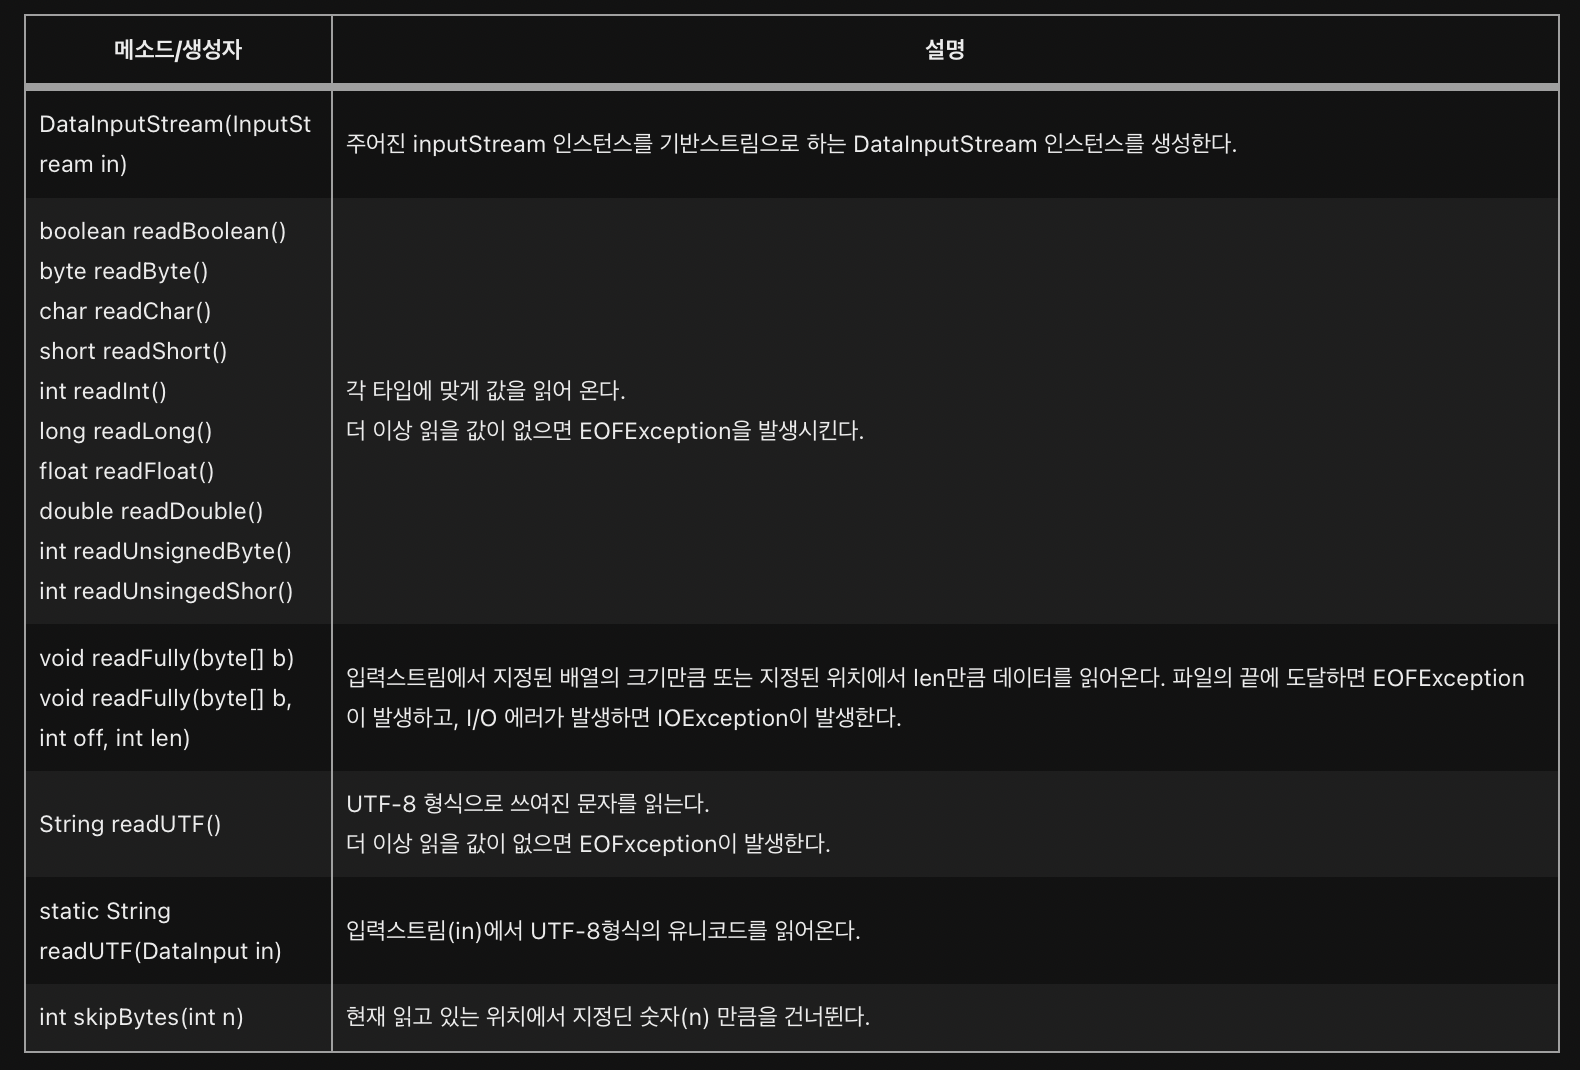
DataInputStream과 DataOutputStream
각각 FilterInputStream/FilterOutputStream의 자손
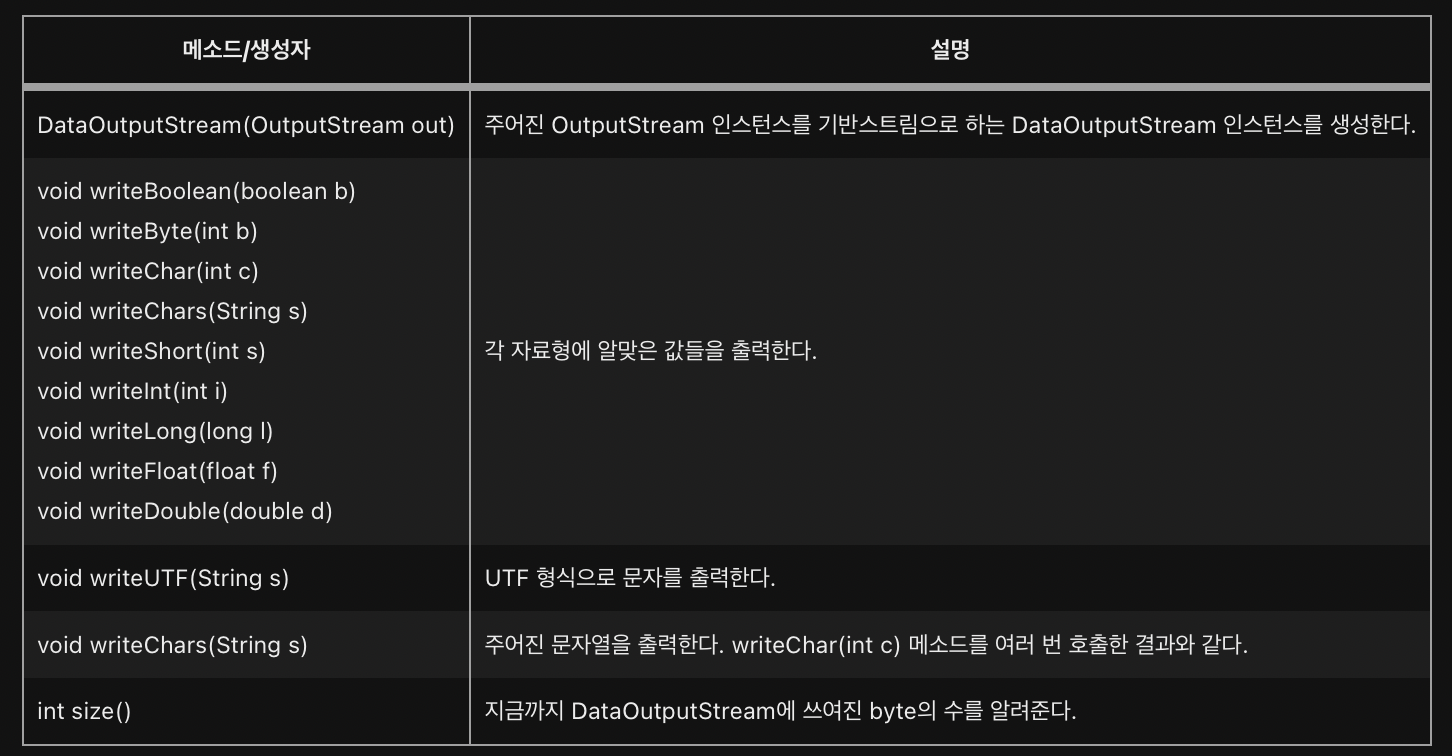
DataInputStream은 DataInput 인터페이스를, DataOutputStream은 DataOutput 인터페이스를 구현했기 때문에 데이터를 읽고 쓰는데 byte 단위가 아닌, 8가지 기본 자료형의 단위로 읽고 쓸 수 있다는 장점이 있다.
각 자료형의 크기가 다르므로, 출력한 데이터를 다시 읽어 올 때에는 출력했을 때의 순서를 염두에 두어야 한다.
import java.io.*;

class DataOutputStreamEx1 {
	public static void main(String args[]) {
		FileOutputStream fos = null;
		DataOutputStream dos = null;

		try {
			fos = new FileOutputStream("sample.dat");
			dos = new DataOutputStream(fos);
			dos.writeInt(10);
			dos.writeFloat(20.0f);
			dos.writeBoolean(true);

			dos.close();
		} catch (IOException e) {
			e.printStackTrace();
		}
	} // main
}
위 예제는 FIleOutputStream을 기반으로 하는 DataOutputStream을 생성한 후, DataOutputStream의 메소드들을 이용해서 sample.dat 파일에 값들을 출력하며,
이 때 출력한 값들은 이진 데이터(binary data)로 저장된다.
문자 데이터(text data)가 아니므로 문서 편집기로 sample.dat을 열어도 알 수 없는 글자들로 이루어져 있을 것이다.
-> 이 경우 파일을 16진 코드로 볼 수 있는 프로그램이나 ByteArrayOutputStream을 사용하면 이진데이터를 확인할 수 있다
import java.io.*;
import java.util.Arrays;

class DataOutputStreamEx2 {
	public static void main(String args[]) {
		ByteArrayOutputStream bos = null;
		DataOutputStream      dos = null;

		byte[] result = null;

		try {
			bos = new ByteArrayOutputStream();
			dos = new DataOutputStream(bos);
			dos.writeInt(10);
			dos.writeFloat(20.0f);
			dos.writeBoolean(true);

			result = bos.toByteArray();

			String[] hex = new String[result.length];

			for(int i=0;i<result.length; i++) {
				if(result[i] < 0) {
					hex[i] = String.format("%02x", result[i]+256);
				} else {
					hex[i] = String.format("%02x", result[i]);
				}
			}

			System.out.println("10진수  :" + Arrays.toString(result));
			System.out.println("16진수  :" + Arrays.toString(hex));

			dos.close();
		} catch (IOException e) {
			e.printStackTrace();
		}
	} // main
}
위 예제는 이전 예제에서의 FileOutputStream 대신 ByteArrayOutputStream을 사용한 것
10진수  :[0, 0, 0, 10, 65, -96, 0, 0, 1]
16진수  :[00, 00, 00, 0a, 41, a0, 00, 00, 01]
결과에서 첫 번째 4 byte인 0, 0, 0, 10은 writeInt(10)에 의해서 출력된 값
두 번째 4 byte인 65, -96, 0, 0은 writeFloat(20.0f)에 의해서 출력된 것
마지막 1 byte인 1은 writeBoolean(true)에 의해 출력된 것
부호 비트가 음수인 경우 256을 더한 이유

위와 같이 모든 bit의 값이 1인 1 byte의 데이터가 있다고 할 때, 왼쪽에서 첫 번째 비트를 부호로 인식하지 않으면 부호 없는 1 byte가 되어 범위는 0~255이므로 이 값은 최대값은 255가 되지만, 부호로 인식하는 경우 범위는 -128~127이 되고 이 값은 0보다 1 작은 값인 -1이 된다.
결국 같은 데이터이지만 자바의 자료형인 byte의 범위가 부호 있는 1 byte 정수의 범위인 -128~127이기 때문에 -1로 인식하는 것이다.
-> 이 값은 0~255 사이의 값으로 변환하려면 256을 더해야 한다.
이처럼 ByteArrayInputStream/ByteArrayOutputStream을 사용하면 byte 단위의 데이터 변환 및 조작이 가능하다.
여러 가지 종류의 자료형으로 출력한 경우, 읽을 때는 반드시 쓰인 순서대로 읽어야 함
import java.io.*;

class DataInputStreamEx1 {
	public static void main(String args[]) {
		try {
			FileInputStream fis = new FileInputStream("sample.dat");
			DataInputStream dis = new DataInputStream(fis);

			System.out.println(dis.readInt());
			System.out.println(dis.readFloat());
			System.out.println(dis.readBoolean());
			dis.close();
		} catch (IOException e) {
			e.printStackTrace();
  		}
	} // main
}
10
20.0
true파일로부터 데이터를 읽어올 때, 변환이나 자릿수를 고려할 필요 없이 단순히 읽어 올 데이터의 타입에 맞는 메소드를 사용하기만 하면 된다.
이처럼 DataInputStream과 DataOutputStream을 사용하면 문자로 데이터를 저장할 때와 같이 데이터를 변환할 필요("100"을 숫자 100으로 변환)도 없고 자릿수를 세어서 따지지 않아도 되므로 편리하고 빠르게 데이터를 저장하고 읽을 수 있게 된다.
import java.io.*;

class DataOutputStreamEx3 {
	public static void main(String args[]) {
		int[] score = { 100, 90, 95, 85, 50 };

		try {
			FileOutputStream fos = new FileOutputStream("score.dat");
			DataOutputStream dos = new DataOutputStream(fos);

			for(int i=0; i<score.length;i++) {
				dos.writeInt(score[i]);
			}

			dos.close();
		} catch (IOException e) {
			e.printStackTrace();
		}
	} // main
}
import java.io.*;

class DataInputStreamEx2 {
	public static void main(String args[]) {
		int sum   = 0;
		int score = 0;

		FileInputStream fis = null;
		DataInputStream dis = null;

		try {
			fis = new FileInputStream("score.dat");
			dis = new DataInputStream(fis);

			while(true) {
				score = dis.readInt();
				System.out.println(score);
				sum += score;
			}
		} catch (EOFException e) {
			System.out.println("점수의 총합은 " + sum +"입니다.");
		} catch (IOException ie) {
			ie.printStackTrace();
		} finally {
			try {
				if(dis!=null)
					dis.close();
			} catch(IOException ie){
				ie.printStackTrace();
			}
		} // try
	} // main
}
100
90
95
85
50
점수의 총합은 420입니다.DataInputStream의 readInt()와 같이 데이터를 읽는 메소드는 더 이상 읽을 값이 없으면 EOFException을 발생
-> 다른 입력스트림과는 다르게 무한반복문과 EOFException을 처리하는 catch문을 이용해서 데이터를 읽음. 이후 모든 데이터를 읽은 경우 finally 블럭에서 스트림을 닫도록 처리
import java.io.*;

class DataInputStreamEx3 {
	public static void main(String args[]) {
		int sum   = 0;
		int score = 0;

		try (FileInputStream fis = new FileInputStream("score.dat");
		     DataInputStream dis = new DataInputStream(fis))
		{

			while(true) {
				score = dis.readInt();
				System.out.println(score);
				sum += score;
			}
		} catch (EOFException e) {
			System.out.println("점수의 총합은 " + sum +"입니다.");
		} catch (IOException ie) {
			ie.printStackTrace();
		} // try
	} // main
}
위 예제는 이전의 예제를 JDK 1.7부터 추가된 try-with-resources문을 이용해서 close()를 직접 호출하지 않아도 자동 호출되도록 한 예제