
매개변수 다형성 예시
class Product
{
	int price;
    int bonusPoint;
}
class Tv extends Product{}
class Computer extends Product{}

class Buyer
{
	int money = 1000;
    int bonuspoint = 0;
}
// 사는 기능 추가하기
// Product 타입을 매개변수로 받지 않을 시 tv, com 사는 각각의 메서드 선언해야함
void buy(Product p)
{
money -= p.price;
bonusPoint += p.bonusPoint;
}class Product2
{
int price;
int bonusPoint;
Product2(int price)
{
this.price = price;
bonusPoint = (int)(price/10.0);
}
Product2(){}
}
class Tv2 extends Product2
{
Tv2()
{
// 조상 클래스 생성자 호출
super(100);
}
public String toString() { return "TV";}
}
class Computer2 extends Product2
{
Computer2() { super(200);}
public String toString() { return "Computer";}
}
class Audio2 extends Product2
{
Audio2(){super(50);}
public String toString() { return "Audio";}
}
class Buyer2
{
int money = 1000;
int bonusPoint = 0;
Product2[] cart = new Product2[10];
int i = 0;
void buy(Product2 p)
{
if(money < p.price)
{
System.out.println("잔액 부족 ");
return;
}
money -= p.price;
bonusPoint += p.bonusPoint;
cart[i++] = p;
System.out.println(p + "을/를 구입하셨습니다. ");
}
void summary()
{
int sum = 0;
String itemList = "";
for(int i = 0; i < cart.length; i++)
{
if(cart[i] == null) break;
sum+= cart[i].price;
itemList += cart[i] + ", ";
}
System.out.println("구입하신 제품의 총금액은" +sum + "만원입니다. ");
System.out.println("구입하신 제품의 제품 은" +itemList + "입니다. ");
}
}
public class Ex7_8 {
public static void main(String[] args) {
Buyer2 b = new Buyer2();
b.buy(new Tv2());
b.buy(new Computer2());
b.buy(new Audio2());
b.summary();
}
}
// 구매 물품이 10개 이상일 경우 Vector 클래스 활용하기!
추상클래스(abstract)
extends를 통해 추상 클래스 구현시 한 메서드라도 구현 안할 경우
-> 구현하는 클래스 또한 abstract
인터페이스(interface)
일종의 추상 클래스
추상 클래스보다 추상화 정도가 높아 일반 메서드 및 멤버변수를 가질 수 없다.
오직 추상 메서드 + 상수
interface 인터페이스이름
{
	public static final 타입이름 = 값;
    public abstract 메서드이름(매개변수목록);
}-
모든 멤버 변수는
public static final -
모든 메서드는
public abstract
제어자가 생략된 경우 자동으로 추가됨!
상속
인터페이스 끼리만 가능!
다중 상속 가능!
interface Fightable extends Movable, Attackable{}구현
class 클래스이름 implements 인터페이스 이름
{
	// 인터페이스에 정의된 추상메서드를 모두 구현해야 함!
}
일부만 구현시 abstract class로 선언해야함
상속과 구현 동시에 가능
class Fighter extends Unit implements Fightable
{
	public void move(int x, int y) {}
    public void attack(Unit u) { }
}
인터페이스를 이용한 다형성
인터페이스 Fightable을 클래스 Fighter를 구현한 경우
Fightable f = (Fightable)new Fighter();

or

Fightable f = new Fighter();
인터페이스를 매개변수로 사용 시
class Fighter extends Unit implements Fightable
{
	public void move(int x, int y){ }
    public void attack(Fightable f){ }
}

Fightable f 즉 인터페이스 타입의 매개변수는 메서드 호출 시 해당 인터페이스를 구현한!!!!
클래스의 인스턴스를 매개변수로 제공해야 한다는 것!

즉 attack(new Fighter()) 와 같이 할 수 있다
리턴타입이 인터페이스라는 것은 메서드가 해당 인터페이스를 구현한 클래스의 인스턴스를 반환한다는 의미!!!!!!
인터페이스 default 메서드
추상 메서드가 아니기 때문에 해당 인터페이스를 구현한 클래스를 변경할 필요 X
Interface MyInterface
{
	void method();
    default void newMethod(){}
}
디폴트 메서드와 기존 메서드가 출동시에는 오버라이딩 해버리자!
JDK1.8부터 디폴트 메서드와 static 메서드 추가 가능
public class Ex7_11 {

	public static void main(String[] args) {
		Child3 c = new Child3();
		c.method1();// 오버라이딩된 메서드 호출
		c.method2();// 상속된 메서드 호출
		MyInterface.staticMethod(); // static 메서드 호출
		MyInterface2.staticMethod();

	}

}

class Child3 extends Parent3 implements MyInterface, MyInterface2
{
	public void method1()
	{
		System.out.println("method1() in Child3");// 오버라이딩
	}
}

class Parent3
{
	public void method2()
	{
		System.out.println("method2() in Parent3");
	}
}

interface MyInterface
{
	default void method1()
	{
		System.out.println("method1() in MyInterface");
	}

	default void method2()
	{
		System.out.println("method2() in MyInterface");
	}

	static void staticMethod()
	{
		System.out.println("staticMethod() in MyInterface");
	}
}

interface MyInterface2
{
	default void method1()
	{
		System.out.println("method1() in MyInterface2");
	}

	static void staticMethod()
	{
		System.out.println("staticMethod() in MyInterface2");
	}
}
method1() in Child3
method2() in Parent3
staticMethod() in MyInterface
staticMethod() in MyInterface2
내부 클래스
말 그대로 클래스 내에 선언된 클래스
선언 이유: 두 클래스가 긴밀한 관계가 있기 때문!
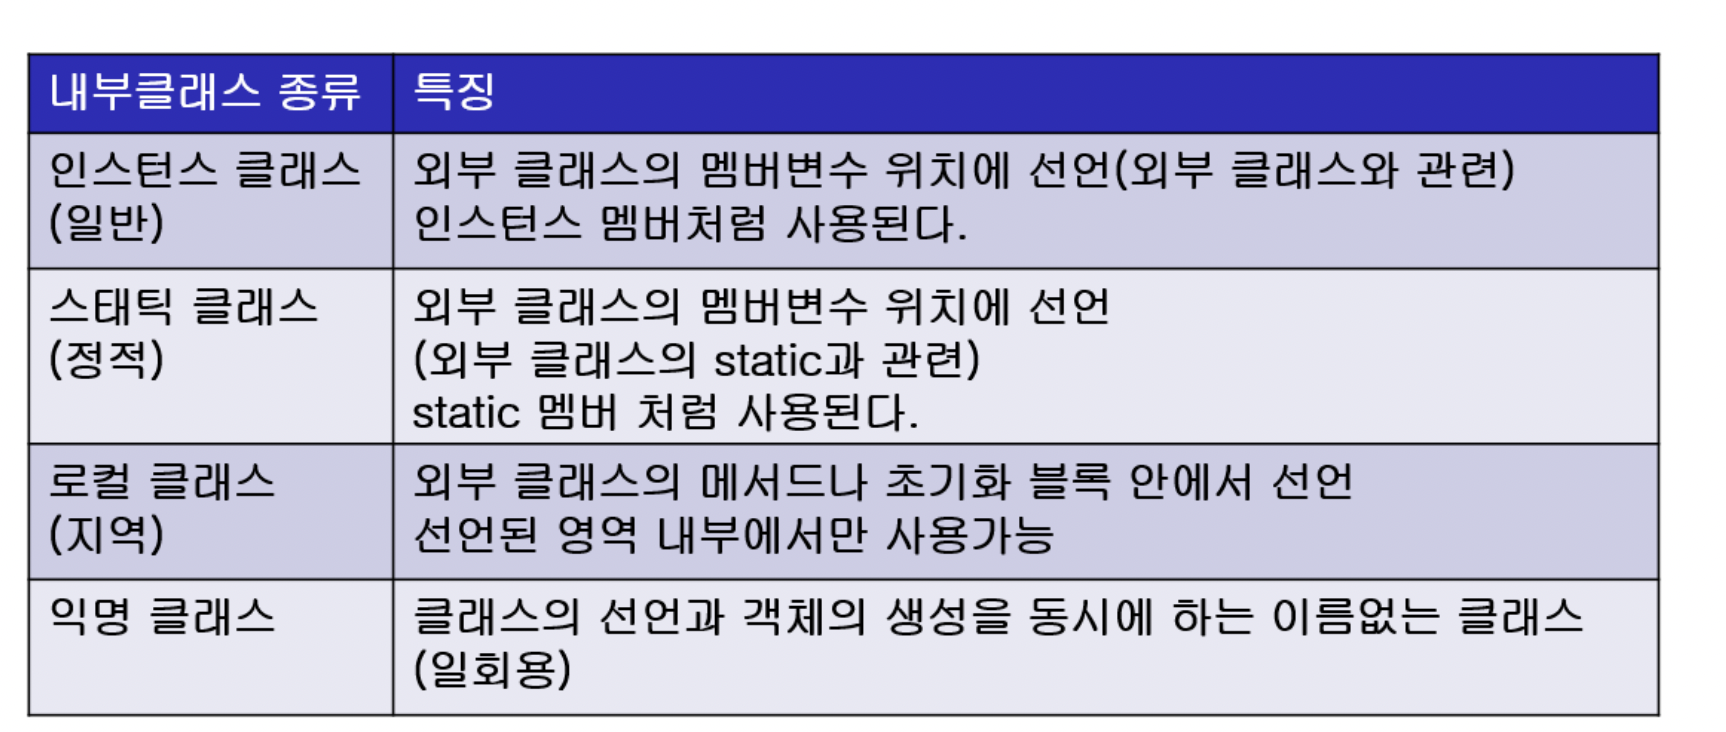
내부 클래스의 종류와 범위는 변수와 동일하다!

abstract, final과 같은 제어자 사용 가능
private, protected과 접근제어자도 사용 가능
package java_exercise;

public class Ex7_12 {
	class InstanceInner{}
	static class StaticInner{}

	InstanceInner iv = new InstanceInner();
	static StaticInner cv  = new StaticInner();

	static void staticMethod()
	{// static 멤버는 인스턴스 멤버에 직접 접근 X
	// InstanceInner obj1 = new InstanceInner();
		StaticInner obj2 = new StaticInner();

		// 인스턴스 클래스에 접근 하려면 객체 생성해야함
		Ex7_12 outer = new Ex7_12();
		InstanceInner obj1 = outer.new InstanceInner();
	}

    void instanceMethod()
    { // 인스턴스메서드에서는 인스턴스멤버와 static멤버 모두 접근 가능
     	InstanceInner obj1 = new InstanceInner();
        StaticInner obj2 = new StaticInner();

	}
class Outer2
{
class InstanceInner
{
int iv = 100;
}
static class StaticInner
{
int iv = 200;
static int cv = 300;
}
void myMethod()
{
class LocalInner
{
int iv = 400;
}
}
}
public class Ex7_15 {
public static void main(String[] args) {
// 인스턴스클래스의 인스턴스를 생성하려면 외부 클래스의 인스턴스를 먼저 생성해야 한다
Outer2 oc = new Outer2();
Outer2.InstanceInner il = oc.new InstanceInner();
// 스태틱 클래스 인스턴스 생성
Outer2.StaticInner si = new Outer2.StaticInner();
}
}
내부 클래스와 외부 클래스의 변수 이름이 같을 때 this와 외부클래스이름.this를 붙여 서로 구별
익명 클래스
클래스 선언과 객체 선언을 동시에 함
생성자 X
하나의 클래스 상속 or 하나의 인터페이스 구현만 가능
new 조상클래스이름()
{
	// 멤버 선언
}

new 구현인터페이스이름()
{
	// 멤버 선언
}
class Ex7_17
{
Object iv = new Object(){void method(){}};
static Object cv = new Object(){ void method(){}};
void myMethod()
{
Object lv = new Object() { void method(){}};
}
}
/*
컴파일시
EX7_17.class
Ex7_17$1.class
Ex7_17$2.class
Ex7_17$3.class 생성됨
*/두개의 독립된 클래스 작성 후 익명클래스를 이용하여 변경하면 쉽게 코드 작성 가능
// 익명 클래스 사용 전!
import java.awt.*;
import java.awt.event.*;

public class Ex7_18 {

	public static void main(String[] args) {
		Button b = new Button("Start");
		b.addActionListener(new EventHandler());
	}

}

class EventHandler implements ActionListener
{
	public void actionPerformed(ActionEvent e)
	{
		System.out.println("ActionEvent occurred!!!");
	}
}
import java.awt.*;
import java.awt.event.*;

public class Ex7_18 {

	public static void main(String[] args) {
		Button b = new Button("Start");
		b.addActionListener(new ActionListener(){
        public void actionPerformed(ActionEvent e){
        	System.out.println("ActionEvent Occurred!!!");
            }
        } // 익명 클래스의 끝
		);
    } // main의 끝
}