개요
AWS의 S3를 이용해서 서버에서 이미지를 넣고 빼고 하는 것을 진행하기 위해 이전 게시글에서 S3를 설정하는 것까지 했다. 이젠 다음이다!
node.js를 이용해서 시행해보자.
사용해보기
s3로 이미지나 파일을 저장시켜서, s3에 이미지가 저장되면 URL을 발급해주는데, 이것을 이용해서 html에 이미지를 보여주면된다.
그리고 이 이미지의 URL을 DB에 보관해뒀다가 필요할때 img태그에 넣어주면 되겠다.
- 작성 페이지에 이미지 input 태그
- 서버는 이미지 받으면 S3에 업로드
- 이미지 URL은 DB에 글과 함께 저장
- 이미지 필요하면 DB에 있던 URL을 이용해서 html에서 활용
html
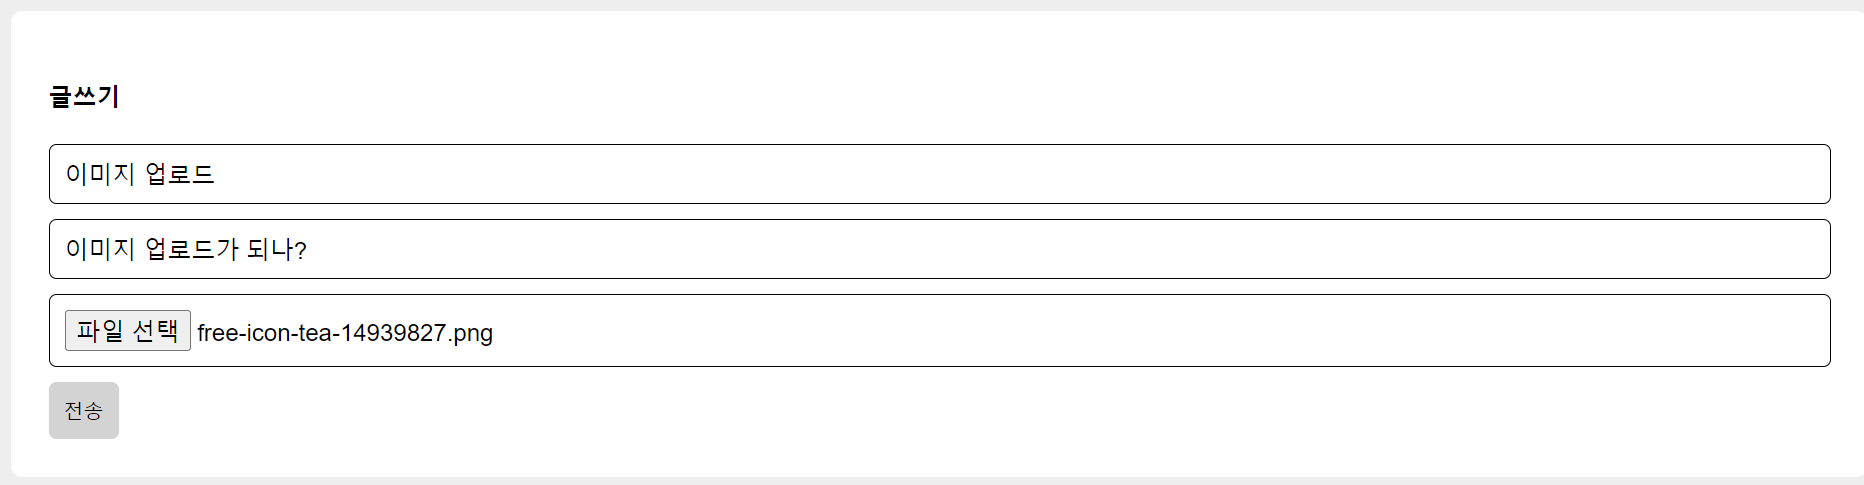
기존 코드에서 이미지를 input받도록 해주자.
아래 name은 img1이고, image파일만 입력받는 file타입의 input을 생성해서 추가해주자.
<input type="file" name="img1" accept="image/*">여러장 업로드 하고 싶으면 multiple을 추가해주자.
<input type="file" name="img1" accept="image/*" multiple>추가로 input을 감싸주고 있는 form 태그에 인코딩타입을 추가해주자. enctype="multipart/formdata" 라고 추가해주면된다. 그러니까 내 코드가 아래처럼 되었다.
<form class="form-box" action="/add" method="POST" enctype="multipart/form-data">
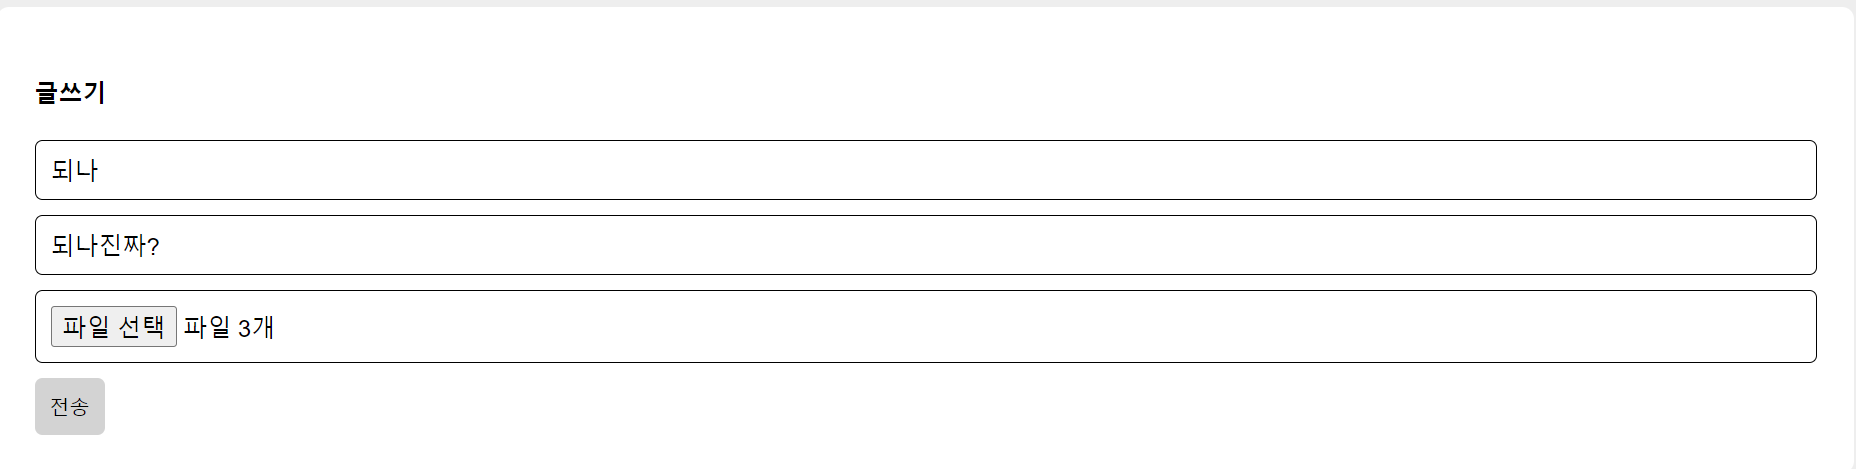
<h4>글쓰기</h4>
<input type="text" name="title">
<input type="text" name="content">
<input type="file" name="img1" accept="image/*">
<button type="submit">전송</button>
</form>그런데 이는 평범한 사용자에게 이미지 파일을 입력시키게 하기 위함이라, 사이트에 장난질 하려는 사람들한텐 위험할 수 있으니, 서버에서도 걸러줘야함.
서버
이미지를 s3로 보내자.
multer 또는 formidable 같은 라이브러리를 쓰면 쉽게 업로드한 파일을 다를 수 있으므로 여기선 multer를 이용해보자.
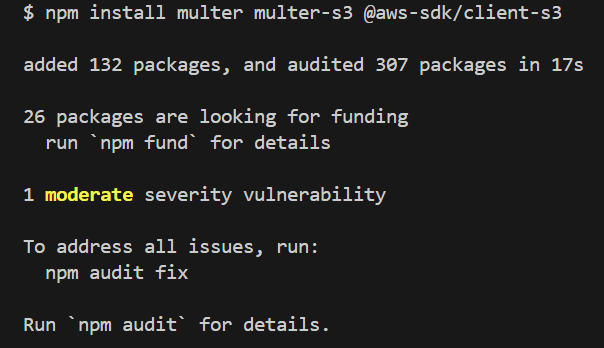
아래 명령어를 터미널에 입력해서 설치해주자.
npm install multer multer-s3 @aws-sdk/client-s3
multer : 사용자가 보낸 파일을 다루기 쉽게 도와줌
multer-s3 : 해당 파일을 쉽게 S3로 업로드하게 도와줌
@aws-sdk/client-s3 : AWS 사용시 필요함
이제 server.js 상단에 아래 코드를 붙여넣기 하자.
const { S3Client } = require('@aws-sdk/client-s3')
const multer = require('multer')
const multerS3 = require('multer-s3')
const s3 = new S3Client({
  region : 'ap-northeast-2', // 서울로 기입했으면 이거 기입
  credentials : {
      accessKeyId : 'AWS IAM에서 발급받은 액세스키',
      secretAccessKey : 'AWS IAM에서 발급받은 시크릿키'
  }
})

const upload = multer({
  storage: multerS3({
    s3: s3,
    bucket: '사용할버킷이름',
    key: function (요청, file, cb) {
      cb(null, Date.now().toString()) //업로드시 파일명 변경가능
    }
  })
})
난 .env파일에 따로 저장해뒀고 이를 이용하기로 했다.
S3_KEY="액세스키"
S3_SECRET="시크릿키"
그리고
cb(null, Date.now().toString())이 부분에 업로드할 이미지 파일명을 입력할 수 있다. 이 파일명이 겹치면 안되니까, 겹치는 것을 피하기 위해 Date.now().toString()을 사용했다.
여기까지 라이브러리 사용준비가 되었고,
input에서 mutliple을 쓰지않아 단일 이미지만 올릴때는 upload.single('input이름')을 실행하면 S3에 업로드 된다.
여러장을 올린다면 upload.array('input이름')을 실행하면 된다.
단일: upload.single('input이름')
여러장: upload.array('input이름', 최대 이미지 갯수)
우선 단일로 해보자.
그리고 난 html에서 form태그가 /add로 post요청을 보내고 있었기에 기존 서버의 /add로 가는 post 코드를 보니 다음과 같았다.
app.post('/add', async (요청, 응답) => {

  try {
    if(요청.body.title == '' || 요청.body.content == ''){
      응답.send('제목입력안했는뎁쇼')
    }else{
      await db.collection('post').insertOne({title: 요청.body.title, content: 요청.body.title});
      응답.redirect('/list')
    }
  } catch (error) {
    console.log(error)
    응답.status(500).send('서버에러났으여')
  }
});
이곳에 middleware로 앞에서 말한 upload.single('input이름') 을 입력해주자.
그리고 업로드 완료시 S3에서 제공해주는 이미지 URL을 받아보자.
app.post('/add', upload.single('img1'),async (요청, 응답) => {
  console.log(요청.file)

});
우선 위처럼 console.log만 사용해서 되는지 안되는지 확인 테스트를 해보자.
이러고 S3에 들어가서 새로고침하고 확인해보면
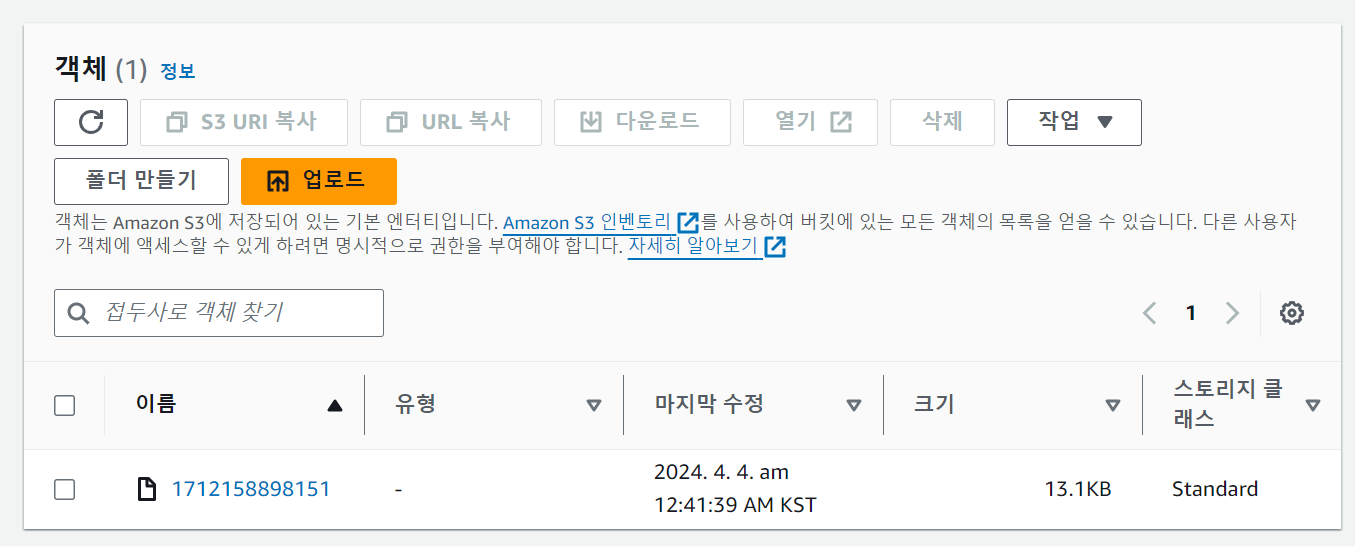
집어넣은 img가 잘 들어가 있는 것을 알 수 있다.
upload.array('input이름', 최대 이미지 갯수)이번엔 여러개를 넣어보자.
app.post('/add', upload.array('img1',2 ),async (요청, 응답) => {
console.log(요청.files) // 요것도 수정해줘야함.
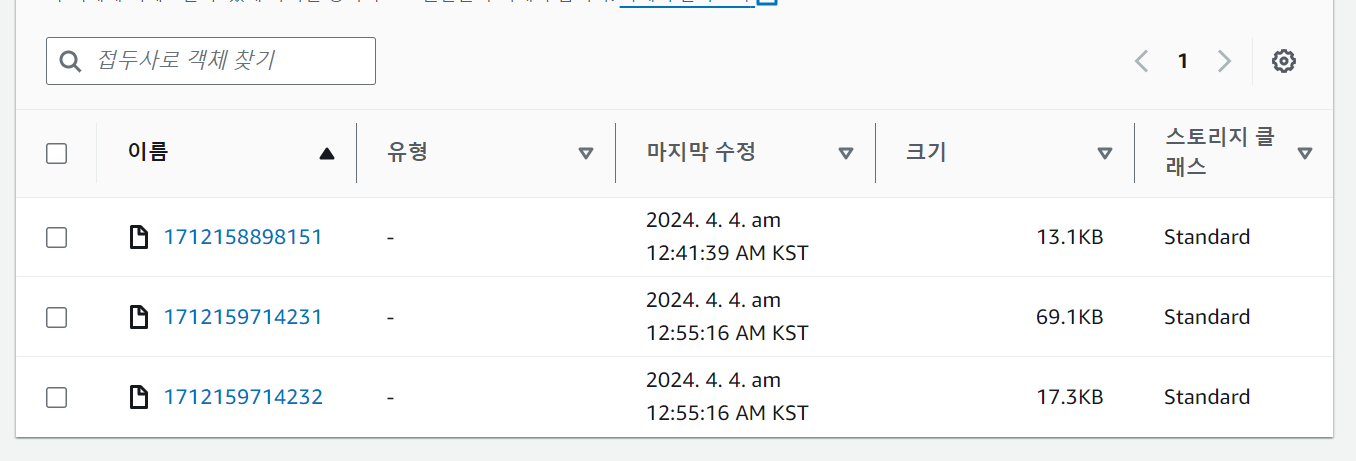
});코드로 middleware를 수정하고 input태그도 multiple을 추가해서 이미지 2개를 넣어보면?

s3에서 확인하니 잘 되는 것을 확인할 수 있다.
이미지 3개를 넣어보면?
흑 이런 에러가 발생한다. 에러처리는 입맛에 맞게 알아서 해보자.
MulterError: Unexpected fieldupload.single시 성공 시 console.log(요청.file)을 보면 아래처럼 나오는 것을 확인 가능하다.
{
  fieldname: 'img1',
  originalname: 'Tarot Cards.png',
  encoding: '7bit',
  mimetype: 'image/png',
  size: 17672,
  bucket: 'whalebigwhaletest1',
  key: '1712159950569',
  acl: 'private',
  contentType: 'application/octet-stream',
  contentDisposition: null,
  contentEncoding: null,
  storageClass: 'STANDARD',
  serverSideEncryption: null,
  metadata: undefined,
  location: 'https://whalebigwhaletest1.s3.ap-northeast-2.amazonaws.com/1712159950569',
  etag: '"b0bdfb6945012880d244b7c5f9354d20"',
  versionId: undefined
}
여기서 location에 주소가 적혀있는데 이것을 이용해서 html의 img태그에 사용하면, s3로 전송한 이미지를 사용할 수 있다.
그리고 여러개를 사용한 경우 요청.files로 받는 코드는 아래와 같다.
[
  {
    fieldname: 'img1',
    originalname: 'TarotMilkTeaLogo.png',
    encoding: '7bit',
    mimetype: 'image/png',
    size: 70761,
    bucket: 'whalebigwhaletest1',
    key: '1712160053563',
    acl: 'private',
    contentType: 'application/octet-stream',
    contentDisposition: null,
    contentEncoding: null,
    storageClass: 'STANDARD',
    serverSideEncryption: null,
    metadata: undefined,
    location: 'https://whalebigwhaletest1.s3.ap-northeast-2.amazonaws.com/1712160053563',
    etag: '"918466cb412463cac2a9a207269380f4"',
    versionId: undefined
  },
  {
    fieldname: 'img1',
    originalname: 'Tarot Cards.png',
    encoding: '7bit',
    mimetype: 'image/png',
    size: 17672,
    bucket: 'whalebigwhaletest1',
    key: '1712160053564',
    acl: 'private',
    contentType: 'application/octet-stream',
    contentDisposition: null,
    contentEncoding: null,
    storageClass: 'STANDARD',
    serverSideEncryption: null,
    metadata: undefined,
    location: 'https://whalebigwhaletest1.s3.ap-northeast-2.amazonaws.com/1712160053564',
    etag: '"b0bdfb6945012880d244b7c5f9354d20"',
    versionId: undefined
  }
]
이를 입맛에 맞게 알아서 잘 사용해보면 되겠다.
DB 저장 및 에러 처리
이제 DB에 저장해보자.
그전에 위에서 에러처리를 나는 아래처럼 해보았다.
난 middleware로 사용된 upload.single() 또는 upload.array()를 app.post 안으로 넣어두고 이용하기로 했다.
그러니 아래처럼 코드가 수정되었다.
오....류????
app.post('/add', async (요청, 응답) => {
try {
await new Promise((해결, 거부) => {
upload.array('img1',2)(요청, 응답, (error) => {
if (error) {
거부(error) // 업로드 에러 발생 시 거부
} else {
해결() // 업로드 성공 시 해결
}
})
})
if (요청.body.title === '' || 요청.body.content === '') {
응답.send('제목 입력 안했는뎁쇼')
} else {
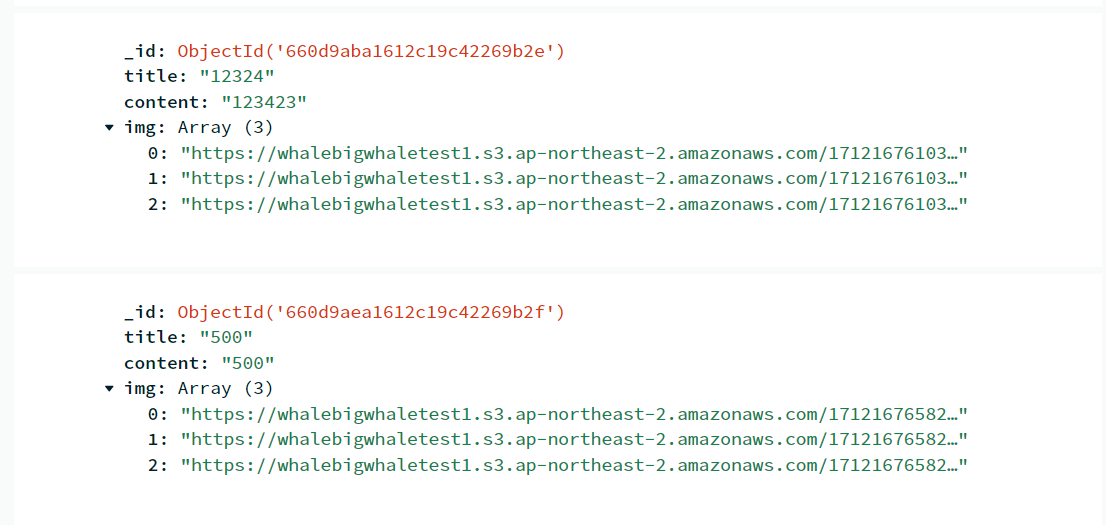
await db.collection('post').insertOne({
title: 요청.body.title,
content: 요청.body.content,
img: 요청.files.length ? 요청.files.map((file)=>file.location) : '',
})
응답.redirect('/list')
}
} catch (error) {
console.log(error)
if(error.code === 'LIMIT_UNEXPECTED_FILE'){
return 응답.send("이미지 초과남")
}
응답.status(500).send('서버 에러났으여')
}
})db에도 잘 들어간다.
그런데 왜????? 2개를 넣으면 1개만 s3에 들어가고, 3개를 넣으면 2개만 s3에 들어가지....
아무래도 await new Promise 때문인 것 같은데.... 흐으으음.... 다시 짜봐야겠다...
one hours later...
뭐여 왜 다시 되는겨?
뭐지 왜 다시 제대로 되는거지.....????????????
app.post('/add', async (요청, 응답) => {
  // console.log(요청.files)
  try {
    await new Promise((해결, 거부) => {
      upload.array('img1',3)(요청, 응답, (error) => {
        if (error) {
          거부(error); // 업로드 에러 발생 시 거부
        } else {
          해결(); // 업로드 성공 시 해결
        }
      });
    });

    if (요청.body.title === '' || 요청.body.content === '') {
      응답.send('제목 입력 안했는뎁쇼');
    } else {
      await db.collection('post').insertOne({
        title: 요청.body.title,
        content: 요청.body.content,
        img: 요청.files.length ? 요청.files.map(file=>file.location) : '',
      });
      응답.redirect('/list');
    }
  } catch (error) {
    console.log(error);
    if(error.code === 'LIMIT_UNEXPECTED_FILE'){
      return 응답.send("이미지 초과남")
    }
    응답.status(500).send('서버 에러났으여');
  }
});
뭐... DB에 제대로 들어가는 것을 확인했다. 몇 번을 시도 해봐도 제대로 들어간다???
버그였나보다....
DB에서 꺼내서 사용해보기
html로 제대로 출력할 수 있는지도 보자.
server.js의 detail페이지를 보는 페이지에 대해 다음처럼 해주었다.
app.get('/detail/:idNo', async (요청, 응답) =>{
  try {
    let result =  await db.collection('post').findOne({_id : new ObjectId(요청.params.idNo)})
    console.log(result)
    if(result === null){
      응답.status(400).send('잘못된 url 입력')
    }
    응답.render('detail.ejs', {result: result})
  } catch (error) {
    console.log(error)
    응답.status(400).send('잘못된 요청');
  }
})
난 ejs를 사용중이고 detail이라는 페이지에서 이미지가 잘 출력되는지 확인하기 위해 다음처럼 해주었다.
<div class="detail-bg">
    <h4><%= result.title %></h4>
    <p><%= result.content %></p>
    <img src="<%= result.img[0] %>" alt="">
</div> 

위처럼 잘 출력되는 것을 확인할 수 있다. 집어 넣은 모든 것을 보여주려면 javascript를 사용해야겠지만, 이것은 작동여부만 확인하며 되니 이 정도만 작성.
정리
- 작성 페이지에 이미지 input 태그
- 서버는 이미지 받으면 S3에 업로드
- 이미지 URL은 DB에 글과 함께 저장
- 이미지 필요하면 DB에 있던 URL을 이용해서 html에서 활용
Node.js를 이용중이면
npm install multer multer-s3 @aws-sdk/client-s3
를 이용해서 S3를 활용해보자.
#####생각 정리
한 번 해보니 Node.js뿐 아니라 다른 곳에서도 활용할 수 있을 것 같다는 괜한 자신감이 생긴다. 후후후
앞으로도 생각만 하지 말고 실행하도록 해야지