1. 첫 화면 SplashActivity 설정
Manifest에서 시작화면 설정을 담당하는 intent-filter를 설정해야한다. 위치는 생성한 액티비티 안에서 하면 된다.
<application
        android:allowBackup="true"
        android:icon="@mipmap/ic_launcher"
        android:label="@string/app_name"
        android:roundIcon="@mipmap/ic_launcher_round"
        android:supportsRtl="true"
        android:theme="@style/Theme.TodoListApp">
        <activity
            android:name=".SplashActivity"
            android:exported="true">
            <intent-filter>
                <action android:name="android.intent.action.MAIN" />

                <category android:name="android.intent.category.LAUNCHER" />
            </intent-filter>
        </activity>
그러면 exported라는게 생기는데 쉽게 타 앱에서 접근 가능한지를 나타낸다.
2. 제목 설정하기
제목은 activity_splash.xml에서 TextView로 작성하였다.
<TextView
        android:layout_width="wrap_content"
        android:layout_height="wrap_content"
        android:layout_marginTop="32dp"
        android:fontFamily="@font/kotra_hope"
        android:textStyle="bold"
        android:textColor="#00ABF6"
        android:textSize="60sp"
        android:text="Life & List"/>
위에서 보이는 폰트패밀리는 사이트에서 직접 다운로드한 것으로 눈누 사이트에서 코트라희망체를 다운받아서 사용하였다.
font 설정법은 res폴더 안에 새로운 font폴더를 만들고 다운받은 .ttf 파일을 붙여넣기 해주면 된다.
3. 이미지 설정하기.
이미지는 보여주기를 위한 것으로 ImageView를 사용하였다.
<ImageView
        android:layout_width="wrap_content"
        android:layout_height="wrap_content"
        android:src="@drawable/img_list"/>
이미지는 flaticon이라는 사이트에서 다운받았다.
이미지 다운시 주의해야할 점이 있는데 512px( 플레이스토어 업로드용 ) & 128px( 앱 내부 사용 ) 두 가지 사이즈를 다운받아주는게 좋다.
지금까지 전체 코드
<?xml version="1.0" encoding="utf-8"?>
<LinearLayout xmlns:android="http://schemas.android.com/apk/res/android"
    xmlns:app="http://schemas.android.com/apk/res-auto"
    xmlns:tools="http://schemas.android.com/tools"
    android:layout_width="match_parent"
    android:layout_height="match_parent"
    android:gravity="center"
    android:orientation="vertical"
    tools:context=".SplashActivity">

    <ImageView
        android:layout_width="wrap_content"
        android:layout_height="wrap_content"
        android:src="@drawable/img_list"/>

    <TextView
        android:layout_width="wrap_content"
        android:layout_height="wrap_content"
        android:layout_marginTop="32dp"
        android:fontFamily="@font/kotra_hope"
        android:textStyle="bold"
        android:textColor="#00ABF6"
        android:textSize="60sp"
        android:text="Life & List"/>

</LinearLayout>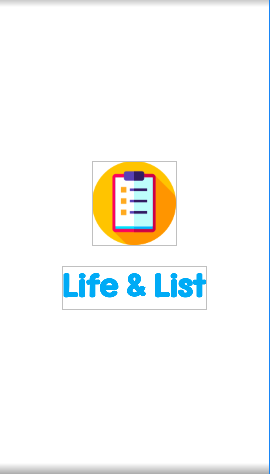

장래희망 : 침대 위 녹아든 치즈