1. 배열(Array)
1.1 배열의 기초
- 배열의 길이는 한번 만들면 변경되지 않는다.
int[] Arrayname = new int[size] // 생성과선언을 한번에 한 케이스

int[] Arrayname[]// 데이터타입에 []을 넣는다.
int Arrayname[];//생성  C언어처럼 해도 되긴함
Arrayname = new int[size] //선언  new를 써서 객체를 생성
// 배열선언
int[] arr;
float[] arr;
point[] arr; 객체 참조형으로 배열 선언// 배열 생성
int[] arr; // int 형으로 배열 선언
arr = new int[size]; //배열변수에 쿠기를 명시하여 객체 생성int[] intArr = {10, 20, 30, 40, 50}; // 정수 배열(크기 5)
String[] weekday = { "sunday", "monday", "tuesday", "wednesday",
"thursday", "friday", "saturday" }; // 문자열 배열(크기 7)
int[] intArr;
int = {10,20,30,40,50}; // 에러 난다. 선언과 동시에 초기화를 하든가 해야함
int[] intArr;
intArr = new int[]{10,20,30,40,50}; //이미 선언된것 쓸려면 이렇게 해야함- 인덱스 요소를 참조하기
ArrayName[index] = value;
Arr[2] = 50;
1.2 배열의 메모리 구조와 복사
- 기본 데이터형 배열과 참조 데이터형 배열은 배열의 요소가 저장하는 값이 다르다.
- 기본 데이터형 배열의 요소는 값을 저장
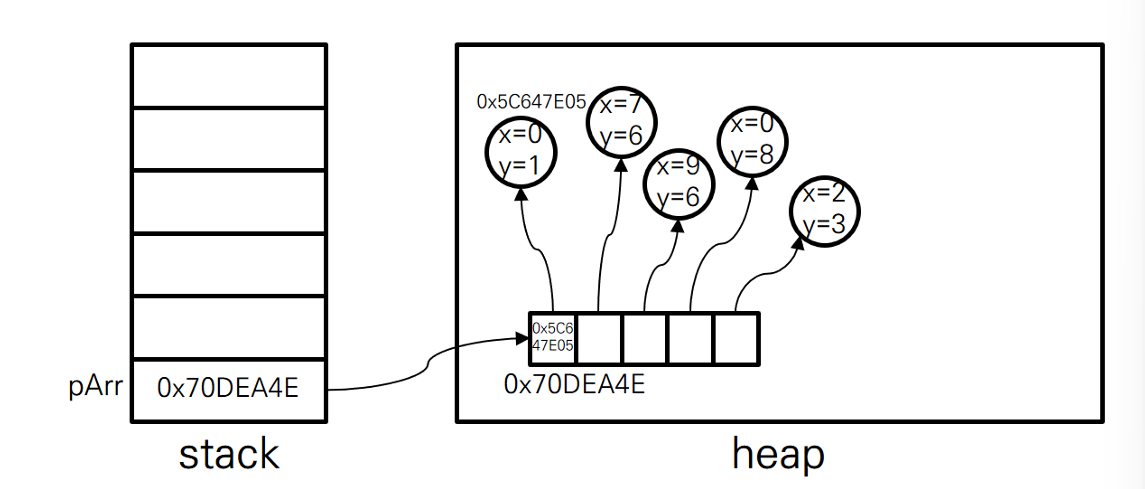
- 참조 데이터형 배열의 요소는 객체의 주소를 저장 기본형 코드
public class PrimitveArrayExample{ public static void main(String[] args){ char[] Arr = {'A','B','C'}; for(int i = 0; i<Arr.length; i++) { System.out.print(Arr[i] + "\t"}; } } }for(char data : Arr){ System.out.print(data + "/t") }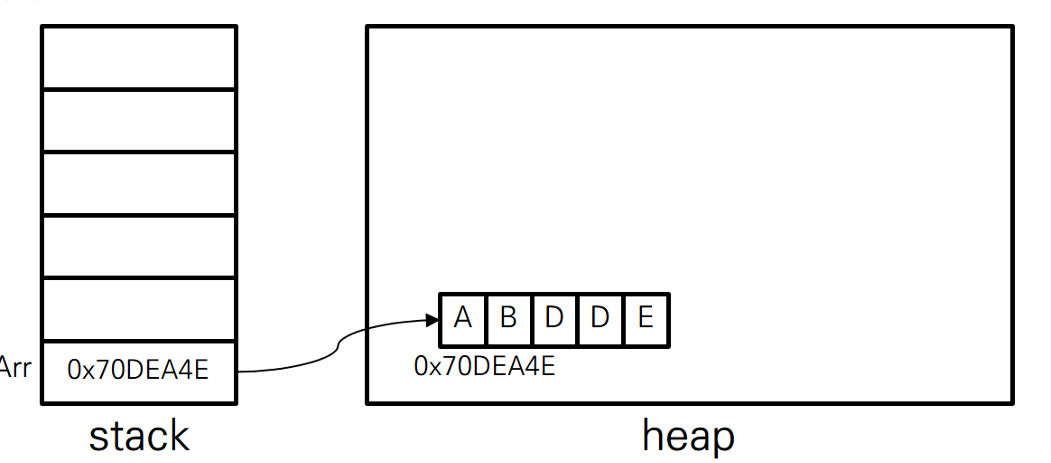
참조 타입
import java.awt.Point;
public class refernece{
	public static void main(String[] args){
		Point[] arr = {
			new	Point(0,	1),	new	Point(7,	6),	new	Point(9,	6),
			new	Point(0,	8),	new	Point(2,	3)
		};
		for(int i =0; i<arr.length; i++){
			System.out.println(arr[i]);
		}
	}
}
1.3 할당에 의한 복사
- 주소가 복사되고 원본의 값또한 변경이 되게 복사본과 원본 값이 다 바뀜
import	java.util.Arrays;
	public	class	ArrayReferenceExample	{
		public	static	void	main(String[]	args)	{
			int[]	array1	=	{	2,	3,	5,	7,	11,	13,	17,	19	};
			int[]	array2;
			System.out.println(Arrays.toString(array1));
			array2	=	array1;
			array2[0]	=	0;
			array2[2]	=	2;
			System.out.println(Arrays.toString(array1));
		}
	}
1.4 System.arraycopy()
- = 을 쓰는 것은 주소를 를 저장하고 하기 복사가 어렵다그래서 System.arraycopy()를 쓴다.
- 배열의 크기를 변경할는 없고 기존의 배열보다 더 많은 정보를 저장하려면 새로운 배열을 만들고 기존 배열의 값을 복사해야합니다.
- System.arraycopy(복사할 원본 배열 이름. int 복사할 원본 배열의 시작위치, 복사되는 대상 배열 이름, 복사될 대상의 위치, 복사할 원본 배여르이 시작위치 이후 요소개수)
import java.util.Arrays;
public class ArrayCopyExample {
	public static void main(String[] args){
		int source[] = {1,2,3,4,5,6};
		int destination[] = {9,8,7,6,5,4,3,2,1,0};
		System.arraycopy(soure,1,destination,3,4);
		System.out.println(Arrays.toString(destination));
	}
}
// source배열에서 1번 요소부터 destination배열의 3번쨰 요소를 시작으로 4를 복사한다.
// {9,8,7,2,3,4,5,2,1,0}
2.1 데이터 추가
- 이미 저장된 요소들의 가장 마지막 위치 다음에 데이터를 추가하는것
arr[num] = inputData;
num++;
2.2 데이터 전체 출력
- 전체 출력을 하려면 반복문을 이용한다.
for(int =0; i<arr.length; i++){
	System.out.print(arr[i] +' ');
}
2.3 데이터 검색
- 배열에서 찾고자 하는 값의 인덱스를 알려면 처음부터 하나씩 비교해야함
for(int i =0; i<count; i++){
	if(arr[i] == searchData){
		System.out.printlln(i + "위치에서 데이터 찾음");
	}
}
2.4 데이터수정
- index위치의 데이터를 수정
arr[index] = updateData;2.5 데이터 삭제
- 삭제 데이터 뒤 데이터부터 시작해서 가장 마지막 데이터까지 앞으로 한칸씩 복사해주면 된다.
int count = arr.length
int index = 2 // 삭제해야하는 데이터의 인덱스
for (int i = index; i < count -1; i++){
	arr[i] = arr[i+1];
}
arr[count] = 0;
count-;
2. 다차원 배열
- 배열기호를 여러개 사용해 정의한 배열
2.1 다차원 배열 생성
int[][] arr1 = new int[3][5]; //2차월 배열2.2 다차원 배열 초기화
int[][] arr1 = {{1,2,3},{2,3,4},{5,6,7},{7,8,9}}; // 3행 4열
2.3 다차원 배열의 가변 배열
- 더 높은 차원의 크기를 정한 후에 낮은 차원의 크기가 각각 다르게 정할수 있다
- 배열기호( [ ] )가 앞에 있을수록 더 큰 차원을 의마한다.
int[][] arr2 = new int[3][];
arr2[0] = new int[4];
arr2[1] = new int[5];
arr2[2] = new int[7];

int[][] intarr = new int[][10] // 에러 생성안된다.

int[][] arr1 = {{1,2,3},{2,4,6,8,10},{1,2,3,4,5,6,7}};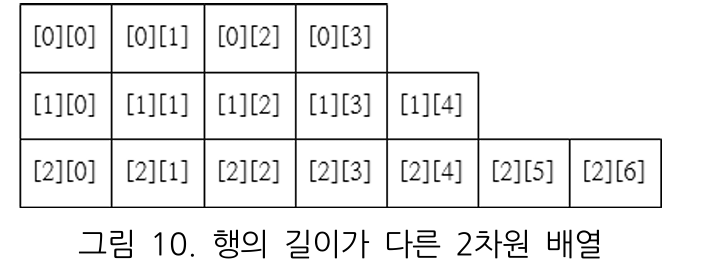
2.4 반복문을 이요한 다차원 배열 초기화
- 직접 하나하나 넣는건 비효율적이다. 규칙이 있다면 반복문을 사용하면 된다.
 int[][]	arr	=	new	int[3][5];
 for(int	i=0;	i<arr.length;	i++)	{   //length은 속성이기에 ()을 쓰지 않는다.
	 for(int	j=0;	j<arr[i].length;	j++)	{
		 arr[i][j]	=	i*j;
	 }
 }
클래스와 객체
1.1 객체와 클래스
- 모든 객체는 고유의 정보와 기능을 갖는다. (예: 펜 - 색깔, 굵기)
- 객체는 속성(변수)과 동작(메서드)을 가지며, 이 정보와 기능을 조합해 하나의 독립적인 존재가 된다.
- 클래스는 객체를 만들기 위한 설계도 또는 틀이다. (예: 연필을 만드는 설계도)
- 객체는 클래스의 인스턴스이다.
1.2 객체 추상화
- 현실의 물체를 코드 형태로 변환하는 과정
- 객체의 명사적 특성(속성)과 동사적 특성을 추출하여 클래스를 만든다.
- 예: 연필의 색상, 굵기(속성) + 쓰다(행위) →
Pencil클래스로 표현 가능
class Account {
    String name;
    String accountNumber;
    long balance;

    void deposit(long amount) {
        balance += amount;
    }

    void withdraw(long amount) {
        balance -= amount;
    }

    long getBalance() {
        return balance;
    }
}
1.3 클래스 선언과 인스턴스 생성
class 클래스명 {
    변수 선언;
    생성자 선언;
    메서드 선언;
}
클래스명 변수명 = new 생성자();
class Pen {
    String color;
}

public class Main {
    public static void main(String[] args) {
        Pen myPen = new Pen();  // 객체 생성
        System.out.println(myPen);
    }
}
1.4 멤버 변수 선언 및 사용
멤버 변수에는 접근 제한자를 사용할 수 있다.
| 접근 제한자 | 설명 | 접근 가능 범위 |
|---|---|---|
public | 어디서든 접근 가능 | 모든 클래스에서 사용 가능 |
protected | 같은 패키지 + 상속받은 클래스 접근 가능 | 패키지 내부 + 자식 클래스 |
| (default) | 같은 패키지 내에서 접근 가능 | 패키지 내부 |
private | 해당 클래스 내부에서만 접근 가능 | 클래스 내부에서만 사용 가능 |
class Pen {
    public String brand;
    private String color;

    public void setColor(String newColor) {
        color = newColor;
    }

    public String getColor() {
        return color;
    }
}
1.5 멤버 메서드의 선언 및 사용
메서드는 객체의 행동을 정의하는 함수이다.
class Pen {
    void write() {
        System.out.println("펜으로 글을 씁니다.");
    }
}

public class Main {
    public static void main(String[] args) {
        Pen myPen = new Pen();
        myPen.write();  // 메서드 호출
    }
}
1.6 지역변수와 멤버 변수
- 지역변수는 반드시 초기화 후 사용해야 한다.
- 멤버 변수는 클래스 내부에서 정의되며, 자동으로 초기화된다.
class Pen {
    String color = "black";
    int price;

    void write(int count) {
        int data = 1;
        System.out.println("멤버변수: " + this.color);
        System.out.println("지역변수: " + data);
        System.out.println("매개변수: " + count);
    }
}
1.7 클래스 변수와 인스턴스 변수
인스턴스 변수
static없이 선언된 변수- 반드시 객체를 생성해야 접근 가능
class Example {
    int instanceVar = 10;
}

public class Main {
    public static void main(String[] args) {
        Example obj = new Example();
        System.out.println(obj.instanceVar);
    }
}
클래스 변수
static이 붙어 있는 변수- 클래스 이름만으로 접근 가능
class Example {
    static int staticVar = 20;
}

public class Main {
    public static void main(String[] args) {
        System.out.println(Example.staticVar);
    }
}

인생 별거 없어