캡틴판교 장기효님의 Vue.js시작하기 인프런 강의를 수강하고 내용을 정리했다.
매일 20분 야금야금 Vue.js 화이팅.
IDE: Visual Studio Code
크롬 뷰 개발자 도구: Vue.js devtools
싱글 파일 컴포넌트에서 props 속성와 event emit 을 구현해보자.
실습 코드는 이전 포스팅에서 만든 것을 바탕으로 하고 있다.
현재 컴포넌트 구조
상위 컴포넌트 App
하위 컴포넌트 AppHeader
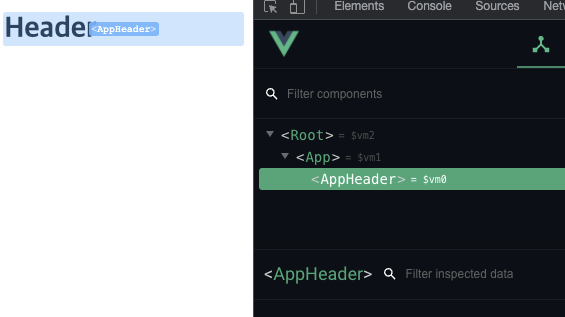
props 속성으로 데이터 내리기
App 컴포넌트의 문자열 데이터를 하위 컴포넌트인 AppHeader 컴포넌트로 내리자.
1. [App] 상위 컴포넌트에서 내리고 싶은 data를 정의
'Header'라는 문자를 내리고 싶다.
data 속성에 str이라는 이름으로 정의하자.
<script>
import AppHeader from './components/AppHeader.vue'

export default {
  data: function(){
    return {
      str: 'Header'
    }
  },
  components: {
    'app-header': AppHeader
  }
}
</script>
2. [App] 상위 컴포넌트에서 props 속성에 data를 바인딩
컴포넌트 구조에서 확인한 것 처럼, 상위 컴포넌트는 하위 컴포넌트를 갖고 있다.
v-bind로 props 속성에 data를 바인딩 하자.
props 속성 이름은 propsdata로 지었다.
<하위 컴포넌트명 v-bind:프롭스 속성="데이터"></하위 컴포넌트명>
<template>
  <div>
    <app-header v-bind: 하위 컴포넌트의 프롭스 속성 이름="상위 컴포넌트의 데이터 이름"></app-header>
    <app-header v-bind:propsdata="str"></app-header>
  </div>
</template>
하위 컴포넌트가 데이터를 내려받는 것이기 때문에, 하위 컴포넌트 태그에 props를 작성한다는걸 기억하자.
3. [AppHeader] 하위 컴포넌트에는 props 속성을 정의
props 속성에 propsdata 라는 이름으로 정의하자.
<template>
<header>
<h1>{{ propsdata }}</h1>
</header>
</template>
<script>
export default {
props: ['propsdata']
}
</script>
<style>
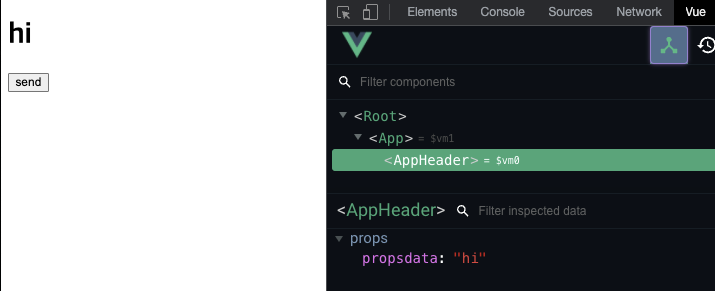
</style>4. 개발자 도구에서 확인
하위 컴포넌트 AppHeader의 props속성
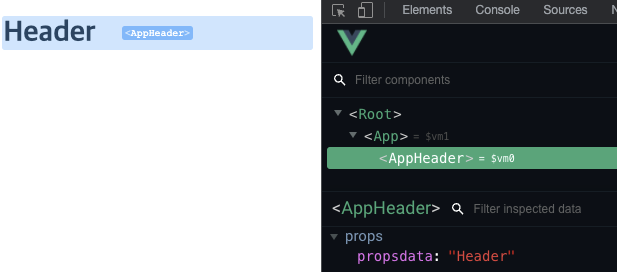
상위 컴포넌트의 str 데이터
event emit 구현하기
하위 컴포넌트에서 버튼을 클릭해서 상위 컴포넌트로 emit을 보내면, propsdata를 바꿔보자.
1. [AppHeader] 하위 컴포넌트에 button 과 method 만들기
버튼에 v-on 디렉티브를 만들고 sendEvent라는 메서드를 실행하는 click 이벤트를 정의한다.
<template>
  <header>
      <h1>{{ propsdata }}</h1>
      <button v-on:click="sendEvent">send</button>
  </header>
</template>
sendEvent 라는 메서드를 만든다.
<script>
export default {
  props: ['propsdata'],
  methods: {
    sendEvent: function(){

    }
  }
}
</script>
2. [AppHeader] renew라는 이름의 emit을 만든다.
sendEvent 메서드에 emit을 정의한다.
'renew'라는 emit을 올리면, props속성으로 내리는 propsdata를 변경해보자.
<script>
export default {
  props: ['propsdata'],
  methods: {
    sendEvent: function(){
      this.$emit('renew')
    }
  }
}
</script>
3. [App] 상위 컴포넌트에서 renew 이벤트를 받으면 renewStr 메서드를 실행한다.
하위 컴포넌트의 renew 이벤트가 올라오면, 상위 컴포넌트에서는 renewStr 메서드를 실행하자.
v-on:event-emit이름="메서드 이름"
app-header 태그에 추가할 코드는 아래와 같다
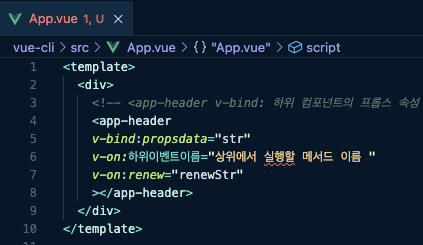
<template>
  <div>
    <app-header
    v-bind:propsdata="str"
    v-on:renew="renewStr"
    ></app-header>
  </div>
</template>
renewStr 메서드는 str 문자열을 'hi'로 바꾼다.
methods: {
renewStr: function(){
this.str = 'hi';
}
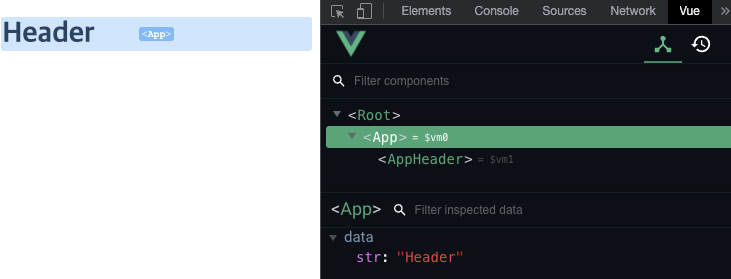
}4. 뷰 개발자도구에서 확인
이벤트 탭을 켜고, renew 이벤트 확인
app-header 에 의해 $emit이 발생한 renew 이벤트임이 보인다.
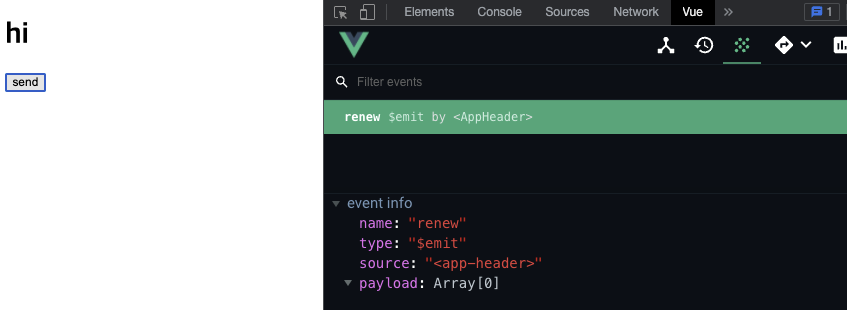
propsdata 변경 확인
새로고침 누르고, 'send'버튼을 눌러보면 propsdata가 Header에서 hi로 변한 것이 보인다.
[참고] npm run serve로 실행한 뷰를 종료시키기
터미널에서 ctrl + c로 시그널을 보내 종료시키면 된다.
참고로 ctrl + z 시그널은 일시중지(suspended)이기 때문에 종료가 아니다.
props와 emit 실습 코드
[App] 상위 컴포넌트
<template>
  <div>
    <!-- <app-header v-bind: 하위 컴포넌트의 프롭스 속성 이름="상위 컴포넌트의 데이터 이름"></app-header> -->
    <app-header
    v-bind:propsdata="str"
    v-on:renew="renewStr"
    ></app-header>
  </div>
</template>

<script>
import AppHeader from './components/AppHeader.vue'

export default {
  data: function(){
    return {
      str: 'Header'
    }
  },
  components: {
    'app-header': AppHeader
  },
  methods: {
    renewStr: function(){
      this.str = 'hi';
    }
  }
}
</script>

<style>

</style>
[AppHeader] 하위 컴포넌트
<template>
  <header>
      <h1>{{ propsdata }}</h1>
      <button v-on:click="sendEvent">send</button>
  </header>
</template>

<script>
export default {
  props: ['propsdata'],
  methods: {
    sendEvent: function(){
      this.$emit('renew')
    }
  }
}
</script>

<style>

</style>
다음 시간에는 기본 강의의 마지막인 '사용자 입력 폼'을 만들어본다.