
🍄 Nodes 알아보기
앞서 예시를 보았던 것처럼,
Reactflow 에는 반드시 nodes 와 edges 를 넣어줘야 한다.
nodes 는 도형, edges 는 선이라고 간단하게 이해하면 된다.
nodes 의 타입은 Node[] 인데, 데이터 형태는 다음과 같다.
reactflow - node[]의 타입 상세 링크 바로가기
export type Node<T, U extends string> = {
  id: string;
  position: XYPosition;
  data: T;
  type?: U;
  sourcePosition?: Position;
  targetPosition?: Position;
  hidden?: boolean;
  selected?: boolean;
  dragging?: boolean;
  draggable?: boolean;
  selectable?: boolean;
  connectable?: boolean;
  resizing?: boolean;
  deletable?: boolean;
  dragHandle?: string;
  width?: number | null;
  height?: number | null;
  /** @deprecated - use `parentId` instead */
  parentNode?: string;
  parentId?: string;
  zIndex?: number;
  extent?: 'parent' | CoordinateExtent;
  expandParent?: boolean;
  positionAbsolute?: XYPosition;
  ariaLabel?: string;
  focusable?: boolean;
  style?: React.CSSProperties;
  className?: string;
};
이 nodes는 초기 node 를 작성하여, useNodesState 안에 담아주면, nodes, setNodes, onNodesChange를 가져다 쓸 수 있다.
// 초기 형태의 nodes
const initialNodes = [
  { id: "1", position: { x: 0, y: 0 }, data: { label: "1" } },
  { id: "2", position: { x: 0, y: 100 }, data: { label: "2" } },
];

// useNodesState 훅 안에 담아주기
const [nodes, onNodesChange] = useNodesState(initialNodes);

 <ReactFlow
     nodes={nodes}
     onNodesChange={onNodesChange as OnNodesChange}
  >
      ...
🍄 Nodes 커스텀해보기
Reactflow 타입 중 nodeTypes 라는 props 가 있다.
이곳에 우리가 직접 node(컴포넌트) 를 만든 후, 키-객체처럼 등록을 해주면,
nodes 를 작성할 때,type 필드에 해당 노드의 키를 연결하여
커스텀 한 노드를 띄어줄 수 있다.
1️⃣ CustomNode.tsx 만들기
CustomNode.tsx 를 만들어 다음과 같이 작성해보자
import React from "react";
import { Handle, Position } from "reactflow";

const CustomNode = React.memo(() => {
  return (
    <>
      <div className="module">CustomNode</div>
      <Handle type="target" position={Position.Left} />
      <Handle type="source" position={Position.Right} />
    </>
  );
});

export default CustomNode;
Node에는 기본적으로 화살표의 target이 되는 점과, 화살표를 그릴 수 있는 source 점이 있어야 하기 때문에
reactflow 에서 제공하는 Handle과 Position을 사용하였는데, 이 외에도 제공되는 컴포넌트가 다양하니 자세한 내용은 공식 문서를 보면 활용해볼 수 있다. 😊
2️⃣ CustomNode 를 nodeTypes에 담아주기
nodeTypes 에 다음과 같이 작성하여 props에 넣어줄 수 있다.
  const NodeTypes = {
    custom: CustomNode,
  };

  <ReactFlow
        nodeTypes={NodeTypes}
      >
3️⃣ InitialNodes 에 custom 노드 추가하기
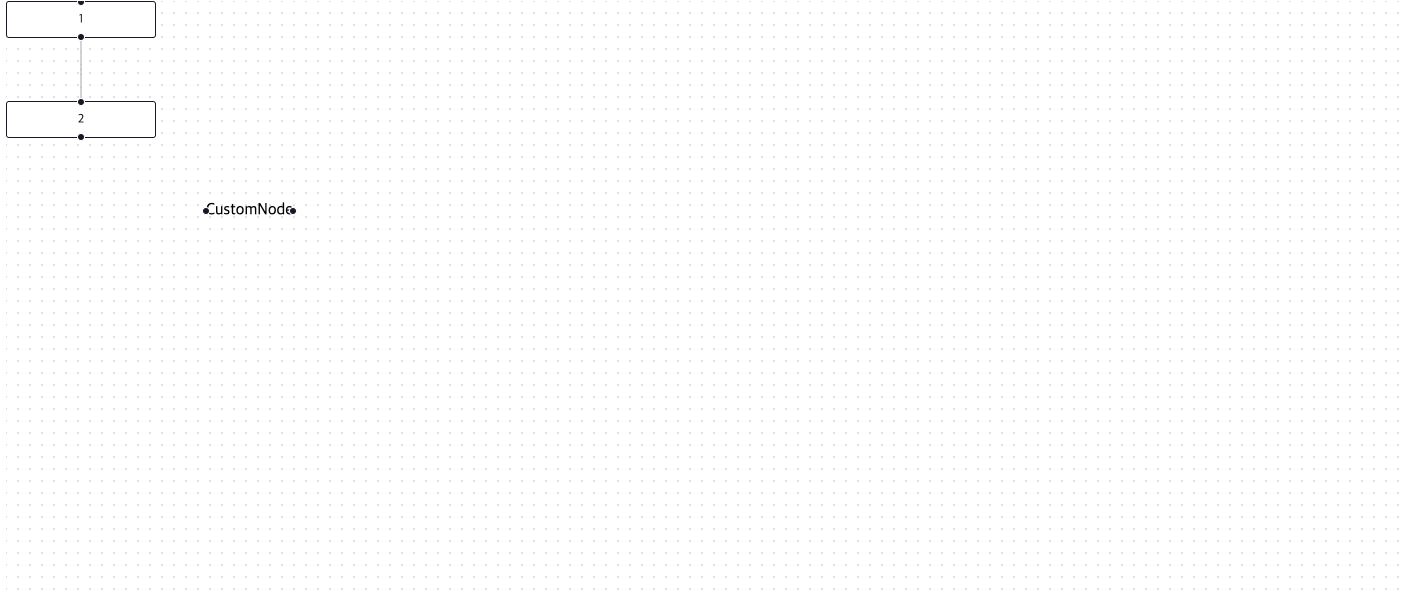
nodeTypes에 custom 이란 키값으로 컴포넌트를 등록해주었으니, initialNodes 배열에 다음과 같이 추가하여 주자
const initialNodes = [
  { id: "1", position: { x: 0, y: 0 }, data: { label: "1" } },
  { id: "2", position: { x: 0, y: 100 }, data: { label: "2" } },
  {
    id: "3",
    position: { x: 200, y: 200 },
    data: { label: "" },
    type: "custom",
  },
];
결과를 보면 custom node가 다음과 같이 추가된 것을 확인할 수 있다.
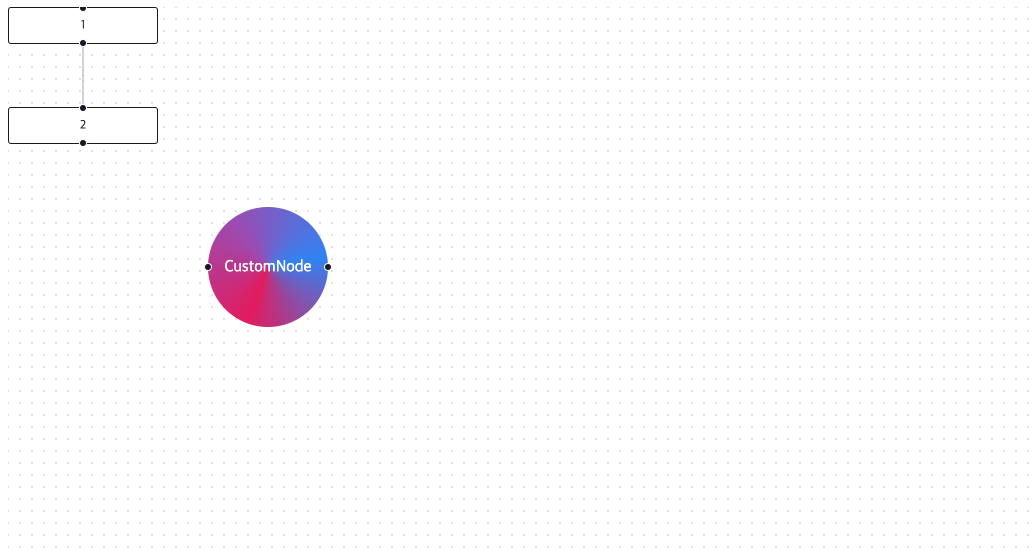
4️⃣ node 스타일링 해주기!
필자의 경우 styled-component를 사용하기 때문에,
컴포넌트 안에서 해당 node의 className을 잡아 스타일링 해줄 것이다.
다음과 같다.
const ReactFlowStyled = styled(ReactFlow)`
  .react-flow__node-custom {
    width: 120px;
    height: 120px;
    background: conic-gradient(
      from -160deg at 50% 50%,
      #e92a67 0deg,
      #a853ba 120deg,
      #2a8af6 240deg,
      #e92a67 360deg
    );
    border-radius: 100%;
    color: #fff;
    display: flex;
    align-items: center;
    justify-content: center;
  }
`;
🍄 전체 코드
import React, { useCallback } from "react";
import ReactFlow, {
  MiniMap,
  Controls,
  Background,
  useNodesState,
  useEdgesState,
  addEdge,
  Connection,
  Edge,
} from "reactflow";

import "reactflow/dist/style.css";
import CustomNode from "./CustomNode";
import styled from "styled-components";

const initialNodes = [
  { id: "1", position: { x: 0, y: 0 }, data: { label: "1" } },
  { id: "2", position: { x: 0, y: 100 }, data: { label: "2" } },
  {
    id: "3",
    position: { x: 200, y: 200 },
    data: { label: "" },
    type: "custom",
  },
];
const initialEdges = [{ id: "e1-2", source: "1", target: "2" }];

const NodeTypes = {
  custom: CustomNode,
};

const ReactFlowExample = () => {
  const [nodes, setNodes, onNodesChange] = useNodesState(initialNodes);
  const [edges, setEdges, onEdgesChange] = useEdgesState(initialEdges);

  const onConnect = useCallback(
    (params: Edge | Connection) => setEdges((eds) => addEdge(params, eds)),
    [setEdges]
  );

  return (
    <div style={{ width: "100vw", height: "100vh" }}>
      <ReactFlowStyled
        nodes={nodes}
        edges={edges}
        onNodesChange={onNodesChange}
        onEdgesChange={onEdgesChange}
        onConnect={onConnect}
        nodeTypes={NodeTypes}
      >
        <Controls />
        <MiniMap />
        <Background gap={12} size={1} />
      </ReactFlowStyled>
    </div>
  );
};
export default ReactFlowExample;

const ReactFlowStyled = styled(ReactFlow)`
  .react-flow__node-custom {
    width: 120px;
    height: 120px;
    background: conic-gradient(
      from -160deg at 50% 50%,
      #e92a67 0deg,
      #a853ba 120deg,
      #2a8af6 240deg,
      #e92a67 360deg
    );
    border-radius: 100%;
    color: #fff;
    display: flex;
    align-items: center;
    justify-content: center;
  }
`;
다음시간에는 간단히 edges 에 대해 알아보겠다 🙇🏻♀️