두번째 강의에선 여러종류의 Geometry를 불러와서
랜더링 해보는 내용이었기 때문에 생략!
세번째 강의의 transform을 알아보고 이를 이용해 Scene Graph를 만들어봄
Scene Graph란 컴퓨터 그래픽 장면을 구성하는 요소들을 논리적 또는 공간적으로 계층 구조로 정리하는 자료 구조로, 그래픽 편집 프로그램이나 게임 개발에서 자주 사용한다.
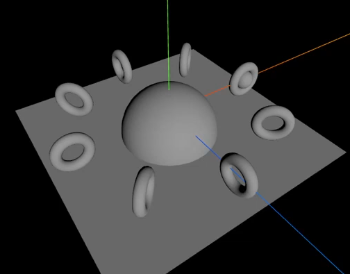
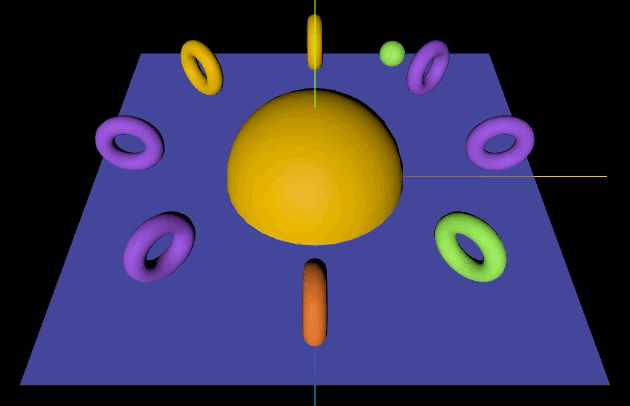
지금은 위와 같은 그래픽을 three.js로 구현할거고, 이 장면을 Scene Graph로 나타내면 아래와 같다.
Scene
├── groundMesh (Plane)
└── bigSphereMesh (Sphere)
    ├── torusPivot_0~8 (Object3D)
    │   └── torusMesh_0~8 (Torus)
    └── smallSpherePivot (Object3D)
        └── smallSphereMesh (Sphere)
첨에 저 Pivot을 왜 만드는지 이해가 안 갔다. 그냥 bigSphere에 추가하고 bigSphere를 회전시키면 되지 않나? 생각하고 코드를 짰더니 안되는것.
찾아보니 torus나 smallSperer를 회전시키려면 각각의 회전축이 존재해야했던것. 그래서 Object3D 객체로 중심점을 각각 만들어주어야 한단다.
그렇게 하나하나 짜 본 코드
// 공통으로 쓰일 material
const material = new THREE.MeshPhongMaterial();

const ground = new THREE.PlaneGeometry(15, 15);
const groundMesh = new THREE.Mesh(ground, material);
groundMesh.rotation.x = THREE.MathUtils.degToRad(-90);
this.scene.add(groundMesh);
처음엔 rotation deg를 90을 줬는데 아무것도 안 보여서 보니까 아랫부분이라 안 보이는거였다.
ground 완성!
그 다음은 bigSphere 만들기
const bigSphere = new THREE.SphereGeometry(3);
const bigSphereMesh = new THREE.Mesh(bigSphere, material);
this.scene.add(bigSphereMesh);
geometry랑 mesh를 만들어서 scene에 추가하기만 하면 돼서 어려운건 없다.
다음은 torusPivot들과 torus 만들기
for (let i = 0; i < 8; i++) {
  const torusPivot = new THREE.Object3D();
  const torus = new THREE.TorusGeometry(0.8, 0.3);
  const torusMesh = new THREE.Mesh(torus, material);
  torusPivot.add(torusMesh);
  torusMesh.position.x = 6;
  torusPivot.position.y = 1.5;
  torusPivot.rotation.y = THREE.MathUtils.degToRad(-45 * i);
  bigSphereMesh.add(torusPivot);
}
반복문을 이용해 만들어주었다.
다음은 smallSpherePivot과 smallSphere
const smallSpherePivot = new THREE.Object3D();
smallSpherePivot.name = "smallSpherePivot";
const smallSphere = new THREE.SphereGeometry(0.5);
const smallSphereMesh = new THREE.Mesh(smallSphere, material);
smallSphereMesh.position.x = 6;
smallSphereMesh.position.y = 1.5;
smallSpherePivot.add(smallSphereMesh);
bigSphereMesh.add(smallSpherePivot);
smallSpherePivot에 name 속성을 준 것은 이걸 회전시키기 위한 것이다.
update 메서드에서 추가해 줄 것임!!
private update(time: number) {
  time *= 0.001; // ms -> s

  const smallSpherePivot = this.scene.getObjectByName("smallSpherePivot");
  if (smallSpherePivot) {
    smallSpherePivot.rotation.y = time;

    // Euler를 이용한 rotation
    // const euler = new THREE.Euler(0, time, 0);
    // smallSpherePivot.quaternion.setFromEuler(euler);
  }
}
회전값을 주는 방법은 2개가 있는데, time을 그대로 주거나 euler객체와 quaternion 프로퍼티를 사용하는 방법이 있다.
quaternion을 사용하는건 회전축을 변경할 일이 있을 때 사용하면 될 듯...
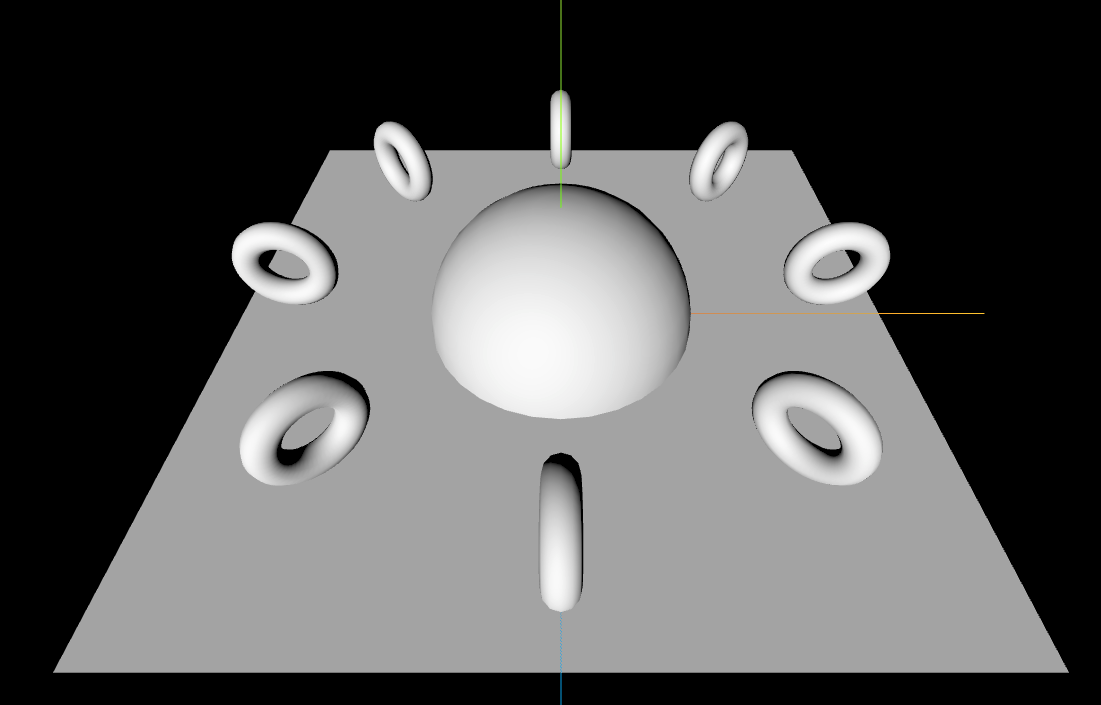
이렇게 만들고나면

이렇게 만들어진다!!
이 뒤로 색이 없는게 뭔가 심심해서 material에 랜덤 색상을 가지는 material을 넣어주기로 함
private makeRandomColorMaterial() {
  const colors = [
    "#fcba03",
    "#ff852e",
    "#a664e8",
    "#6471e8",
    "#4de3a0",
    "#94e65a",
    "#f573c3",
  ];
  const randomNum = Math.floor(Math.random() * colors.length);
  return new THREE.MeshPhongMaterial({ color: colors[randomNum] });
}
기존 mesh를 생성할 때 material를 넣었던 자리에 this.makeRandomColorMaterial()를 넣어주면
ㅋㅋㅋㅋㅋㅋㅋ뭔가 색깔이 구리구리하지만 랜덤색상의 mesh들이 나타나게 된다
이렇게 transform 속성들을 알아보는 시간이었다!
출처 - GIS DEVELOPER 유튜브 TypeScript로 즐기는 Three.js : 3. 트렌스폼(Transfrom)