매번 비슷한 Next.js프로젝트만 만들기보단 이전부터 관심있었던 three.js를 공부해보기로 했다.
우선 찍먹해보기 위해 유튜브에서 한국어 강의를 검색하던 중 괜찮아보이는 강의를 찾음!
GIS DEVELOPER 유튜브 | TypeScript로 즐기는 Three.js
첫번째 시작하기 영상과 공식문서를 보고나서 정리해두는 글
three.js의 구조

three.js의 앱 구조를 도식화한 그림이다.
각 객체에 대해 간단하게 설명하자면
Renderer: 장치에 출력을 담당하는 객체
Scene: 3차원 모델과 빛으로 구성되는 장면
Camera: 장면(Scene)을 어떤 방식으로 바라볼 지 결정하는 객체
Mesh: 장면에 출력되는 3차원 모델 객체
Geometry: Mesh의 형상
Material: Mesh의 색상, 투명도 등의 표면 속성
Light: 광원
이정도로 간단하게 정리해볼 수 있다.
그림에서도 알 수 있든 Geometry와 Material은 여러 Mesh에서 사용 가능.
그럼 이제 바로 만들어보자!
Vite+TypeScript 환경 세팅
npm create vite@latest threejs_study # vanilla, TypeScript 선택
npm install -D @types/three # three의 타입 정의 파일
npm i
그리고나서 main.ts 파일에서 import "./style.css" 제외하곤 전부 지워주고 style.css 파일엔 아래와 같이 써준다.
#app {
  position: absolute;
  inset: 0;
  background-color: black;
}
이렇게 초기 세팅은 완료!
three.js 만져보기
이 강의는 객체지향 프로그래밍으로 class를 사용해서 three.js를 다룬다. 따라서 class에 대한 이해도가 있어야 할 듯.
class App {
  // private 접근자로 App 클래스 내에서만 참조할 수 있도록 함
  // renderer : 장치에 출력하는 객체
  // scene : 3차원 모델과 빛으로 구성된 장면
  // camera : 장면을 어떤 관점에서 바라볼 지 결정함
  private renderer: THREE.WebGLRenderer;
  private domApp: Element;
  private scene: THREE.Scene;
  private camera?: THREE.PerspectiveCamera;
  private cube?: THREE.Mesh

  constructor() {
    // renderer 객체를 생성할 때 WebGLRenderer를 사용하겠다(WebGPURenderer도 있음 )
    this.renderer = new THREE.WebGLRenderer({ antialias: true });
    // 고해상도 모니터에서 픽셀을 좀 더 많이 표현되게 설정
    // window.devicePixelRatio(현재 모니터의 픽셀 비율 프로퍼티)
    // Math.min을 이용해 비율을 2가 넘지 않게 함(2를 넘어봤자 사람 눈으로 구분도 안되면서 성능만 저하됨)
    this.renderer.setPixelRatio(Math.min(2, window.devicePixelRatio));

    this.domApp = document.querySelector("#app")!;
    // 캔버스 타입의 DOM객체인 renderer를 #app의 자식으로 추가함
    this.domApp.appendChild(this.renderer.domElement);

    this.scene = new THREE.Scene();

    // 카메라, 광원, 3D모델을 표현하는 메서드를 호출
    this.setupCamera();
    this.setupLight();
    this.setupModels();
  }

  private setupCamera() {
    // 카메라 렌즈의 가로에 대한 세로의 비율이 필요함
    const width = this.domApp.clientWidth;
    const height = this.domApp.clientHeight;

    // PerspectiveCamera -> 카메라의 종류
    this.camera = new THREE.PerspectiveCamera(75, width / height, 0.1, 100);
    // 카메라의 z 좌표 설정
    this.camera.position.z = 2;
  }

  // DirectionalLight -> 광원의 종류
  private setupLight() {
    // color : 빛의 색상
    // intensity : 빛의 강도
    const color = 0xffffff;
    const intensity = 1;
    const light = new THREE.DirectionalLight(color, intensity);
    light.position.set(-1, 2, 4);

    this.scene.add(light);
  }

  private setupModels() {
    // geometry : 3차원 모델의 형상, 매개변수는 가로, 세로, 깊이
    // material : 3차원 모델의 색상, 투명도도 정의 가능
    const geometry = new THREE.BoxGeometry(0.5, 0.5, 0.5);
    const material = new THREE.MeshPhongMaterial({
      color: 0x55aaff,
    });

    this.cube = new THREE.Mesh(geometry, material);

    this.scene.add(cube);
  }
}
제일 먼저 Renderer와 Camera, Scene, Mesh를 만들어준다. 각 메서드에 대한 설명은 주석으로 적어두었으니 참고.
이렇게 객체들을 만들었다면 화면에 표현해주는 메서드도 만들어야 한다.
// 이벤트를 처리하는 메서드
  private setupEvent() {
    this.resize();
    window.onresize = this.resize.bind(this);

    // setAnimationLoop로 render가 전달되면서 this를 찾지못해
    // render가 undefined가 될 수 있으므로
    // .bind(this)를 이용해 현재 클래스에 바인딩해줌
    this.renderer.setAnimationLoop(this.render.bind(this));
  }

  // 창의 크기가 변경되면 값을 계산하여 카메라에 비율을 다시 전달
  private resize() {
    const width = this.domApp.clientWidth;
    const height = this.domApp.clientHeight;

    const camera = this.camera;
    if (camera) {
      camera.aspect = width / height;
      camera.updateProjectionMatrix();
    }

    this.renderer.setSize(width, height);
  }

  // 모델을 회전시키려면 회전에 대한 값을 계속 업데이트 해줘야함
  private update(time: number) {
    time *= 0.001; // ms -> s 변환

    const cube = this.cube;
    if (cube) {
      cube.rotation.x = time;
      cube.rotation.y = time;
      cube.rotation.z = time;
      cube.rotateX(0.1);
      cube.rotateY(0.2);
      cube.rotateZ(0.2);
    }
  }

  // 위에서 만든 모든 것들을 표현해주는 메서드
  // time : setAnimationLoop의 호출에 의해 결정됨. 단위는 ms.
  private render(time: number) {
    this.update(time);
    this.renderer.render(this.scene, this.camera!);
  }
그리고 이 setupEvent 메서드를 constructor 내부에서 호출해주면!
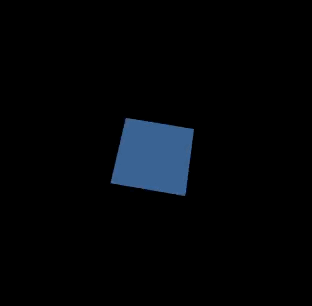
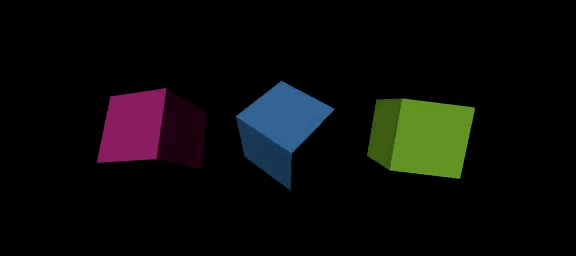
우히히 귀여워
강의는 여기에서 끝났는데, 공식문서를 보니 Mesh를 여러개 만드는 방법도 있어서 해봤다.
private cubes?: THREE.Mesh[]; // cubes 객체 추가

private setupModels() {
    // geometry : 3차원 모델의 형상, 매개변수는 가로, 세로, 깊이
    // material : 3차원 모델의 색상, 투명도도 정의 가능
    const geometry = new THREE.BoxGeometry(0.5, 0.5, 0.5);

    this.cubes = [
      this.makeModelInstance(geometry, 0x44aaff, 0),
      this.makeModelInstance(geometry, 0xff44aa, -1),
      this.makeModelInstance(geometry, 0xaaff44, 1),
    ];
  }

  private makeModelInstance(
    geometry: THREE.BoxGeometry,
    color: number,
    x: number
  ) {
    const meterial = new THREE.MeshPhongMaterial({ color });

    const cube = new THREE.Mesh(geometry, meterial);
    this.scene.add(cube);

    if (cube) cube.position.x = x;

    return cube;
}setupModels에서 makeModelInstance 메서드를 이용해 큐브 배열을 만들어준다.
private update(time: number) {
    time *= 0.001; // ms -> s 변환

    const cubes = this.cubes;
    if (cubes) {
      cubes.forEach((cube, idx) => {
        const speed = 1 + idx * 0.1;
        const rot = time * speed;
        cube.rotation.x = rot;
        cube.rotation.y = rot;
      });
    }
  }
그리고 이 큐브들도 회전시켜줘야 하니까 forEach 메서드를 이용해 각 큐브의 값을 조절함!

히히 왱성~!!
지금은 겨우 큐브 돌리는게 다지만 나중에 이거로 포트폴리오에 활용도 해볼 수 있으면 좋겠다. 나머지도 얼른 공부해봐야지..!!