배경
OAuth2 소셜 로그인 기능을 사용하기 위해 spring 의 라이브러리를 처음 사용했을 때 redirect url 을 통해 프론트에게 답변해야 된다는게 꽤 당황스러웠습니다.
제가 만들고 있는 서비스는 소셜 로그인 기능을 가지고 있는데 소셜 로그인을 성공하면 login access token 을 발행해야 했습니다.
그런데 제게 익숙한 rest api 가 아니라 redirect url 방식을 사용하는 것의 불편함과 중요한 보안 데이터를 redirect url 로 전송해도 안전한가? 에 대한 불안함이 있었습니다.
따라서 redirect url 없이 rest api 만으로 oauth2 소셜 로그인 기능을 구현해봤습니다.
먼저 redirect url 을 전체 프로젝트에서 아예 사용하지 않는 것은 아니고 프론트에서만 사용하고 백앤드 단에서만 사용하지 않습니다.
글을 읽기 전에!!
OAuth2 는 구글이나 깃헙과 같은 서비스가 인증된 클라이언트에 한하여 프로필과 같은 유저 정보에 접근하게 해주는 기능입니다.
이를 이용해 흔히 아는 "구글로 로그인", "네이버로 로그인" 과 같은 소셜 로그인 서비스를 만들 수 있습니다.
정확히는 구글과 같은 서비스가 로그인 인증을 대신해준다는 느낌보다 구글로 로그인해서 발행된 access token 으로 사용자 정보를 가져와서 회원가입을 시키는 방식으로 구현됩니다.
이렇게 하면 사용자는 회원가입 정보를 입력하지 않아도 됩니다.
이때 가져온 사용자 정보 중 하나(ex. email)를 회원 식별자로 등록해 나중에 access token 으로 다시 가져온 사용자 정보가 이미 저장되어있다는게 확인되면 회원가입하지 않고 바로 로그인이 되게 할 수 있습니다.
OAuth2 의 진행 과정은 간략히 아래와 같습니다.
예시를 위해 깃헙으로 사용자 정보를 받아오는 과정을 들겠습니다.
- 깃헙으로 로그인을 클릭한다
- 깃헙 로그인 페이지로 리다이렉트 된다.
- 사용자는 올바른 아이디와 패스워드를 입력한다.
- 깃헙은
code를 준다. code를 통해access token을 받아온다.access token을 통해 사용자 정보를 받아온다.
용어 설명
code: 깃헙에access token을 받아오기 위한 인증 데이터입니다.
유효기간이 매우 짧고 일회용이라는 특징이 있습니다.access token: 깃헙의 유저 정보를 받아오기 위한 인증 데이터입니다.
이 글에서는access token이 두 종류가 나오는데 하나는 OAuth2 안에서 유저 정보를 받아올 때 사용하는access token이고, 하나는 백앤드가 로그인 성공에 대해서 자체적으로 발행하는access token입니다. 이를 구별하기 위해 백앤드에서 발행하는access token은login access token이라고 하겠습니다.
생각해볼만한 점
왜 바로access token을 주지 않고code를 주는 걸까?
access token마다 접근할 수 있는 데이터의 권한의 범위 (scope) 가 다를 수 있기 때문입니다.
예를 들어 어떤access token은 이메일과 이름 정보만 접근할 수 있는데 반해 어떤access token은 이메일, 이름 정보 뿐만 아니라 민감한 프로필 데이터에도 접근하는게 가능할 수 있습니다.
왜 redirect url 을 사용해야만 했을까
그 이유는 소셜 서비스의 로그인 페이지를 사용하기 때문입니다.
깃헙을 예시로 들면 깃헙 로그인 홈페이지에서 아이디, 비밀번호를 입력해서 로그인을 요청합니다.
그러면 그 요청은 제가 보낸 요청이 아니라 깃헙 프론트가 보내는 요청입니다.
따라서 깃헙은 로그인이 성공했을 시 답변을 어디로 줘야할지 알 수 없고, 이때 받은 url을 이용해 파라미터에 정보를 담아 리다이렉트합니다.
백앤드에서 리다이렉트를 사용하지 않기 위한 해결책
소셜 로그인 페이지로 리다이렉트 되기 때문에 code를 리다이렉트 url 로 받는 것을 피할 수는 없었습니다.
고민 끝에 이 작업을 프론트에서 진행하는 것으로 하였습니다.
즉 code 를 redirect url 로 받는 과정을 분리해냄으로써
이후 작업을 rest api 로 작성할 수 있었습니다.
이로써 전체적인 진행 방식은 아래와 같아 집니다.
- 유저는 깃헙으로 로그인하기 버튼을 누릅니다.
- 프론트는 깃헙 로그인 페이지로 리다이렉트 시킵니다.
- 유저는 적절한 아이디와 패스워드로 로그인을 요청합니다.
- 깃헙은 프론트의 redirect url 로 code 를 반환합니다.
- 프론트는 code를 받아 백앤드에 로그인을 요청합니다.
- 백앤드는 받은 code로 access token 을 발급받습니다. (rest api 로 이루어집니다.)
- 백앤드는 받은 access token 으로 필요한 깃헙에 필요한 정보를 요청합니다. (ex. 이메일, 이름 ...)
직접 구현하기
먼저 본인이 구현하고 싶은 소셜 로그인 서비스를 정합니다.
저는 구글, 네이버, 깃헙으로 정했습니다.
이제 각 서비스 홈페이지에 방문하여 연동합니다.
이는 어떤 각 회사의 서비스마다 방법이 다르므로 연동하고자 하는 홈페이지에 직접 접속하셔서 등록해야합니다.
의존관계 설정
직접 구현하는 방법을 사용하므로 oauth2 라이브러리는 사용하지 않습니다.
대신 편리하게 getter setter 등을 만들어주는 lombok,
rest api 를 만들어 테스트 할 것이므로 spring-web,
그리고 api를 직접 요청할 것이므로 web-flux 를 추가합니다.
	implementation 'org.springframework.boot:spring-boot-starter-web'
    testImplementation 'org.springframework.boot:spring-boot-starter-test'

    // lombok
    compileOnly 'org.projectlombok:lombok'
    annotationProcessor 'org.projectlombok:lombok'

    // webflux
    implementation 'org.springframework.boot:spring-boot-starter-webflux'
1. yml 세팅
client-id, client-secret 의 경우 연동했을 때 받은 것을 입력합니다.
이 데이터가 소셜 서비스에 정보를 요청하는 클라이언트 식별자가 되므로 보안 상 누출되지 않도록 주의합니다.
redirect-url 은 프론트가 code 를 받는데 사용한 것 입니다.
구글과 같은 어떤 소셜 서비스의 경우 보안 상 access token 을 받는데 해당 redirect-url 을 입력해줘야 하는 것 같습니다. 직접 사용하지는 않습니다.
저는 구글, 네이버, 깃헙을 사용했고 다른 서비스를 사용하시는 경우 그에 맞게 변경하시면 됩니다. 아마 아래 양식을 그대로 사용하시면 문제없을 것 같습니다.
oauth2:
  github:
    client-id: ...
    client-secret: ...
    redirect-uri: http://localhost:3000/oauth2/callback/github
    token-uri: https://github.com/login/oauth/access_token
    user-info-uri: https://api.github.com/user
  google:
    client-id: ...
    client-secret: ...
    redirect-uri: http://localhost:3000/oauth2/callback/google
    token-uri: https://www.googleapis.com/oauth2/v4/token
    user-info-uri: https://www.googleapis.com/oauth2/v3/userinfo
  naver:
    client-id: ...
    client-secret: ...
    redirect-uri: http://localhost:3000/oauth2/callback/naver
    token-uri: https://nid.naver.com/oauth2.0/token
    user-info-uri: https://openapi.naver.com/v1/nid/me
2. Configuration Property 객체 생성
이제 설정한 정보를 @Value 를 통해 가져와도 되지만
사용하는 곳이 다양하고, 이를 interface 로 추상화하면 깔끔해지는 기능이 있으므로 객체로 만들겠습니다.
사용할 소셜 서비스의 기능을 Enum 객체로 만들고 property 객체를 interface 로 추상화합니다.
public enum OAuth2Provider {
    GOOGLE, NAVER, GITHUB;
}
public interface OAuth2Property {
String getClientId();
String getClientSecret();
String getRedirectUri();
String getTokenUri();
String getUserInfoUri();
}이제 추상화한 interface 를 implement 합니다.
@ConfigurationProperties(prefix = "oauth2")
@Getter @Setter
public class OAuth2Properties {

    public OAuth2Property get(OAuth2Provider oAuth2Provider) {
        switch (oAuth2Provider) {
            case GITHUB:
                return github;
            case NAVER:
                return naver;
            case GOOGLE:
                return google;
            default:
                throw new IllegalArgumentException("Invalid OAuth2 Provider");
        }
    }

    private Github github;
    private Naver naver;
    private Google google;

    @Getter @Setter
    private static class Github implements OAuth2Property {
        private String clientId;
        private String clientSecret;
        private String redirectUri;
        private String tokenUri;
        private String userInfoUri;
    }

    @Getter @Setter
    private static class Naver implements OAuth2Property {
        private String clientId;
        private String clientSecret;
        private String redirectUri;
        private String tokenUri;
        private String userInfoUri;
    }

    @Getter @Setter
    private static class Google implements OAuth2Property{
        private String clientId;
        private String clientSecret;
        private String redirectUri;
        private String tokenUri;
        private String userInfoUri;
    }

}
이제 어플리케이션에 ConfigurationProperty 를 사용할 수 있도록 등록합니다.
@SpringBootApplication
// 아래 한 줄을 추가합니다.
@EnableConfigurationProperties(OAuth2Properties.class)
public class Oauth2DemoApplication {

    public static void main(String[] args) {
        SpringApplication.run(Oauth2DemoApplication.class, args);
    }

}
3. code 로 access token 가져오기
이제 access token 을 요청할 준비가 끝났으니 요청하는 객체를 만듭니다.
구글, 깃헙, 네이버에서는 x-www-form-urlencoded 으로 요청하는 것이 모두 호환되었습니다.
아마 다른 소셜 서비스의 경우에도 문제없을 것 같지만 OAuth2 에서 access token 을 받는 것과 관련된 공식 문서를 확인해보시는걸 추천드립니다.
@Getter
public class OAuth2AccessTokenResponse {
    @JsonProperty("access_token")
    private String accessToken;
}
@Component
public class OAuth2AccessTokenFetcher {
public OAuth2AccessTokenResponse fetch(String code, OAuth2Property oAuth2Property) {
return WebClient.create()
.post()
.uri(oAuth2Property.getTokenUri())
.headers(header -> {
header.setBasicAuth(oAuth2Property.getClientId(), oAuth2Property.getClientSecret());
header.setContentType(MediaType.APPLICATION_FORM_URLENCODED);
header.setAccept(Collections.singletonList(MediaType.APPLICATION_JSON));
header.setAcceptCharset(Collections.singletonList(StandardCharsets.UTF_8));
})
.bodyValue(accessTokenRequestForm(code, oAuth2Property))
.retrieve()
.bodyToMono(OAuth2AccessTokenResponse.class)
.block();
}
private MultiValueMap<String, String> accessTokenRequestForm(String code, OAuth2Property oAuth2Property) {
MultiValueMap<String, String> form = new LinkedMultiValueMap<>();
form.add("code", code);
form.add("grant_type", "authorization_code");
form.add("redirect_uri", oAuth2Property.getRedirectUri());
return form;
}
}4. 유저 정보 추출 객체 구현하기
access token 을 받았으니 이제 이것으로 소셜 서비스의 유저 정보에 접근할 수 있습니다.
하지만 response 양식이 서비스마다 다르므로 이를 추출할 객체가 각각에 맞게 필요합니다.
따라서 추출할 객체를 interface 로 추상화한 뒤 서비스에 맞게 구현하겠습니다.
먼저 필요한 유저 정보에 대한 dto 를 만듭니다.
유저 정보는 code 를 발급 받을 때 설정한 scope 에 한하여 접근할 수 있습니다.
저는 scope 로 name, email, imageUrl(프로필 사진) 를 설정했습니다.
email 에 대해서 validation 하는 기능이 있는데 이는 사용자가 소셜 서비스에 email 을 등록해 놓지 않았을 때 예외처리를 하기 위함입니다.
@Data
public class UserProfileDto {
    private String name;
    private String email;
    private String imageUrl;

    public UserProfileDto(String name, String email, String imageUrl) {
        this.name = name;

        if (email == null || email.isEmpty() || email.isBlank()) {
            throw new IllegalArgumentException("there is no email in profile");
        } else {
            this.email = email;
        }

        this.imageUrl = imageUrl;
    }
}
유저 정보 추출 객체를 추상화해서 interface를 만듭니다.
public interface UserProfileExtractor {
    UserProfileDto extract(Map<String, Object> attributes);
}
추상화한 interface 를 각각의 소셜 서비스에 맞게 implement 합니다.
@Component
public class GitHubUserProfileExtractor implements UserProfileExtractor{
    @Override
    public UserProfileDto extract(Map<String, Object> attributes) {
        String name = (String) attributes.get("name");
        String email = (String) attributes.get("email");
        String imageUrl = (String) attributes.get("avatar_url");

        return new UserProfileDto(name, email, imageUrl);
    }
}
@Component
public class GoogleUserProfileExtractor implements UserProfileExtractor{
@Override
public UserProfileDto extract(Map<String, Object> attributes) {
String name = (String) attributes.get("name");
String email = (String) attributes.get("email");
String imageUrl = (String) attributes.get("picture");
return new UserProfileDto(name, email, imageUrl);
}
}@Component
public class NaverUserProfileExtractor implements UserProfileExtractor{
@Override
public UserProfileDto extract(Map<String, Object> attributes) {
Map<String, Object> response = (Map<String, Object>) attributes.get("response");
String name = (String) response.get("name");
String email = (String) response.get("email");
String imageUrl = (String) response.get("profile_image");
return new UserProfileDto(name, email, imageUrl);
}
}구체적인 객체를 제공하는 팩토리 객체를 만듭니다.
@Component
@RequiredArgsConstructor
public class UserProfileExtractorFactory {
    private final GitHubUserProfileExtractor gitHubUserProfileExtractor;
    private final GoogleUserProfileExtractor googleUserProfileExtractor;
    private final NaverUserProfileExtractor naverUserProfileExtractor;

    public UserProfileExtractor get(OAuth2Provider oAuth2Provider) {
        switch (oAuth2Provider) {
            case GOOGLE:
                return googleUserProfileExtractor;
            case NAVER:
                return naverUserProfileExtractor;
            case GITHUB:
                return gitHubUserProfileExtractor;
            default:
                throw new IllegalArgumentException("Invalid OAuth2 Provider");
        }
    }
}
5. 유저 정보 가져오기
이제 access token 으로 유저 정보를 가져올 수 있습니다.
@Component
public class OAuth2UserAttributesFetcher {
    public Map<String, Object> fetch(String accessToken, OAuth2Property oAuth2Property) {
        return WebClient.create()
                .post()
                .uri(oAuth2Property.getUserInfoUri())
                .headers(header -> {
                    header.setBearerAuth(accessToken);
                })
                .retrieve()
                .bodyToMono(new ParameterizedTypeReference<Map<String, Object>>() {})
                .block();
    }
}
6. 서비스 구현하기
모든 하위 프로세스 작업은 끝났습니다.
이제 이를 통합해서 서비스를 구현합니다.
순서를 살펴보면 아래와 같습니다.
- 파라미터로 code 와 로그인할 소셜 서비스를 받는다.
- 소셜 서비스의 설정을 가져온다.
- access token 을 요청한다.
- access token 으로 유저 정보를 요청한다.
- 가져온 유저 정보를 추출한다.
@Service
@RequiredArgsConstructor
public class OAuth2UserProfileService {
    private final OAuth2AccessTokenFetcher oAuth2AccessTokenFetcher;
    private final OAuth2UserAttributesFetcher oAuth2UserAttributesFetcher;
    private final OAuth2Properties oAuth2Properties;
    private final UserProfileExtractorFactory userProfileExtractorFactory;

    public UserProfileDto getUserProfile(String code, OAuth2Provider oAuth2Provider) {
        OAuth2Property oAuth2Property = oAuth2Properties.get(oAuth2Provider);

        OAuth2AccessTokenResponse accessTokenResponse =
                oAuth2AccessTokenFetcher.fetch(code, oAuth2Property);

        Map<String, Object> attributes = oAuth2UserAttributesFetcher.fetch(
                accessTokenResponse.getAccessToken(), oAuth2Property);

        UserProfileExtractor userProfileExtractor = userProfileExtractorFactory.get(oAuth2Provider);
        return userProfileExtractor.extract(attributes);
    }
}
7. 테스트 하기
정상적으로 작동하는지 rest api를 만들어서 테스트합니다.
@RestController
@RequiredArgsConstructor
public class TestController {
    private OAuth2UserProfileService oAuth2UserProfileService;
    @GetMapping("/user-profile")
    public ResponseEntity<UserProfileDto> getUserProfile(
            @RequestParam String code,
            @RequestParam OAuth2Provider provider) {
        UserProfileDto userProfileDto = oAuth2UserProfileService.getUserProfile(code, provider);
        return ResponseEntity.ok(userProfileDto);
    }
}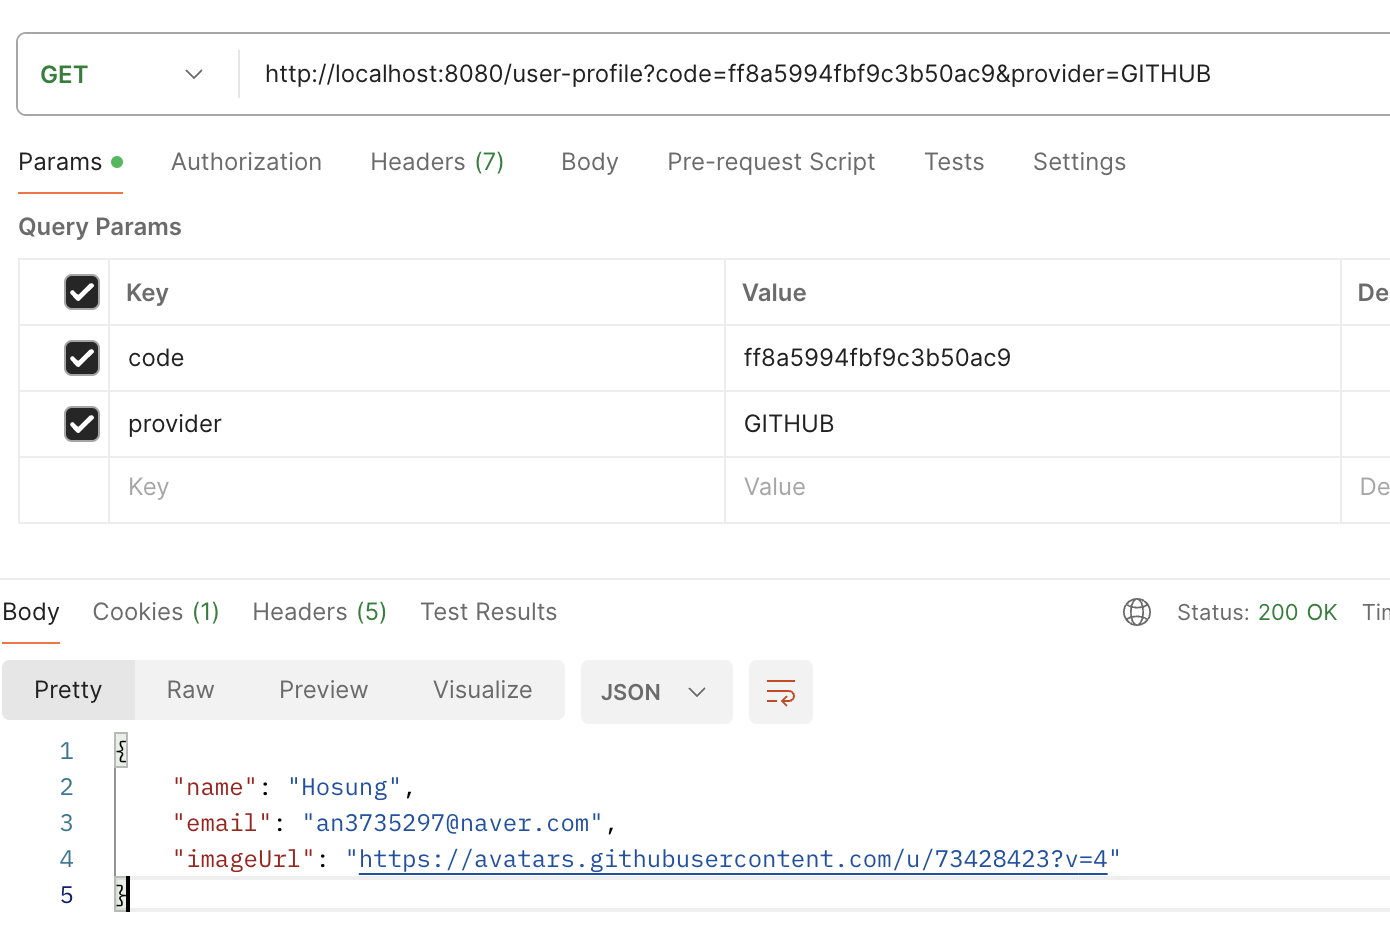
성공적으로 유저 정보를 받아옵니다.
마치며
사실 앞에서도 설명했듯이 OAuth2 를 직접 구현한 이유는 login access token 을 rest api 를 이용해서 발급하기 위해서였습니다.
따라서 여기까지만 보면 굳이 이렇게 만들 이유를 모르겠다는 생각이 들기도 합니다.
하지만 이렇게 만들면 백앤드 로그인 요청을 rest api 로 만들 수 있습니다. 이렇게 되면 access token 을 json 에 담아서 안전하게 보내줄 수도 있고, cookie 에 refresh token 을 담아 줄 수도 있습니다.
그렇지만 여기까지 글을 쓰면 할 말도 많고 쓸 코드도 너무 많아질 것 같아서 최대한 OAuth2 에 한정해서 작성하였습니다.
JWT 와 Spring Security 에 대해서는 다음 포스팅에서 자세히 작성해보도록 하겠습니다.