사전 지식
1. Geolocator 플러그인 소개와 기능
Geolocator 플러그인 이란?
지리와 관련된 기능을 쉽게 사용할 수 있는 플러그인이다.
3가지 기능
-
위치 서비스를 사용할 수 있는 권한이 있는지 확인하고 권한을 요청
-
현재 GPS 위치가 바뀔 때 마다 현재 위치값을 받을 수 있는 기능을 사용
-
현재 위치와 목적지 까지 건물간의 거리를 계산
1. 위치 서비스 권한 확인하기
위치 서비스를 사용할 수 있는 상태인지 확인하려면 2단계를 거쳐야 한다.
1. 기기 위치 서비스가 활성화 되어있는지 확인
isLocationServiceEnabled() 함수를 사용하면 확인할 수 있다.
final isLocationEnabled = await Geolocator.isLocationServiceEnabled();2. 앱에서 위치 서비스 권한을 요청하고 허가받아야 한다.
checkPermission() 함수를 사용하면 된다.
만약 권한이 없다면 requestPermission() 함수를 사용해서 권한을 요청할 수 있다.
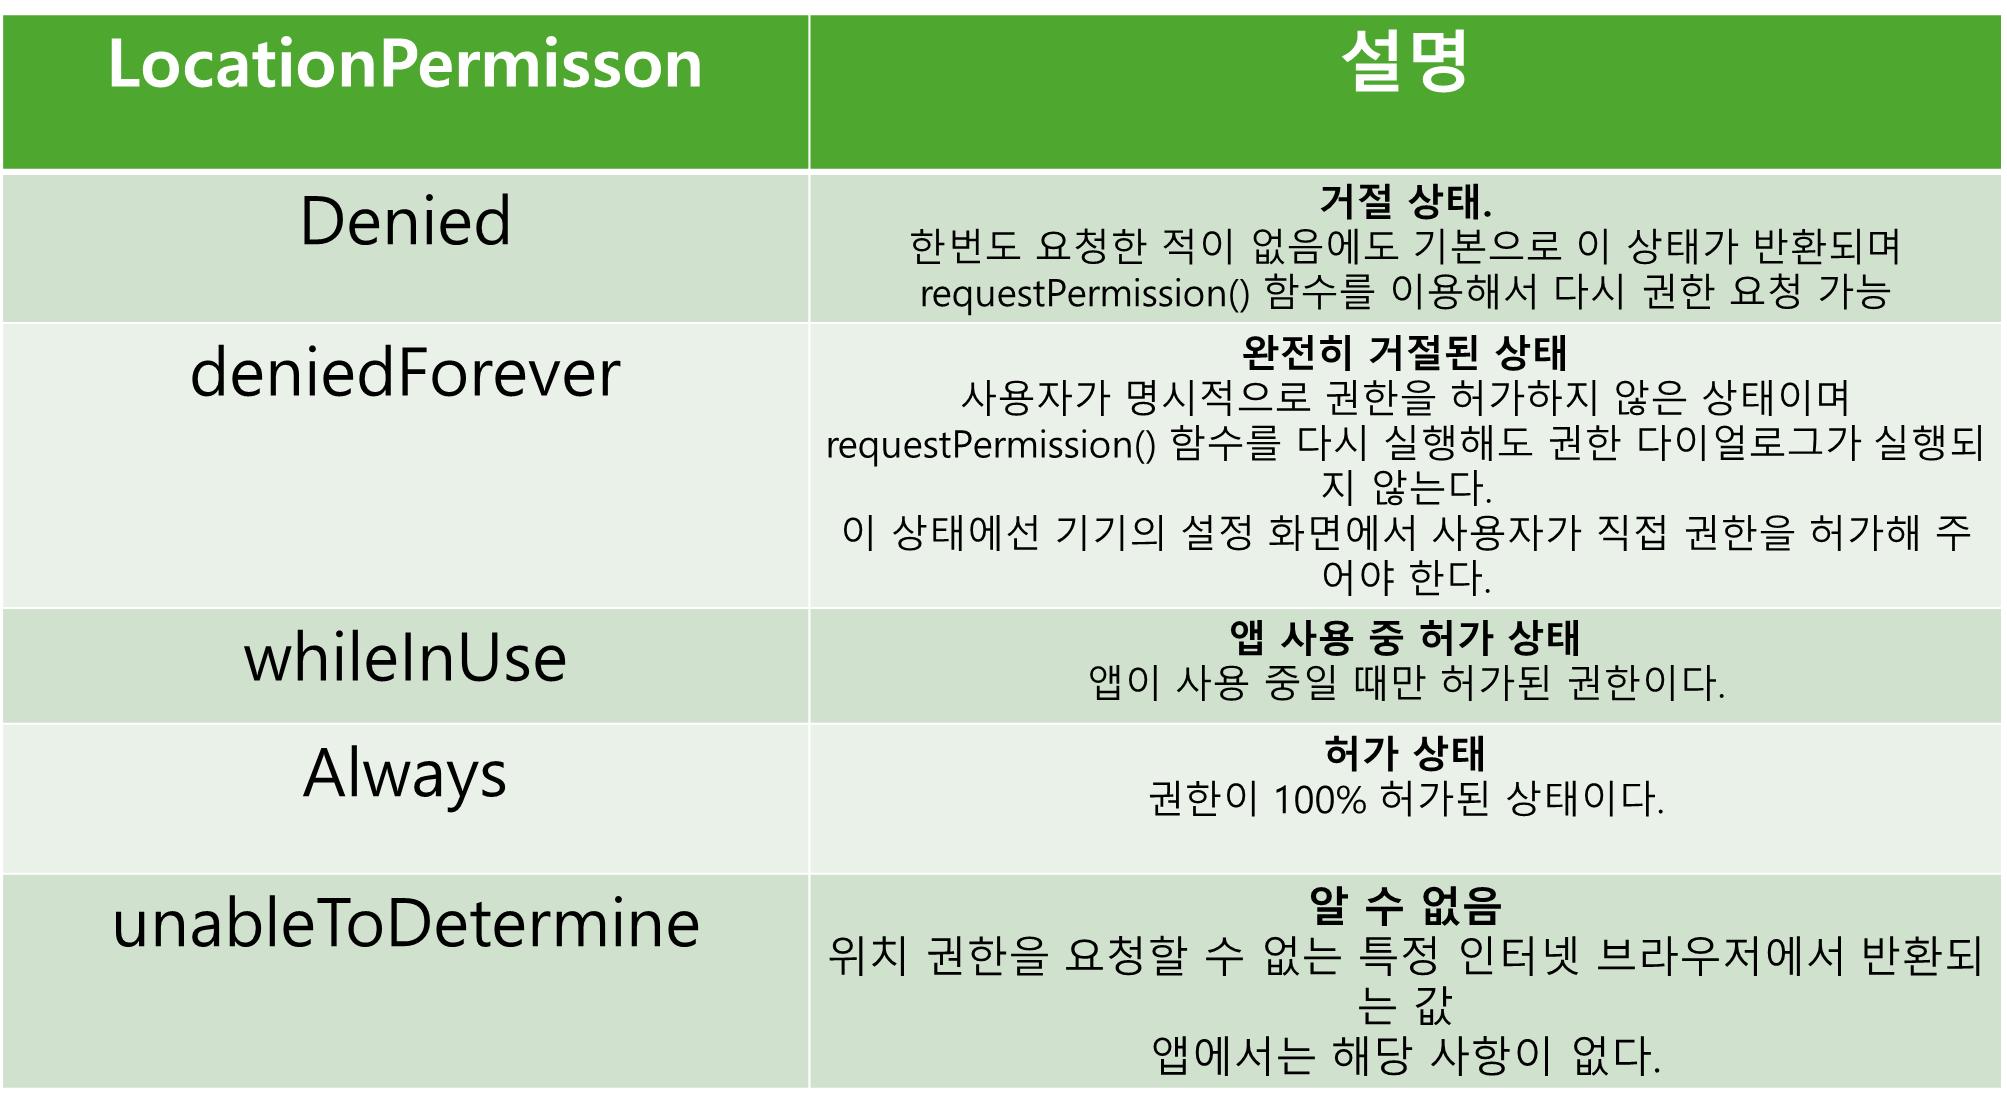
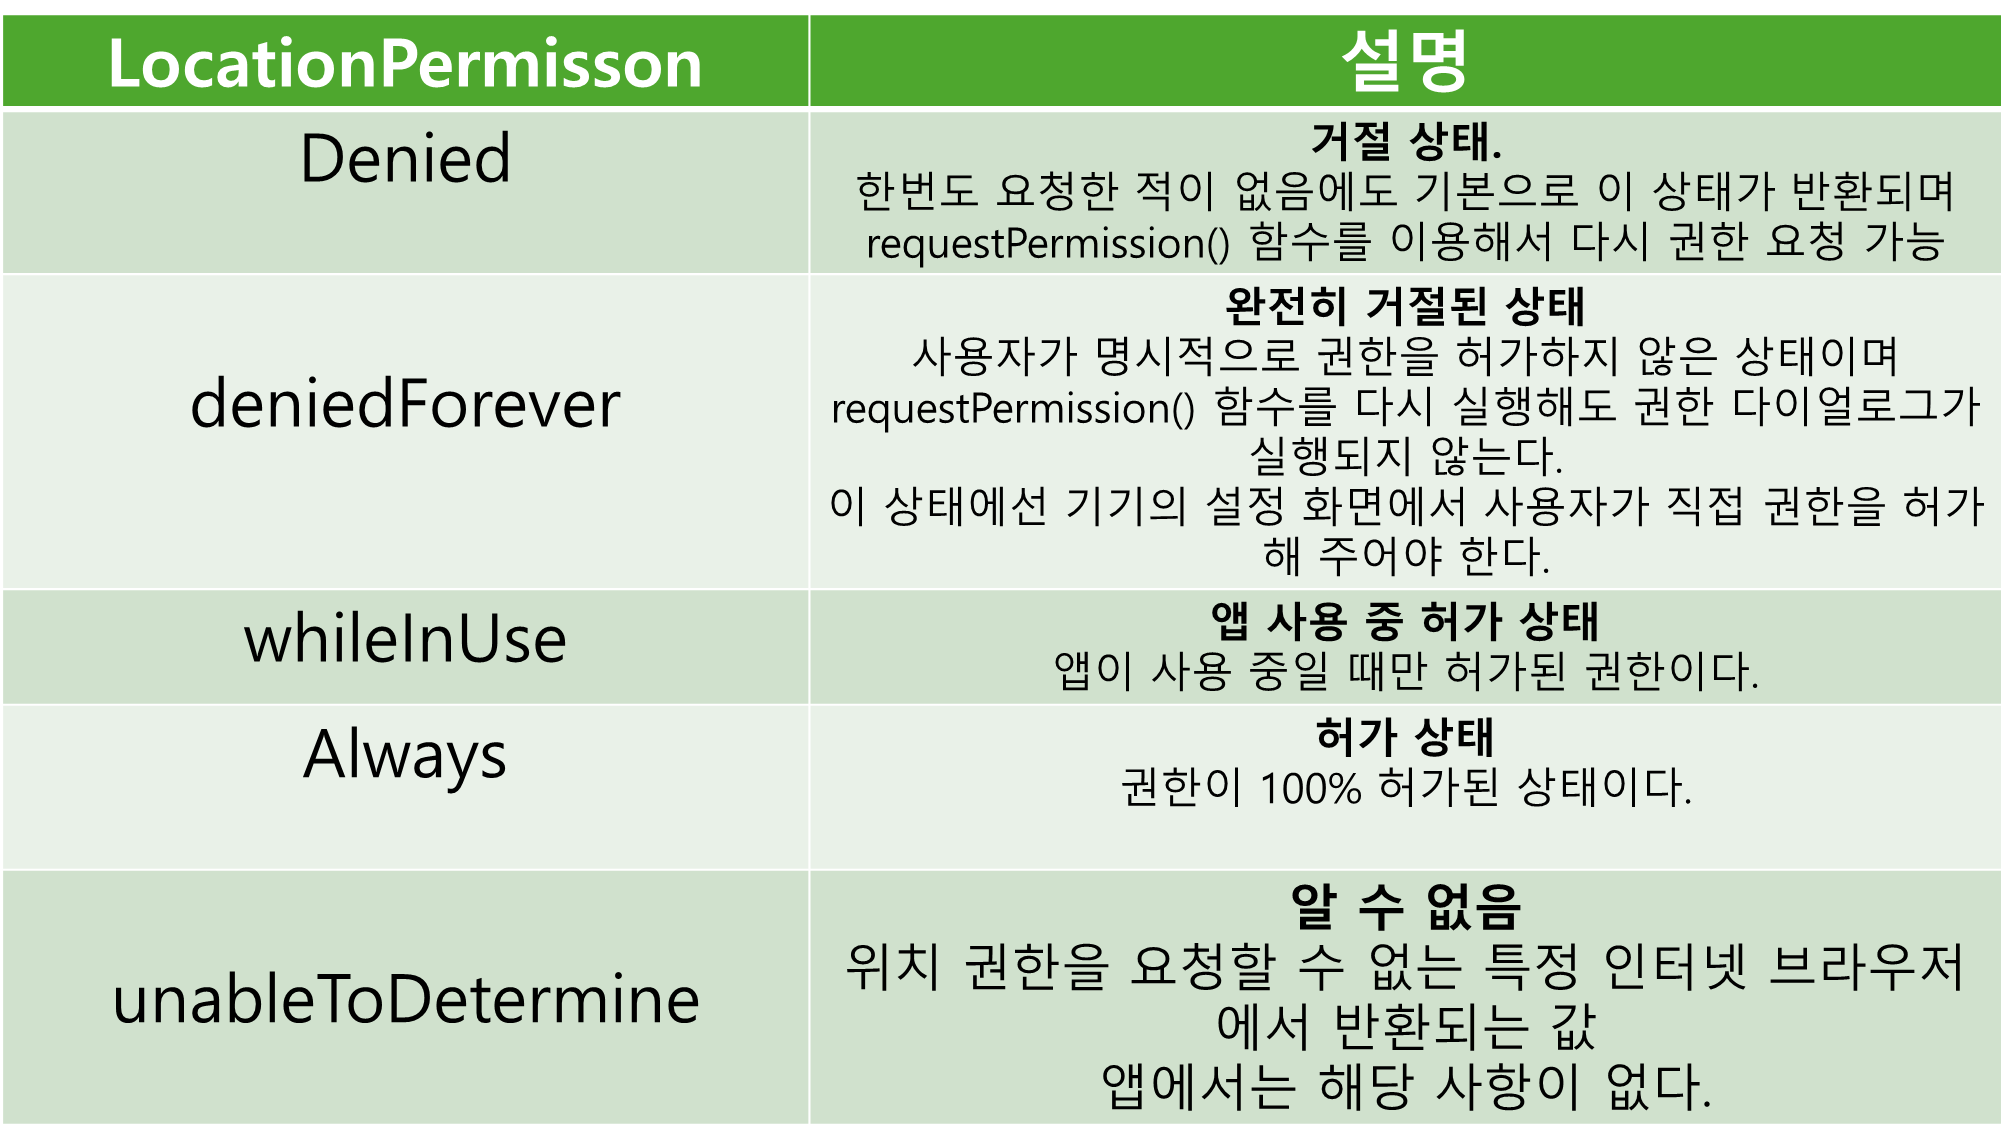
두 함수 모두 LocationPermission enum 을 반환해주며 5가지 값 중 하나를 반환받을 수 있다.
final checkedPermission = await Geolocator.checkPermission();	// 권한 확인
final checkedPermission = await Geolocator.requestPermission(); // 권한 요청
LocationPermission 반환값 정리
2. 현재 위치 지속적으로 반환받기
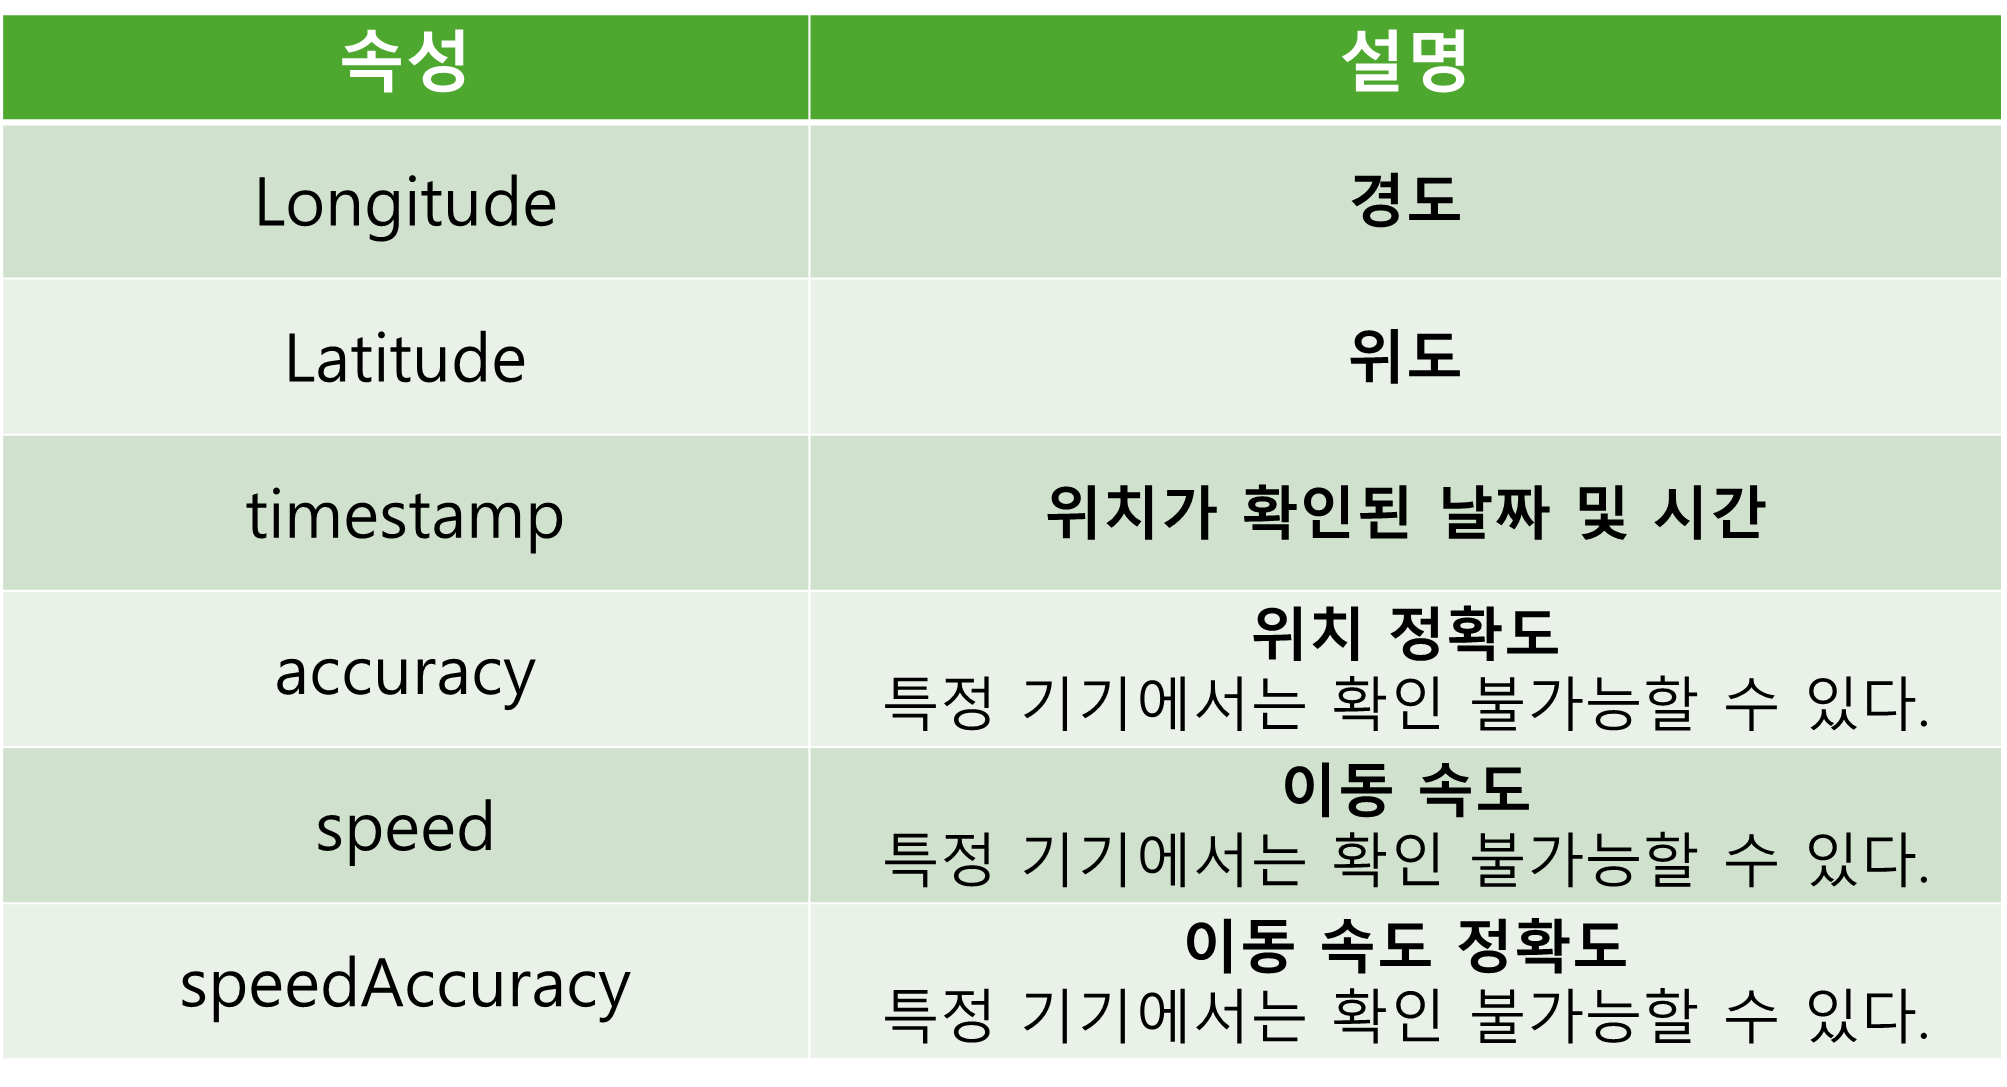
Geolocator 플러그인의 getPositionStream() 함수를 사용하면 현재 위치가 변경될 때 마다 현재 위치값을 Position 클래스 형태로 주기적으로 반환받을 수 있다.
Geolocator.getPositionStream().listen((Position position) {
	print(position);
});
Position 클래스 주요 속성
3. 두 위치 간의 거리 구하기
Geolocator 플러그인의 distanceBetween() 함수를 실행하면 복잡한 함수를 직접 구현할 필요 없이 두 위치 간의 거리르 미터 단위로 반환받을 수 있다.
// 두 위치 간의 거리를 double 값으로 반환
final distance = Geolocator.distacneBetween(
  sLat,	// 시작점 위도
  sLng, // 시작점 경도
  eLat, // 끝지점 위도
  eLng, // 끝지점 경도
);
사전 준비
pubspec.yaml 설정
지도 기능을 제공해주는 google_maps_flutter 플러그인과
위치 관련 기능을 제공해주는 geolocator 플러그인을 추가해준다.
dependencies:
  flutter:
    sdk: flutter


  # The following adds the Cupertino Icons font to your application.
  # Use with the CupertinoIcons class for iOS style icons.
  cupertino_icons: ^1.0.8
  google_maps_flutter: 2.5.0
  geolocator: 10.1.0
네이티브 코드 설정
구글 클라우드 플랫폼에서 발급받은 API 키를 안드로이드와 iOS 네이티브 파일에 모두 등록해줘야 구글 지도를 불러올 수 있다.
안드로이드 설정
android/app/build.gradle 파일에서
compileSdkVersion 은 최소 34으로(책에서는 33 이지만 34로 업데이트됨)
minSdkVersion은 최소 20으로 설정해 주어야 한다.
android {
    namespace = "com.example.chool_check"
    compileSdkVersion 34 //


    .
    .
    .


    defaultConfig {
        // TODO: Specify your own unique Application ID (https://developer.android.com/studio/build/application-id.html).
        applicationId = "com.example.chool_check"
        // You can update the following values to match your application needs.
        // For more information, see: https://flutter.dev/to/review-gradle-config.
        minSdkVersion 20 //
        targetSdk = flutter.targetSdkVersion
        versionCode = flutter.versionCode
        versionName = flutter.versionName
    }
추가적으로
android/app/src/main/AndroidManifest.xml에 상세 위치 권한과 미리 발급받은 구글 지도 API 키를 등록해줘야 한다.
iOS 설정
ios/Runner/AppDelegate.swift 파일을 열어주고 수정한다.
iOS 1.9.0. 버전 오류 해결
프로젝트를 실행하려는데 자꾸 버전이 1.7.1로 낮다고 오류가 떳다...
해결 방법은
1. android/build.gradle 파일에 ext.kotlin_version = '1.9.0' 추가하기
buildscript {
    ext.kotlin_version = '1.9.0'
    repositories {
        google()
        mavenCentral()
    }
    dependencies {
        classpath "org.jetbrains.kotlin:kotlin-gradle-plugin:$kotlin_version"
        // 다른 종속성들...
    }
}
allprojects {
    repositories {
        google()
        mavenCentral()
    }
}

rootProject.buildDir = "../build"
subprojects {
    project.buildDir = "${rootProject.buildDir}/${project.name}"
}
subprojects {
    project.evaluationDependsOn(":app")
}

tasks.register("clean", Delete) {
    delete rootProject.buildDir
}
2. android/settings.gradle 파일에 id "org.jetbrains.kotlin.android" version "1.9.0" apply false 여기 부분 버젼 1.9.0으로 수정하기
pluginManagement {
    def flutterSdkPath = {
        def properties = new Properties()
        file("local.properties").withInputStream { properties.load(it) }
        def flutterSdkPath = properties.getProperty("flutter.sdk")
        assert flutterSdkPath != null, "flutter.sdk not set in local.properties"
        return flutterSdkPath
    }()

    includeBuild("$flutterSdkPath/packages/flutter_tools/gradle")

    repositories {
        google()
        mavenCentral()
        gradlePluginPortal()
    }
}

plugins {
    id "dev.flutter.flutter-plugin-loader" version "1.0.0"
    id "com.android.application" version "7.3.0" apply false
    id "org.jetbrains.kotlin.android" version "1.9.0" apply false
}

include ":app"
프로젝트 초기화하기
홈스크린 만들고 main.dart에 등록해준다.
레이아웃 구상하기
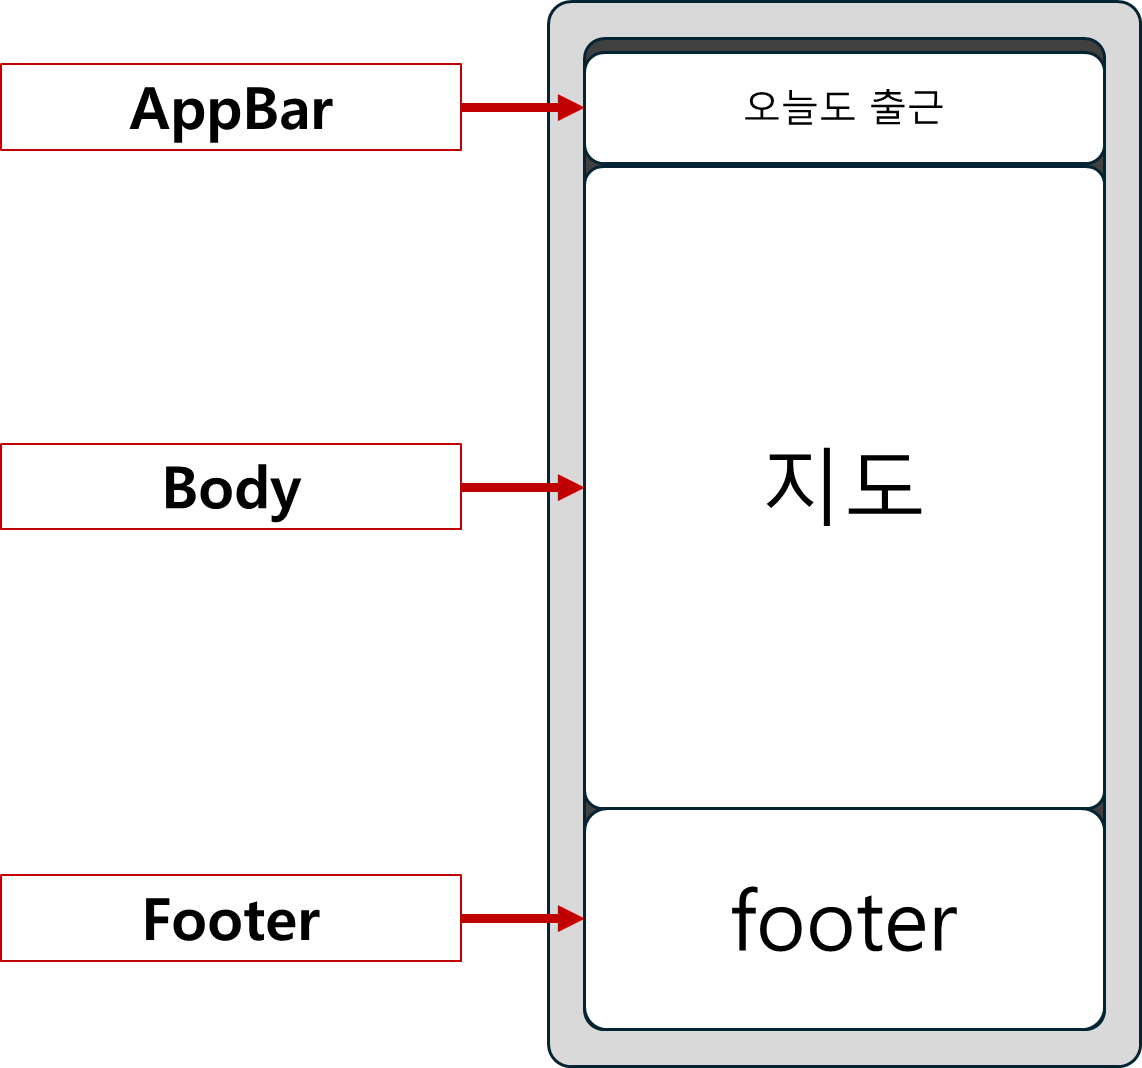
AppBar 중앙에 타이틀을 위치시킨다.
Body 위젯은 구글 지도를 보여주는 역할을 한다.
목적지에 마커를 띄우고 도형을 사용해서 출근 체크가 가능한 영역을 표시해주어야 한다.
Footer 위젯은 출근하기 기능을 구현할 영역이다.
현재 GPS 위치가 출근 체크가 가능한 위치라면 출근하기 버튼이 보이고 아니면 버튼이 보이지 않게 구현하겠다.
구현하기
1. AppBar 구현하기
import 'package:flutter/material.dart';

class HomeScreen extends StatelessWidget {
  const HomeScreen({super.key});

  @override
  Widget build(BuildContext context) {
    return Scaffold(
      appBar: renderAppBar(),
      body: Text("홈스크린"),
    );
  }

  AppBar renderAppBar() {
    // AppBar 구현하는 함수
    return AppBar(
      centerTitle: true,
      title: Text(
        '오늘도 출첵',
        style: TextStyle(
          color: Colors.blue,
          fontWeight: FontWeight.w700,
        ),
      ),
      backgroundColor: Colors.white,
    );
  }
}
'오늘도 출첵' 이라는 글자를 보여줄 Text 위젯을 넣는다.
2. Body 구현하기
1. 목적지의 위도, 경도 정보 LatLng 클래스에 저장하기
import 'package:flutter/material.dart';
import 'package:google_maps_flutter/google_maps_flutter.dart';

class HomeScreen extends StatelessWidget {
  static final LatLng companyLatLng = LatLng(
    // 1. 지도 초기화 위치
    37.5233273,
    126.921252,
  );

  .
  .
  .
LatLng 클래스는위도와경도로 특정 위치를 표현할 수 있는 클래스이다.
2. GoogleMap 위젯 넣기
import 'package:flutter/material.dart';
import 'package:google_maps_flutter/google_maps_flutter.dart';

class HomeScreen extends StatelessWidget {
  static final LatLng companyLatLng = LatLng(
    // 1. 지도 초기화 위치
    37.5233273,
    126.921252,
  );

  const HomeScreen({super.key});
//============================================================
  @override
  Widget build(BuildContext context) {
    return Scaffold( // 2. 지도 위치 지정
      appBar: renderAppBar(),
      body: GoogleMap(
        initialCameraPosition: CameraPosition(target: companyLatLng, zoom: 16), // 확대 정도
//============================================================
      ),
    );
  }
GoogleMap 위젯에는 필수로 입력해야 하는initialCameraPosition 매개변수가 있다.
이 매개변수에는CameraPosition 이라는 클래스를 입력해 주면 된다.
CameraPosition의target 매개변수에는지도의 중심이 될 위치를LatLng으로 입력할 수 있고확대 정도를 의미하는zoom을 double 로 입력할 수 있다.
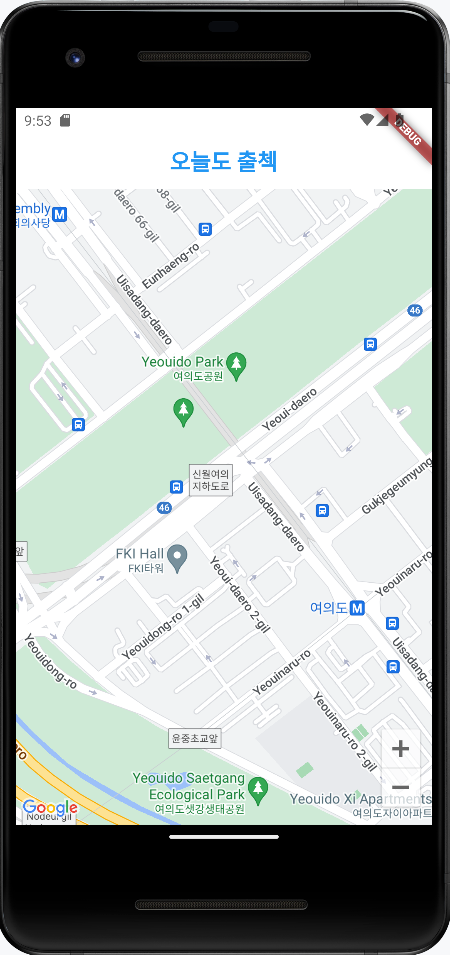
Body 구현 화면
3. Footer 구현하기
Widget build(BuildContext context) {
return Scaffold(
appBar: renderAppBar(),
body: Column(
children: [
Expanded( // 2/3 만큼 공간 차지
flex: 2,
child: GoogleMap(
initialCameraPosition:
CameraPosition(target: companyLatLng, zoom: 16), // 확대 정도
),
),
Expanded( // 1/3 만큼 공간 차지
child: Column(
mainAxisAlignment: MainAxisAlignment.center,
children: [
Icon( // 시계 아이콘
Icons.timelapse_outlined,
color: Colors.blue,
size: 50.0,
),
const SizedBox(
height: 20.0,
),
ElevatedButton( // [출근하기] 버튼
onPressed: () {},
child: Text('출근하기'),
),
],
))
],
),
);
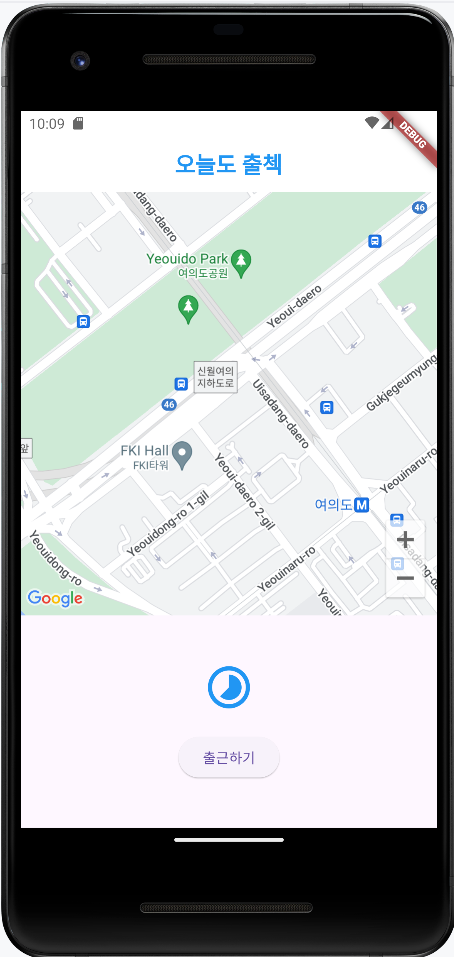
}Footer 구현 화면
4. 위치 권한 관리하기
-
기기 자체의 GPS 사용 권한을 확인하고
-
앱에서 위치 서비스를 사용할 수 있는지 확인한 후
-
위치 권한을 사용할 수 없는 상태면 권한을 재요청하는 로직을 구현
이 단계를 구현하겠다.
1. checkPermission() 함수 구현
모든 권한이 허가되면 '위치 권한이 허가되었습니다.' 라는 String 값을 반환해주고 아니면 문제되는 사항에 대한 정보가 담긴 String 을 반환하는 함수이다.
.
.
.

Future<String> checkPermission() async {
    final isLocationEnabled = await Geolocator.isLocationServiceEnabled();

    // 위치 서비스 활성화 여부 확인
    if (!isLocationEnabled) {
      return '위치 서비스를 활성화해주세요';
    }

    LocationPermission checkedPermission = await Geolocator.checkPermission();

    // 위치 권한 확인
    if (checkedPermission == LocationPermission.denied) {
      // 위치 권한 거절되었을 때
      // 위치 권한 요청하기
      checkedPermission = await Geolocator.requestPermission();

      if (checkedPermission == LocationPermission.denied) {
        return '앱의 위치 권한을 설정에서 허가해주세요';
      }
    }

    // 위치 권한 거절됨 (앱에서 재 요청 불가)
    if (checkedPermission == LocationPermission.deniedForever) {
      return '앱의 위치 권한을 설정에서 허가해 주세요';
    }

    // 위 모든 조건이 통과되면 위치 권한 허가 완료
    return '위치 권한이 허가 되었습니다.';
  }
}
2. checkPermission() 함수 적용하기
Widget build(BuildContext context) {
    return Scaffold(
      appBar: renderAppBar(),
      body: FutureBuilder<String>(
          future: checkPermission(),
          builder: (context, snapshot) {
            // 1. 로딩 상태
            if (!snapshot.hasData &&
                snapshot.connectionState == ConnectionState.waiting) {
              return Center(
                child: CircularProgressIndicator(),
              );
            }

            // 2. 권한 허가된 상태
            if (snapshot.data == '위치 권한이 허가 되었습니다.') {
              Column(
                children: [
                  Expanded(
                    flex: 2,
                    child: GoogleMap(
                      initialCameraPosition: CameraPosition(
                          target: companyLatLng, zoom: 16), // 확대 정도
                    ),
                  ),
                  Expanded(
                      child: Column(
                    mainAxisAlignment: MainAxisAlignment.center,
                    children: [
                      Icon(
                        Icons.timelapse_outlined,
                        color: Colors.blue,
                        size: 50.0,
                      ),
                      const SizedBox(
                        height: 20.0,
                      ),
                      ElevatedButton(
                        onPressed: () {},
                        child: Text('출근하기'),
                      ),
                    ],
                  ))
                ],
              );
            }

            // 3. 권한 없는 상태
            return Center(
              child: Text(
                snapshot.data.toString(),
              ),
            );
          }),
    );
  }
적용 영상
5. 화면에 마커 그리기
import 'package:flutter/material.dart';
import 'package:geolocator/geolocator.dart';
import 'package:google_maps_flutter/google_maps_flutter.dart';

class HomeScreen extends StatelessWidget {
  static final LatLng companyLatLng = LatLng(
    37.5233273,
    126.921252,
  );

  // 목적지 위치 마커 선언
  // 구글 지도 플러그인이 제공하는 Marker 클래스를 사용해서 각 마커별로 ID 를 정해주고 위치 입력해주기
  static final Marker marker = Marker(
    markerId: MarkerId('company'), // 주의! Marker 를 사용할 때 markerId 에 꼭 유일한 값을 넣어줘야 함
    position: companyLatLng,
  );

  const HomeScreen({super.key});

  @override
  Widget build(BuildContext context) {
    return Scaffold(
      appBar: renderAppBar(),
      body: FutureBuilder<String>(
        future: checkPermission(),
        builder: (context, snapshot) {
          if (!snapshot.hasData &&
              snapshot.connectionState == ConnectionState.waiting) {
            return Center(
              child: CircularProgressIndicator(),
            );
          }

          // 2. 권한 허가된 상태
          if (snapshot.data == '위치 권한이 허가 되었습니다.') {
            return Column(
              children: [
                Expanded(
                  flex: 2,
                  child: GoogleMap(
                    initialCameraPosition: CameraPosition(
                        target: companyLatLng, zoom: 16), // 확대 정도
                    markers: Set.from([marker]), // Set 으로 Marker 제공
마커 구현 모습
빨간색 기본 마커가 나타난다.
6. 현재 위치 반경 표시하기
위의 Marker 표시법과 거의 비슷하다. Marker 클래스 대신에 Circle 클래스를 사용하면 된다.
Marker와 마찬가지로 Circle도 id 값을 꼭 유일한 값으로 제공해주어야 한다.
안그러면 중복 처리가 되어서 Set에서 중복 값이 자동으로 배제될 수 있다.
.
.
.

static final Marker marker = Marker(
    markerId: MarkerId('company'),
    position: companyLatLng,
  );
  static final Circle circle = Circle(
    circleId: CircleId('choolCheckCircle'),
    center: companyLatLng,  // 원의 중심이 되는 위치, LatLng 값을 제공한다.
    fillColor: Colors.blue.withOpacity(0.5), // 원의 색상
    radius: 100, // 원의 반지름 (미터 단위)
    strokeColor: Colors.blue, // 원의 테두리 색
    strokeWidth: 1, // 원의 테두리 두께
  );

.
.
.

Widget build(BuildContext context) {
    return Scaffold(
      appBar: renderAppBar(),
      body: FutureBuilder<String>(
        future: checkPermission(),
        builder: (context, snapshot) {
          if (!snapshot.hasData &&
              snapshot.connectionState == ConnectionState.waiting) {
            return Center(
              child: CircularProgressIndicator(),
            );
          }

          if (snapshot.data == '위치 권한이 허가 되었습니다.') {
            return Column(
              children: [
                Expanded(
                  flex: 2,
                  child: GoogleMap(
                    initialCameraPosition: CameraPosition(
                        target: companyLatLng, zoom: 16),
                    markers: Set.from([marker]),
                    circles: Set.from([circle]), // Set 으로 Circle 제공


                    .
                    .
                    .
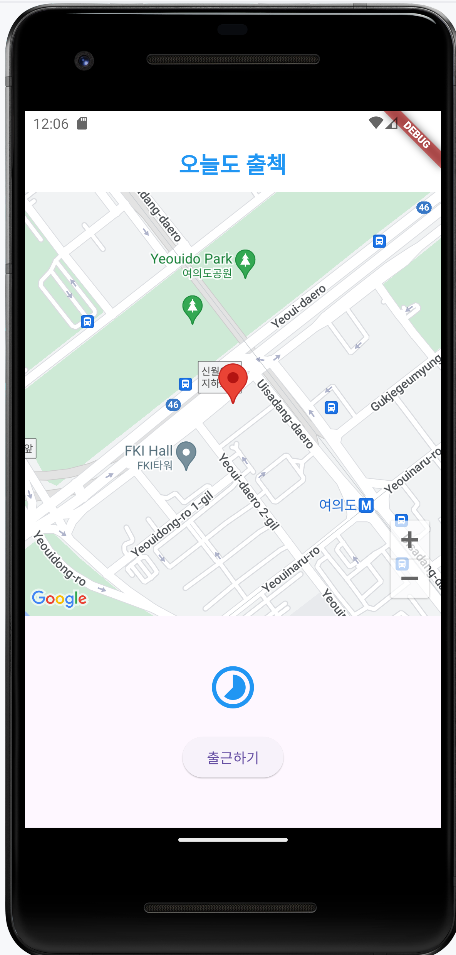
위치 반경 구현 모습

빨간 마커 주위에 파란색 출첵 위치반경이 표시된다.
7. 현재 위치 지도에 표시하기
GoogleMap 위젯에 myLocationEnabled 매개변수가 존재하는데 이걸 true 로 설정하면 현재 GPS 상 위치를 지도에 보여줄 수 있다.
Widget build(BuildContext context) {
    return Scaffold(

      .
      .
      .

          // 1. 로딩 상태
          if (!snapshot.hasData &&
              snapshot.connectionState == ConnectionState.waiting) {
            return Center(
              child: CircularProgressIndicator(),
            );
          }

          // 2. 권한 허가된 상태
          if (snapshot.data == '위치 권한이 허가 되었습니다.') {
            return Column(
              children: [
                Expanded(
                  flex: 2,
                  child: GoogleMap(
                    initialCameraPosition: CameraPosition(
                      target: companyLatLng,
                      zoom: 16,
                    ), // 확대 정도
              // ==========================================================
                    myLocationEnabled: true, // 내 위치 지도에 보여주기
              // ==========================================================
                    markers: Set.from([marker]),
                    circles: Set.from([circle]),
                  ),
8. 출근하기 기능 구현하기
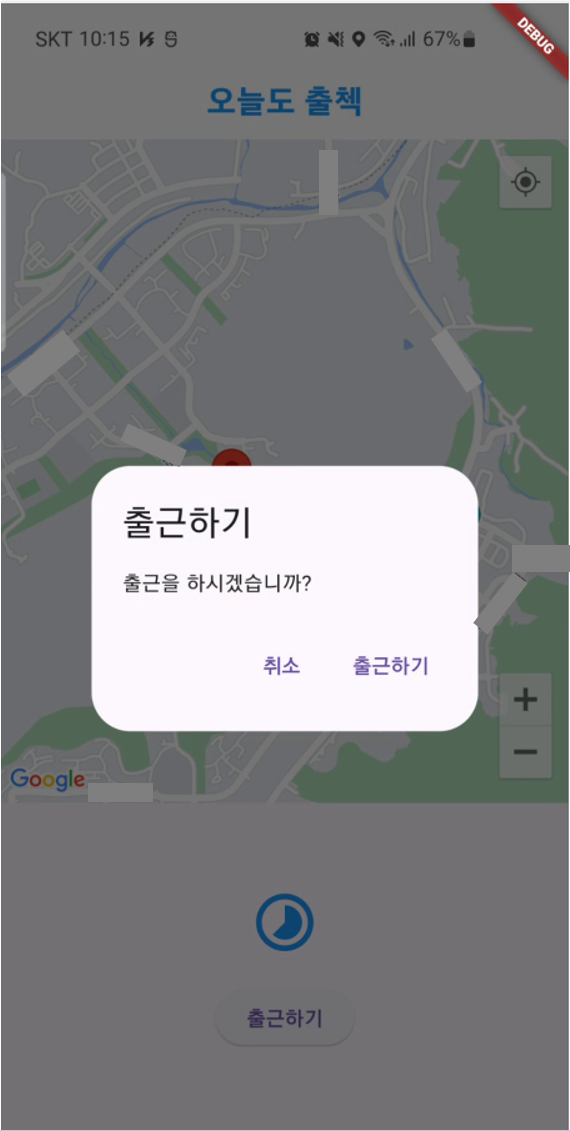
'만난지 며칠 U&I' 앱에서 구현했던 다이얼로그를 사용해 구현하겠다.
다이얼로그 구현
'출근하기' 버튼을 눌렀을 때 현재 위치와 목적지 위치 간의 거리를 미터로 계산하겠다.
Geolocator.getCurrentPosition() 함수를 사용하면 현재 위치를 반환받을 수 있고
Geolocator.distanceBetween() 을 사용하면 쉽게 거리를 구할 수 있다.
Widget build(BuildContext context) {

    .
    .
    .

          // 2. 권한 허가된 상태
          if (snapshot.data == '위치 권한이 허가 되었습니다.') {
            return
            .
            .
            .

                ),
                Expanded(
                    child: Column(
                  mainAxisAlignment: MainAxisAlignment.center,
                  children: [
                    Icon(
                      Icons.timelapse_outlined,
                      color: Colors.blue,
                      size: 50.0,
                    ),
                    const SizedBox(
                      height: 20.0,
                    ),
                    // ========================================================
                    ElevatedButton(
                      onPressed: () async {
                        final curPosition =
                            await Geolocator.getCurrentPosition(); // 현재 위치
                        final distance = Geolocator.distanceBetween(
                          curPosition.latitude,   // 현재 위치 위도
                          curPosition.longitude,  // 현재 위치 경도
                          companyLatLng.latitude, // 목적지 위치 위도
                          companyLatLng.longitude, // 목적지 위치 경도
                        );
                      },
                    // ========================================================
                      child: Text('출근하기'),
원의 반지름 이내로 들어왔을 때 출근 버튼 눌리게 하기
다이얼로그를 실행할 때는 showDialog() 함수를 실행해주면 된다.
builder 매개변수에 다이얼로그로 사용하고 싶은 위젯을 반환해주면 된다.
여기서 AlertDialog 위젯을 사용해서 구현하겠다.
Widget build(BuildContext context) {

  .
  .
  .

                    ElevatedButton(
                      onPressed: () async {
                        final curPosition =
                            await Geolocator.getCurrentPosition(); // 현재 위치
                        final distance = Geolocator.distanceBetween(
                          curPosition.latitude, // 현재 위치 위도
                          curPosition.longitude, // 현재 위치 경도
                          companyLatLng.latitude, // 목적지 위치 위도
                          companyLatLng.longitude, // 목적지 위치 경도
                        );
				// ===========================================================
                        bool canCheck = distance < 100; // 100미터 이내에 있으면 출근 가능
                        showDialog(
                          context: context,
                          builder: (_) {
                            return AlertDialog(
                              title: Text('출근하기'),
                              // 출근 가능 여부에 따라 다른 메시지 제공
                              content: Text(
                                canCheck ? '출근을 하시겠습니까?' : '출근할 수 없는 위치입니다.',
                              ),
                              actions: [
                                TextButton(
                                  // 취소를 누르면 false 반환
                                  onPressed: () {
                                    Navigator.of(context).pop(false);
                                  },
                                  child: Text('취소'),
                                ),
                                // 출근 가능할 때만 '출근하기' 버튼 제공
                                if (canCheck)
                                  TextButton(
                                    // 출근하기를 누르면 true 반환
                                    onPressed: () {
                                      Navigator.of(context).pop(true);
                                    },
                                    child: Text('출근하기'),
                                  )
                              ],
                            );
                          },
                        );
                      },
                      child: Text('출근하기'),
최종 실행
지금은 목적지 위치가 여의도로 되어있어서 출근 불가라고 뜬다
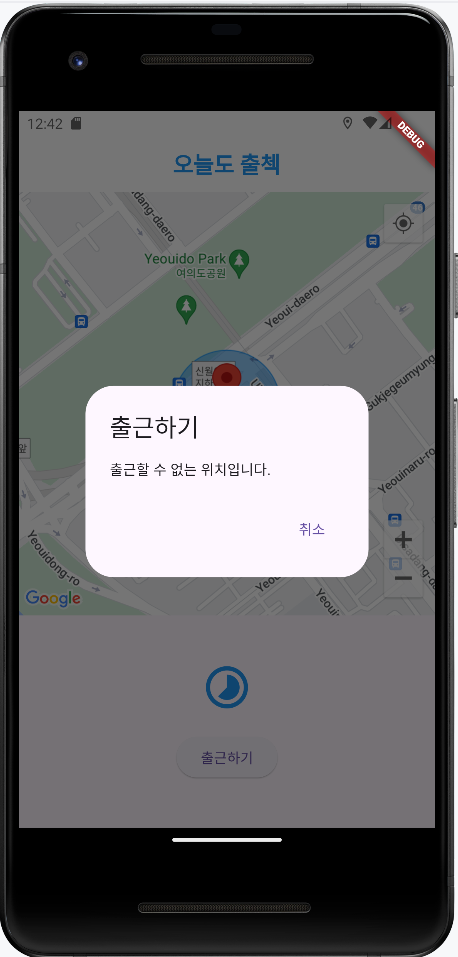
목적지 근처에 오니까 출첵 가능하다고 뜬다