이번 글에서는 안드로이드에서 어떻게 테스트를 진행하는지 공부하고자 한다!
저번글 👉🏻 안드로이드에서 TDD로 개발하기(1)
안드로이드 테스트 문서 살펴보기
어떤 테스트가 있나요?
실제로 테스트를 작성하는 방법을 소개하기 전에 안드로이드 테스트 기본 요소 문서를 간단히 살펴 보고자 한다. 안드로이드 테스트 개요에는 다음과 같은 이미지를 보여주고 있다.

- Small tests
: 하나의 클래스의 동작의 유효성을 검사하는 단위 테스트이다. 단위 테스트란 애플리케이션을 구성하는 작은 단위의 기능이 개발자가 의도한 대로 동작하는지 확인하는 테스트이다. 단위 테스트를 통해 기능에서 발생하는 문제를 빠르게 찾을 수 있다. - Medium tests
: 모듈간의 상호작용의 유효성을 검사하는 통합 테스트이다. 통합 테스트는 단위 테스트가 끝난 모듈을 통합하는 과정에서 발생하는 오류, 결함 찾는 테스트이다. - Large tests
: 사용자의 경험에 대한 유효성을 검사하는 e2e테스트이다. e2e테스트는 사용자의 입장에서 애플리케이션을 테스트하는 것이다.
위로 올라갈 수록 테스트를 수행하는데 드는 비용이 증가한다. 따라서 안드로이드 문서에서 small부터 70, 20, 10의 비율로 테스트 코드를 작성하는 것을 권하고 있다.
안드로이드 프로젝트에는 이러한 테스트를 수행하는 두 개의 폴더가 있다.
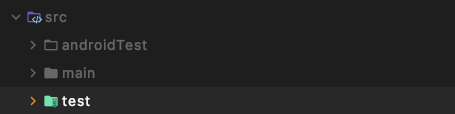
- androidTest : 실제 또는 가상 기기에서 실행되는 테스트가 포함된다. 통합 테스트, e2e 테스트등 jvm만으로 애플리케이션의 유효성을 검사할 수 없는 테스트가 포함된다.
- test : 로컬 시스템에서 수행되는 테스트를 포함한다.
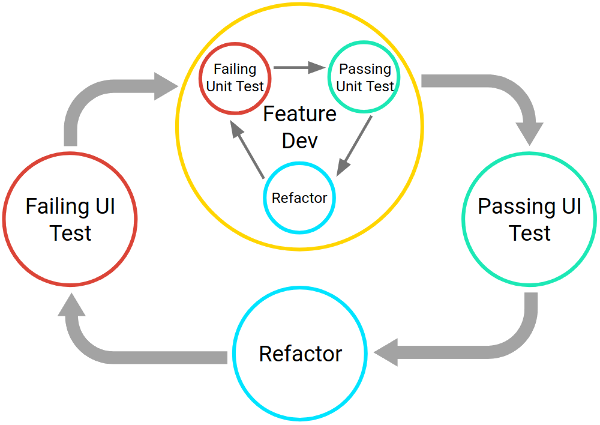
위의 두개의 테스트를 번갈아 가며 애플리케이션을 개발한다. 안드로이드 테스트 문서에는 다음과 같이 테스트 기반 개발의 주기과 관련된 그림을 제공한다.
안드로이드 테스트에는 무엇이 사용되나요?
각 라이브러리에 대해서 공부해보는 것도 좋을 것 같다. 할..일.. 추가...
- Junit
: 자바에서 사용되고 있는 단위 테스트 프레임쿼크이다. - Mockito
: 단위 테스트를 위해 mock 객체를 생성할 수 있는 mocking 프레임워크이다. mokito를 사용하여 쉽게 mock객체를 생성할 수 있다. - Esspresso
: 애플리케이션의 ui를 테스트하는 프레임워크이다. - androidx.test
: 안드로이드에서 사용하는 테스트 라이브러리의 묶음이다. 다음과 같은 라이브러리를 제공한다.
    dependencies {
          // Core library
          androidTestImplementation 'androidx.test:core:1.0.0'

          // AndroidJUnitRunner and JUnit Rules
          androidTestImplementation 'androidx.test:runner:1.1.0'
          androidTestImplementation 'androidx.test:rules:1.1.0'

          // Assertions
          androidTestImplementation 'androidx.test.ext:junit:1.0.0'
          androidTestImplementation 'androidx.test.ext:truth:1.0.0'
          androidTestImplementation 'com.google.truth:truth:0.42'

          // Espresso dependencies
          androidTestImplementation 'androidx.test.espresso:espresso-core:3.1.0'
          androidTestImplementation 'androidx.test.espresso:espresso-contrib:3.1.0'
          androidTestImplementation 'androidx.test.espresso:espresso-intents:3.1.0'
          androidTestImplementation 'androidx.test.espresso:espresso-accessibility:3.1.0'
          androidTestImplementation 'androidx.test.espresso:espresso-web:3.1.0'
          androidTestImplementation 'androidx.test.espresso.idling:idling-concurrent:3.1.0'

          // The following Espresso dependency can be either "implementation"
          // or "androidTestImplementation", depending on whether you want the
          // dependency to appear on your APK's compile classpath or the test APK
          // classpath.
          androidTestImplementation 'androidx.test.espresso:espresso-idling-resource:3.1.0'
        }
안드로이드 테스트 만들기
나는 테스트 작성으로 프로젝트를 시작할 때 e2e테스트를 먼저 작성한다. 안드로이드에서 e2e테스트를 작성하기 위해서는 gradle에 다음과 같이 esspresso 라이브러리에 대한 종속성을 추가해주어야 한다. 또한 ui테스트를 실행하기 위해서 테스트 실행기를 포함한 라이브러리에 대한 종속성을 추가해주어야 한다.
//Espresso dependencies
androidTestImplementation 'androidx.test.espresso:espresso-core:3.3.0'

// AndroidJUnitRunner and JUnit Rules
androidTestImplementation 'androidx.test:runner:1.1.0'
androidTestImplementation 'androidx.test:rules:1.1.0'
👉🏻 AndroidJUnitRunner에 대해서
👉🏻 esspresso에 대해서
이제 진짜로 테스트 코드를 작성해보자.간단하게 Hello Test World!라는 텍스트가 화면에 보이는지 테스트하는 코드를 작성했다.
@LargeTest
@RunWith(AndroidJUnit4::class)
class HelloWorldTest {
    @get:Rule
    val activityRule = ActivityScenarioRule(MainActivity::class.java)

    @Test
    fun showHelloWorldText(){
        onView(withText("Hello Test World!")).check(matches(isDisplayed()))
    }
}
작성후 테스트 코드를 실행하면 테스트는 깨진다.

이유는 Hello Test World!가 화면에 보이지 않기 때문이다.(현재는 Hello World!가 출력된다.) 이제 xml로 돌아가 텍스트를 Hello Test World!로 수정하고 테스트를 다시 실행하면 테스트에 통과하게 될 것이다.
다음 글에서는 단순하지만 hello world보다는 복잡한 예제로 내가 안드로이드에서 TDD를 진행하는 방법을 설명하려고 한다. 또한 테스트를 작성할 때 가독성에 대한 부분을 고민한 내용도 다음 글에 넣고자 한다. (다다음 글이 될 수도 있지만...)