-
Hypervisor(하이퍼바이저): 물리 자원을 추상화한다.
-
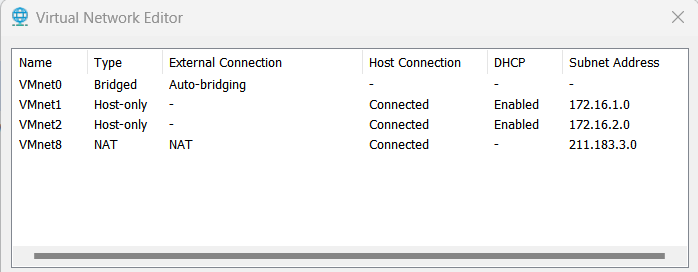
VMWare Workstation - Virtual Network Editor 에서
VMnet0,VMnet1,VMnet8의 의미
: LAN카드를 hypervisor가 분할하여 스위치에 연결
→ 각 스위치가VMnet0,VMnet1,VMnet8임.
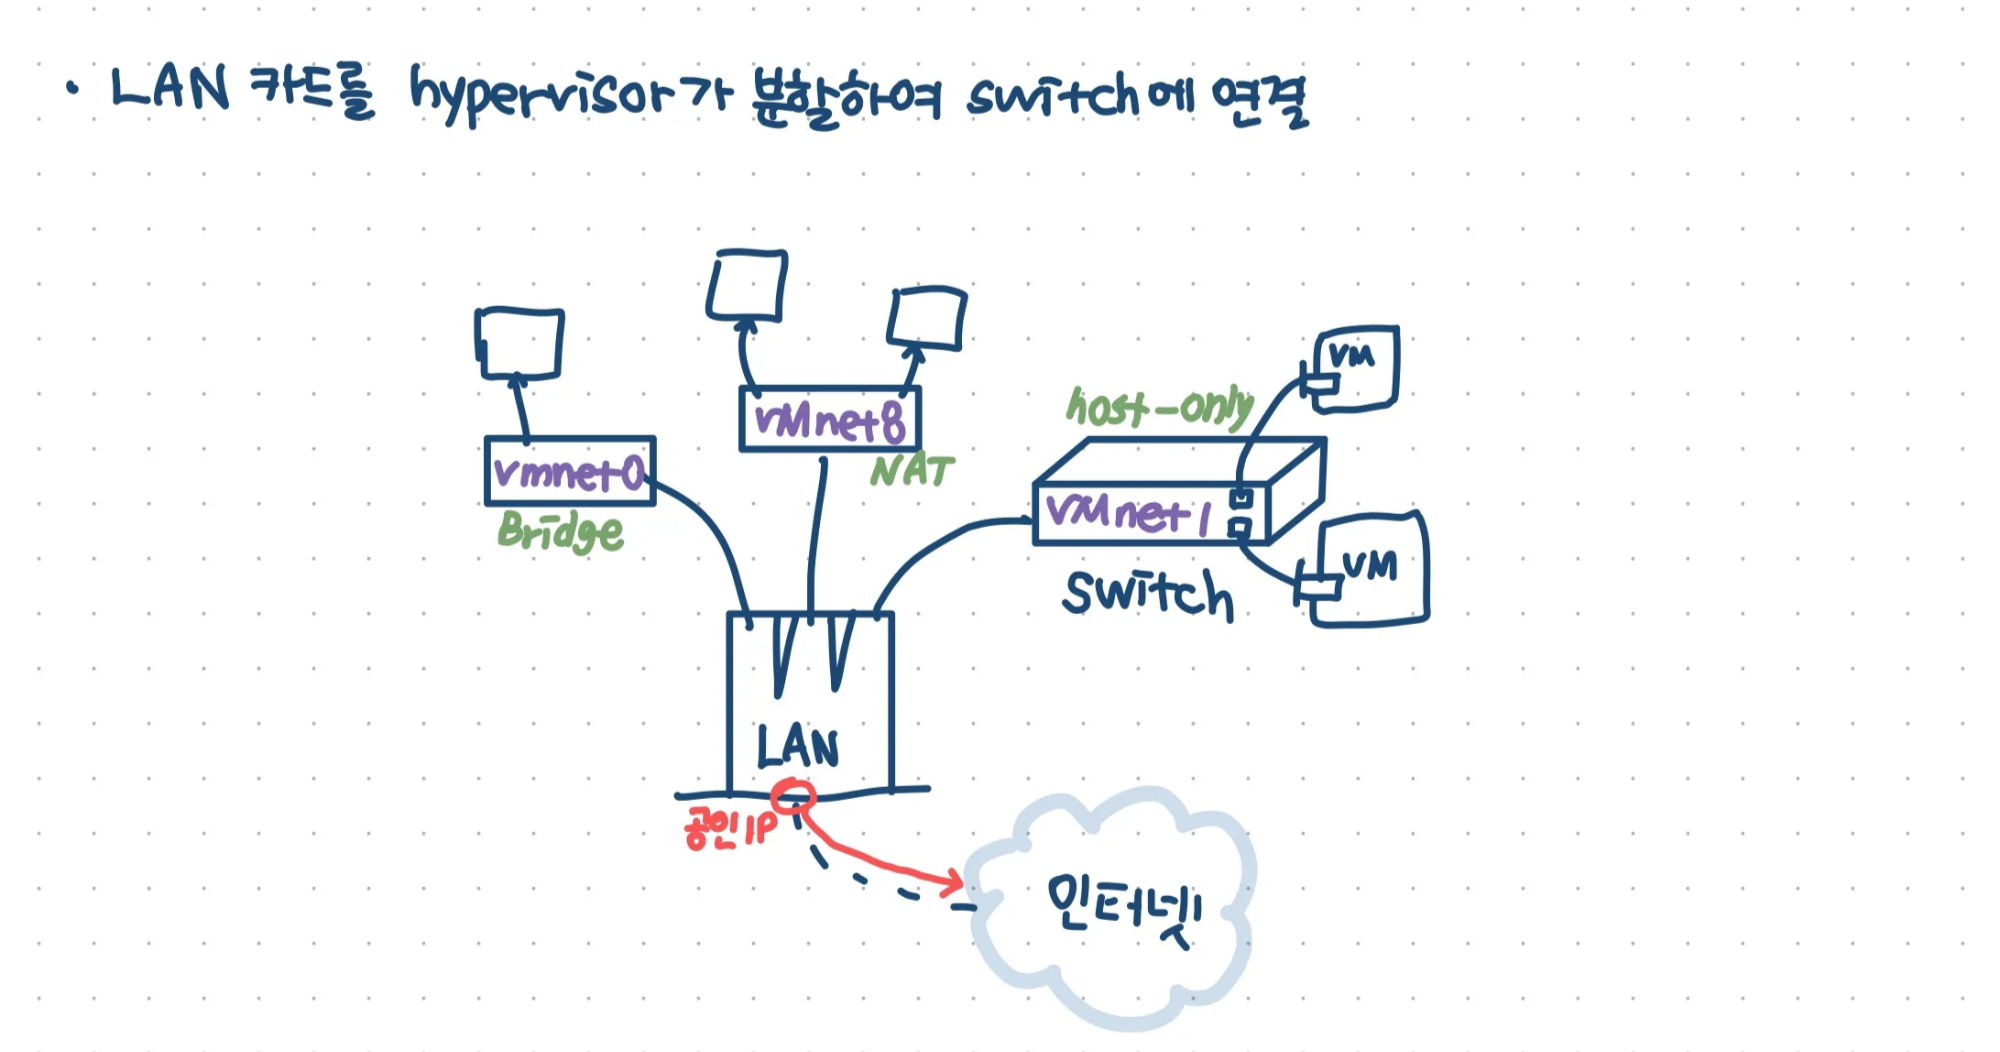
각 스위치에 가상머신(VM)을 연결하는 것! -
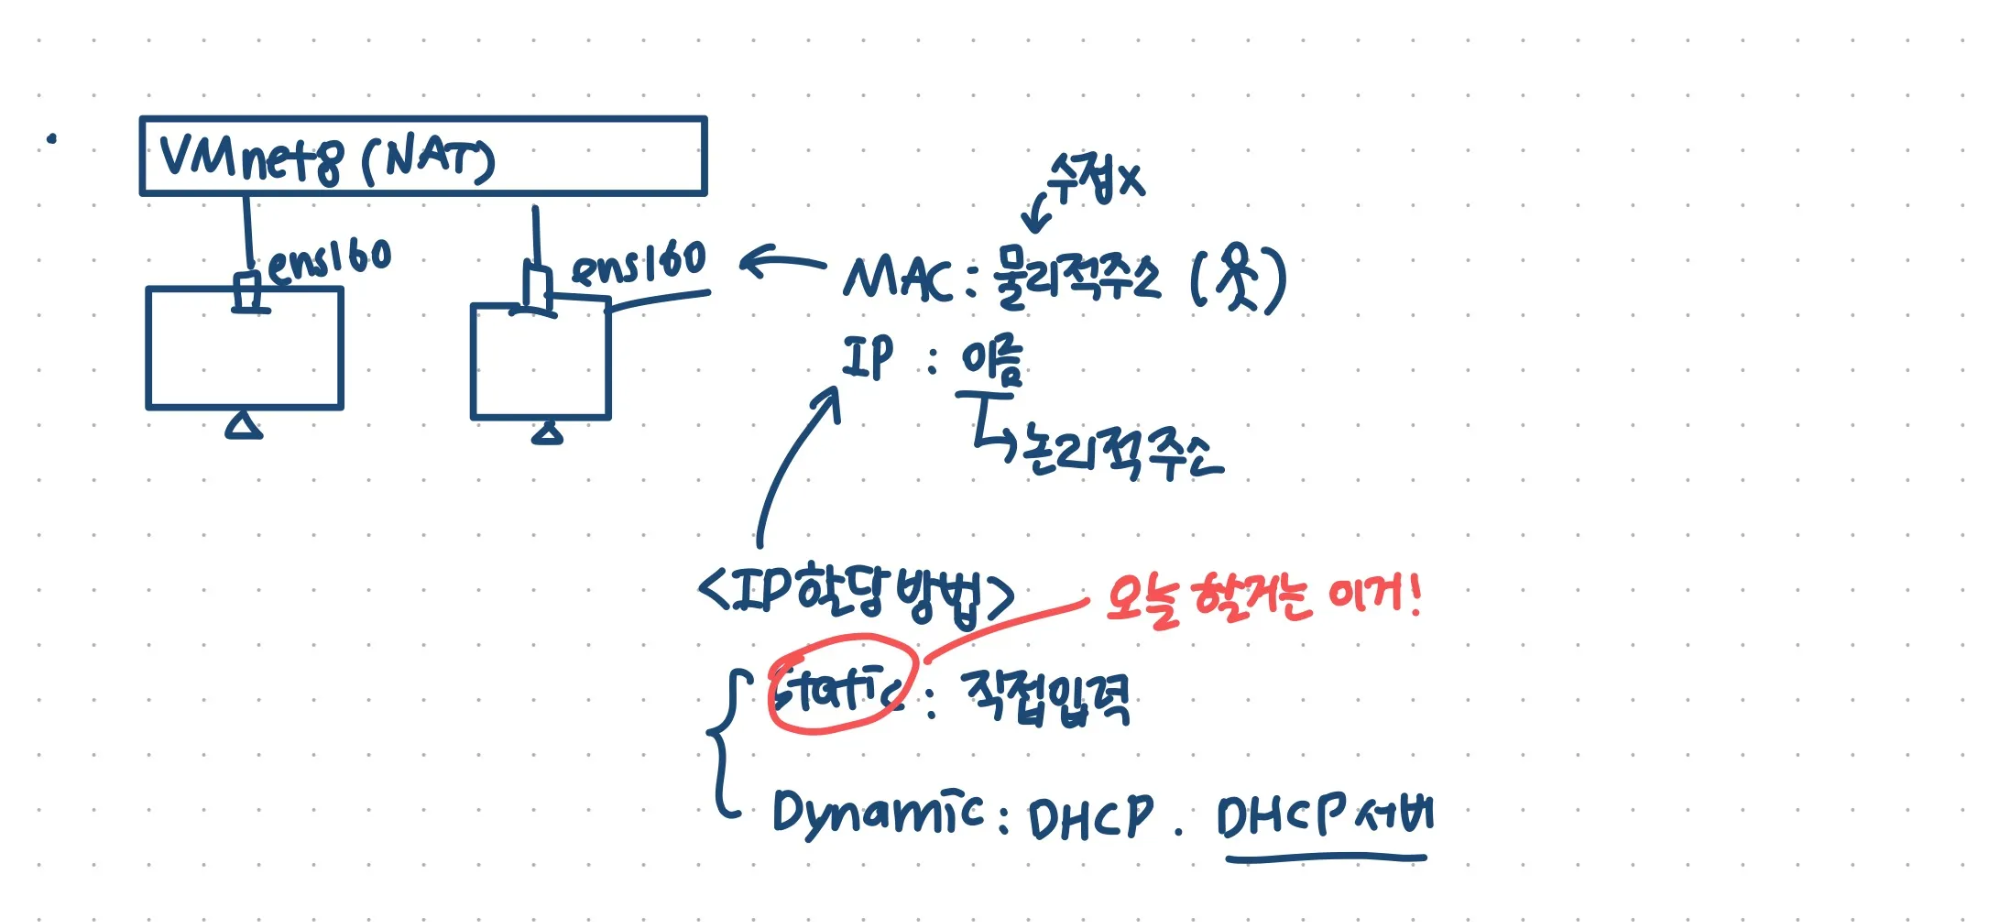
vNIC
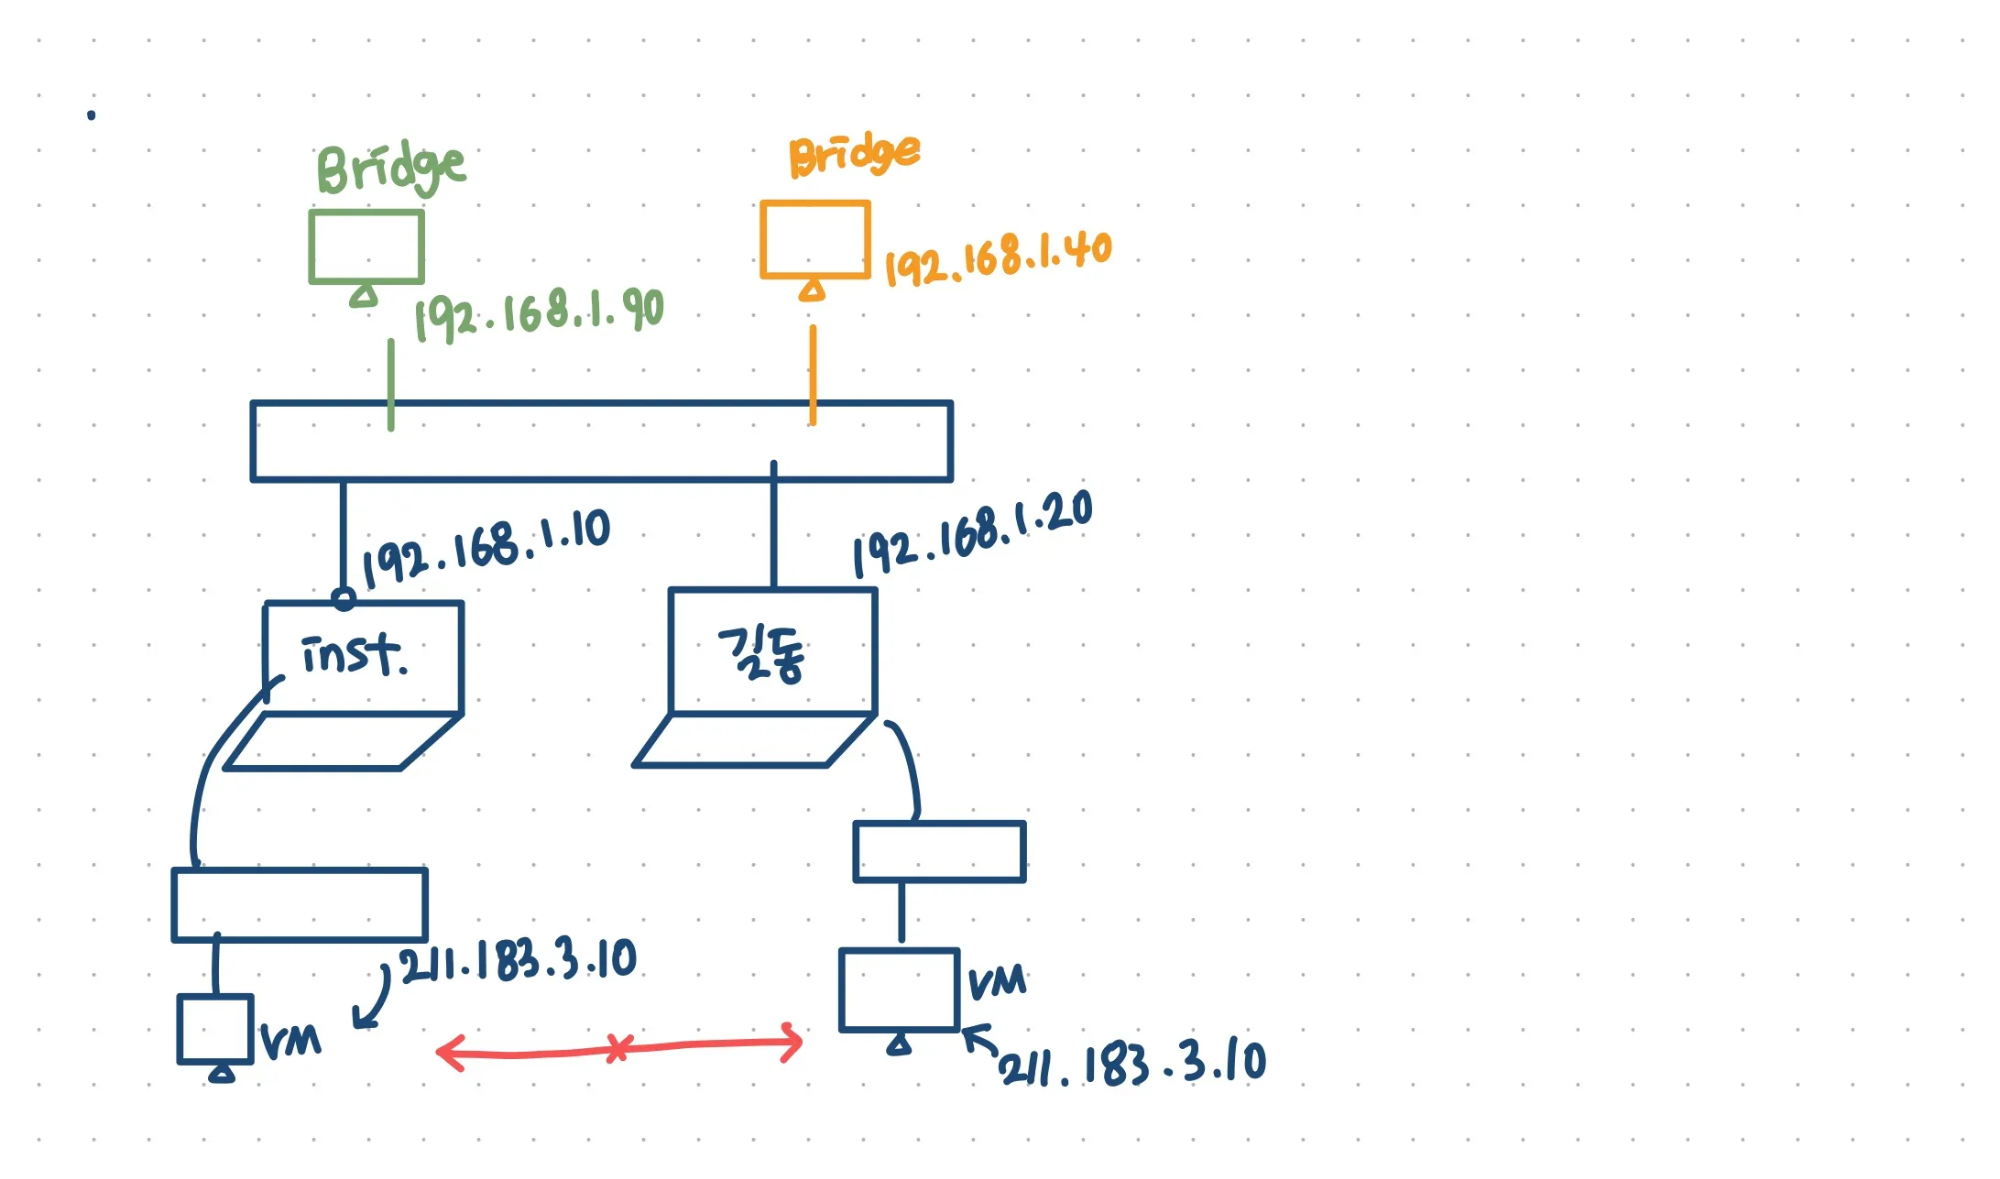
- Bridged: 실제 NIC(랜카드)과 동일한 지역의 ip 사용. 주소 변환 X
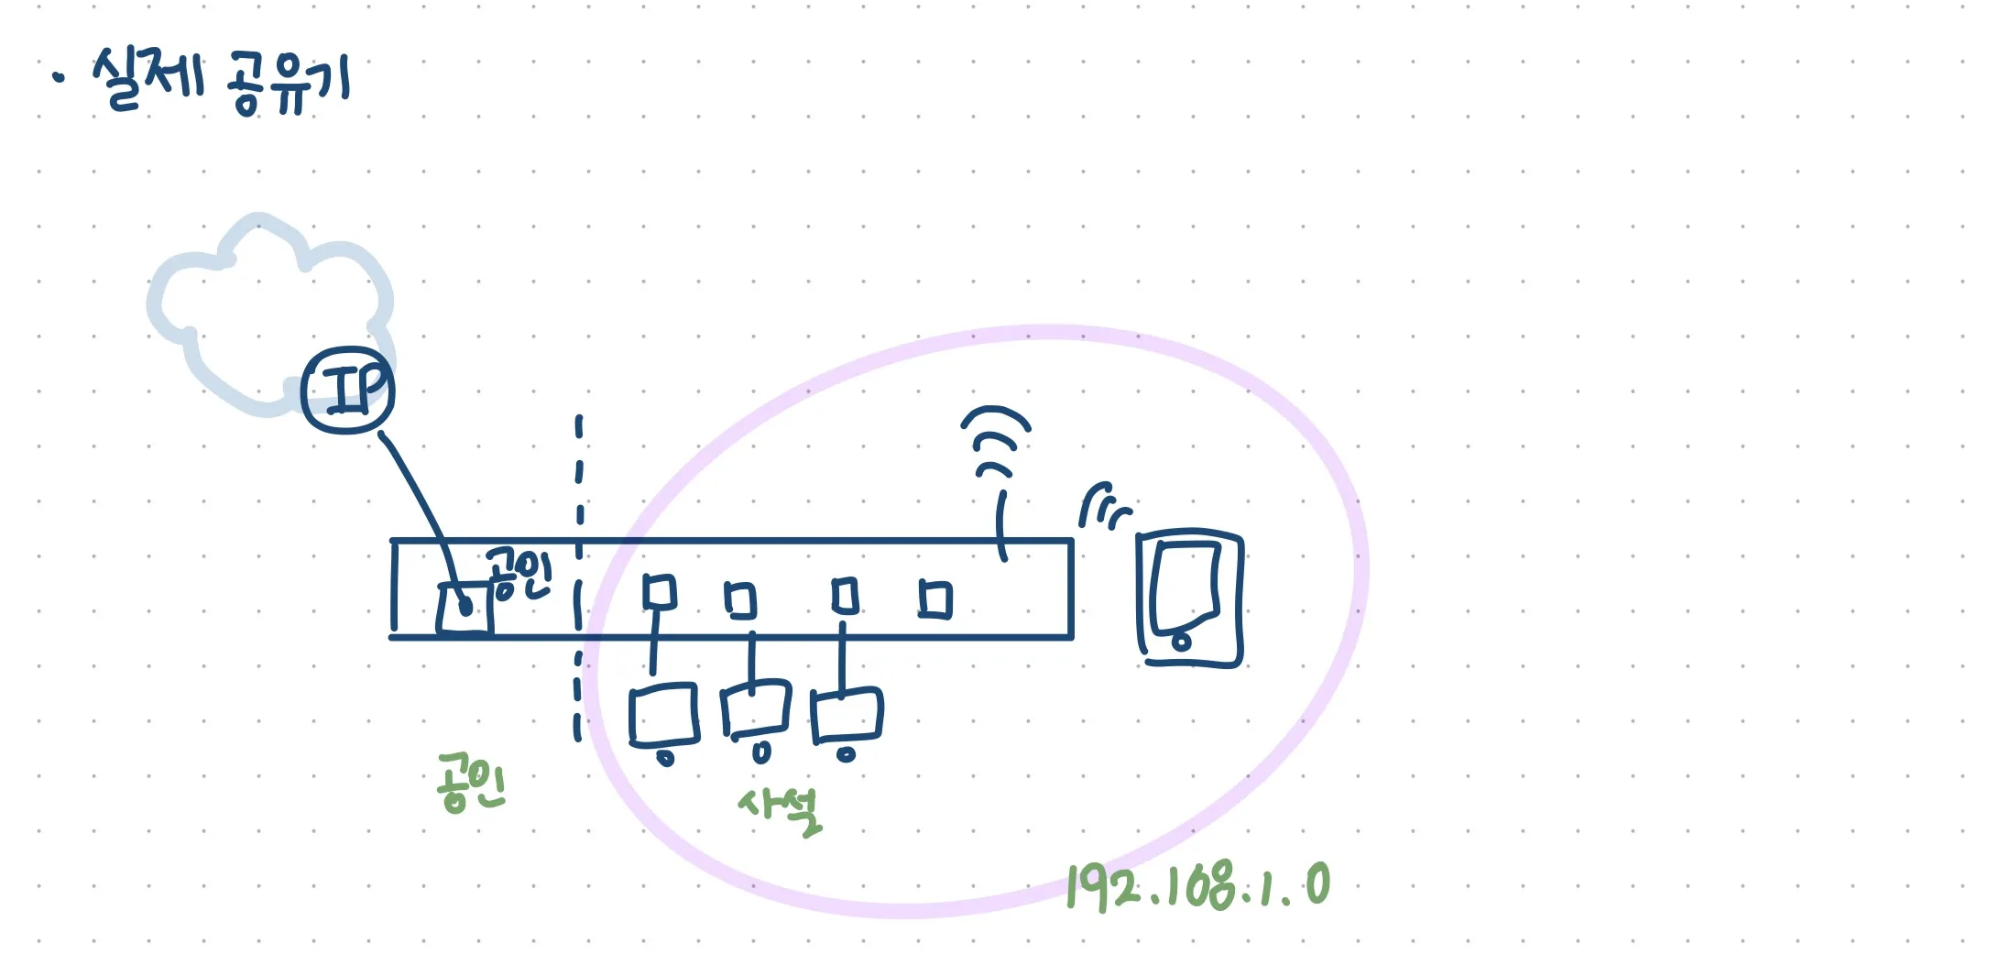
- NAT(Network Address Translation): 실제 NIC(랜카드)을 통해 인터넷 연결 가능. 주소 변환 발생 (네트워크 주소를 바꾸겠다 == IP 주소를 바꾸겠다)
- host-only: isolated. 독립 네트워크, 인터넷 연결 X


VMWare 실습
- Virtual Network Editor에서 아래와 같이 네트워크를 변경함
ipconfig: 명령프롬프트(cmd)에서 본인 노트북의 ip 주소 확인하는 명령어- Gateway: 다른 네트워크와 통신하고 싶을 때 기본 게이트웨이 네트워크 주소로 나간다.
<이것이 리눅스다> p.59-60
- 우리가 쓰는 Rocky Linux - 레드햇(Redhat) 계열
- Ubuntu - 데비안(debian) 계열
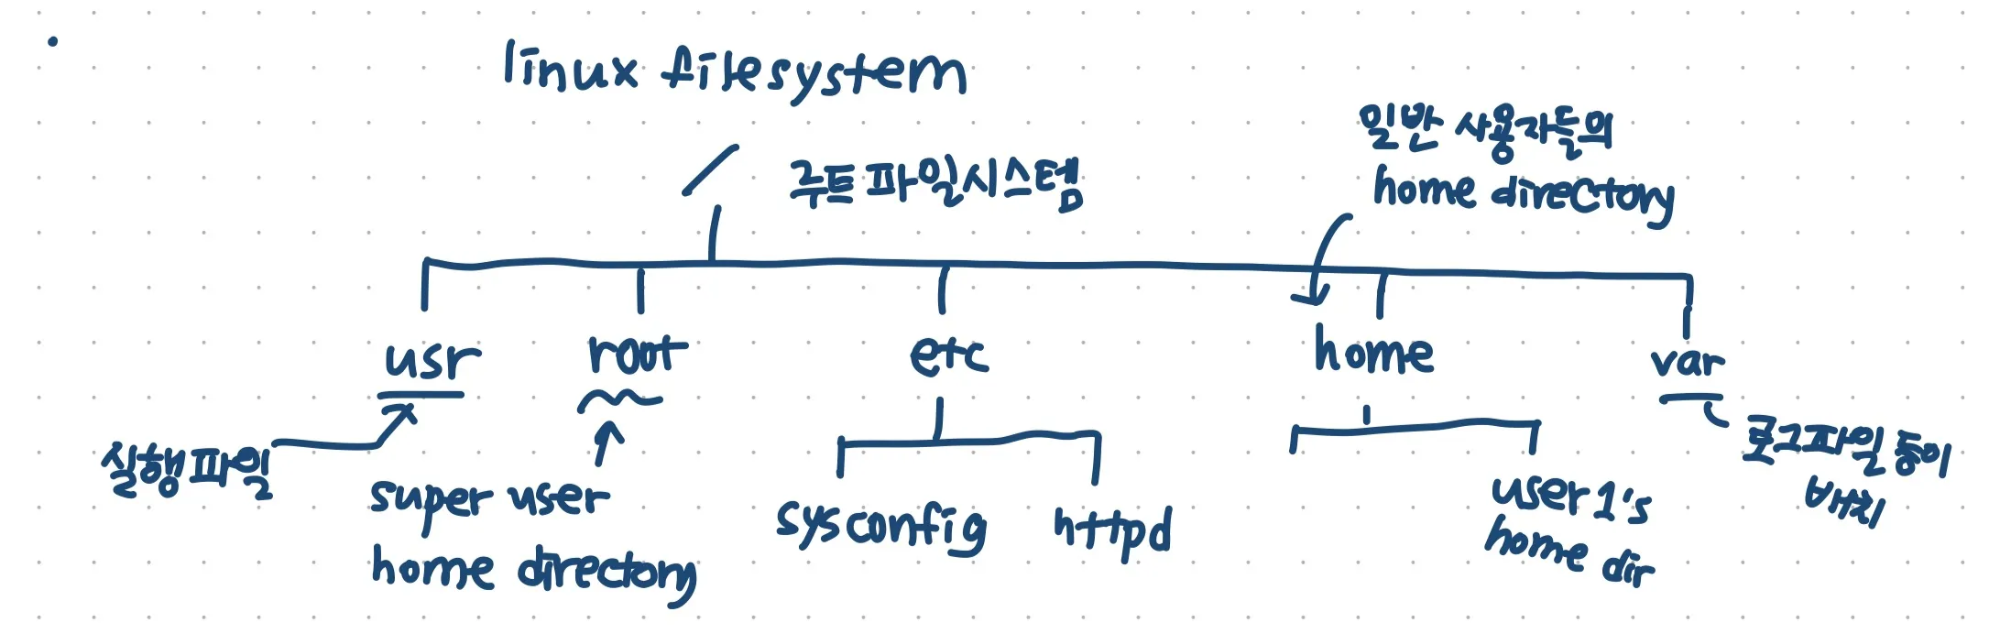
p.66
리눅스 파일 구조

리눅스 실습
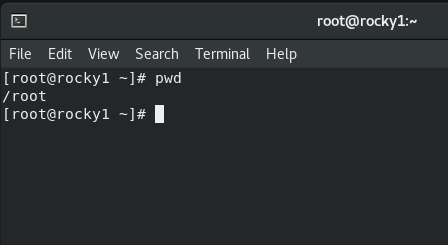
[root@rocky1 ~]root: 현재 사용자 계정이 root라는 슈퍼유저(관리자)임을 나타냄rocky1: 현재 사용 중인 호스트(컴퓨터)의 이름을 나타냄~: 현재 사용자의 홈 디렉토리를 나타냄.~는 사용자의 홈 디렉토리를 간략하게 나타내는 기호
pwd: 내가 지금 작업하고 있는 경로를 출력하는 명령어ls: list의 줄임말로 현재 위치나 특정 경로의 디렉토리 내용의 리스트를 출력하는 명령어gedit a.txt:gedit 파일명을 입력하면 해당 파일을 편집할 수 있다.
<이것이 리눅스다> p.153-154, 159
-
런레벨 3번⭐: 텍스트 모드의 다중 사용자 모드 즉, CLI 환경
-
런레벨 5번: 그래픽 환경
-
systemctl set-default [multi-user.target](http://multi-user.target)명령어 실행시 런레벨 5(그래픽 환경)에서 3(CLI 환경)으로 설정됨 -
systemctl set-default [graphical.target](http://graphical.target)명령어 실행히 런레벨 3에서 5로 설정됨 -
startx: 런레벨 5로 즉시 전환시킨다.
p. 163-
⬆️윗방향 화살표 키: 이전 명령어history: 지금까지 썼던 명령어 목록
IP 바꾸기
-
cat /etc/hostname: 호스트네임(rocky1)을 보여줌(cat: 파일 또는 텍스트파일의 내용을 화면에 출력) -
cd /etc/sysconfig/network-scripts/: network-scripts 경로로 들어감 -
ip 주소 확인하는 명령어
ip addr showifconfig(Linux)ip ahostname -I
-
ip가 변경되지 않았을 때 변경된 내용 적용하는 명령어
systemctl restart NetworkManagerifconfig ens160 down&ifconfig ens160 up
-
rocky2는 ip를
211.183.3.12로 변경하고, rocky1에서ping 211.183.3.12 -c 3을 하여 연결 됐는지 확인 -
LOOPBACK: 원격 연결X, 로컬에서만 쓸 수 있는 테스트용 인터페이스
이름으로 통신하기
ping -c 3 211.183.3.11대신ping -c 3 rocky1,ping -c 3 211.183.3.12대신ping -c 3 rocky2로 연결 여부 확인 가능
[root@rocky2 network-scripts]# ping -c 3 rocky1
ping: rocky1: Name or service not known
[root@rocky2 network-scripts]# gedit /etc/hosts

# 아래 내용 추가
211.183.3.11    rocky1
211.183.3.12    rocky2

[root@rocky2 network-scripts]# ping -c 3 rocky1
PING rocky1 (211.183.3.11) 56(84) bytes of data.
64 bytes from rocky1 (211.183.3.11): icmp_seq=1 ttl=64 time=1.31 ms
64 bytes from rocky1 (211.183.3.11): icmp_seq=2 ttl=64 time=2.80 ms
64 bytes from rocky1 (211.183.3.11): icmp_seq=3 ttl=64 time=0.604 ms

--- rocky1 ping statistics ---
3 packets transmitted, 3 received, 0% packet loss, time 2023ms
rtt min/avg/max/mdev = 0.604/1.572/2.804/0.917 ms- rocky2에도 똑같이 이름으로 통신할 수 있도록 해준다.
명령어 단축하기
<이것이 리눅스다> p.447
alias: 명령어를 단축하는 명령어
[root@rocky1 network-scripts]# alias p="ping"
[root@rocky1 network-scripts]# p -c 3 rocky1
PING rocky1 (211.183.3.11) 56(84) bytes of data.
64 bytes from rocky1 (211.183.3.11): icmp_seq=1 ttl=64 time=0.106 ms
64 bytes from rocky1 (211.183.3.11): icmp_seq=2 ttl=64 time=0.153 ms
64 bytes from rocky1 (211.183.3.11): icmp_seq=3 ttl=64 time=0.088 ms

--- rocky1 ping statistics ---
3 packets transmitted, 3 received, 0% packet loss, time 2048msalias는 영구적으로 보관/저장되지 않는다.- 만약 영구적으로 사용하고 싶다면 root로 로그인 할 때 위의 설정을 현재의 환경에 자동으로 적용시킬 수 있다.
- 모든 리눅스 사용자는 로그인 시 자신의 홈 디렉토리 하위에 있는 .bashrc 파일을 읽어 들인다.
☃️ bashrc 파일이란
→ Bash 가 시작될 때마다 실행되는 스크립트다.
→ Bash 는 대화형 셸 세션이다.
→ Bash 에 무언가 개인화된 기능을 넣을 때 필요하다.
-
ls ~: 홈 디렉토리의 파일과 경로를 볼 수 있음 -
ls ~ -a:-a옵션을 통해 숨겨진 경로를 볼 수 있음 -
.: 현재 디렉토리 -
..: 상위 디렉토리 -
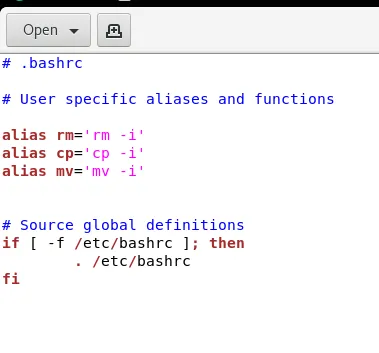
cat ~/.bashrc: bashrc 파일 내용 읽고 출력 -
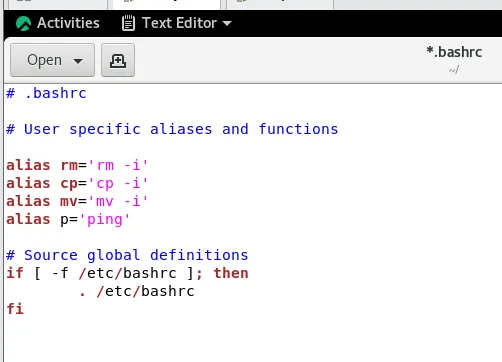
gedit ~/.bashrc명령어⭐: bashrc 파일 수정
-
alias p='ping'을 추가 -
source ~/.bashrc: 재부팅 없이 bashrc 파일 내에 있는 내용을 현재의 환경에 적용하는 명령어
Quiz 1.
alias p=’ping’ 문자열을 ~/.bashrc 파일에 넣어야 한다. 단, 파일을 열지 말고 echo를 이용하여 .bashrc 파일의 가장 아래줄에 추가해 보세요!!!! (기존 내용은 그대로 유지 되어야 합니다)
리눅스 책에서 파이프, 리디렉션(리다이렉션) 을 참고해 주세요!!!(p.276)
💡리디렉션
ls -l >> list.txt: list.txt 파일이 기존에 있으면 기존의 내용에 이어서 씀(append)
[root@rocky2 network-scripts]# echo "alias p='ping'" >> ~/.bashrc
[root@rocky2 network-scripts]# tail -3 ~/.bashrc
	. /etc/bashrc
fi
alias p='ping'
[root@rocky2 network-scripts]# source ~/.bashrc
[root@rocky2 network-scripts]# p -c 1 rocky1
PING rocky1 (211.183.3.11) 56(84) bytes of data.
64 bytes from rocky1 (211.183.3.11): icmp_seq=1 ttl=64 time=0.978 ms

--- rocky1 ping statistics ---
1 packets transmitted, 1 received, 0% packet loss, time 0ms
rtt min/avg/max/mdev = 0.978/0.978/0.978/0.000 ms
변수
[root@rocky2 network-scripts]# echo $USER
root
[root@rocky2 network-scripts]# echo $HOSTNAME
rocky2
[root@rocky2 network-scripts]# name="gildong"
[root@rocky2 network-scripts]# echo $name
gildong
[root@rocky2 network-scripts]# name = "gildong"
bash: name: command not found...name변수에 “gildong”을 넣어줌.- 띄어쓰기를 하면 적용X :
name을 명령어로,=은 옵션으로 인식하기 때문
> 와 >> 사용 주의
[root@rocky2 network-scripts]# echo "hello" > hello.txt
[root@rocky2 network-scripts]# cat hello.txt
hello
[root@rocky2 network-scripts]# echo "hi" > hello.txt
[root@rocky2 network-scripts]# cat hello.txt
hi
[root@rocky2 network-scripts]# echo "hello" >> hello.txt
[root@rocky2 network-scripts]# cat hello.txt
hi
hellotail: 파일의 가장 하단 10줄만 볼 수 있다.head: 파일의 가장 상단 10줄만 볼 수 있다.
Quiz 2.
echo “hello” 를 하면 한줄을 특정 파일에 저장시킬 수 있다.
하지만 여러줄을 입력하면서 특정 파일(b.txt)에 저장하고 싶다면????
EOF(End of File)와 cat를 이용해 보세요!!!
💡[root@rocky2 network-scripts]# cat << EOF >> b.txt
> hello
> hi
> test
> EOF
[root@rocky2 network-scripts]# cat b.txt
hello
hi
testcat→ 표준 입력(stdin)을 받아 출력하는 명령어<< EOF→ Here Document를 사용해 여러 줄 입력 시작>> b.txt→b.txt파일에 내용 추가(append)
->: 기존 파일을 덮어씀
->>: 기존 파일 내용은 유지하면서 새로운 내용 추가
-EOF(End Of File)를 입력하면 Here Document 입력이 종료됨
<이것이 리눅스다> p.193
리눅스 기본 명령
ls경로- 절대 경로: 현재 내가 어느 위치에 있건 상관없이 동일한 경로로 표시
- 상대 경로: 현재 내가 어느 위치에 있느냐에 따라 경로가 달라진다.
ls==ls .(현재 위치)
[root@rocky1 ~]# ls
anaconda-ks.cfg  Desktop    Downloads             Music     Public     Videos
a.txt            Documents  initial-setup-ks.cfg  Pictures  Templates
[root@rocky1 ~]# ls ..
bin   dev  home  lib64  mnt  proc  run   srv  tmp  var
boot  etc  lib   media  opt  root  sbin  sys  usr
[root@rocky1 ~]# ls .
anaconda-ks.cfg  Desktop    Downloads             Music     Public     Videos
a.txt            Documents  initial-setup-ks.cfg  Pictures  Templates
[root@rocky1 ~]# ls /home
user1
ls -l: 파일인지 디렉토리인지 확인할 수 있는 명령어
[root@rocky1 ~]# ls -l
total 12
-rw-------. 1 root root 1353 Feb 25 22:13 anaconda-ks.cfg
-rw-r--r--. 1 root root    5 Feb 26 00:20 a.txt
drwxr-xr-x. 2 root root    6 Feb 26 00:04 Desktop
drwxr-xr-x. 2 root root    6 Feb 26 00:04 Documents
drwxr-xr-x. 2 root root    6 Feb 26 00:04 Downloads
-rw-r--r--. 1 root root 1718 Feb 26 00:03 initial-setup-ks.cfg
drwxr-xr-x. 2 root root    6 Feb 26 00:04 Music
drwxr-xr-x. 2 root root    6 Feb 26 00:04 Pictures
drwxr-xr-x. 2 root root    6 Feb 26 00:04 Public
drwxr-xr-x. 2 root root    6 Feb 26 00:04 Templates
drwxr-xr-x. 2 root root    6 Feb 26 00:04 Videos
⬆️ ‘d’로 시작되면 directory라는 뜻
-
ls *.cfg: 확장자가 cfg인 목록을 표시.*는 ‘아무거나’라는 의미 -
grep⭐: 특정 파일에서 원하는 문자열을 골라서 볼 수 있다. 결과는 행(raw) 단위로 출력된다. -
ls | grep ini: ‘ini’ 라는 문자가 포함된 파일 찾기.|를 기준으로 왼쪽 명령의 결과를 오른쪽 명령의 입력값으로 넘겨준다.
[root@rocky1 ~]# grep root initial-setup-ks.cfg
rootpw --iscrypted $6$NocZ4JG2EgY.n.ji$R59dyUCPqjptDC98/RYw63SGa35Lh2mP0DWKgj8/OTz7C5/eH5af/5plJ2LYqSD7B.2j1drqA84oJ6bUBMNPP.
pwpolicy root --minlen=6 --minquality=1 --notstrict --nochanges --notempty
[root@rocky1 ~]# ls | grep ini
initial-setup-ks.cfg
⤵️ 아래의 둘은 다른 명령임!!
cd /etc/sysconfigcd ../etc/sysconfig
cd /etc/sysconfig
✅ 절대 경로(Absolute Path)를 사용
✅ 루트(/) 디렉터리를 기준으로 이동
설명
/etc/sysconfig는 루트(/) 디렉터리 아래에 있는etc/sysconfig폴더를 의미- 현재 작업 디렉터리와 관계없이 항상 동일한 경로로 이동
2️⃣ cd ../etc/sysconfig
✅ 상대 경로(Relative Path)를 사용
✅ 현재 위치에서 한 단계 위(..)로 이동 후, etc/sysconfig로 이동
- mkdir, rm, rmdir, cp
- mkdir: 디렉토리 생성
- rm: 파일 삭제
- rmdir: 디렉토리 삭제
- cp: 파일 복사
[root@rocky1 ~]# mkdir test
[root@rocky1 ~]# pwd
/root
[root@rocky1 ~]# cd test
[root@rocky1 test]# pwd
/root/test
[root@rocky1 test]# mkdir test2
[root@rocky1 test]# touch a.txt
[root@rocky1 test]# touch test2/b.txt
[root@rocky1 test]# ls
a.txt  test2
[root@rocky1 test]# mkdir test3
[root@rocky1 test]# ls
a.txt  test2  test3
[root@rocky1 test]# rm a.txt
rm: remove regular empty file 'a.txt'? ^C
[root@rocky1 test]# ls
a.txt  test2  test3
[root@rocky1 test]# rm -f a.txt # -f 옵션: 삭제 시 확인하지 않고 바로 삭제(f=force)
[root@rocky1 test]# rm test3
rm: cannot remove 'test3': Is a directory
[root@rocky1 test]# rmdir test3 # rmdir: 디렉터리 삭제
[root@rocky1 test]# rmdir test2
rmdir: failed to remove 'test2': Directory not empty
[root@rocky1 test]# rm -rf test2 # -rf: 최상위 파일부터 모든 파일 삭제
[root@rocky1 test]# rm -rf /
rm: it is dangerous to operate recursively on '/'
rm: use --no-preserve-root to override this failsafe
[root@rocky1 test]# touch a.txt
[root@rocky1 test]# ls
a.txt
[root@rocky1 test]# cp a.txt b.txt # a.txt를 b.txt라는 이름으로 바꿔서 복사
[root@rocky1 test]# ls
a.txt  b.txt
[root@rocky1 test]# cp a.txt .. # 현재 디렉터리(test)에 있는 a.txt 파일을 상위 디렉터리(..)(/root)로 복사- touch
: 크기가 0인 새 파일(빈 파일)을 생성하거나 생성된 파일이 존재한다면 파일의 최종 수정 시간을 변경한다.
[root@rocky1 ~]# touch ifcfg-ens160
[root@rocky1 ~]# ls -l | grep ifcfg
-rw-r--r--. 1 root root 0 Feb 26 02:59 ifcfg-ens160- mv
: 파일이나 디렉터리의 이름을 변경하거나 다른 디렉터리로 옮길 때 사용한다.
[root@rocky1 ~]# ls
anaconda-ks.cfg  Documents     initial-setup-ks.cfg  Public     Videos
a.txt            Downloads     Music                 Templates
Desktop          ifcfg-ens160  Pictures              test
[root@rocky1 ~]# mv test/*.txt ..
[root@rocky1 ~]# ls ..
a.txt  boot   dev  home  lib64  mnt  proc  run   srv  tmp  var
bin b.txt etc lib media opt root sbin sys usr[root@rocky1 ~]# mv a.txt x.txt # a.txt를 x.txt로 이름 변경해서 이동
[root@rocky1 ~]# ls
anaconda-ks.cfg Downloads Music Templates x.txt
Desktop ifcfg-ens160 Pictures test
Documents initial-setup-ks.cfg Public Videos
[root@rocky1 ~]# mv test test2
[root@rocky1 ~]# ls
anaconda-ks.cfg Downloads Music Templates x.txt
Desktop ifcfg-ens160 Pictures test2
Documents initial-setup-ks.cfg Public Videos파일이나 디렉토리를 이동 시킬 수 있을 뿐만 아니라 동일 디렉토리 내에서는 이름 변경의 효과가 있다.
-
mkdir: 디렉터리 생성
[root@rocky1 ~]# mkdir a/b mkdir: cannot create directory ‘a/b’: No such file or directory [root@rocky1 ~]# mkdir -p a/b [root@rocky1 ~]# mkdir -p c/d/e-p옵션: 부모 디렉터리까지 자동 생성
-
cat: 파일 내용을 화면에 출력
-
head, tail
-
more: 텍스트 형식으로 작성된 파일을 페이지 단위로 화면에 출력
- less: more 명령과 용도가 비슷하지만, 기능이 더 확장되어 있다. pagedown, pageup 사용 가능
파일 만들기 실습
[root@rocky1 ~]# mkdir lab1 && cd lab1
[root@rocky1 lab1]# pwd
/root/lab1
[root@rocky1 lab1]# touch lab1.sh && chmod +x lab1.sh
[root@rocky1 lab1]# ls
lab1.sh
[root@rocky1 lab1]# ls -l
total 0
-rwxr-xr-x. 1 root root 0 Feb 26 03:26 lab1.sh
[root@rocky1 lab1]# gedit lab1.sh
chmod +x lab1.sh: lab1.sh 파일에 실행 권한을 추가하는 명령어.+x는 파일에 실행 권한을 부여하는 옵션으로, 이 파일을 실행 가능한 스크립트로 만들 수 있게 된다.
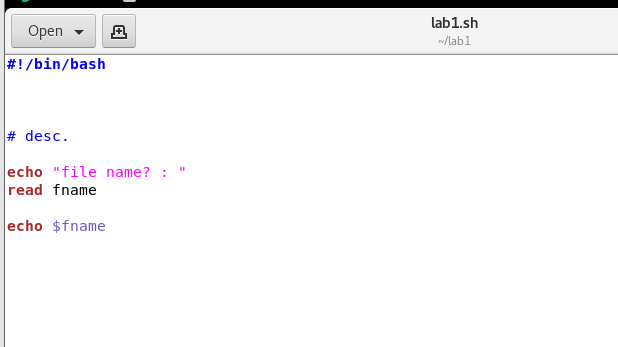
[root@rocky1 lab1]# ./lab1.sh
file name? :
test
test
[root@rocky1 lab1]# gedit lab1.sh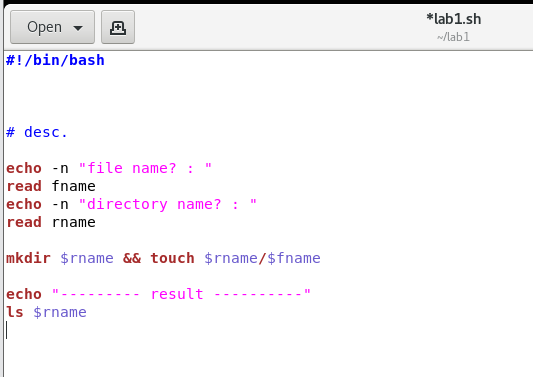
[root@rocky1 lab1]# ./lab1.sh
file name? : testfile
directory name? : testdir
--------- result ----------
testfile
[root@rocky1 lab1]# ls
lab1.sh  testdir
[root@rocky1 lab1]# ls testdir
testfile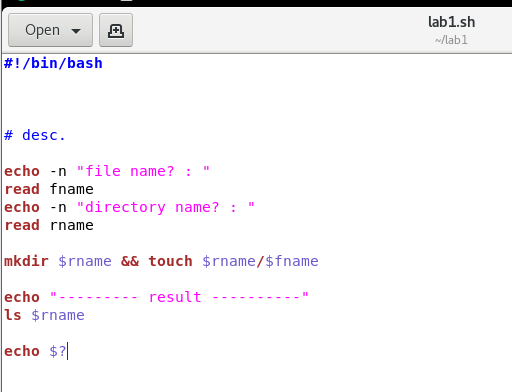
[root@rocky1 lab1]# ./lab1.sh
file name? : file1
directory name? : dir1
--------- result ----------
file1
0 # 결과 코드
echo $?: 마지막으로 종료된 명령어의 종료 상태. (0: 정상적인 종료,그 외 다른 값: 비정상적 종료)
[root@rocky1 lab1]# ./lab1.sh
file name? : file2
directory name? : dir2
--------- result ----------
file2
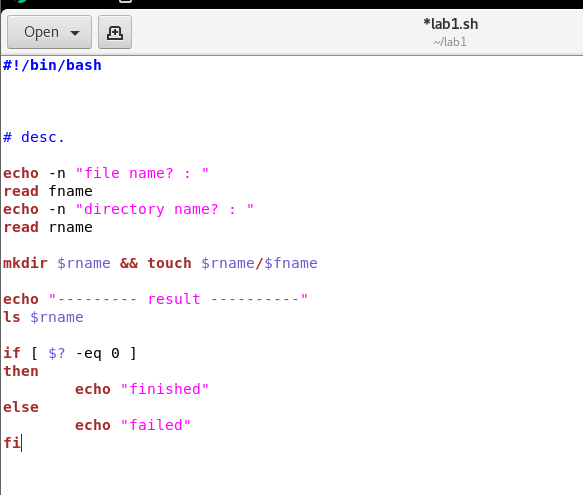
finishedif [ $? -eq 0 ]:$?값이0과 같다(-eq)면if문은fi로 끝냄