토이 프로젝트 목표
Vanilla JavaScript를 사용해서 이미지 슬라이더를 구현하자.
구상
이번에 슬라이더 기능을 구현할 때 버튼으로 구현하는 것이 아니라 드래그 기능을 활용해서 구현을 하고 싶었다. 그래서 일부러 버튼을 넣지 않고 사용자가 마우스를 왼쪽에서 오른쪽으로 드래그를 했을 시에만 사진이 바뀌도록 구현했다.
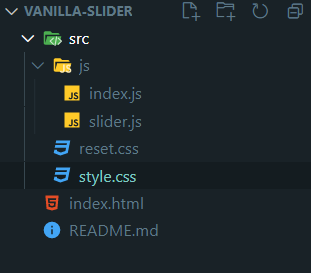
Project 폴더 구조
HTML 소스
<!DOCTYPE html>
<html lang="en">
<head>
    <meta charset="UTF-8">
    <meta http-equiv="X-UA-Compatible" content="IE=edge">
    <meta name="viewport" content="width=device-width, initial-scale=1.0">
    <title>Image Slider</title>
    <link rel="stylesheet" href="src/style.css">
</head>
<body>
    <div class="container">
        <img class="slider__img show" src="https://images.unsplash.com/photo-1613425722536-7c88ed402b97?ixid=MXwxMjA3fDB8MHxlZGl0b3JpYWwtZmVlZHwxM3x8fGVufDB8fHw%3D&ixlib=rb-1.2.1&auto=format&fit=crop&w=500&q=60">
        <img class="slider__img" src="https://images.unsplash.com/photo-1613367046430-fa9eab3014f1?ixid=MXwxMjA3fDB8MHxlZGl0b3JpYWwtZmVlZHw1fHx8ZW58MHx8fA%3D%3D&ixlib=rb-1.2.1&auto=format&fit=crop&w=500&q=60">
        <img class="slider__img" src="https://images.unsplash.com/photo-1613758640603-809cfe8547bb?ixid=MXwxMjA3fDB8MHxlZGl0b3JpYWwtZmVlZHwzN3x8fGVufDB8fHw%3D&ixlib=rb-1.2.1&auto=format&fit=crop&w=500&q=60">
        <img class="slider__img" src="https://images.unsplash.com/photo-1613759880231-6f42c397aac8?ixid=MXwxMjA3fDB8MHxlZGl0b3JpYWwtZmVlZHw0Nnx8fGVufDB8fHw%3D&ixlib=rb-1.2.1&auto=format&fit=crop&w=500&q=60">
        <img class="slider__img" src="https://images.unsplash.com/photo-1613768061916-74d7521828db?ixid=MXwxMjA3fDB8MHxlZGl0b3JpYWwtZmVlZHw0N3x8fGVufDB8fHw%3D&ixlib=rb-1.2.1&auto=format&fit=crop&w=500&q=60">
    </div>
    <script src="src/js/slider.js"></script>
</body>
</html>
Slider를 구현해주기 위해 html 파일에서 container란 class를 가지는 div안에 5개의 이미지를 추가하였다.
CSS
@import "./reset.css";
body,
html,
.container {
  width: 100%;
  height: 100vh;
}

.container {
  display: flex;
  justify-content: center;
  align-items: center;
}

img {
  position: absolute;
  top: 25%;
  margin: 0 auto;
  width: 500px;
  height: 500px;
  margin: 0 0.5rem;
  display: none;
}

.show {
  display: block;
}
style.css 파일에서 reset.css파일을 import해준 이유는 chrome에 기본적으로 설정되어 있는 margin과 padding같은 기본 스타일들을 초기화해주기 때문에 사용하였다.
Js
- Drag기능
- 사진 변환 기능
1. Drag 기능 구현
// slider.js
const container = document.querySelector('.container');

let pressed = false;
let position = [];

function move(event){
    const x = event.offsetX;
    position.push(x);
}

function handleUp(){
    // 마우스를 뗐을 때
    pressed = false;
    container.style.cursor = "";
    container.removeEventListener("mousemove",move);
    checkDirection(position);
    position = [];
}

function checkDirection(position){
    const currentX = position[0];
    const lastX = position.slice(-1).pop();
    const currentXPosition = lastX - currentX;
    changeImg(currentXPosition);
}

function handleClick(){
    // 눌렀을 때
    pressed = true;
    container.style.cursor = "grab";
    if(pressed){
        container.addEventListener("mousemove", move);
    }
}

function init(){
    container.addEventListener("mousedown", handleClick);
    container.addEventListener("mouseup", handleUp);
}

init();
init함수에서 mouse를 눌렀는지 뗐는지를 확인해서 각각의 함수를 호출한다
마우스를 계속 누른 상태이면 pressed 변수를 true, 마우스 포인터를 grab모양으로 바꾸고 mousemove라는 이벤트를 듣는다.
마우스를 누른 상태에서 움직이면 mousemove이벤트가 움직임을 확인하고 move라는 함수를 호출한다.
move함수는 사용자가 스크린상에서 마우스가 움직이는 곳의 x좌표값을 가져와서 position이라는 배열에 저장을 한다.
사용자가 마우스를 뗐을 때 pressed 변수를 false로 마우스 포인터를 화살표 모양으로 바꾸고 mousemove이벤트를 없앤다.
그 후엔 드래그의 방향을 판별해 주는 checkDirection을 호출한다.
function checkDirection(position){
    const currentX = position[0];
    const lastX = position.slice(-1).pop();
    const currentXPosition = lastX - currentX;
    changeImg(currentXPosition);
}
checkDirection 함수에서는 position배열의 첫값과 맨 끝값을 가져와서 마우스가 움직인 거리를 거리를 계산해서 currentXPosition 변수에 저장하고 changeImg(사진을 바꾸는 함수)를 호출한다.
마우스가 왼쪽에서 오른쪽으로 움직였을 경우엔 양수(+)값이 출력, 그 반대의 경우엔 음수(-)가 출력된다.
2. 사진 변환 기능
드래그 시에 사진을 변환하는 기능을 하는 함수인 changeImg 함수는 다음과 같이 작성했다
function changeImg(currentXPosition){
    const img = document.querySelector(`img:first-child`);
    const currentImg = document.querySelector('.show');
    if(currentXPosition > 0){
        if(currentImg){
            currentImg.classList.remove("show");
            const nextImg = currentImg.nextElementSibling;
            if(nextImg){
                nextImg.classList.add("show");
            }
            else{
                img.classList.add("show");
            }
        }
    }
}
currentImg는 현재 보여지는 사진을 가져오는 변수
만약에 사용자가 드래그를 했을 시 현재 사진은 없애고 nextElementSibling을 사용해서 다음 사진이 있을 경우에는 다음 사진을 보여주고, 다음 사진이 없을 경우(맨 마지막 5번째 사진)일 땐 첫번째 사진을 보이게하도록 작성하였다.
애니메이션은 나중에 이 슬라이더를 사용할 때 추가로 작성해서 수정할 것.
날짜
2021-02-21 일요일 ~ 2021-02-22 월요일
Github Repository 주소