6/4 Vue.js 기본강좌 요약정리.
[10] v-for 리스트 렌더링
in 뿐만 아니라 of도 가능.
<div v-for="person of people">
만약 key의 구별요소가 겹치는 경우(ex name: 'e'가 2명)에는
다른 구별요소(ex age)를 추가하여 key가 고유한 id일 수 있게 해야 한다.
(ex :key="person.name" -> :key="person.name + '-' + person.age")
제일 좋은 것은 id이다.
index를 id로 사용하는 것은 지양. 중간에 데이터가 삭제되면 index는 바뀌기 때문.
객체에도 적용될 수 있다. (ex object)
<body>
  <div id="app">
    <hr>
    <div v-for="(person, index) in people" :key="person.id">
      {{ person.name }} {{ person.age }} {{index}}
    </div>
    <hr>
    <ul id="v-for" class="demo">
      <li v-for="(value, name) in object">
        {{ name }} : {{ value }}
      </li>
    </ul>
  </div>
  <script>
    new Vue({
      el: '#app',
      data: {
        people: [
          { id: 1, name: 'a', age: 20 },
          { id: 2, name: 'b', age: 21 },
          { id: 3, name: 'c', age: 22 },
          { id: 4, name: 'd', age: 23 },
          { id: 5, name: 'e', age: 24 },
          { id: 6, name: 'e', age: 25 },
        ],
        object: {
          title: 'How to do lists in Vue',
          author: 'Jane Doe',
          publishedAt: '2016-04-10'
        }
      },
      methods: {
      }
    });
  </script>
</body>
[11] 여러 개의 Vue 인스턴스 사용하기
여러 개의 인스턴스를 사용할 땐, 새롭게 new Vue({})를 생성해서 사용한다.
이때 인스턴스 내에서 el: @각 태그의 id값을 구분해주어야
data:{}와methods:{}를 사용할 수 있다.
아래의 예시처럼 <div id="app"> 과 <div id="app-1">은
el: '#app' 과 el: '#app-1'로 각각의 인스턴스와 연결되어있다.
<body>
  <div id="app">
    {{ name }}<br>
    <button @click="changeText">Click</button>
  </div>
  <div id="app-1">
    {{ name }}<br>
    <button @click="changeText">Click</button>
  </div>
  <script>
    new Vue({
      el: '#app',
      data: {
        name: 'kossie'
      },
      methods: {
        changeText() {
          this.name = 'kossie updated'
        }
      }
    });
    new Vue({
      el: '#app-1',
      data: {
        name: 'kossie1'
      },
      methods: {
        changeText() {
          this.name = 'kossie1 updated'
        }
      }
    });
  </script>
</body>
그런데 만약 하나의 인스턴스에서 다른 인스턴스에 간섭을 하려면 어떻게 해야 할까?
1. 먼저 인스턴스를 변수에 담는다. ex const app1 = new Vue({})
2. 영향을 주려는 변수(인스턴스가 담긴)를 메서드의 대상으로 지정한다.
ex changeText() {this.name = 'kossie updated'}
->changeText() {app1.name = 'kossie updated'}
<body>
  <div id="app">
    {{ name }}<br>
    <button @click="changeText">Click</button>
  </div>
  <div id="app-1">
    {{ name }}<br>
    <button @click="changeText">Click</button>
  </div>
  <script>
    const app = new Vue({
      el: '#app',
      data: {
        name: 'kossie'
      },
      methods: {
        changeText() {
          app1.name = 'kossie updated'
        }
      }
    });
    const app1 = new Vue({
      el: '#app-1',
      data: {
        name: 'kossie1'
      },
      methods: {
        changeText() {
          app.name = 'kossie1 updated'
        }
      }
    });
  </script>
</body>
[12] Vue 컴포넌트
컴포넌트는 각각의 인스턴스에서 반복되는 data 혹은 methods를 반복되지 않게 사용할 수 있게 해준다.
컴포넌트는 전역 등록과 지역 등록으로 나뉜다.
전역 등록
작성법 Vue.component('컴포넌트 이름', {옵션내용})
ex Vue.component('hello-world', { template: '<div>hello world</div>' })
아래의 예시같은 경우, html 을 가져오기 위해 template을 사용하였다.
만약 줄바꿈이 있는 경우 백틱을 사용해야 오류가 생기지 않는다.
<body>
  <div id="app">
    <!-- {{ name }}<br>
    <button @click="changeText">Click</button>
    <hr> -->
    <!-- 만든 컴포넌트(kossie-button)를 html태그처럼 사용가능-->
    <kossie-button></kossie-button>
  </div>
  <hr>
  <hr>
  <div id="app-1">
    <!-- {{ name }}<br>
    <button @click="changeText">Click</button>
    <hr> -->
    <!-- 만든 컴포넌트(kossie-button)를 html태그처럼 사용가능-->
    <kossie-button></kossie-button>
  </div>
  <script>
    //인스턴스 위에 컴포넌트를 생성한다
    // Vue.js는 하나의 태그로 감싸줘야 함. JSX처럼. Vue.js 버전 3 이상부턴 필요 없는 듯.
    Vue.component('kossie-button', {
      template: `
      <div>
        {{ name }}<br>
        <button @click="changeText">Click</button>
      </div>
      `,
      // 인스턴스와 다르게 오브젝트가 레퍼런스로 다른 컴포넌트 같은 곳에서 쓰이기에 아래와 같이 함수 실행으로 작성해준다. 근데 data만 그런건지 methods는 그대로 놔둬도 오류가 안생긴다.
      // 일단 그냥 함수를 만들어서 오브젝트를 리턴한다고 알고 있자.
      data() {
        return {
          name: 'kossie'
        }
      },
      methods: {
        changeText() {
          this.name = 'kossie updated'
        }
      }
    });
    const app = new Vue({
      el: '#app',
      // data: {
      //   name: 'kossie'
      // },
      // methods: {
      //   changeText() {
      //     this.name = 'kossie updated'
      //   }
      // }
    });
    const app1 = new Vue({
      el: '#app-1',
      // data: {
      //   name: 'kossie'
      // },
      // methods: {
      //   changeText() {
      //     this.name = 'kossie updated'
      //   }
      // }
    });
  </script>
</body>
하나의 컴포넌트를 다른 컴포넌트 안에서 사용할 수도 있다.
hello-world라는 컴포넌트가 kossie-button이라는 컴포넌트 안으로 들어간 모습.
    Vue.component('hello-world', {
      template: '<div>hello world</div>'
    })
    Vue.component('kossie-button', {
      template: `
      <div>
        {{ name }}<br>
        <hello-world></hello-world>
        <button @click="changeText">Click</button>
      </div>
      `,
      data() {
        return {
          name: 'kossie'
        }
      },
      methods: {
        changeText() {
          this.name = 'kossie updated'
        }
      }
    });
지역 등록
지역 등록은 컴포넌트를 개별적으로 변수에 저장하고
변수화된 컴포넌트를 인스턴스에서 사용하는 방법이다.
작성법 const (컴포넌트 이름) = {옵션내용}
ex)const KossieButton = {template: '<hello-world></hello-world>'}
사용법 const (인스턴스) = new Vue({components: { 해당 태그 이름: 컴포넌트 이름}})
ex)const app = new Vue({ el: '#app', components: { 'kossie-button': KossieButton } });
아래의 코드에서 흐름을 살펴보자면,
- 먼저
<div id="app">과<div id="app-1">에서<kossie-button>이라는 태그가 사용되었다. - 이
<kossie-button>태그는app인스턴스와app-1인스턴스에서components의 키로 사용되었다. - 그리고 이 키의 밸류값으로
KossieButton이라는 컴포넌트(지역 등록)가 배정되었다. KossieButton컴포넌트(지역 등록)의 옵션 내용은 상황에 맞게 작성하면 된다.- 같은 방식으로
KossieButton컴포넌트 안에서HelloWorld컴포넌트가 삽입되어 사용되었다.
<body>
  <div id="app">
    <kossie-button></kossie-button>
  </div>
  <hr>
  <hr>
  <div id="app-1">
    <kossie-button></kossie-button>
  </div>
  <script>
    const HelloWorld = {
      template: '<div>hello world</div>'
    }
    const KossieButton = {
      // HelloWorld라는 지역 등록된 컴포넌트를 KossieButton라는 지역 등록된 컴포넌트 안에 넣은 모습이다.
      components: {
        'hello-world': HelloWorld
      },
      template: `
      <div>
        {{ name }}<br>
        <hello-world></hello-world>
        <button @click="changeText">Click</button>
      </div>
      `,
      data() {
        return {
          name: 'kossie'
        }
      },
      methods: {
        changeText() {
          this.name = 'kossie updated'
        }
      }
    };
    const app = new Vue({
      el: '#app',
      components: {
        'kossie-button': KossieButton
      }
    });
    const app1 = new Vue({
      el: '#app-1',
      components: {
        'kossie-button': KossieButton
      }
    });
  </script>
</body>
컴포넌트에 대해선 공식문서가 좀 더 간결하고 쉬울 수도 있다.
https://kr.vuejs.org/v2/guide/components.html#%EC%BB%B4%ED%8F%AC%EB%84%8C%ED%8A%B8%EA%B0%80-%EB%AC%B4%EC%97%87%EC%9D%B8%EA%B0%80%EC%9A%94
[13] Vue Cli로 뷰 설치하기
Vue를 전역으로 설치(로컬 어느 위치든 Vue 사용가능)
npm install -g @vue/cli
*node.js 버전이 8.9이상이어야 함.
Vue 버전 확인
vue --version
Vue 프로젝트 설치(create react app과 동일)
vue create 프로젝트 이름(폴더 이름)
ex vue create sample
뷰를 설치하면서 여러 설정들을 하는데 영상에서 하는 것(영상 4:36 ~ 5:31. Router,Vuex를 선택 후 올엔터)들을 기본값으로 하고 프로젝트에 맞게 여러 설정을 추가하면 된다.
모두의 주차장같은 경우엔 babel과 Eslint를 사용한다고 했는데 babel은 된 것 같은데 eslint가 설치됐는지는 확실하지 않다. 만약 안되었다면 npm install eslint로 설치해줄 것.
Vue를 설치하지 않고 사용하기
npx @vue/cli create 프로젝트 이름(폴더 이름)
ex vue create sample2
설치설정은 위와 동일하다(Router,Vuex를 선택 후 올엔터).
[14] 뷰 라우터(Vue Router)
SPA(single page app)은 하나의 페이지로 이루어진 어플리케이션이다.
html파일은 하나만 존재하고 페이지의 기능들은 Vue 및 자바스크립트 파일로 구현된다.
분기를 맡는 가장 상위 컴포넌트에는 <router-view/>라는 명령어가 입력되어 라우터들을 상황에 따라 바꿔가며 구현한다.
home과 about 등의 라우터 분기 아래에 작성한다.
<template>
  <div id="app">
    <div id="nav">
      <router-link to="/">Home</router-link>|
      <router-link to="/about">About</router-link>
    </div>
    <router-view />
  </div>
</template>
내 로컬의 sample 폴더를 기준으로 라우팅 흐름을 생각해보자면, 다음과 같다.
- Home.vue와 About.vue가 각각의 기능을 구현한다.
- App.vue가 실제 페이지(id="app")에서 위의 코드로 분기를 구현한다.
- index.js에선 path와 name으로 실제 라우팅을 작성한다. 이렇게 만들어진 라우팅을 2에서 가져다 쓴다.
- 다같이 main.js에 임포트 되고 main.js는 id="app"에 렌더링된다.
[15] 싱글 파일 컴포넌트(Single File Component)
싱글 파일 컴포넌트란 말 그대로 하나의 컴포넌트를 담은 하나의 싱글파일이다.
싱글 파일 컴포넌트는 총 3개의 구성요소로 작성된다.
template,script,style.
template은 기본 뼈대가 되는 html 코드가 작성된다.
script안에는 옵션들이 들어간다. data,methods,computed,watch등등.
style에는 css 코드가 들어간다. 주의할 점은 반드시 scoped를 넣어줘야 한다. scoped는 해당 싱글 파일에만 css를 적용하는 것이라서 넣지 않을 경우 전체 css에 영향을 미치게 된다.
<template>
  <!-- 리액트의 컴포넌트와 마찬가지로 하나의 태그로 감싸줘야 한다. 대표적인 것이 div. -->
  <div>
    <h1>This is Home page</h1>
    <!-- 컴포넌트를 script에 입력했으면 templated에서 사용도 해줘야 함. 안그러면 안썼다고 오류가 남. -->
    <KossieCoder />
  </div>
</template>
<script>
//새로 만든 KossieCoder컴포넌트를 임포트. @는 src를 가리킴.
import KossieCoder from "@/components/KossieCoder.vue";
export default {
  //임포트한 컴포넌트도 export에 포함시켜줘야 한다.
  components: {
    KossieCoder
  },
  //data는 function으로 작성해야 한다.
  data() {
    return {
      name: "Kossie Coder"
    };
  }
};
</script>
<style scoped>
h1 {
  color: red;
}
</style>
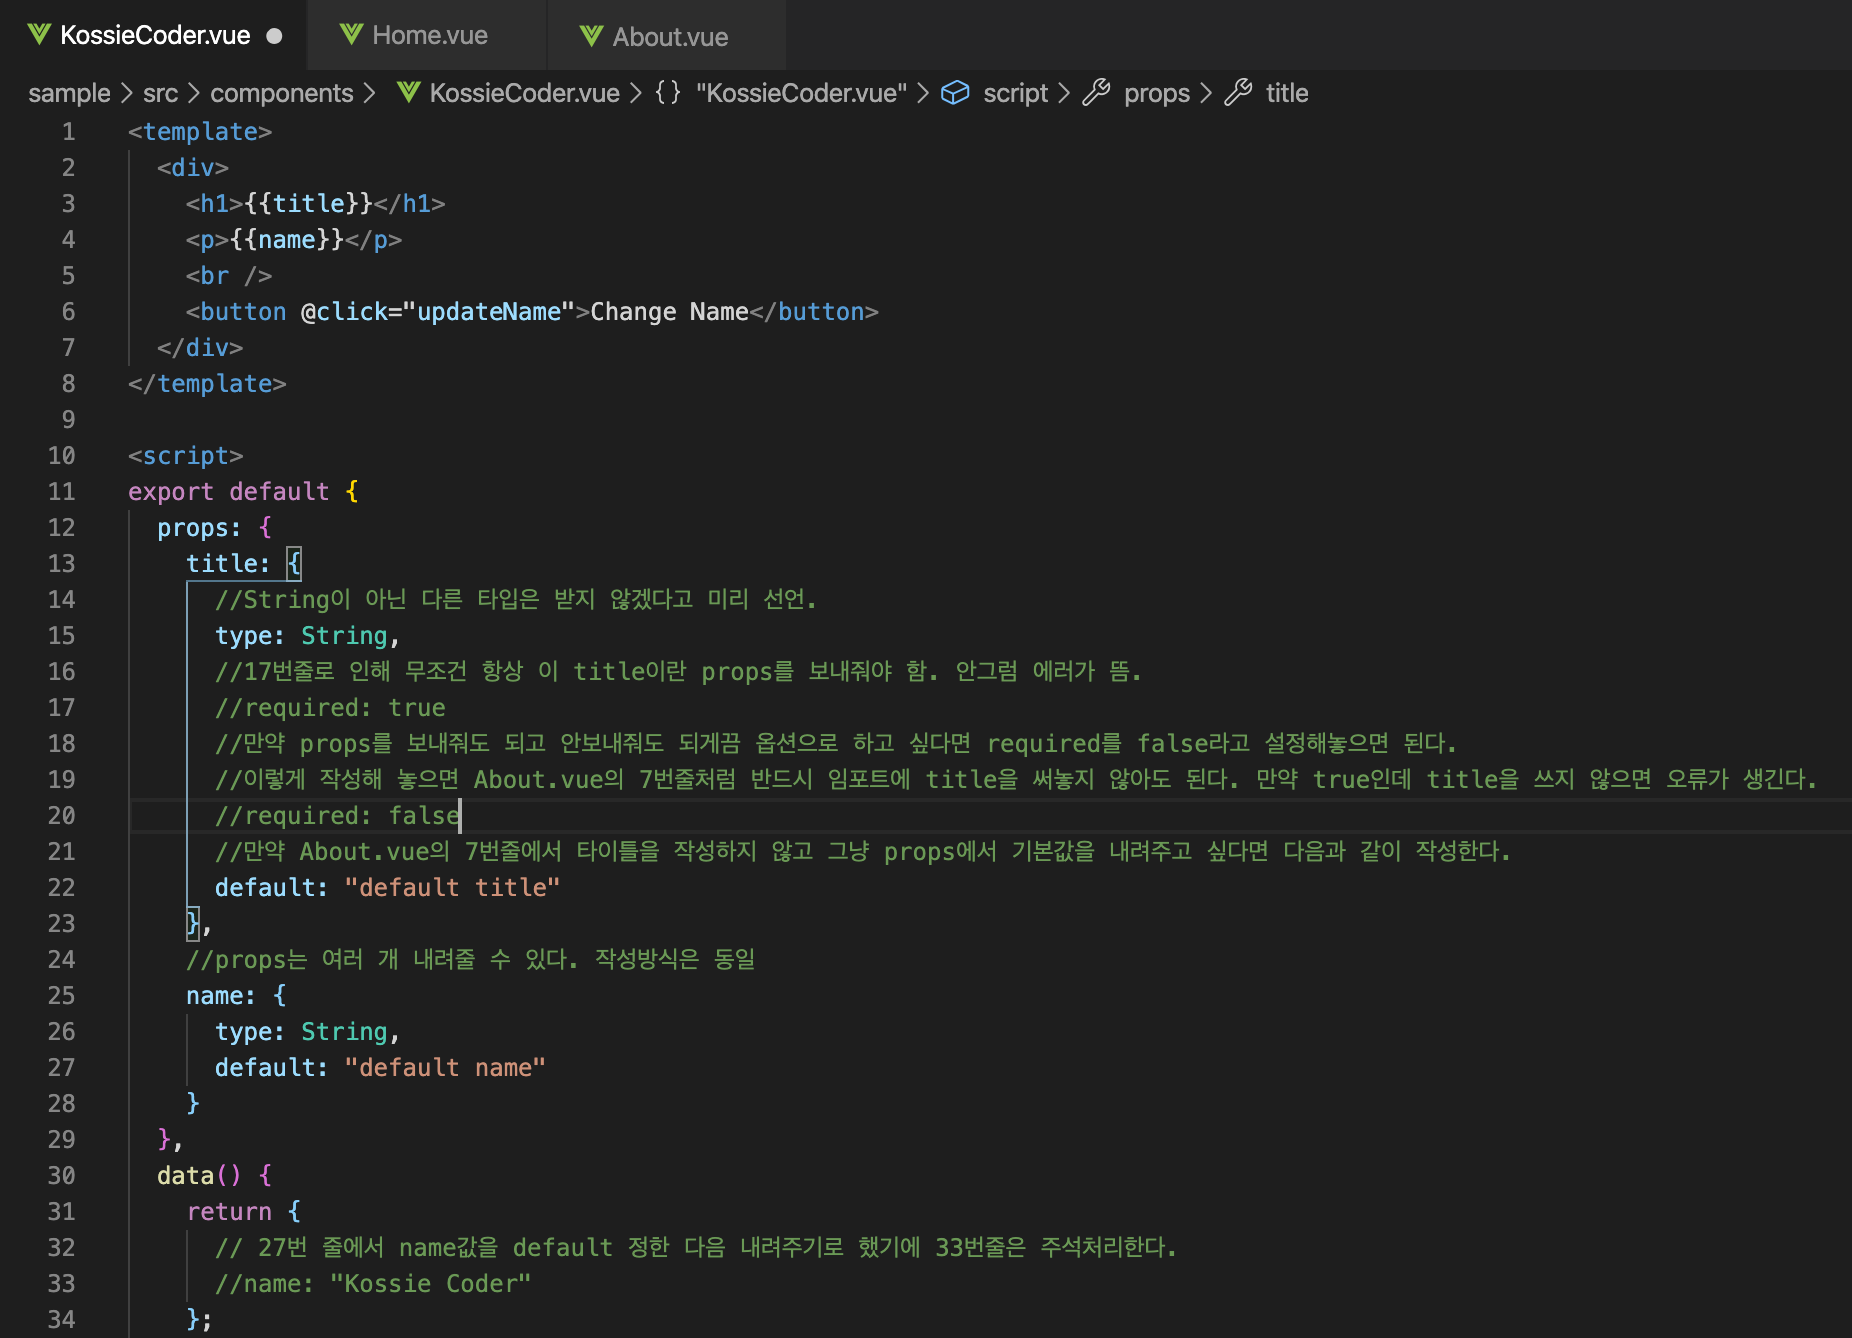
[16] 자식 컴포넌트에 데이터 보내기(Props)
KossieCoder.vue 컴포넌트에서 About.vue와 Home.vue에 props를 내려준다. 그 내용은 title 이고 Home.vue와 About.vue의 템플릿에서 임포트된 것을 확인할 수 있다.
KossieCoder.vue
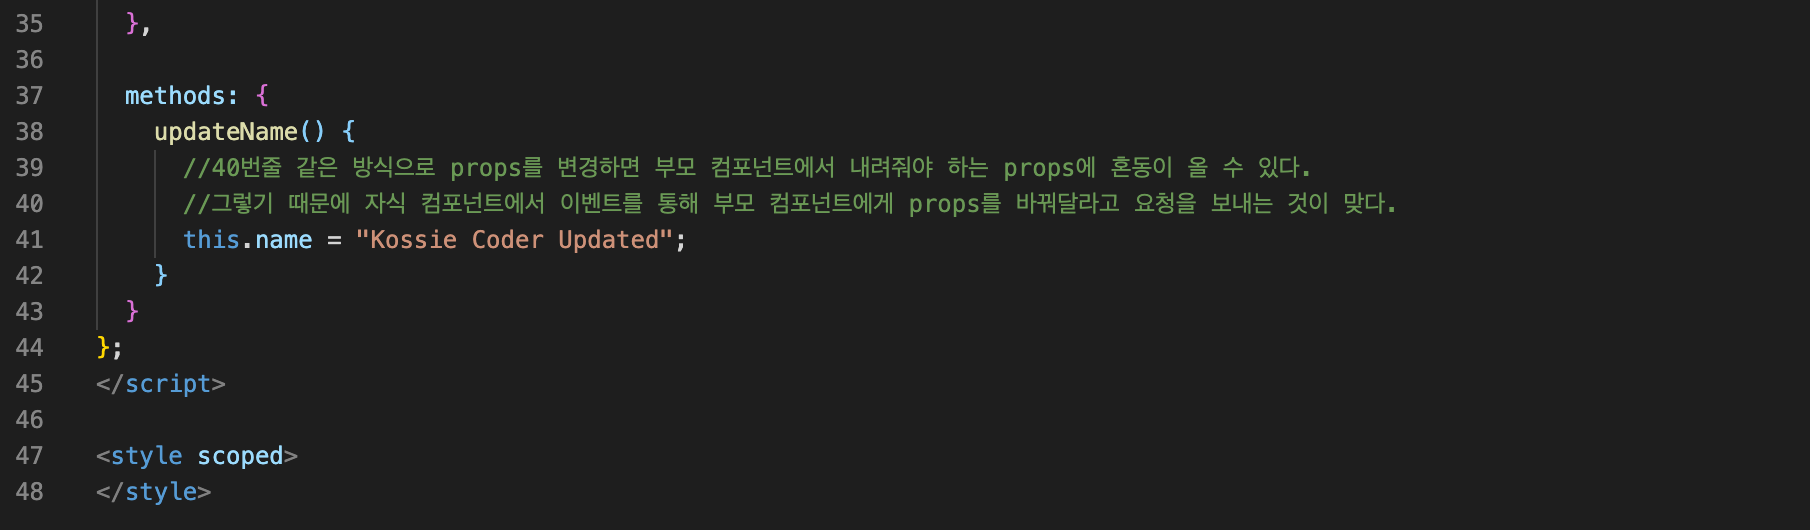
Home.vue
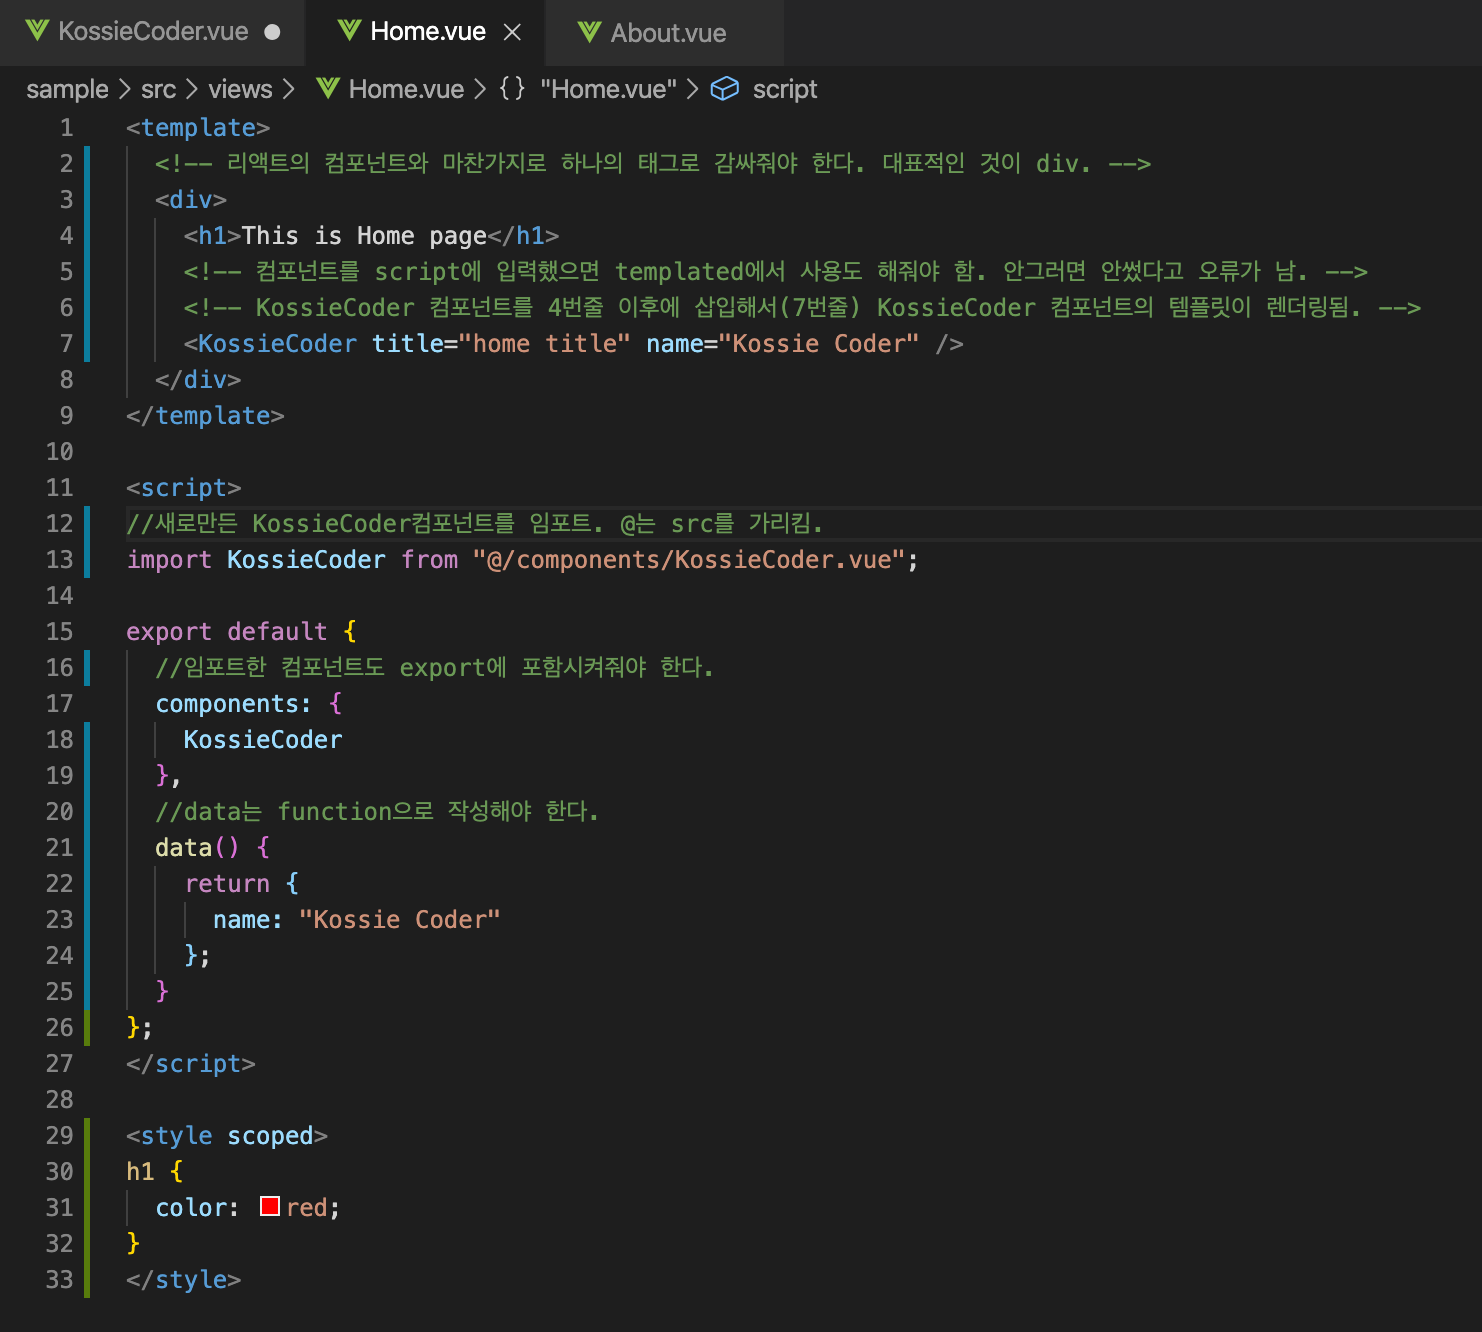
About.vue
[17] 부모 컴포넌트로 데이터 보내기(Emit)
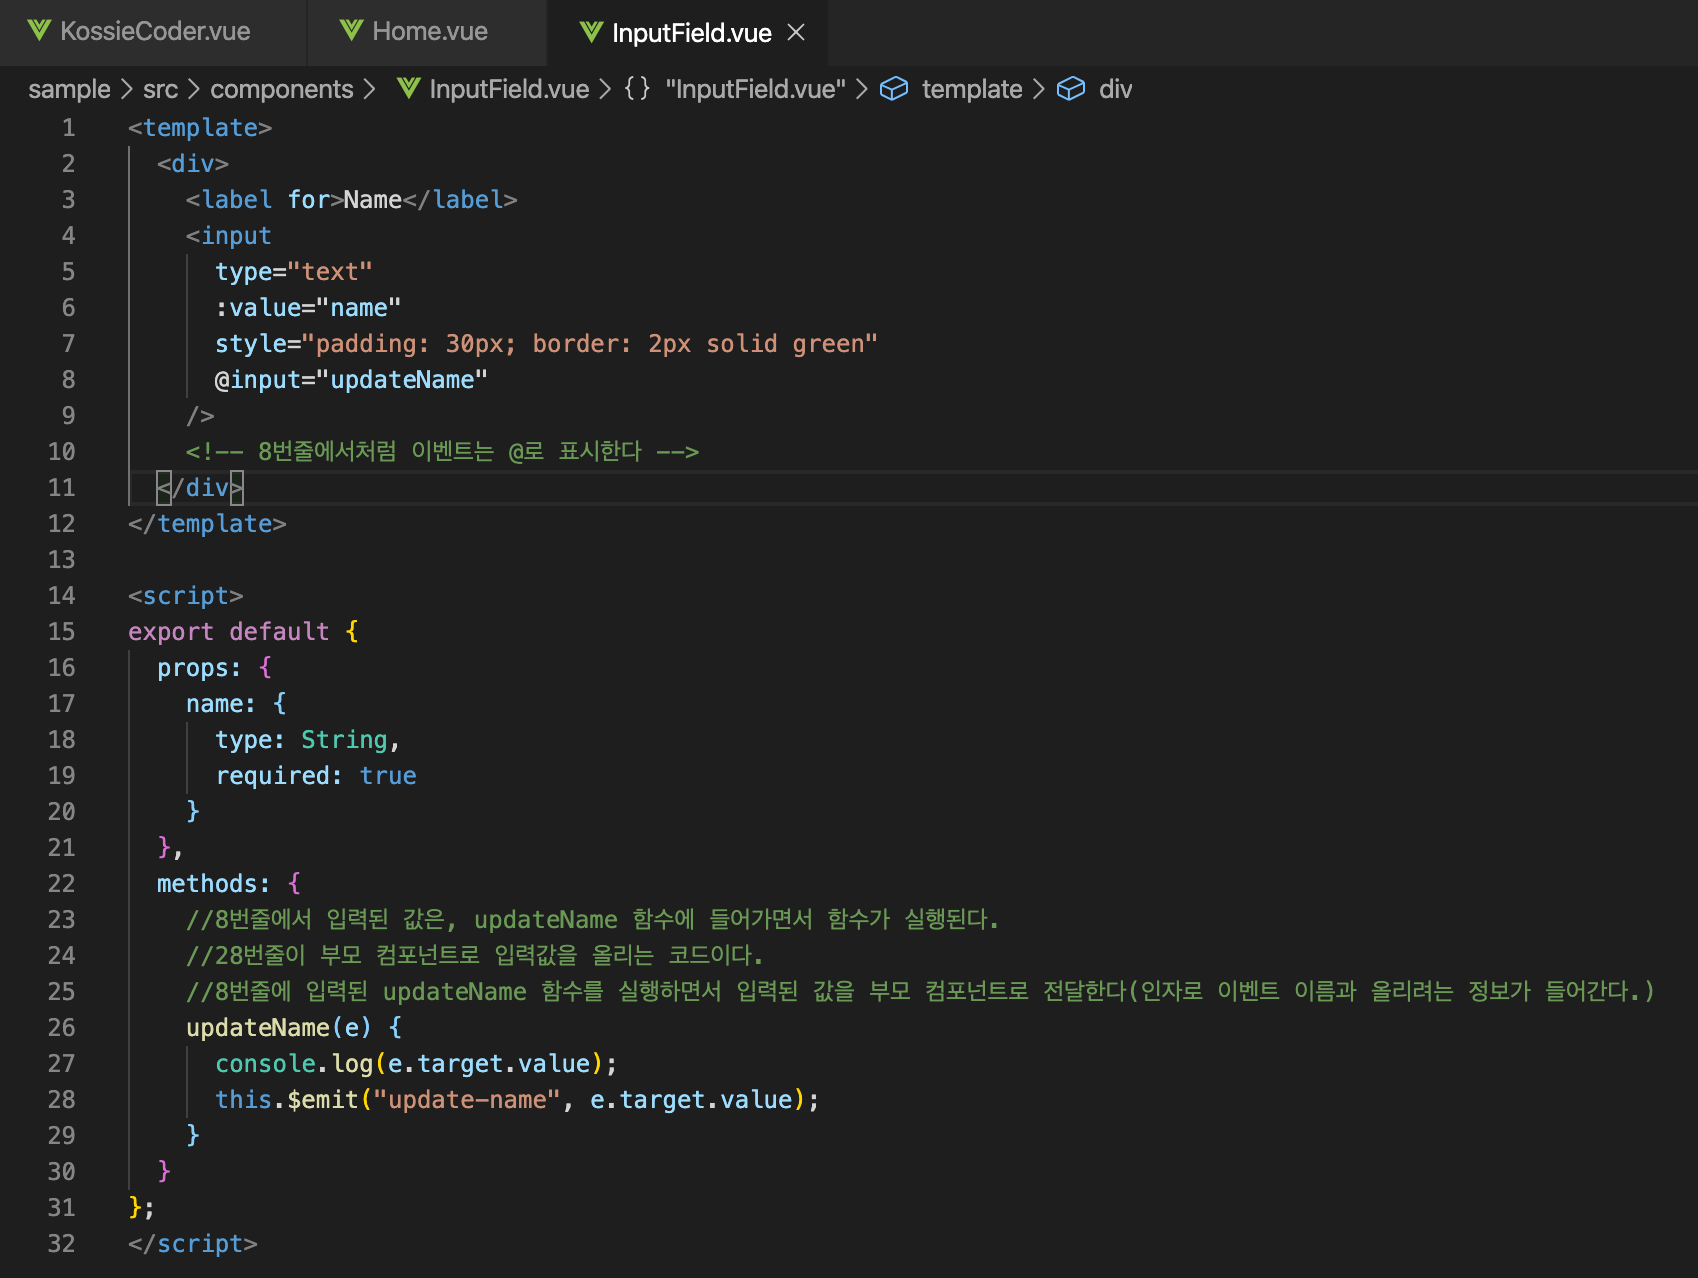
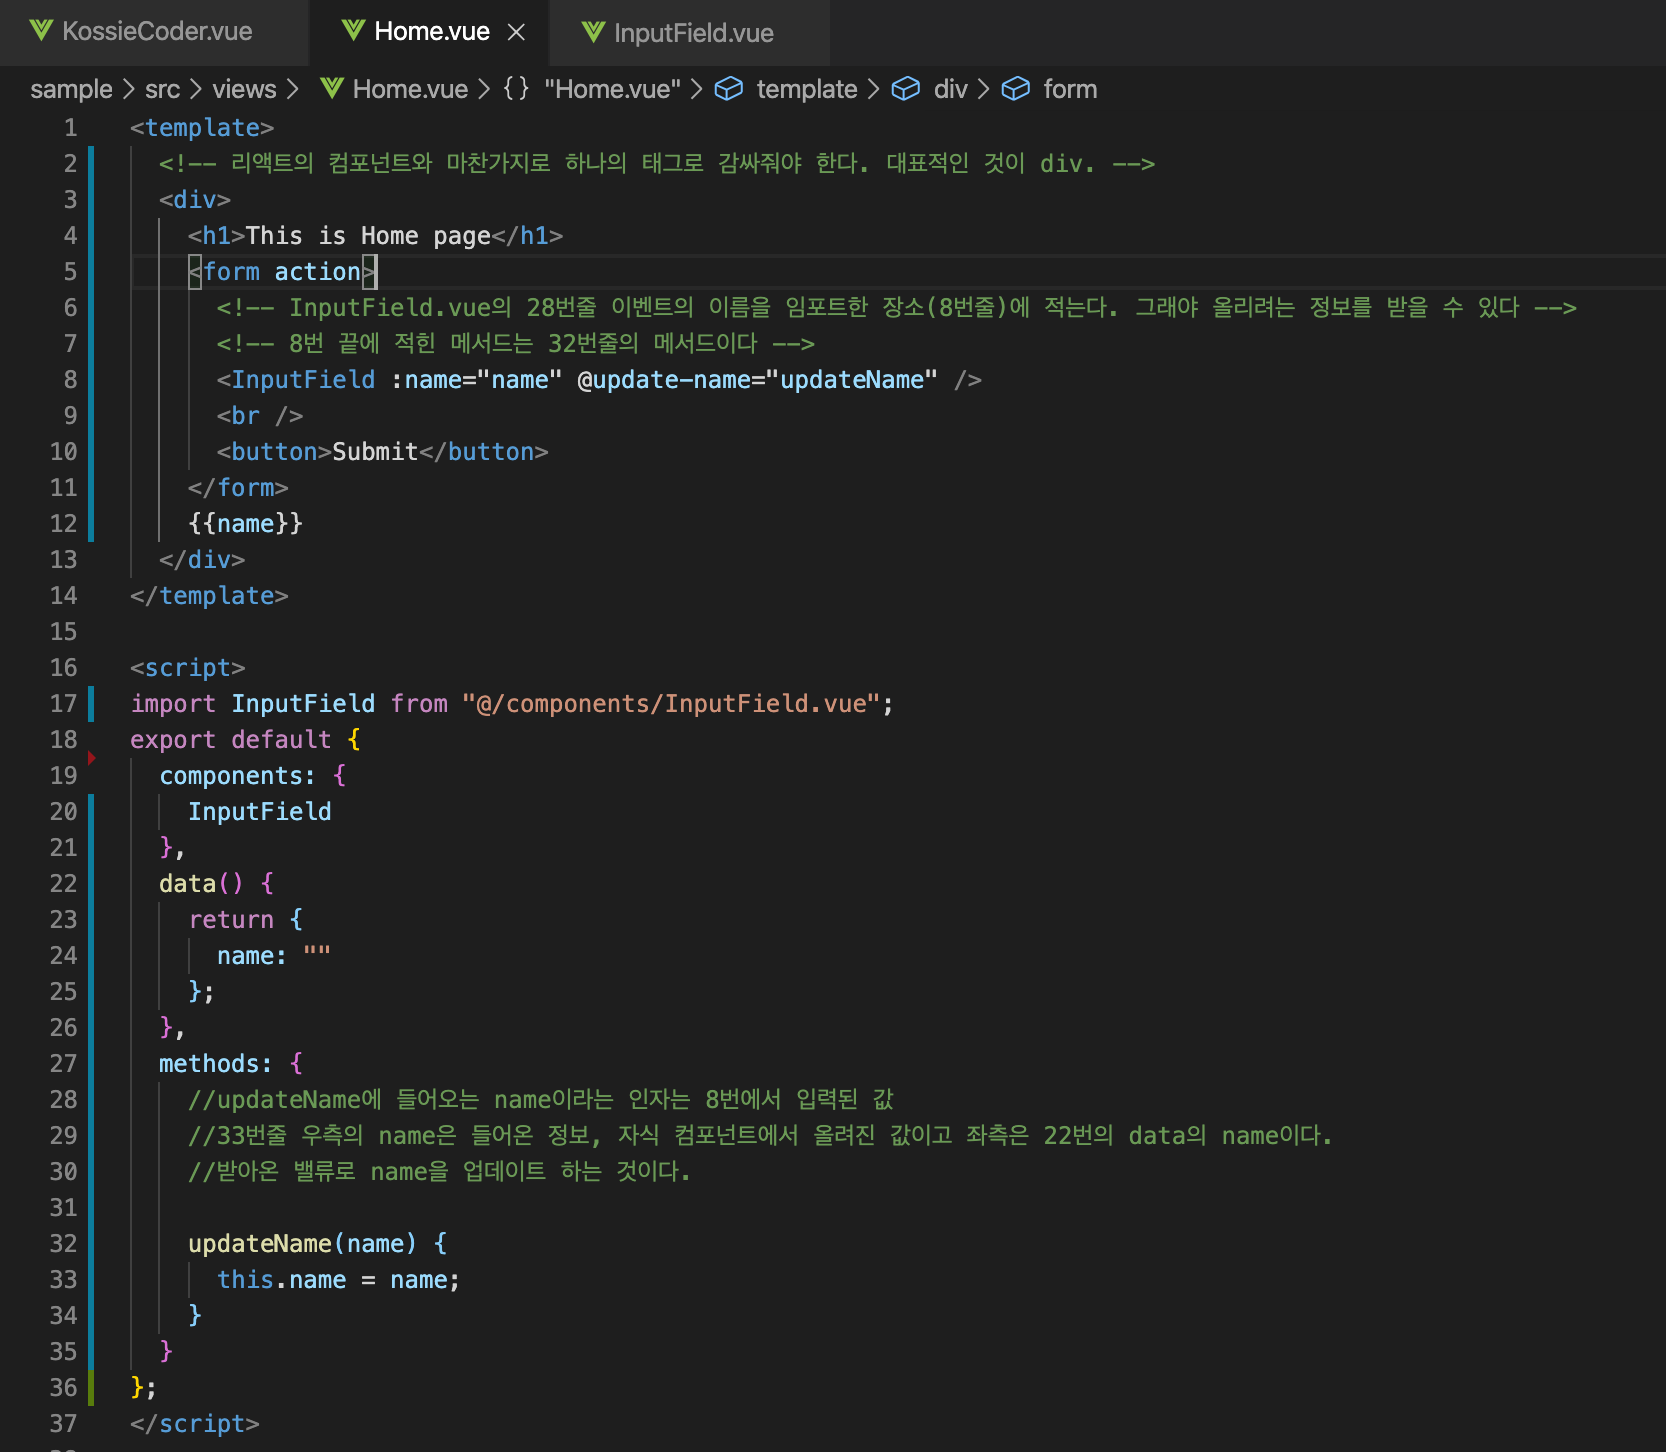
InputField.vue에 입력된 값을 Home.vue에 렌더링되도록,
자식 컴포넌트에서 부모 컴포넌트로 값을 전달하는 것이다.
this.$emit("이벤트 이름", 올려보내려는 값);
먼저 InputField.vue에서 값을 입력해서 올린다.
그리고나서 Home.vue에서 다음과 같이 받는다.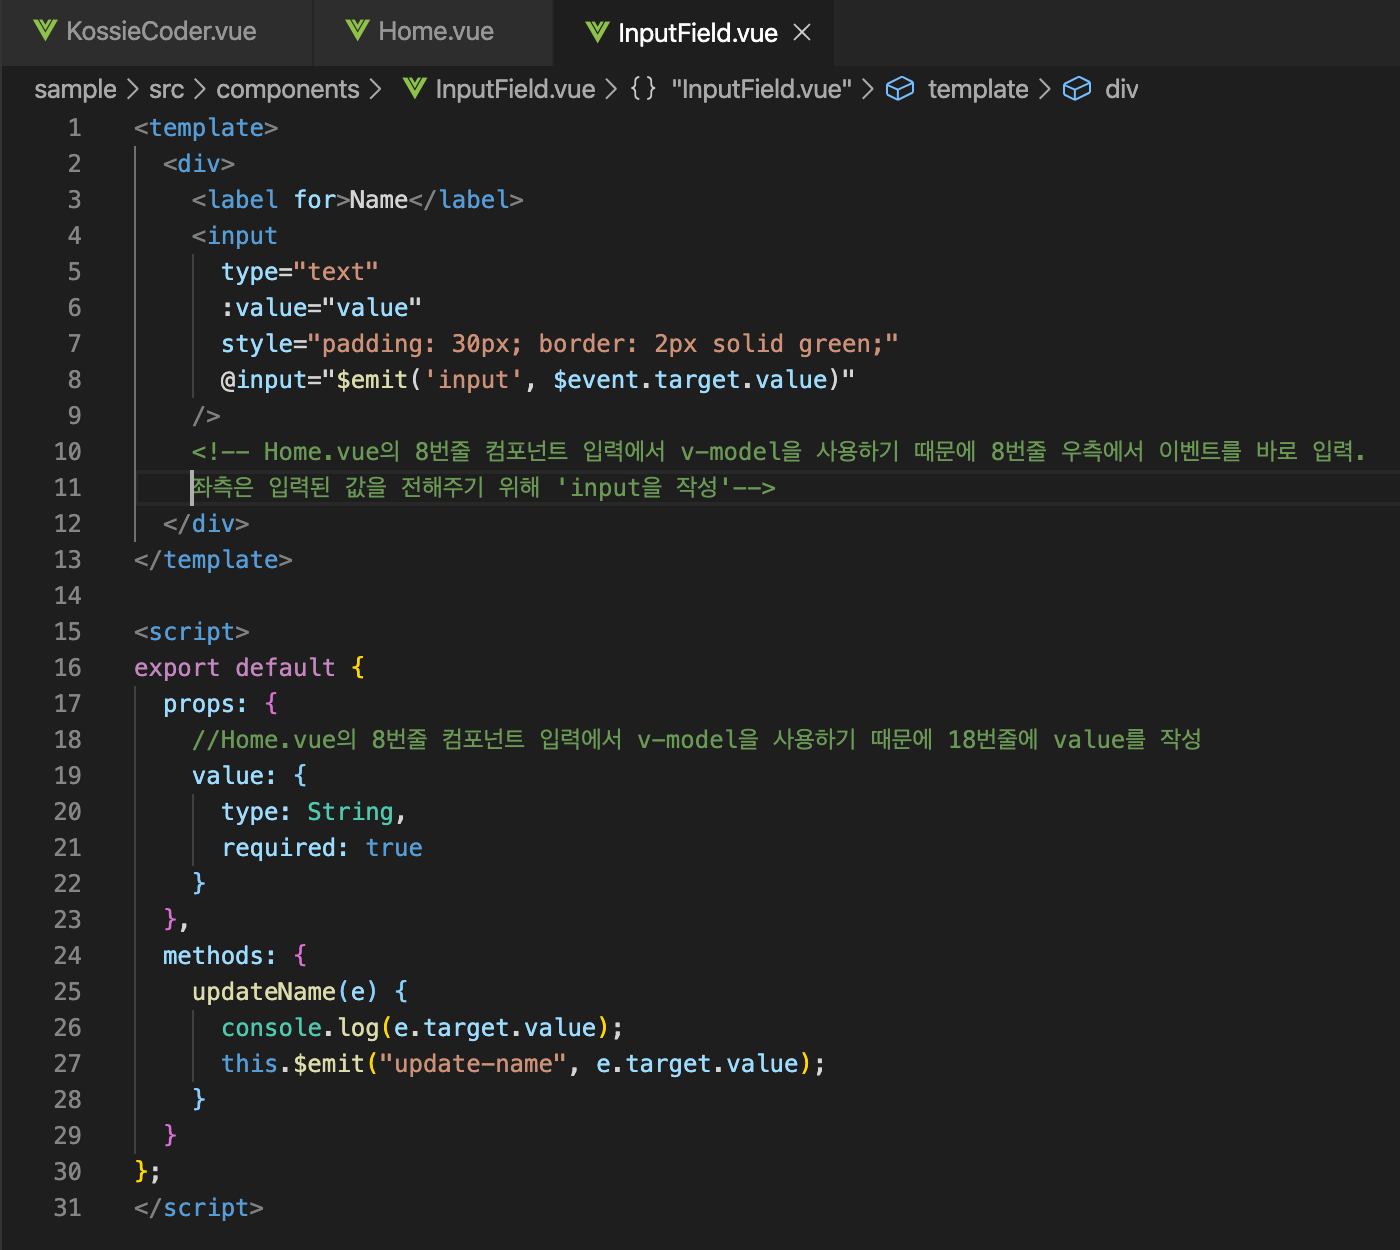
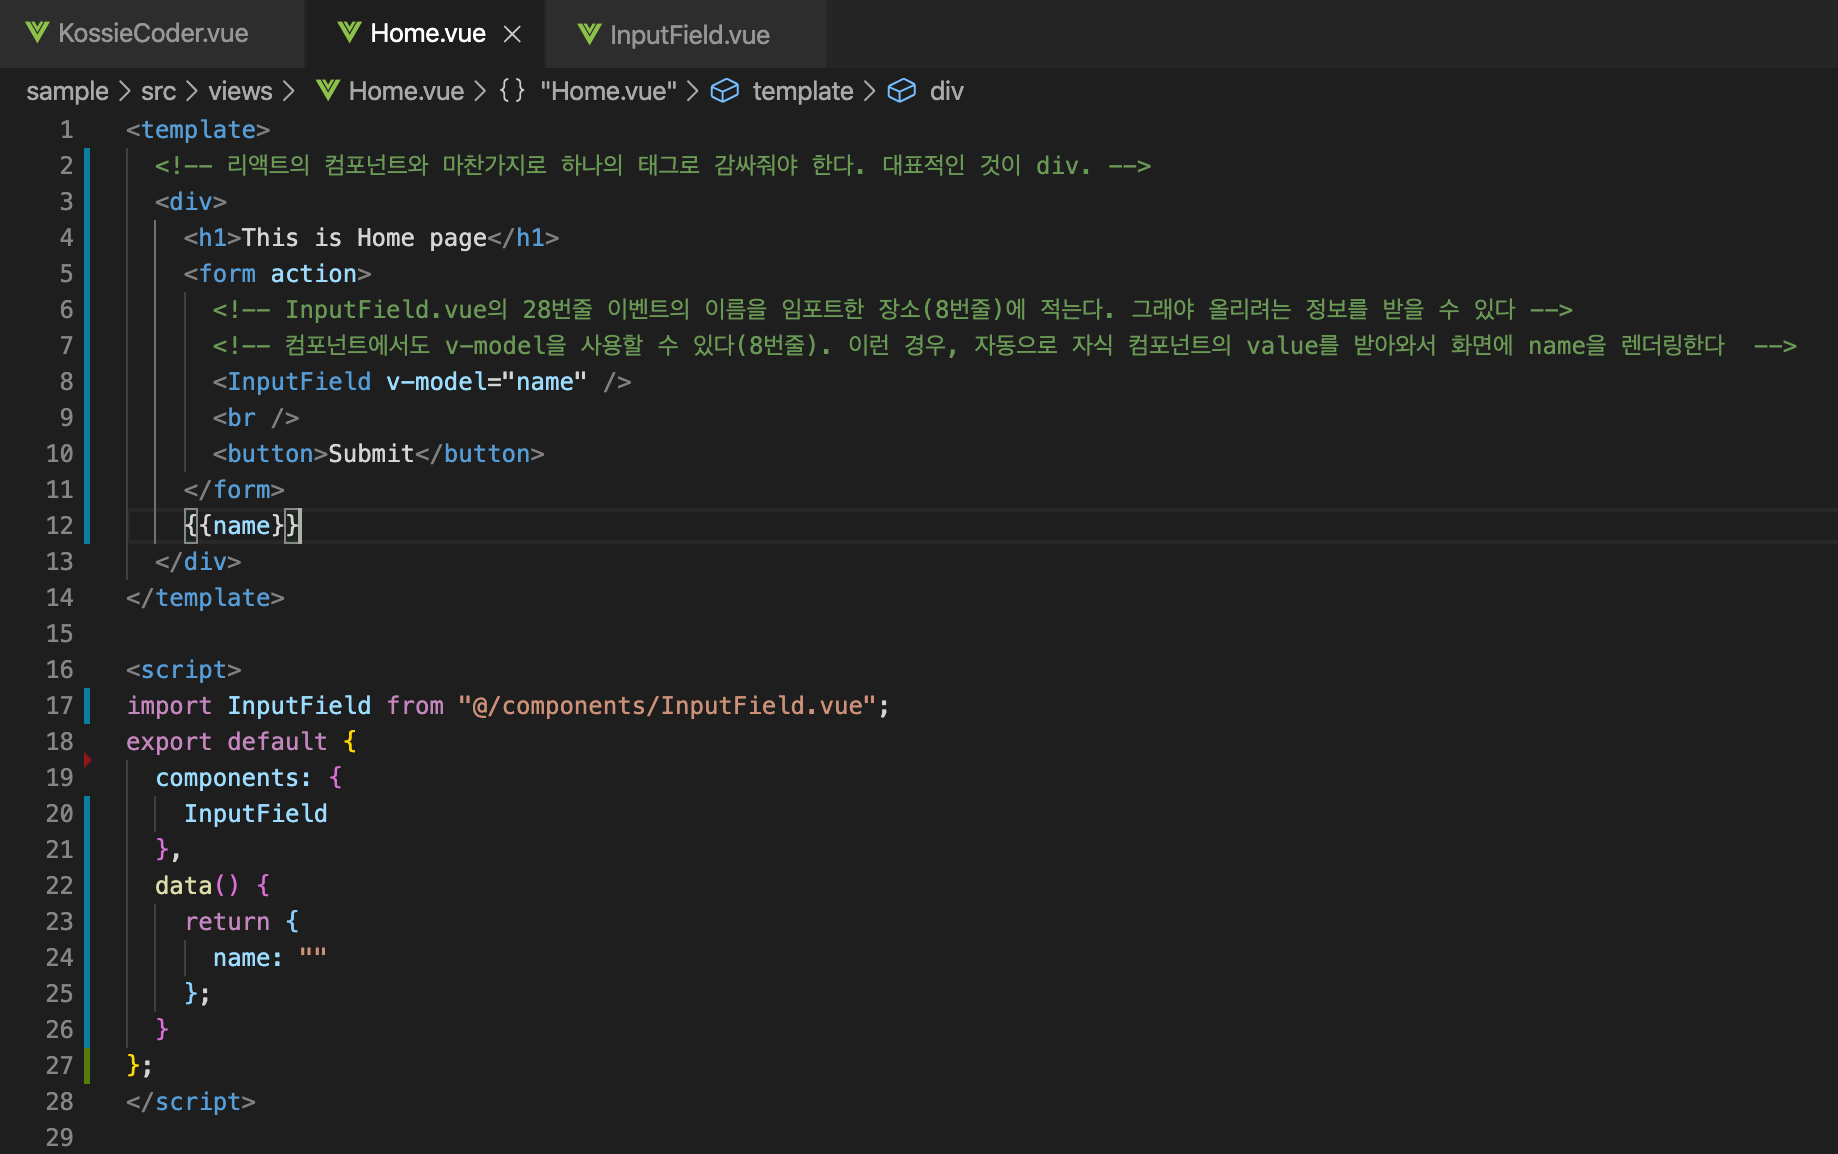
메서드를 사용하지 않고 v-model을 사용하는 방법도 있다.
먼저 InputField.vue에서 @input에 이벤트를 바로 입력해준다.
그리고 Home.vue에서 v-model로 받는다
출처
https://kr.vuejs.org/v2/guide/
https://www.youtube.com/watch?v=HAegTAEW1Y0&list=PLB7CpjPWqHOtYP7P_0Ls9XNed0NLvmkAh&index=10
