시작하기에 앞서서
음악 플레이리스트에서 ListView를 활용하면 좋을 것 같다는 생각에
2주차에 만들었던 Genie 클론을 develop 하기로 결정했다.> 시간
오후 9시 ~ 새벽 2시까지 할 예정
새벽엔 집중이 잘되니까> 구체적 내용: ListView와 CRUD를 1차적으로 구현한다.
1) ListView 구현 - 이전에 리스트뷰처럼 보이려고 만들었던 item view를 List item layout에 사용한다.
--> 예상 시간) 15분
2) Create - 구현해놨던 플레이리스트(MusicActivity)와 음악추가(AddActivity) 액티비티를 사용한다.
--> 예상 시간) 1시간
3) Delete - 롱클릭 기능을 사용하여 팝업창을 띄운 후 응답에 따라 삭제한다.
--> 예상 시간) 2시간
4) Update - 드래그&드랍으로 플레이리스트 순서 변경
--> 예상 시간) 3시간 이상
결과
>> 리스트 뷰 구현: 1시간
List Item XML파일에서 view들을 재배치하고 글자 크기나 여백과 같은 UI 수정, 어댑터 클래스 코드에 대한 이해 등 생각보다 훨씬 많은 시간이 걸림.
>> Create: 10분
인텐트로 받아온 데이터를 배열에 추가하고 어댑터에 알려준다.
when(resultCode){
    100 -> { // 확인 버튼
    Log.i("RESULT_OK","${Activity.RESULT_OK}")
    val music = data?.extras?.getSerializable("newMusic") as MusicData
    musicList.add(music)
    musicListAdapter.notifyDataSetChanged()
    // List item의 data에 새 음악을 추가하고 어댑터에게 알린다.
    }
}
>> Delete: 3시간
1. 롱클릭: 리스트 뷰의 롱클릭리스너를 사용해서 롱클릭 기능 구현 --> 코틀린의 override, 람다 함수 등에 관한 문법을 모르고 억지로 이해하려고 하다보니 오래 걸렸다. 일찍 함수 문법에 대해 찾아봤다면 시간을 훨씬 단축시킬 수 있었을 것 같다.
music_list_view.setOnItemLongClickListener{ parent, view, position, id ->
            val deletePopupIntent = Intent(this, DeletePopupActivity::class.java)
            deletePopupIntent.putExtra("p", position)    //삭제를 위해 인덱스를 함께 넘겨준다
            startActivityForResult(deletePopupIntent, DELETE_ACTIVITY_CODE)
            true
} // 리스트 아이템 롱클릭 이벤트 -> 삭제 팝업창을 띄운다- 2. 팝업창: 팝업 액티비티를 따로 만들고, dialog 테마를 적용
3. 삭제: 사용자 반응에 따라 클릭한 리스트 아이템의 데이터 삭제
DELETE_ACTIVITY_CODE -> {   // 음악 삭제
                when(resultCode){
                    Activity.RESULT_OK -> {
                        val idx = data?.extras?.get("p") as Int // 전달했던 인덱스를 그대로 돌려받음
                        musicList.removeAt(idx)
                        musicListAdapter.notifyDataSetChanged()
                    }
                }
            }
문제점
1) 레이아웃을 구성할 때마다, 글자크기, View 위치, 공백 등 사소한 화면구성에 너무 많은 시간을 사용한다.
2) 코틀린에 대한 이해가 부족한 것이 검색할 때 많은 시간을 쓰게된다.**
3) 팝업창이 의도한대로 보이지 않는다. 레이아웃 크기가 match_parent라서 그런것 같다.
4) 글자 크기는 하나의 디바이스 크기를 기준으로 정하는 방법 밖엔 없는 건가?
팝업창 xml 코드)
<?xml version="1.0" encoding="utf-8"?>
<androidx.constraintlayout.widget.ConstraintLayout xmlns:android="http://schemas.android.com/apk/res/android"
    android:layout_width="match_parent"
    android:layout_height="match_parent"
    xmlns:app="http://schemas.android.com/apk/res-auto"
    xmlns:tools="http://schemas.android.com/tools"
    tools:context=".DeletePopupActivity">

    <LinearLayout
        android:id="@+id/popup_layout1"
        android:layout_width="0dp"
        android:layout_height="0dp"
        app:layout_constraintWidth_percent="0.7"
        app:layout_constraintHeight_percent="0.315"
        app:layout_constraintStart_toStartOf="parent"
        app:layout_constraintTop_toTopOf="parent"
        app:layout_constraintEnd_toEndOf="parent"
        app:layout_constraintBottom_toTopOf="@id/delete_button_layout"
        app:layout_constraintVertical_chainStyle="packed"
        android:orientation="vertical"
        android:weightSum="6">

        <TextView
            android:id="@+id/textView2"
            android:layout_width="match_parent"
            android:layout_height="2dp"
            android:layout_weight="2"
            android:gravity="center"
            android:text="알림"
            android:textAppearance="@style/TextAppearance.AppCompat.Large"
            android:textStyle="bold"/>

        <TextView
            android:id="@+id/textView3"
            android:layout_width="match_parent"
            android:layout_height="0dp"
            android:layout_weight="2"
            android:gravity="center"
            android:text="TextView" />


        <TextView
            android:id="@+id/textView5"
            android:layout_width="match_parent"
            android:layout_height="0dp"
            android:layout_weight="1"
            android:gravity="center"
            android:text="선택하신 곡을 삭제하시겠습니까?"
            android:textColor="@color/textGray"/>

    </LinearLayout>
    <LinearLayout
        android:id="@+id/delete_button_layout"
        android:layout_width="0dp"
        android:layout_height="0dp"
        app:layout_constraintWidth_percent="0.7"
        app:layout_constraintHeight_percent="0.035"
        app:layout_constraintTop_toBottomOf="@id/popup_layout1"
        app:layout_constraintStart_toStartOf="parent"
        app:layout_constraintEnd_toEndOf="parent"
        app:layout_constraintBottom_toBottomOf="parent"
        app:layout_constraintVertical_chainStyle="packed"
        android:orientation="horizontal"
        android:weightSum="2">

        <Button
            android:id="@+id/delete_cancel"
            android:layout_width="138dp"
            android:layout_height="match_parent"
            android:layout_weight="1"
            android:background="@android:color/transparent"
            android:gravity="center"
            android:text="취소"
            android:textColor="@color/textGray" />

        <Button
            android:id="@+id/delete_confirm"
            android:layout_width="match_parent"
            android:layout_height="match_parent"
            android:layout_weight="1"
            android:gravity="center"
            android:background="@android:color/transparent"
            android:text="확인"
            android:textColor="@color/blue"/>
    </LinearLayout>
</androidx.constraintlayout.widget.ConstraintLayout>
의도한 화면
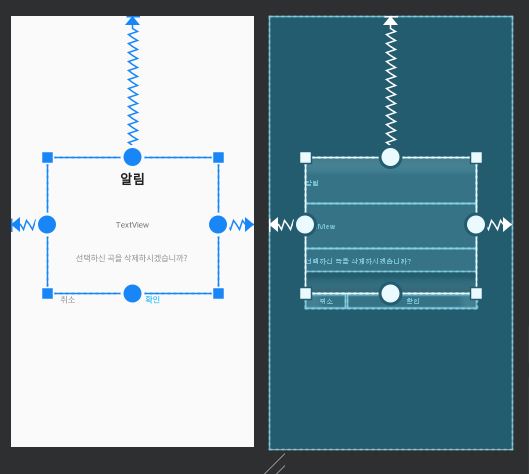
실제 보이는 화면