web3.js 실습
- web3 객체 생성
// Add the web3 node module
const Web3 = require('web3');

// Ganache node on local enviroment
const ENDPOINT = 'http://localhost:7545';

const web3 = new Web3(new Web3.providers.HttpProvider(ENDPOINT));- 네트워크 기본 정보
web3.eth.net.getId()
.then(id=>console.log("Network Id: ",id));- 네트워크 ID : 현재 상호작용하는 노드가 속한 네트워크의 고유 번호
web3.eth.net.getPeerCount()
.then(peerCount=>console.log("No. of Peers: ",peerCount));- 피어 수 : 노드와 직접 연결되어 있는 피어의 수
web3.eth.net.getBlockNumber()
.then(blockNo=>console.log("Latest Block Number: ",blockNo));- 현재 블록 번호 : 네트워크에서 생성도니 가장 최근 블록의 번호
- 트랜잭션 생성
web3.eth.sendTransaction({
	from: FROM_ADDRESS,
    to: TO_ADDRESS,
    value: VALUE_IN_WEI
})
.on('transactionHash',hash=>{...})
.on('receipt',receipt=>{...})
.on('confirmation',confirNum=>{...})
.on('error',console.error);- 트랜잭션 객체
- from: 보내는 주소- to : 받는 주소
- value: 전송량 (wei 단위)
- 비동기 처리 지원
:PromiEvent
- sending
- sent
- transactionHash
- receipt
- confirmation
- error
- 트랜잭션 결과 확인
...
.on('confirmation',confirNum=>{
	//잔액 확인
    web3.eth.getBalance(fromAddr)
    .then(balance => console.log(`${fromAddr};
    ${web3.utils.fromwei(balance,"ether")}
    ether`));
})
.on('error',console.error);- 잔액 확인
- 보낸 주소, 받은 주소의 잔액 확인- 출력 시 ether 단위로 변환
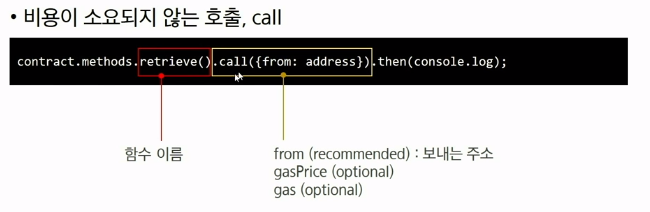
web3.eth.getTransaction(TRANSACTION_HASH)
.then(console.log)
.catch(console.log);- 트랜잭션 해시로 검색
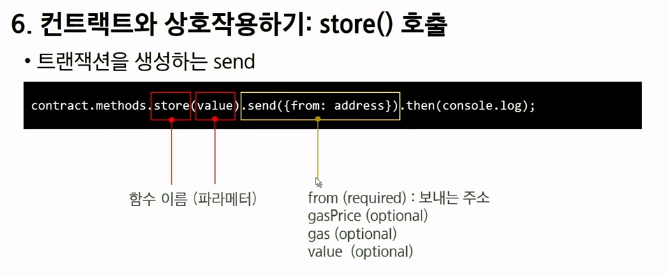
- 컨트랙트 배포하기
- Remix IDE를 통해 ganache에 1_storage.sol 배포(day3 참고)
- 컨트랙트와 상호작용하기 : 인스턴스 생성
const ABI = [...
];

const CONTRACT_ADDRESS = '0x_DEPLOYED_CONTRACT_ADDRESS';

const contract = new web3.eth.Contract(ABI, CONTRACT_ADDRESS);- Contract 접근을 위한 인스턴스 생성
- ABI- CONTRACT_ADDRESS

모르지만 알아가고 있어요!