스킨스쿨 일기장 어플은 MPA로 제작된 Web App인데요.
MPA 특성상 페이지 전환 시 뚝-뚝 끊기게 됩니다. 이런 현상은 자연스러운 현상이고 웹 서핑을 하게 된다면 볼 수 있는 현상이에요.
저희는 사용자에게 더욱 앱을 이용한다는 느낌을 주기 위해 자연스러운 트랜지션을 넣기로 했어요.
이번 글에서는 페이지 트랜지션을 제작하기 위해 경험했던 내용과 코드를 보여드릴게요.
좋은 라이브러리 찾기
먼저 페이지 트랜지션을 개발하기에는 쏟을 수 있는 개발 시간이 부족하였기 때문에 라이브러리를 찾기로 했어요.
Github에 수많은 라이브러리들의 문서들을 읽어보며 제게 가장 편한 환경을 제공하겠다 싶은 barba.js를 이용하기로 하였답니다.
barba.js의 경우 트랜지션을 만들기에 너무 좋은 라이브러리였지만, 제작 초기에 저희 앱에서 제거되었어요.
다음 페이지의 특정 객체의 내용만 파싱 하여 HTML을 현재 페이지에 덮어씌우기 때문에 JS를 Ajax로 불러와 사용해야 했고, 이 작업 때문에 한 페이지에서 JS가 중첩 로드되어 여러 이슈가 발생하기 시작했기 때문이에요.
barba.js의 아쉬움을 뒤로하고 예비 후보에 있던 Animsition.js을 이용하기로 하였답니다.
선택한 라이브러리에서 보이는 단점
Animsition은 배포 된지 오래되었지만 단순해서 사용하기 편하답니다.
하지만 너무나 큰 단점이 있어요.
- 한 번 정한 트랜지션으로만 이용한다.
- 페이지 이동 후 (1) 에서 정한 트랜지션만 이용된다.
- 여러 트랜지션으로 관리가 어렵다.
페이지 트랜지션은 상황에 맞게 변해야 한다고 생각해요.
Animstion이 이용된 이미지를 볼까요?
이미지에 보이는 것과 같이 페이지가 앞으로 이동하나 뒤로 이동하나 같은 트랜지션을 이용해 어색한 모습을 보이고 있어요.
이 부분을 해결해보려고 했지만 불가능해 라이브러리를 커스텀해야겠다 생각하였어요.
커스텀 진행
미루고 미루다 앱 개편을 하며 제작하기로 마음을 먹었습니다!
빠르게 작업하기 위해 Animistion의 소스코드를 참고하여 새롭게 진행하였어요.
- 여러가지 트랜지션으로 관리가 가능해야한다.
- 페이지 전환 후 지정한 트랜지션이 작동해야한다.
이 두 조건만 충족하면 됐어요.
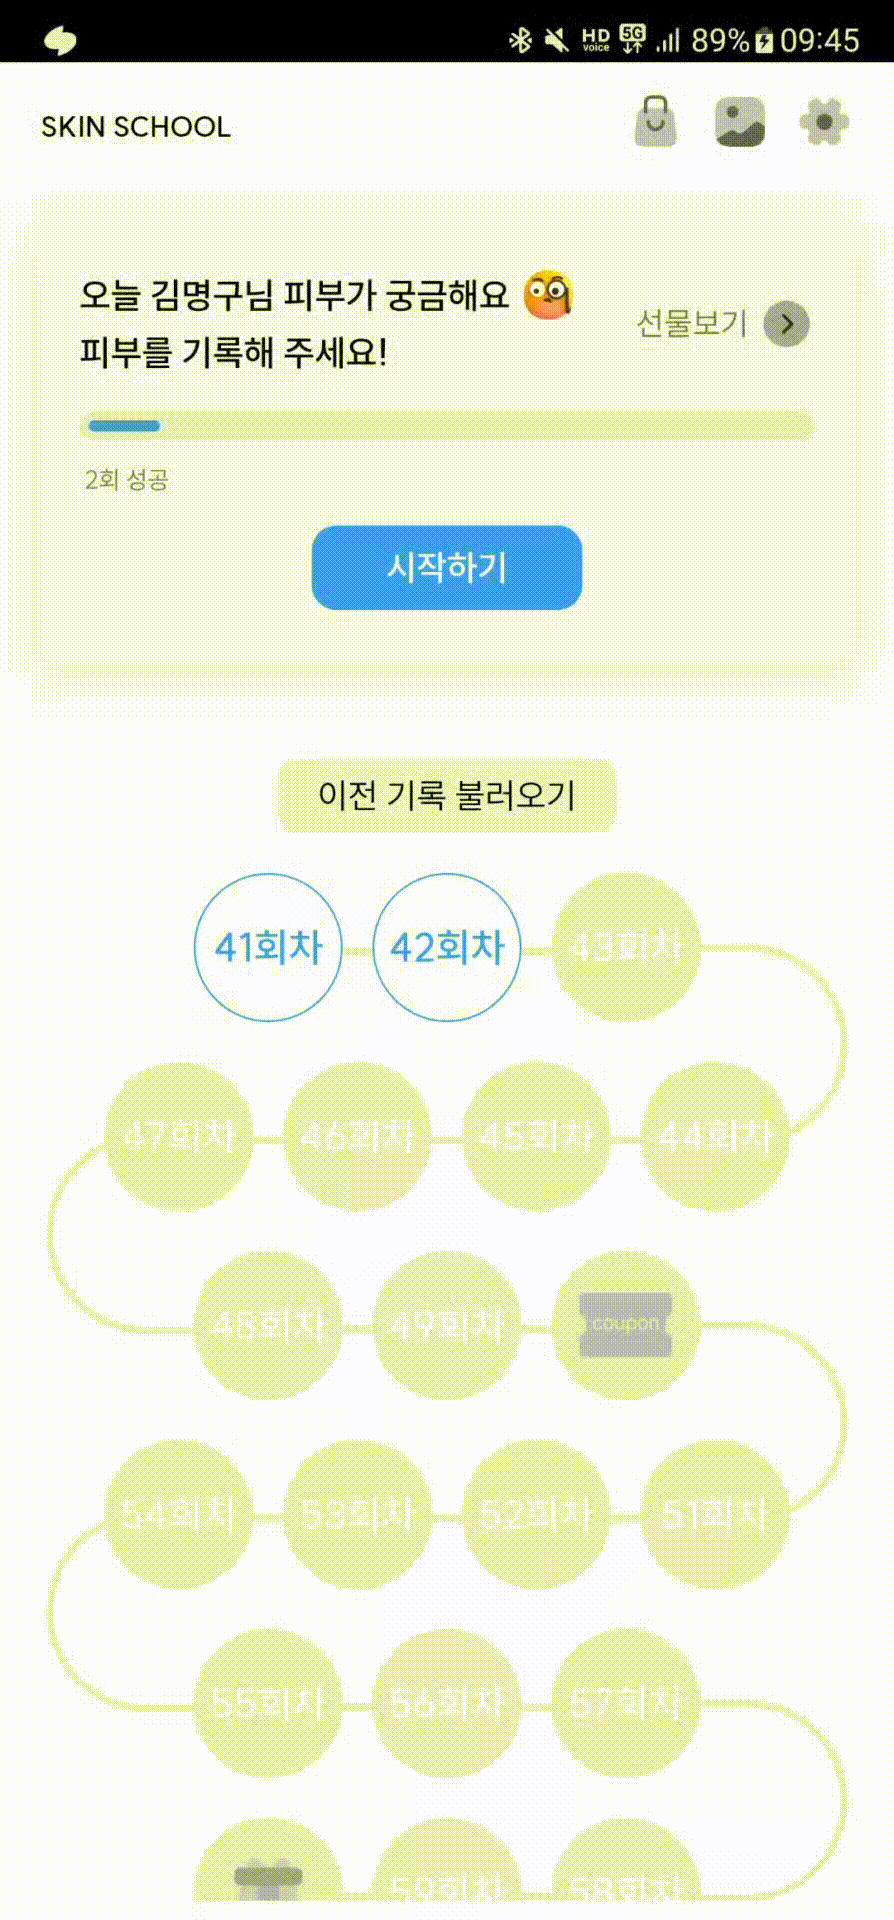
먼저 결과를 볼까요?

각 버튼마다 트랜지션을 역할이 정해져 전환이 정말 자연스러워졌어요.
이러한 결과 까지는 Animistion에서 몇 가지 개선사항이 있었어요.
1. jQuery 의존성 제거
Animistion는 jQuery를 의존하고 있어요.
때문에 항상 jQuery를 불러온 후 이용해야 하죠.
이러한 의존성이 마음에 들지 않아 순수 JavaScript로 제작하기로 했어요.
( 이전 글 Android, iOS 모바일 키보드 대응 의 코드도 순수 JavaScript로 제작한 이유 또한 같답니다. )
때문에 일기장 앱에서 이용하는 자체 제작 라이브러리들은 대부분 외부 라이브러리에 의존하지 않는 코드로 제작되어 있어요.
2. 사용방법 단순화
변경 전
Animistion의 구조를 그대로 이용하고 있었어요.
작성하지 않아도 되는 부분들을 작성했기 때문에 길어보이지만 실제로 이용하는 옵션은 6개 정도 될 것 같아요.
$(".animsition").animsition({
    inClass: "fade-in-right",
    outClass: "fade-out-left",
    inDuration: 300,
    outDuration: 300,
    linkElement: ".animsition-link",
    // e.g. linkElement: 'a:not([target="_blank"]):not([href^="#"])'
    loading: true,
    loadingParentElement: 'body', //animsition wrapper element
    loadingClass: 'animsition-loading',
    loadingInner: '', // e.g '<img src="loading.svg" />'
    timeout: false,
    timeoutCountdown: 3000,
    onLoadEvent: true,
    browser: [ 'animation-duration', '-webkit-animation-duration'],
    // "browser" option allows you to disable the "animsition" in case the css property in the array is not supported by your browser.
    // The default setting is to disable the "animsition" in a browser that does not support "animation-duration".
    overlay : false,
    overlayClass : 'animsition-overlay-slide',
    overlayParentElement : 'body',
    transition: function(url){ window.location.href = url; }
});
변경 후
디버그를 통해 Log를 Console에서 확인하게끔 하였고, transitions 배열을 통해 여러 객체를 한꺼번에 관리 가능하도록 했어요.
또 transitions의 object들에서 각 객체에 원하는 트랜지션 형태와 시간을 지정 가능하도록 했죠.
new pagingTransition({
    debug:true,
    transitions: [
        // forword page transition
        {
            linkElement : ".paging-transition-link",
            inClass : "fade-in-right",
            outClass : "fade-out-left",
            inDuration : 300,
            outDuration : 300,
        },
        // prevent page transition
        {
            linkElement : ".paging-transition-link-prevent",
            inClass : "fade-in-left",
            outClass : "fade-out-right",
            inDuration : 300,
            outDuration : 300,
        },
        // bottom navigtaion page transition
        {
            linkElement : ".paging-transition-link-nav",
            inClass : "fade-in-up",
            outClass : "fade-out-down",
            inDuration : 300,
            outDuration : 300,
        }
    ]
});
실제로 최종 코드의 옵션은 정말 간소화되었어요.
페이지 전환에서 사용하지 않고 필요 없는 옵션들을 모두 제거하고, 필요한 옵션들만 제공해서 소스만 보아도 쉽게 이해가 가능하도록 되었답니다.
#defaultOption = {
    debug : false,
    parentElement : ".paging-transition",
    transitions: [],
    loading : true,
    disableBrowser : [ 'animation-duration', '-webkit-animation-duration'], // CSS 미지원 브라우저 제외
    init: function() {},
    beginTransition : function() {},
    afterTransition : function() {},
    complete: function() {},
};
3. LocalStorage 이용
앞서 이야기했던 필요로 했던 두 조건중 [페이지 전환 후 지정한 트랜지션이 작동해야 한다]는 저에게 있어서 가장 중요한 숙제였어요.
Animistion의 경우는 다음 페이지에 항상 같은 in(페이지 진입) 트랜지션이 작동하도록 되어있기 때문이에요.
물론 시간만 투자하면 Animistion으로 개선하긴 불가능한 건 아니에요.
개선된 코드를 함께 볼까요?
먼저 다음은 out(페이지 이탈) 액션 발생 시 코드예요.
중간에 보이는 것처럼 localStorage를 통해 다음 페이지에서 이용할 트랜지션 Class 정보와 트랜지션 속도 정보를 담아 넘기고 있어요.
#out(transition, url) {
    const parent = document.querySelector(this.#option.parentElement);

    this.#log("+out / fire event : beginTransition");
    this.#option.beginTransition();

    // (outDuration + 1) | #55 outDuration: 0 crashes on Safari only ( https://github.com/blivesta/animsition/blob/92e340bbd80d4a8a6b651bce477c90437f438191/dist/js/animsition.js#L296C7-L296C71 )
    parent.style.webkitAnimationDuration = (transition.outDuration + 1) + "ms";
    parent.style.animationDuration = (transition.outDuration + 1) + "ms";
    parent.classList.add(transition.outClass);

    // set localstorage
    localStorage.setItem("pagingTransitionInClass", transition.inClass);
    localStorage.setItem("pagingTransitionInDuration", transition.inDuration);

    parent.addEventListener("animationend", animationEnd.bind(this), false);
    parent.addEventListener("webkitAnimationEnd", animationEnd.bind(this), false);
    parent.addEventListener("oAnimationEnd", animationEnd.bind(this), false);
    parent.addEventListener("MSAnimationEnd", animationEnd.bind(this), false);

    function animationEnd() {
        this.#log("+out / fire event : afterTransition");
        this.#option.afterTransition();

        parent.classList.remove(transition.outClass);
        parent.style.opacity = 0;

        this.#log("+out / fire event : complete");
        this.#option.complete();

        // 페이지 이동
        window.location.href = url;
    }
}
그럼 받는 쪽에 선 당연히 저장한 localStorage를 in(페이지 진입) 때 이용하면 되겠죠.
localStorage의 값을 받아 변수에 넣어주고 다음에는 이용하지 않도록 localStorage에서 제거해 주도록 하면 돼요.
#in() {
    const parent = document.querySelector(this.#option.parentElement);

    this.#log("+in / fire event : beginTransition");
    this.#option.beginTransition();

    if (this.#option.loading) {
        this.#removeLoading();
    }

    var inClass = "fade-in-left";
    var inDuration = 300;
    if (localStorage.pagingTransitionInClass != undefined) {
        inClass = localStorage.getItem("pagingTransitionInClass");

        localStorage.removeItem("pagingTransitionInClass");
    }
    if (localStorage.pagingTransitionInDuration != undefined) {
        inDuration = localStorage.getItem("pagingTransitionInDuration");

        localStorage.removeItem("pagingTransitionInDuration");
    }

    parent.style.webkitAnimationDuration = inDuration + "ms";
    parent.style.animationDuration = inDuration + "ms";
    parent.classList.add(inClass);

    parent.addEventListener("animationend", animationEnd.bind(this), false);
    parent.addEventListener("webkitAnimationEnd", animationEnd.bind(this), false);
    parent.addEventListener("oAnimationEnd", animationEnd.bind(this), false);
    parent.addEventListener("MSAnimationEnd", animationEnd.bind(this), false);

    function animationEnd() {
        this.#log("+in / fire event : afterTransition");
        this.#option.afterTransition();

        parent.classList.remove(inClass);
        parent.style.opacity = 1;

        this.#log("+in / fire event : complete");
        this.#option.complete();
    }
}
이렇게 간단하게 localStorage 몇 줄 더 작성하여 해결되었어요.
끝으로
이번에 했던 페이지 트랜지션 개선 작업은 백로그에 남아 항상 거슬렸는데 생각보다 금방 해결되었어요.
물론 Animistion의 코드를 베이스로 삼고 제 입맛대로 수정한 것이기 때문에 쉽게 제작이 가능했다 생각해요.
참고 문서
