
Intro
이번 글은 Ngrinder를 이용하여 성능테스트를 하고 DB Index를 통해 TPS수치를 개선하는 과정을 작성하는 글입니다.
TPS란?
1초당 처리할 수 있는 트랜잭션의 개수를 의미합니다.
nGrider란?
nGrinder란 네이버에서 진행한 오픈 소스 프로젝트로 서버의 부하 테스트를 위한 도구입니다. 웹서비스를 하기전에 서버가 얼마나 많은 사용자를 수용할 수 있는지 요청해보고 성능을 측정할 수 있습니다.
nGrinder는 Controller와 agent로 이루어져있습니다.
Controller : 테스팅을 위한 인터페이스를 제공하는 서버
Agent : Controller가 명령을 수행 받아 실제 부하를 발생시키는 서버입니다.
기본적으로 nGrinder와 같은 오픈소스를 이용한 성능테스트를 할 때는 높은 성능의 서버를 이용하는 것이 좋습니다. 그래야 성능테스트의 결과를 비교적 정확히 파악할 수 있습니다.
또 Controller와 Agent, 그리고 테스트할 서버는 각각 구축되어있는 것이 좋습니다.
서버 사양
저는 Ncloud를 이용하였습니다.
- Controller Server : [Standard] 2vCPU, 4GB Mem, 50GB Disk [g1]
- Agent Server : [Standard] 4vCPU, 8GB Mem, 50GB Disk [g1]
- Was Server : [Standard] 2vCPU, 4GB Mem, 50GB Disk [g1]
- DB Server : [Compact] 1vCPU, 2GB Mem, 50GB Disk [g1]
테스트 상황
Springboot Code
우선 제가 테스트할 api입니다.
단순 조회 api입니다.
TestController.java
   @GetMapping("/board/{title}")
    public BoardResponseDTO getBoard(@PathVariable(value = "title") String title) {
        return boardResponseMapper.toDto(boardService.getBoardByTitle(title));
    }
BoardService.java
    @Transactional(readOnly = true)
    public Board getBoardByTitle(String title) {
        return boardRepository.findByTitle(title);

    }
제목이 같은 게시글을 가져오는 단순 조회 기능입니다.
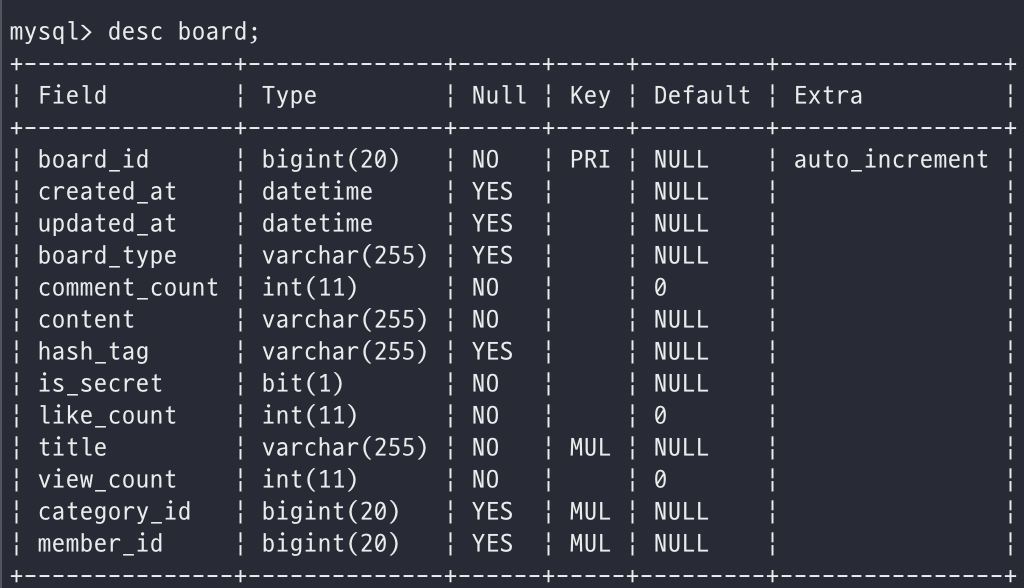
Database
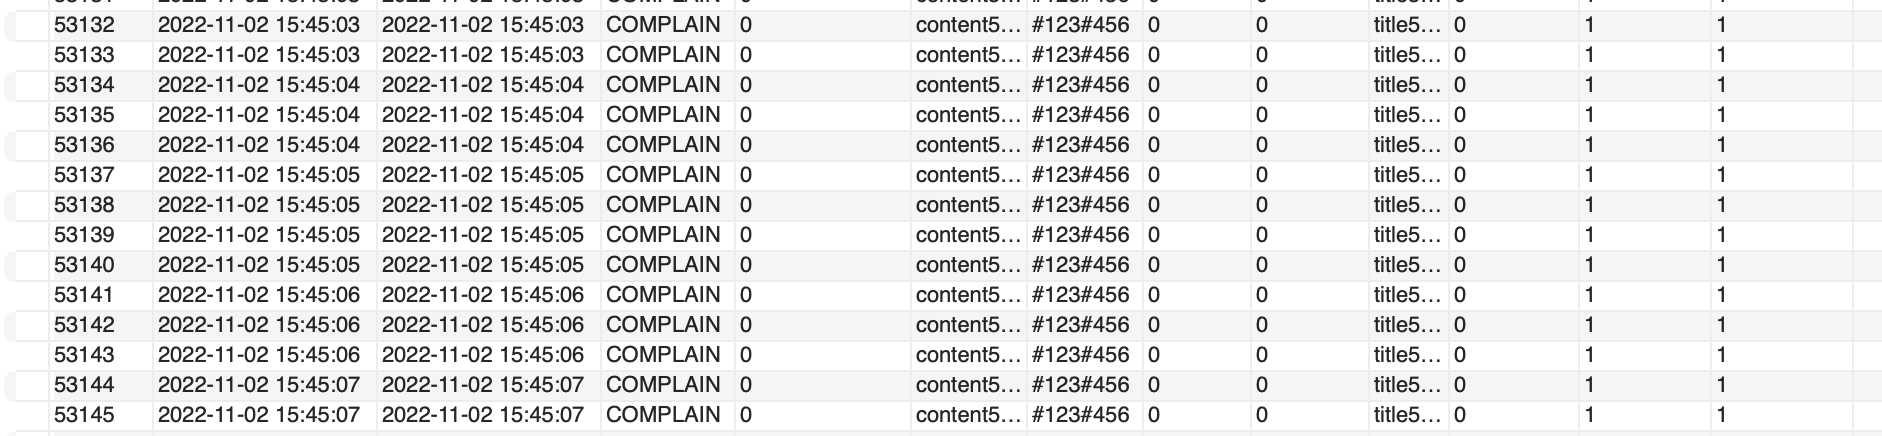
위의 사진에서 알 수 있듯이 저는 임의의 게시글 데이터 53145개를 넣어두었습니다.
그리고 현재 index는 board_id를 제외하고는 아무것도 걸려있지 않은 상태입니다.
test할 스크립트
스크립트 내용은 아래와 같습니다.
import static net.grinder.script.Grinder.grinder
import static org.junit.Assert.*
import static org.hamcrest.Matchers.*
import net.grinder.script.GTest
import net.grinder.script.Grinder
import net.grinder.scriptengine.groovy.junit.GrinderRunner
import net.grinder.scriptengine.groovy.junit.annotation.BeforeProcess
import net.grinder.scriptengine.groovy.junit.annotation.BeforeThread
// import static net.grinder.util.GrinderUtils.* // You can use this if you're using nGrinder after 3.2.3
import org.junit.Before
import org.junit.BeforeClass
import org.junit.Test
import org.junit.runner.RunWith

import org.ngrinder.http.HTTPRequest
import org.ngrinder.http.HTTPRequestControl
import org.ngrinder.http.HTTPResponse
import org.ngrinder.http.cookie.Cookie
import org.ngrinder.http.cookie.CookieManager

/**
* A simple example using the HTTP plugin that shows the retrieval of a single page via HTTP.
*
* This script is automatically generated by ngrinder.
*
* @author admin
*/
@RunWith(GrinderRunner)
class TestRunner {

	public static GTest test
	public static HTTPRequest request
	public static Map<String, String> headers = [:]
	public static Map<String, Object> params = [:]
	public static List<Cookie> cookies = []

	@BeforeProcess
	public static void beforeProcess() {
		HTTPRequestControl.setConnectionTimeout(300000)
		test = new GTest(1, "118.67.142.135")
		request = new HTTPRequest()
		grinder.logger.info("before process.")
	}

	@BeforeThread
	public void beforeThread() {
		test.record(this, "test")
		grinder.statistics.delayReports = true
		grinder.logger.info("before thread.")
	}

	@Before
	public void before() {
		request.setHeaders(headers)
		CookieManager.addCookies(cookies)
		grinder.logger.info("before. init headers and cookies")
	}

	@Test
	public void test() {
		HTTPResponse response = request.GET("http://118.67.142.135/test/board/title25000", params)

		if (response.statusCode == 301 || response.statusCode == 302) {
			grinder.logger.warn("Warning. The response may not be correct. The response code was {}.", response.statusCode)
		} else {
			assertThat(response.statusCode, is(200))
		}
	}
}
아래와 같이 약 50000개의 데이터 중 25000번째글을 선택하여 조회하는 것으로 테스트를 하였습니다.
HTTPResponse response = request.GET("http://118.67.142.135/test/board/title25000", params)nGrinder에서의 설정정보는 아래와 같습니다.
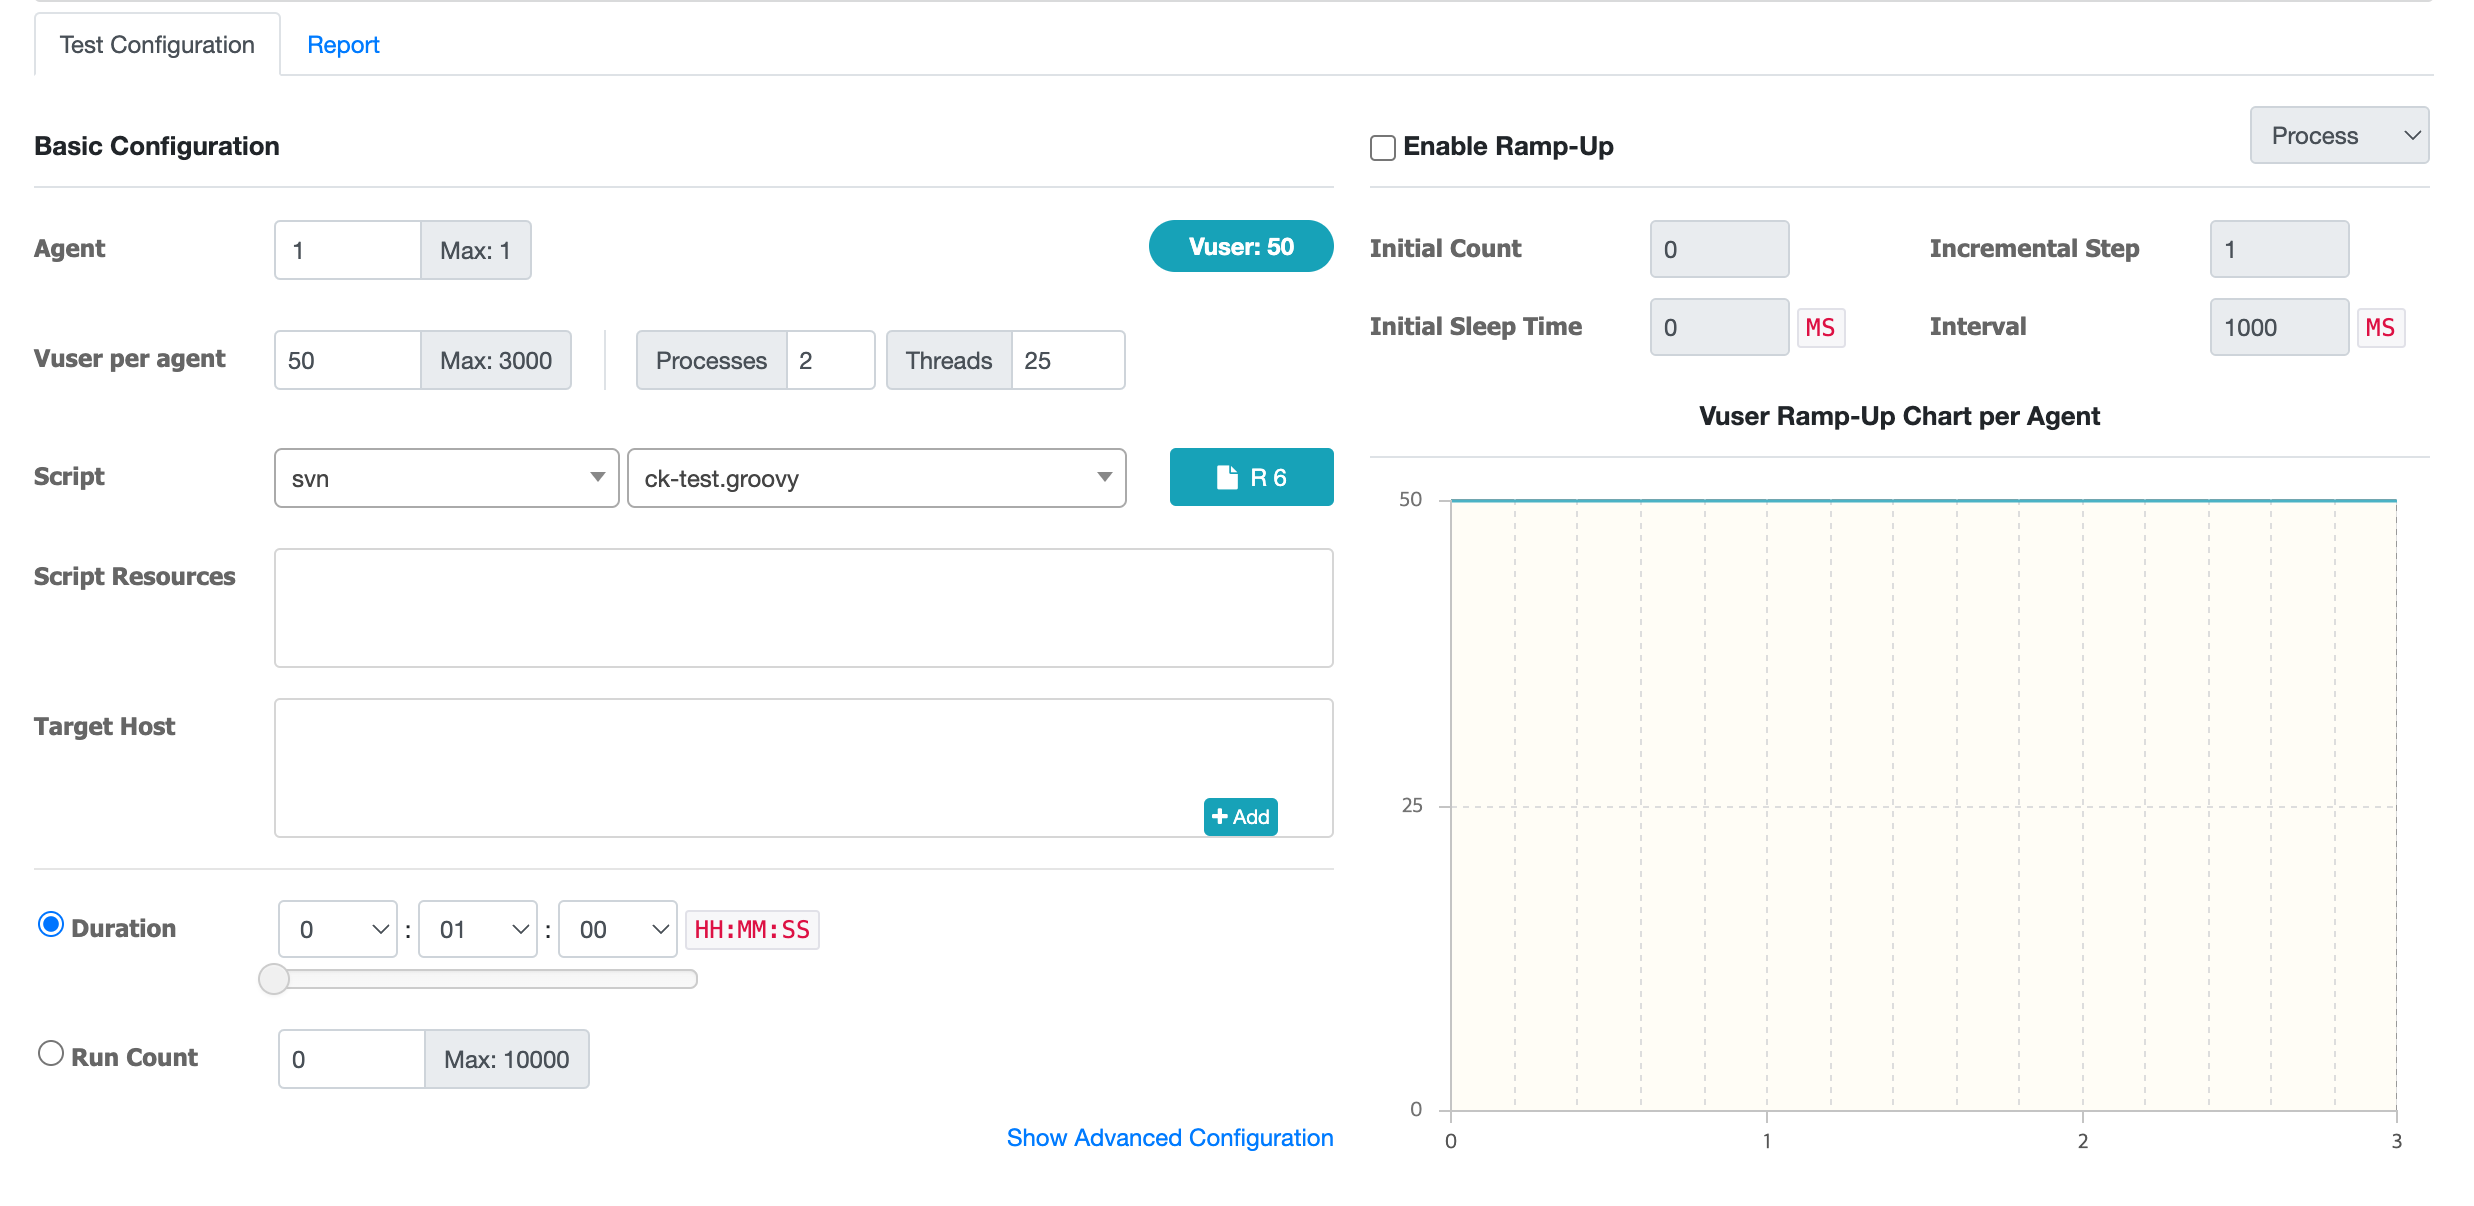
- Agent : 성능 측정에 사용할 Agent 개수 (현재 저는 1개만 두었습니다.)
- Vuser per agent : agent 당 설정할 가상 사용자 수 (동시에 요청을 날리는 사용자 수를 의미) -> 현재는 가상 사용자 50명을 기준으로 작성하였음
- Script : 성능 측정 시 각 Agent에서 실행할 스크립트
- Duration : 성능 측정 수행 시간
- Run Count : 스레드 당 테스트 코드를 수행하는 횟수
주의사항
12000~13000번 포트를 이용하여 agent에서 테스트할 서버로 부하테스트를 진행하기때문에 아래와 같이 포트를 열어주어여합니다.

위의 작업이 없다면
Stopped by error Connection is not completed or cached files digest weren't received until 10 sec 에러가 발생하게 됩니다.
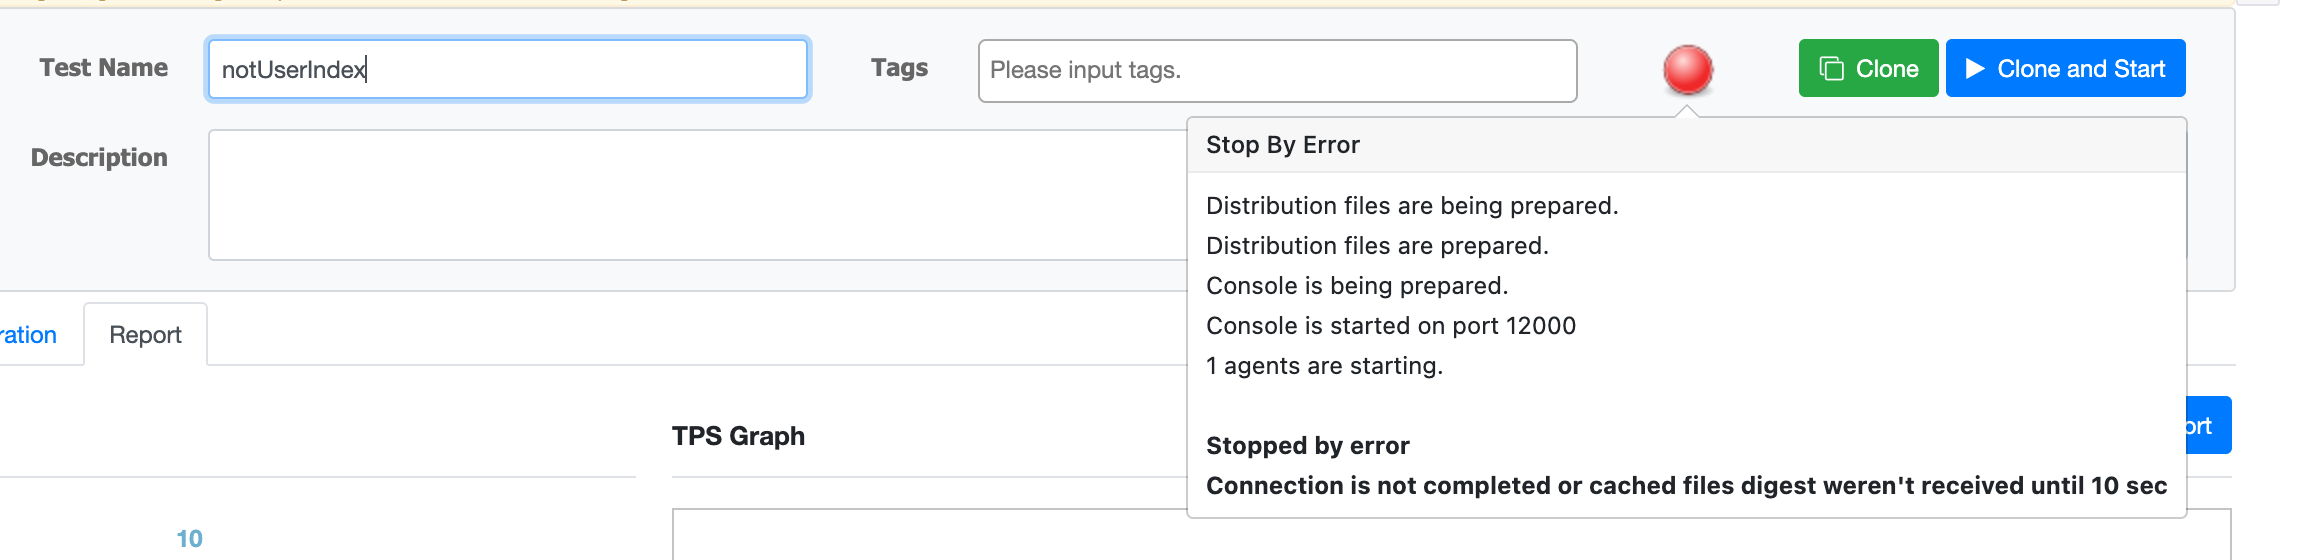
저는 nGrinder 간편 사용가이드의 블로그에서 힌트를 얻어 해결했습니다.
1차테스트(Index 없이)
다시 한번 언급하지만 이 기능은 title이 같은 게시글을 조회하는 기능입니다. 그리고 현재는 title에 Index를 걸어두지 않았습니다.
1차 결과 확인하기
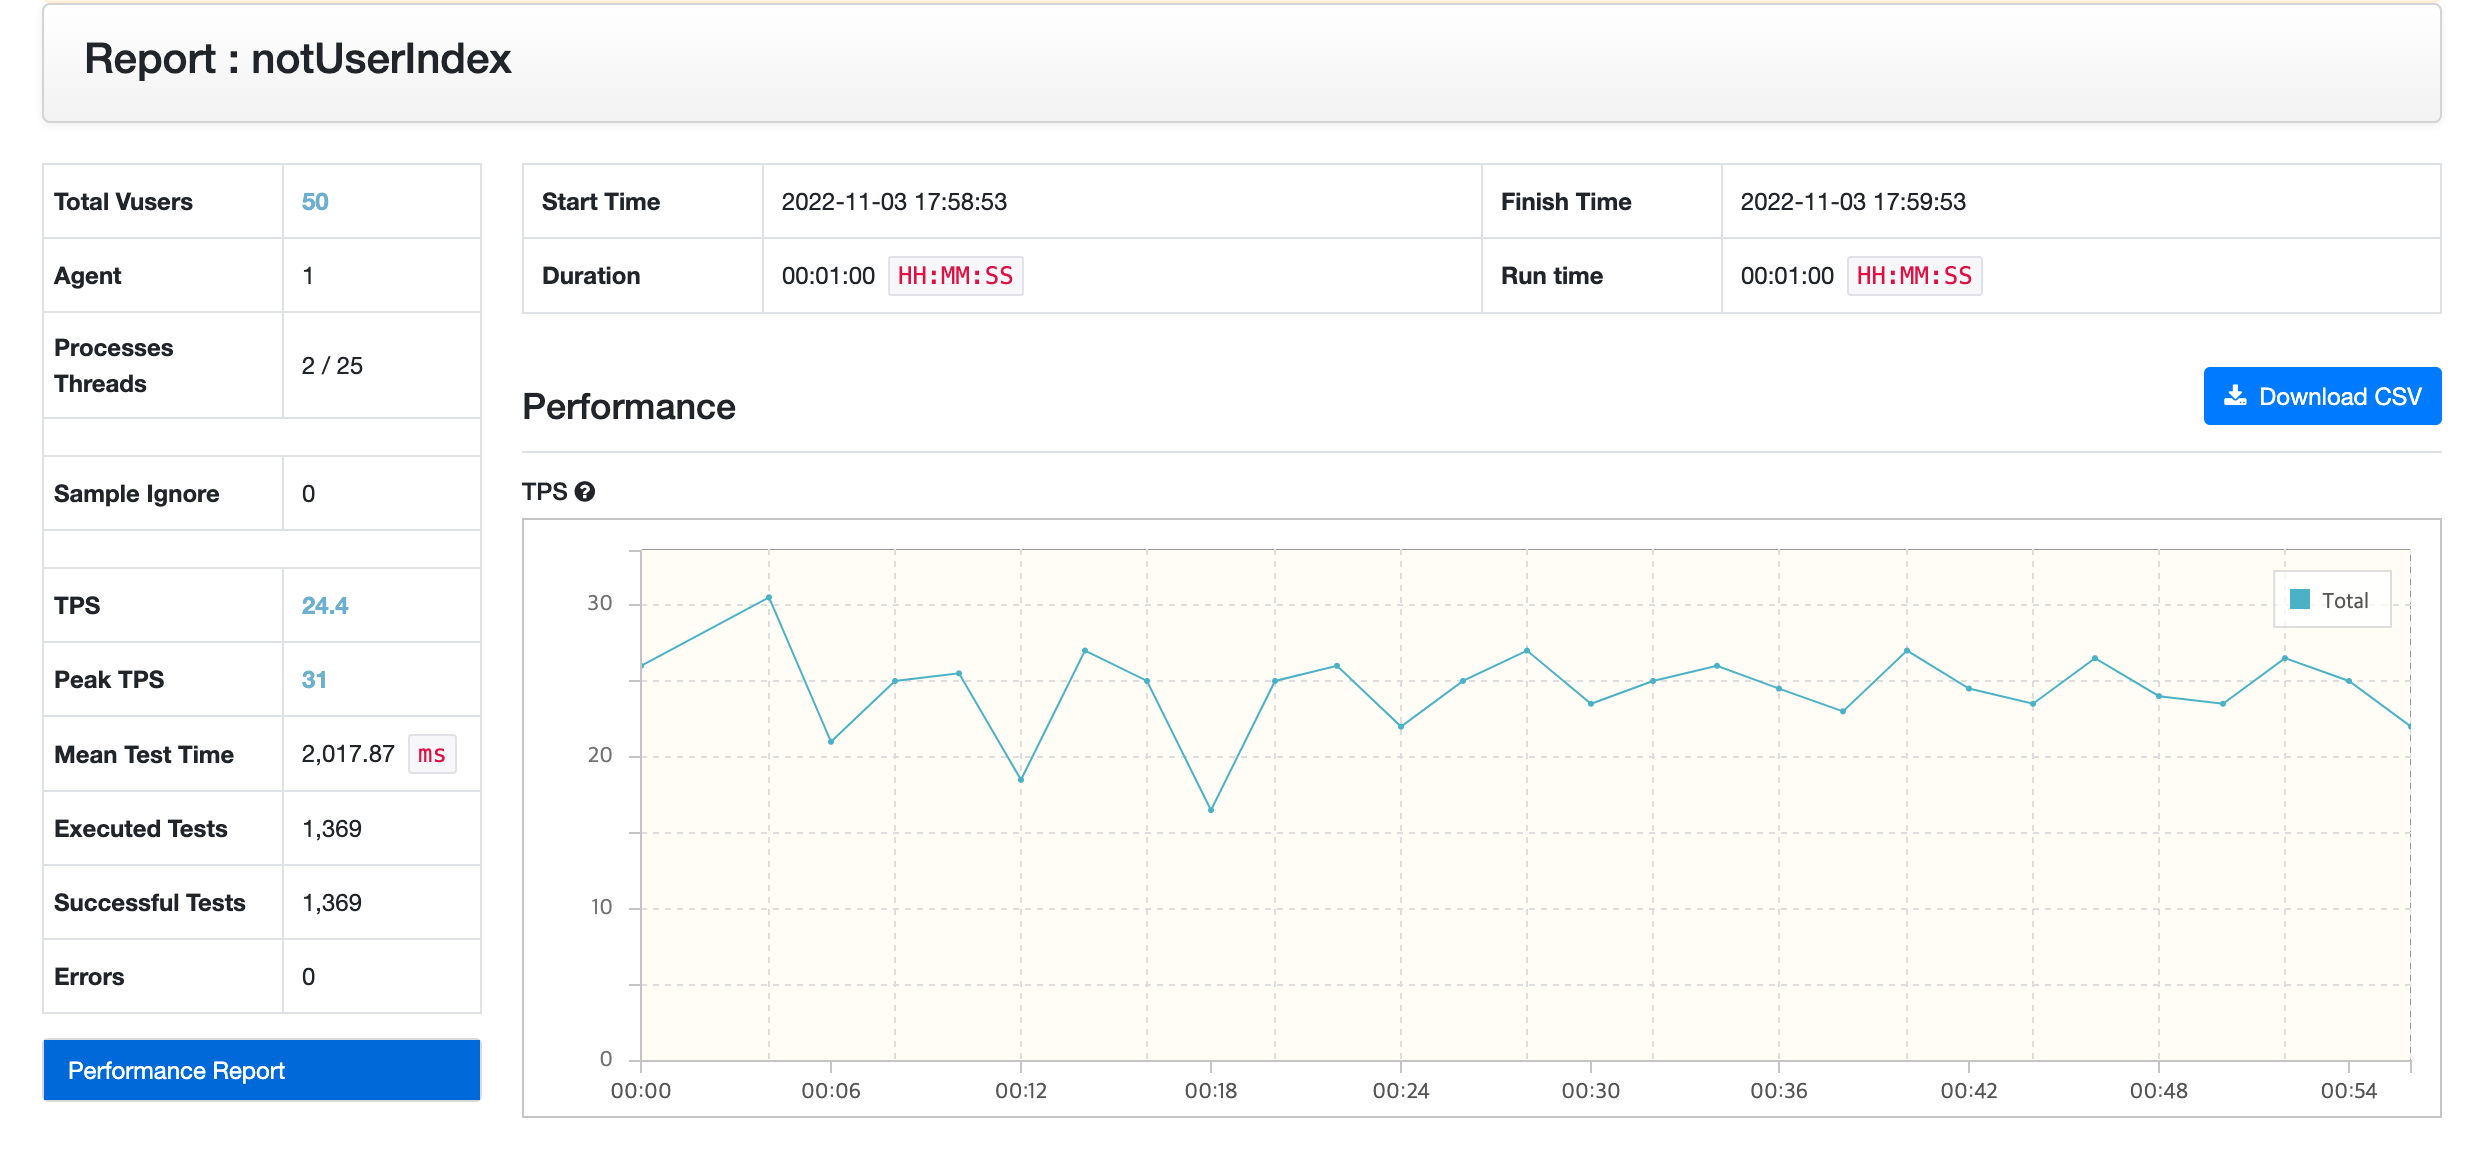
평균 TPS가 24.4가 나왔습니다.
1초당 24.4개의 트랜잭션을 처리한다는 것을 의미 합니다.
이제 다음에는 title에 Index를 걸어 테스트 해보겠습니다.
2차테스트(title에 Index생성하여 조회)
board table의 구조입니다.
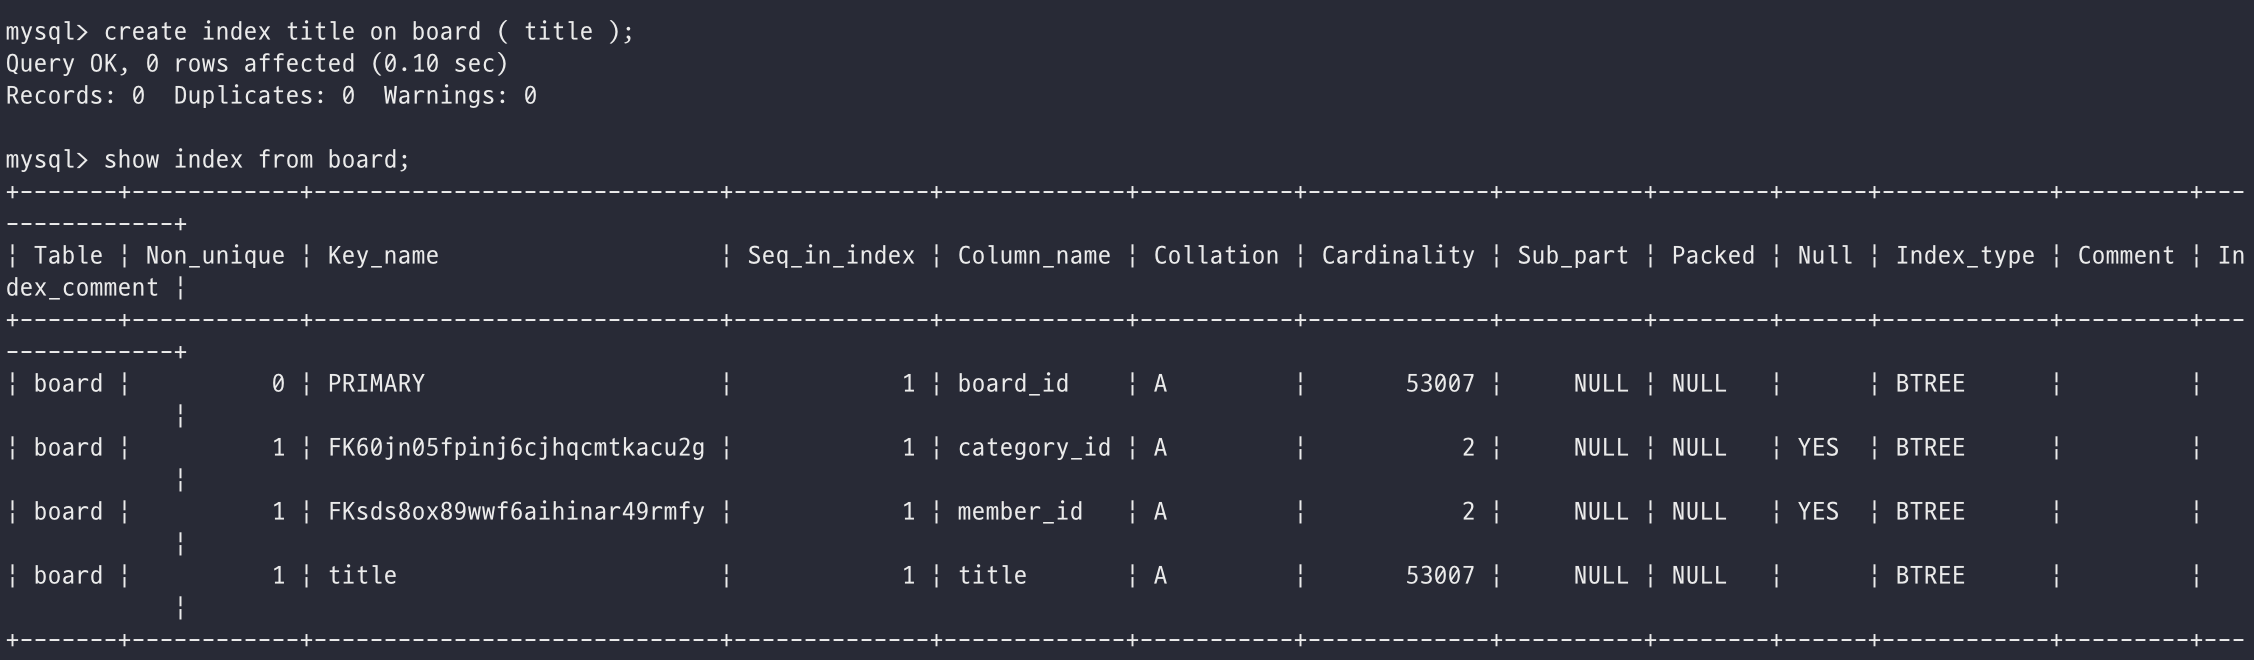
인덱스를 생성하는 과정입니다.
2차 결과 확인하기
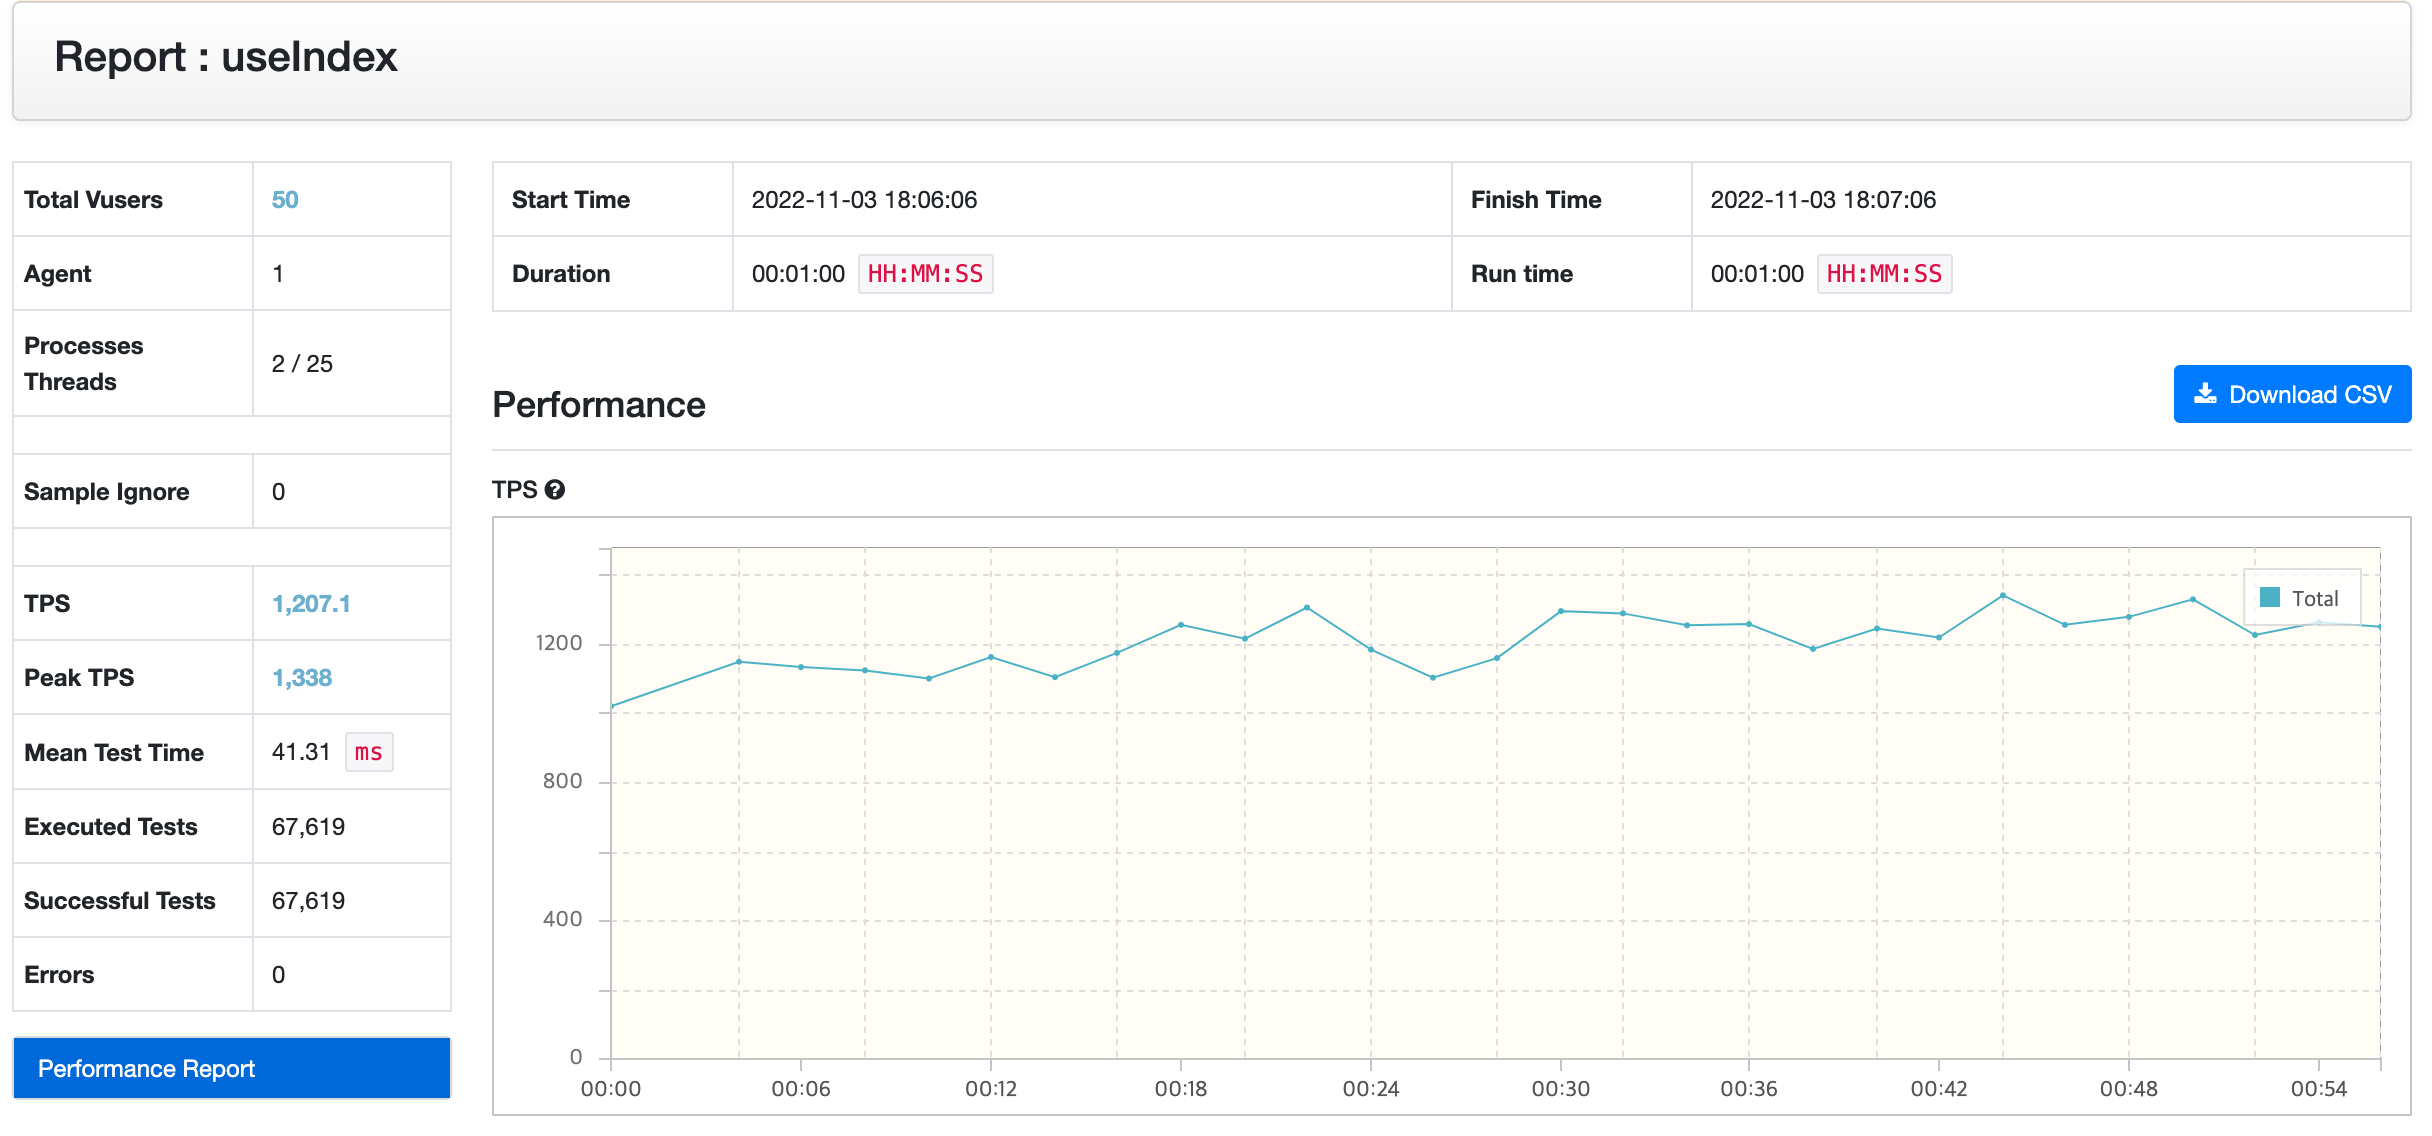
title에 대하여 index만 생성했을 뿐인데도 평균 TPS가 1207.1로 약 50배 성능이 개선된 것을 확인할 수 있습니다.
결론
이번글에서는 Index만 잘 생성하여도 성능향상을 크게 체험할 수 있는 것을 알 수 있었습니다. 하지만 Index를 생성하는 것 또한 비용이고(메모리를 차지하고) 모든 Index생성이 성능향상을 가져오는 것은 아니기 때문에 미리 테스트를 해본 뒤에 좋은 Index를 생성한다면 성능향상에 크게 기여할 수 있습니다.
다음 글에서는 Nginx와 Scale out을 통해 성능을 개선해보록 하겠습니다.
2022.11.8 추가내용
이전에 했던 nGrinder를 통한 성능테스트가 정확한 성능을 측정할 수 없다는 피드백을 받고 수정하면서 내용을 추가합니다.
문제상황
정확한 성능 측정을 할 수 없었던 이유는 아래와 같습니다.
	@Test
	public void test() {
		HTTPResponse response = request.GET("http://118.67.142.135/test/board/title25000", params)

		if (response.statusCode == 301 || response.statusCode == 302) {
			grinder.logger.warn("Warning. The response may not be correct. The response code was {}.", response.statusCode)
		} else {
			assertThat(response.statusCode, is(200))
		}
	}
}
저는 위와 같이 스크립트를 구성했었습니다.
보시다시피 매번 같은 번호의 게시글을 호출하고있었습니다.
이렇게 매번 같은 게시글 번호를 이용하여 테스트를 하게된다면 DB캐시 혹은 JPA캐시 등에 저장되어 테스트하고 싶은 API에 대하여 정확한 성능테스트가 어려워질 수 있습니다.
수정한 스크립트
이전글에서도 작성했지만 약 50000개의 데이터 중 1개의 게시글을 가져오는 것이기 때문에 난수를 생성하여 데이터를 가져오기로하였습니다.
수정한 스크립트는 아래와 같습니다.
	@Test
	public void test() {
		// HTTPResponse response = request.GET("http://118.67.142.135/test/board/title25000", params)

		int dValue = Math.abs(new Random().nextInt() % 50000) + 1
		HTTPResponse response = request.GET("http://118.67.142.135/test/board/title" + dValue, params)

		if (response.statusCode == 301 || response.statusCode == 302) {
			grinder.logger.warn("Warning. The response may not be correct. The response code was {}.", response.statusCode)
		} else {
			assertThat(response.statusCode, is(200))
		}
	}
위와 같이 작성하게되면 1 ~ 50000번의 숫자 중 random으로 하나가 지정되어 api를 호출하게됩니다.
테스트 시 유의할 점
- 테스트는 다양하게 하는 것이 좋다.
- 성능테스트를 할 때는 모수를 많이 두는 것이 좋다.
제가 잘못이해하고 있거나 잘못 작성한 부분이 있다면 지적, 비판, 피드백 뭐든 해주시면 감사하겠습니다!
