OLED
반려동물의 표정이 교감에 중요하듯이,
반려로봇의 표정 또한 교감에 중요하다.
OLED를 사용하여 생동감 있게
로봇의 표정을 구현하는 방법이다.
1.OLED 출력
OLED library 사용법
위에 링크를 타고 들어가면,
라이브러리 다운 후에 기본이미지 출력 하는 것까지 알 수 있다.
위에 내용은 구글링하면 많이 있다.
2.커스텀 이미지 출력
원하는 이미지 bitmap으로 만들어서, 코드화 시키는법
나는 위에 링크가 가장 쉬웠다.
윈도우 그림판 128*64 흑백 이미지 만들고
링크로 들어가서 만들면 된다.
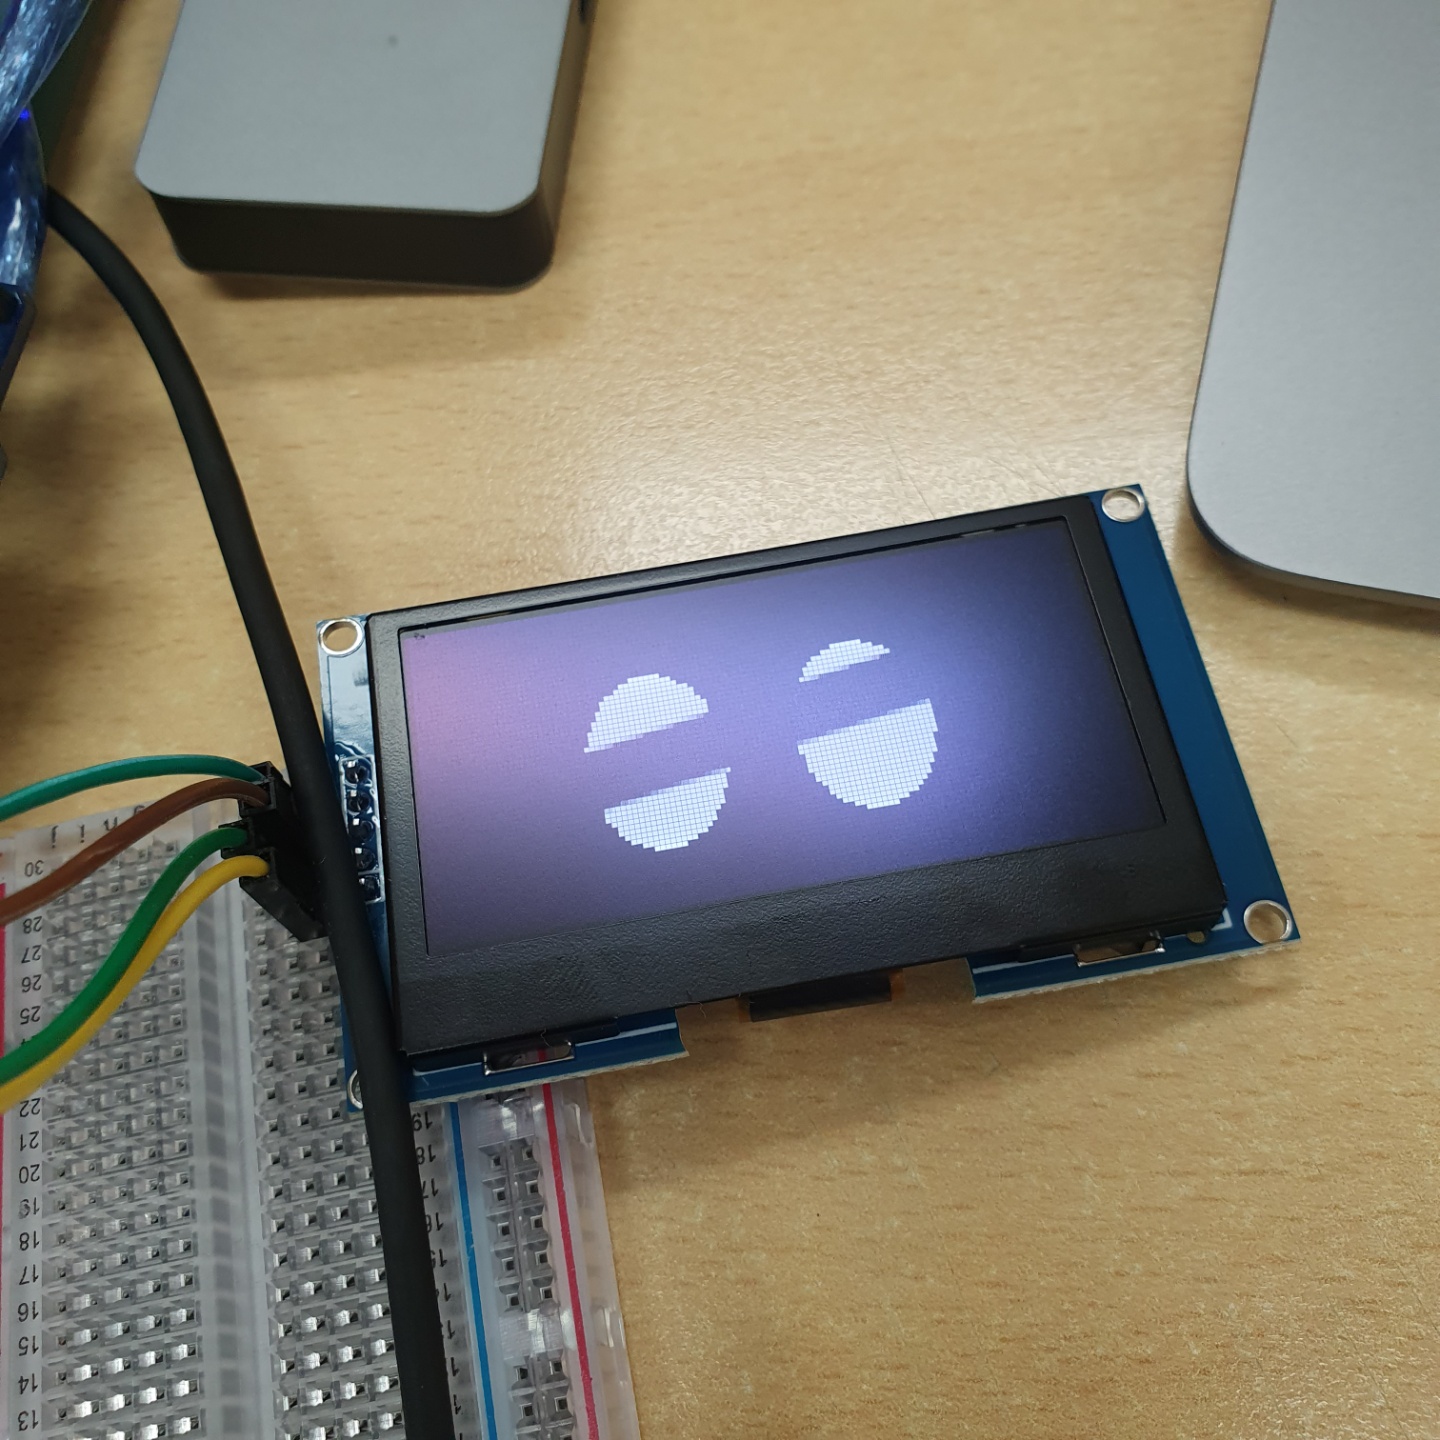
로봇의 눈을 표현하고 싶어서
아래의 그림처럼 drawBitmap() 해주었다.

3.눈알 굴리기
library에서
그림을 움직이게 하는 함수
void startscrollright(uint8_t start, uint8_t stop)
void startscrollleft(uint8_t start, uint8_t stop);
함정이다.
start 값을 기준으로 stop까지 비트맵을 움직여주는데,
움직이는 속도를 제어할 수가 없다.
void Adafruit_SSD1306::startscrollright(uint8_t start, uint8_t stop) {
  TRANSACTION_START
  static const uint8_t PROGMEM scrollList1a[] = {
      SSD1306_RIGHT_HORIZONTAL_SCROLL, 0X00};
  ssd1306_commandList(scrollList1a, sizeof(scrollList1a));
  ssd1306_command1(start);
  ssd1306_command1(0X00);
  ssd1306_command1(stop);
  static const uint8_t PROGMEM scrollList1b[] = {0X00, 0XFF,
                                                 SSD1306_ACTIVATE_SCROLL};
  ssd1306_commandList(scrollList1b, sizeof(scrollList1b));
  TRANSACTION_END
}
위 코드가 함정함수인데,
어디를 수정해야 속도를 제어할 수 있는지 도저히 모르겠다..
해결방법.
해결 방법 이전에,
Adafruit_SSD1306 class에 대해서 간단히 알면 좋다.

drawbitmap함수로 buffer bitmap을 넣어주고
disaplay함수로 OLED로 보여주고
cleardisaply로 초기화 시켜준다.
그러면, drawbitmap함수로 이동한 bitmap을 연속적으로 넣어주고
display함으로써, 애니메이션을 만들 수 있다고 생각했다.
drawbitmap() 함수
void Adafruit_GFX::drawBitmap(int16_t x, int16_t y, const uint8_t bitmap[],int16_t w, int16_t h, uint16_t color)
{
	int16_t byteWidth = (w + 7) / 8;
 	uint8_t byte = 0;
	startWrite();
    for (int16_t j = 0; j < h; j++, y++) {
    for (int16_t i = 0; i < w; i++) {
      if (i & 7)
        byte <<= 1;
      else
        byte = pgm_read_byte(&bitmap[j * byteWidth + i / 8]);
      if (byte & 0x80)
        writePixel(x + i, y, color);
    }
  }
  endWrite();
}
int16_t x, int16_t y
bitmap을 넣어주는 기준인 것 같다.
128x64 bitmap은 딱 맞게 들어가지만,
그것보다 작은 bitmap을 중앙에 넣어주기위해 사용하는 것 같다.
나는 이 녀석을 사용해서 애니메이션을 만들 것이다.
x -> 왼쪽 오른쪽을 제어 가능하고
y -> 위로 아래로 제어 가능하다.
아래 코드를 보면,
void scroll_eyes(void) {
  display.clearDisplay();
  display.drawBitmap(5,0, epd_bitmap_ROBOT, 128, 64, 1);
  display.display();
  delay(2);
  display.clearDisplay();
  display.drawBitmap(10,0, epd_bitmap_ROBOT, 128, 64, 1);
  display.display();
  delay(4);
  display.clearDisplay();
  display.drawBitmap(15,0, epd_bitmap_ROBOT, 128, 64, 1);
  display.display();
  delay(5);
  display.clearDisplay();
  display.drawBitmap(20,0, epd_bitmap_ROBOT, 128, 64, 1);
  display.display();
  delay(10);
  display.clearDisplay();
  display.drawBitmap(25,0, epd_bitmap_ROBOT, 128, 64, 1);
  display.display();
  delay(10);
  display.clearDisplay();
  display.drawBitmap(30,0, epd_bitmap_ROBOT, 128, 64, 1);
  display.display();
  delay(10);
  delay(1000);
}위의 코드를 응용해서,
왼쪽, 오른쪽 뿐만이 아니라
원하는 속도, 원하는 방향으로 눈을 움직이는 모듈을 만들어볼 예정이다.
%% 항상 부족한 내용입니다.. 죄송합니다 %%