전체 일지를 확인하고 싶으시면 여기 들어가시면 됩니다.
해당 글은 코루틴 정리 글을 읽고 학습한 내용을 정리했습니다.
CoroutineContext / CoroutineScope
이전 Coroutine 탐험일지(1)에 정리한 내용을 보면
코루틴 컨텍스트, 코루틴 스코프 이런 단어를 꺼냈습니다.
오늘은 이놈들이 정확히 무엇인지 한번 알아봅시다.
CoroutineContext
public interface CoroutineContext {
  /**
   * Returns the element with the given [key] from this context or `null`.
   * Keys are compared _by reference_, that is to get an element from the context the reference to its actual key
   * object must be presented to this function.
   */
  public operator fun <E : Element> get(key: Key<E>): E?
  /**
   * Accumulates entries of this context starting with [initial] value and applying [operation]
   * from left to right to current accumulator value and each element of this context.
   */
  public fun <R> fold(initial: R, operation: (R, Element) -> R): R
  /**
   * Returns a context containing elements from this context and elements from  other [context].
   * The elements from this context with the same key as in the other one are dropped.
   */
  public operator fun plus(context: CoroutineContext): CoroutineContext = ...impl...
  /**
   * Returns a context containing elements from this context, but without an element with
   * the specified [key]. Keys are compared _by reference_, that is to remove an element from the context
   * the reference to its actual key object must be presented to this function.
   */
  public fun minusKey(key: Key<*>): CoroutineContext
}
코루틴 컨텍스트의 구현 코드입니다.
get(), fold(), plus(), minusKey()의 4가지 함수를 가지고 있습니다.
get(key: Key<E>): 주어진 key에 해당하는 컨텍스트를 반환합니다.fold(initial: R, operation: (R, Element) -> R): 초기값(initial)을 시작으로 제공된 병합 함수(operation)를 이용해 대상 컨텍스트 요소들을 병합한 후 결과를 반환합니다. 예를 들어EmptyCoroutineContext를 주고 특정 컨텍스트 요소들만 찾아 추가하는 함수를 주면 해당 요소만으로 구성된 코루틴 컨텍스트를 만들 수 있습니다.plus(context: CoroutineContext): 현재 컨텍스트와 파라미터로 주어진 컨텍스트가 갖는 요소들을 모두 포함해 컨텍스트를 반환합니다. 이때 중복 요소는 버려집니다.minusKey(key: Key<*>): 현재 컨텍스트에서 주어진 키를 갖는 요소들을 제외한 새로운 컨텍스트를 반환합니다.
Key, Element
/**
 * Key for the elements of [CoroutineContext]. [E] is a type of element with this key.
 * Keys in the context are compared _by reference_.
 */
public interface Key<E : Element>

/**
 * An element of the [CoroutineContext]. An element of the coroutine context is a singleton context by itself.
 */
public interface Element : CoroutineContext {
  	/**
   	* A key of this coroutine context element.
   	*/
  	public val key: Key<*>

  	...overrides...
}Key는 Element 타입을 제네릭 타입으로 가집니다.
Element는 CoroutineContext를 상속하며 Key를 멤버 속성으로 가집니다.
코루틴 컨텍스트를 구성하는 Element의 예시를 들면 CoroutineId, CoroutineName, CoroutineDispatcher, ContinuationInterceptor, CoroutineExceptionHandler 등이 있습니다.
이런 Element들은 각각의 Key를 기반으로 CoroutineContext에 등록됩니다.
CoroutineContext는 Element들이 등록될 수 있고, 각 요소들이 등록될 때 요소의 고유한 Key를 기반으로 등록됩니다.
CoroutineContext 구현체
CoroutineContext는 인터페이스입니다. 이를 구현한 구현체는 3가지 종류가 있습니다.
- EmptyCoroutineContext:컨테긋트가 명시되지 않은 경우 이 Singleton객체가 사용됨
- CombinedContext:두 개 이상의 컨텍스트가 명시되면 컨텍스트간 연결을 하는 컨텍스트
- Element: 컨텍스트의 각 요소들도 CoroutineContext를 구현
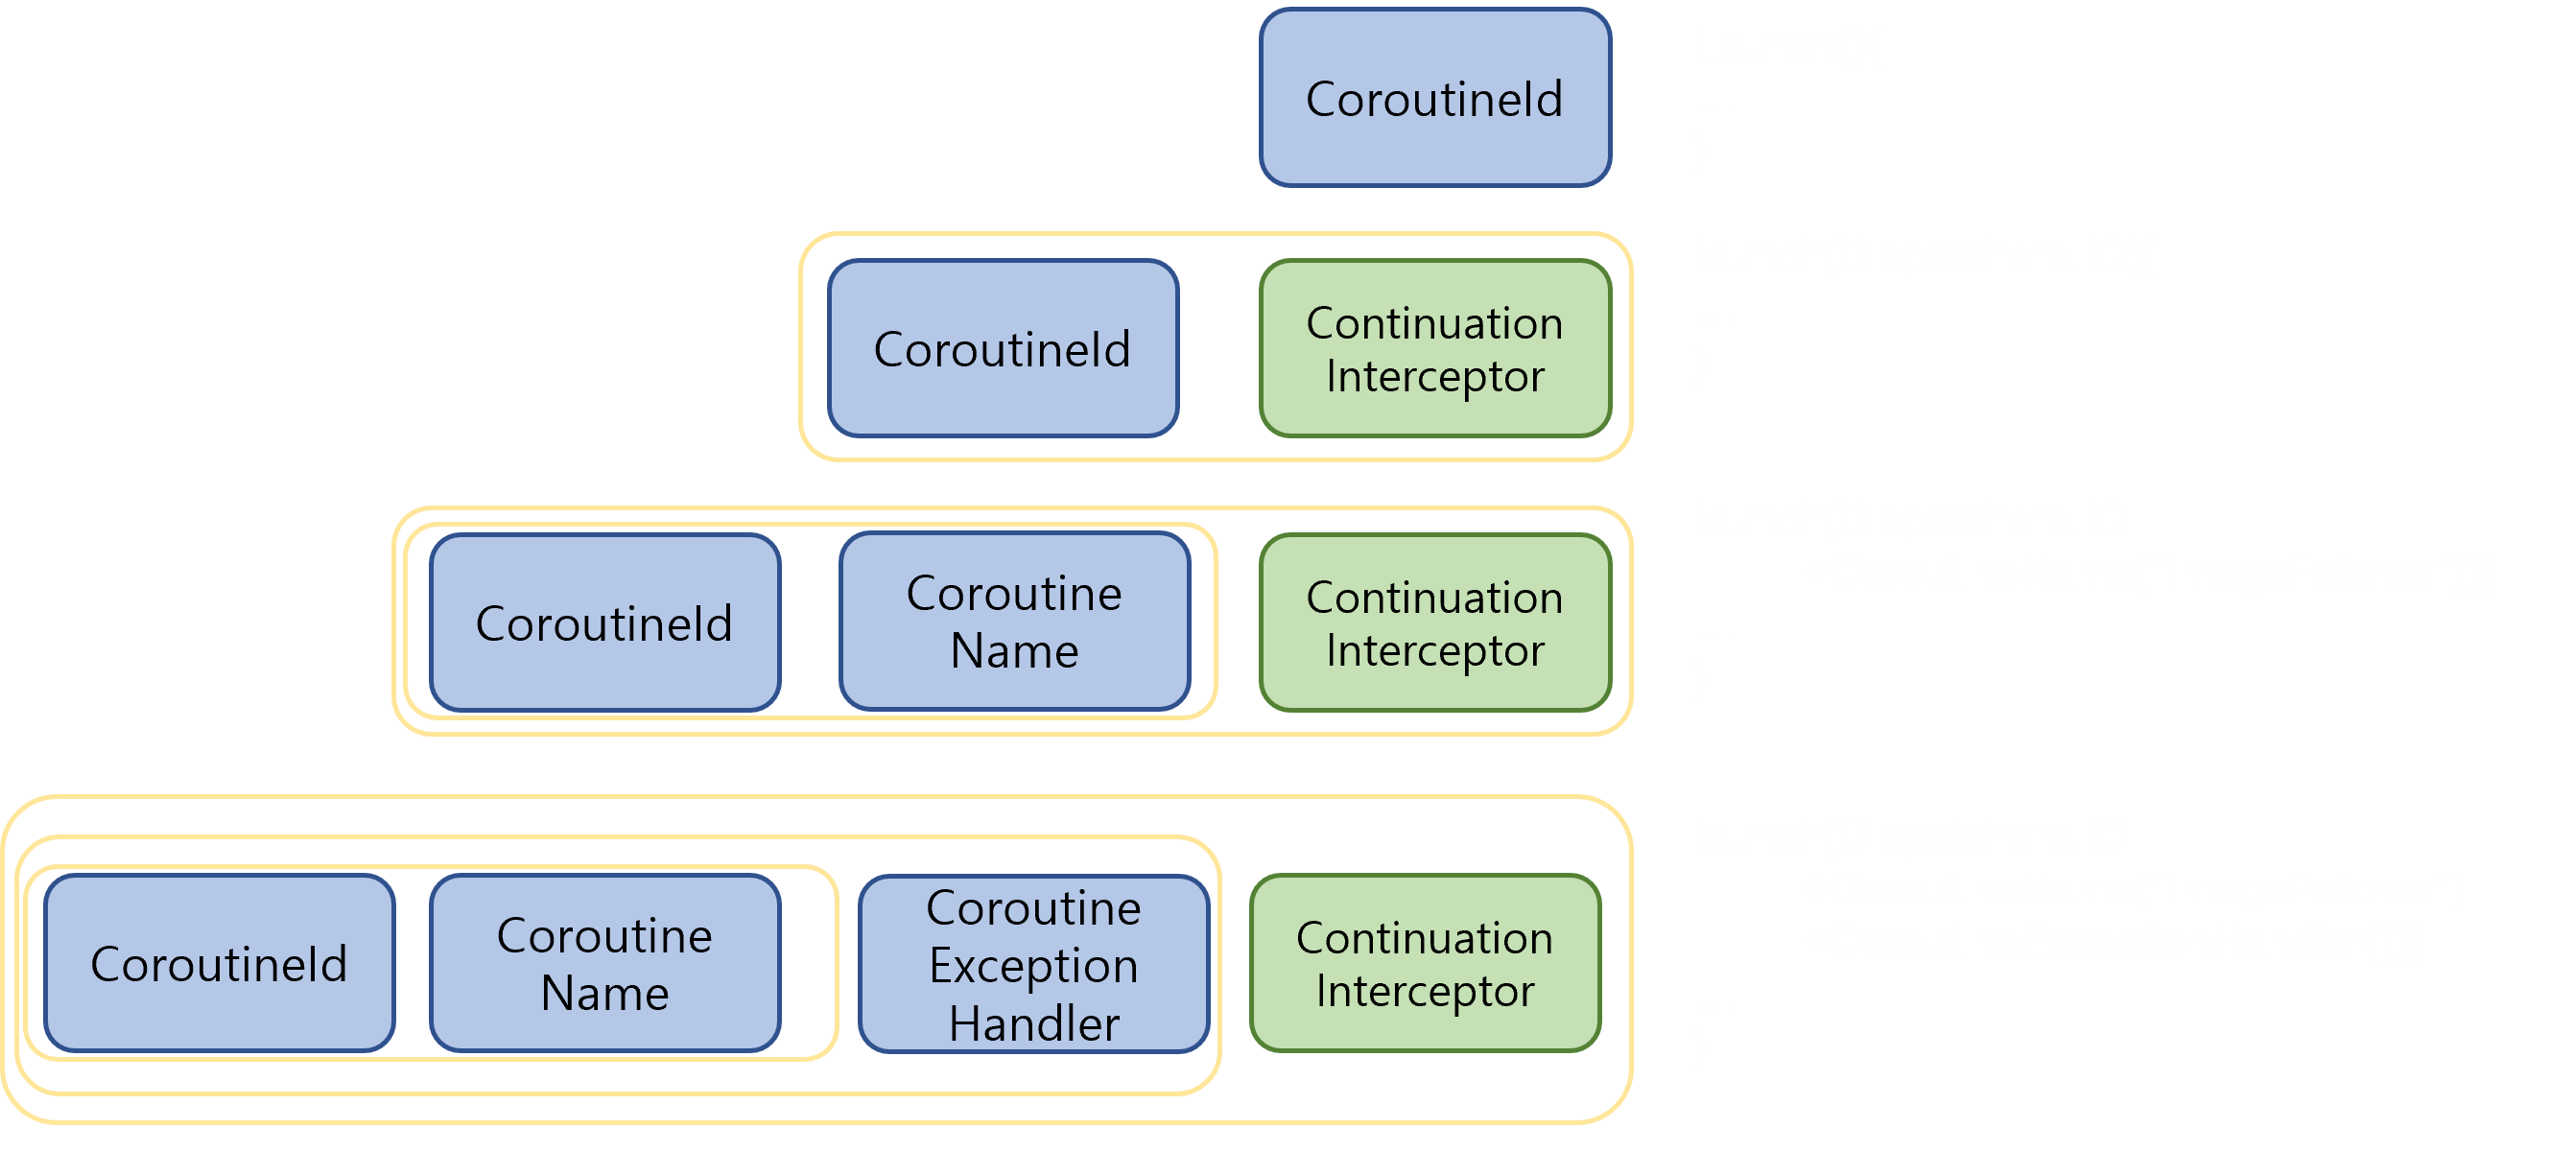
위 그림은 우리가 GlobalScope.launch{}를 수행할 때 launch 함수의 첫번째 파라미터인 CoroutineContext에 넘기는 값에 따라 변화하는 코루틴 컨텍스트의 상태를 보여줍니다.
CoroutineId, ContinuationInterceptor, CoroutineName, CoroutineExceptionHandler가 보이듯 이들 각각이 Element이다.
각각의 요소를 + operator를 이용해 연결하고 있는데 이는 앞서 설명한 것처럼 CoroutineContext가 plus 연산자를 구현하고 있기 때문이다. Elment + Element + .. 는 결국 CombinedContext로 인해 하나로 병합된 코루틴 컨텍스트입니다.
주황색 테두리는 CoroutineContext와 Elment가 묶여 하나으 ㅣCoroutineContext가 되는 것을 아타낸다. 마지막에 ContinuationInterceptor가 존재하는데 이는 인터셉토로의 빠른 접근을 위해 존재한다.
CoroutineScope
public interface CoroutineScope {
    /**
     * Context of this scope.
     */
    public val coroutineContext: CoroutineContext
}
CoroutineScope는 기본적으로 CoroutineContext 하나만 멤버 속성으로 정의하는 인터페이스이다.
우리가 사용하는 모든 코루틴 빌더들은 CoroutineScope의 확장 함수로 정의된다. 즉, 빌더들은 CoroutineScope의 함수들이고 코루틴을 생성할 때 소속된 CoroutineScope에 정의된 CoroutineContext를 기반으로 필요한 코루틴들을 생성한다.
Android Activity 예시
class MyActivity : AppCompatActivity(), CoroutineScope {
  lateinit var job: Job
  override val coroutineContext: CoroutineContext
  get() = Dispatchers.Main + job

  override fun onCreate(savedInstanceState: Bundle?) {
    super.onCreate(savedInstanceState)
    job = Job()
  }

  override fun onDestroy() {
    super.onDestroy()
    job.cancel()
  }

  fun loadDataFromUI() = launch {
    val ioData = async(Dispatchers.IO) {
      // blocking I/O operation
    }

    // do something else concurrently with I/O
    val data = ioData.await()
    draw(data)
  }
}
위 코드는 안드로이드 Activity에서 CoroutineScope를 구현하는 코드입니다.
CoroutineScope의 멤버인 CoroutineContext를 구현해야하는데 여기선 Dispatchers.Main + Job으로 정의해, Activity에서 생성되는 코루틴은 메인스레드로 디스패치되고, 액티비티에서 정의한 Job 객체를 parent로 하는 Job들을 생성함으로써 액티비티 Job과 그 운명을 같이 합니다.(cancel parent = cancel all childern)
GlobalScope.launch{}는 정확히 뭘까?
CoroutineScope는 인터페이스일 뿐이다.
Activity와 같이 어떠한 생명주기를 갖는 오브젝트에 적용해 사용자 정의 스코프를 만들 수 있찌만, 편의를 위해 코루틴 프레임워크에 미리 정의된 스코프들도 있다. 그중 하나가 GlobalScope이다.
// -- in CoroutineScope.kt
object GlobalScope : CoroutineScope {
    override val coroutineContext: CoroutineContext
        get() = EmptyCoroutineContext
}

// -- in CoroutineContextImpl.kt
@SinceKotlin("1.3")
public object EmptyCoroutineContext : CoroutineContext, Serializable {
    private const val serialVersionUID: Long = 0
    private fun readResolve(): Any = EmptyCoroutineContext

    public override fun <E : Element> get(key: Key<E>): E? = null
    public override fun <R> fold(initial: R, operation: (R, Element) -> R): R = initial
    public override fun plus(context: CoroutineContext): CoroutineContext = context
    public override fun minusKey(key: Key<*>): CoroutineContext = this
    public override fun hashCode(): Int = 0
    public override fun toString(): String = "EmptyCoroutineContext"
}
GlobalScope는 Singleton이고 EmptyCoroutineContext를 컨텍스트로 가진다.
EmptyCoroutineContext는 구현해야할 모든 CoroutineContext 멤버 함수들에 대해 기본 구현만 정의한 컨텍스트이다. 기본 컨텍스트는 어떤 생명주기에 바인딩된 Job이 정의되어 있지 않기 때문에 어플리케이션 프로세스와 동일한 생명주기를 갖는다.
GloablScope.launch{}로 실행한 코루틴은 애플리케이션이 종료되지 않는 한 필요한 만큼 실행을 계속한다.