
8. 마무리
8-1. setState로 클래스형 컴포넌트와 함수형 컴포넌트 각각 숨기기
- 구현 코드
import React, {useState, useEffect} from 'react';
import './App.css';

function App() {
  // 함수형 컴포넌트와 클래스형 컴포넌트 숨기는 버튼 만들기
  // 기본적으로 보이게 할 것이므로 true값을 준다.
  var [funcShow, setFuncShow] = useState(true);
  var [classShow, setClassShow] = useState(true);
  return (
    <div className="container">
      <h1>Hello World!</h1>
      <input type="button" value="remove func" onClick={function() {
        setFuncShow(false);
      }}></input>
      <input type="button" value="remove class" onClick={function() {
        setClassShow(false);
      }}></input>
      {funcShow ? <FuncComp initNumber={2}></FuncComp> : null}
      {classShow ? <ClassComp initNumber={2}></ClassComp> : null}
    </div>
  );
}
var funcStyle = 'color:blue';
var funcId = 0;
function FuncComp(props) {
  // React의 useState에서 state의 초기값(props.initNumber)을 인자로 넣어주면
  var numberState = useState(props.initNumber);
  // useState() 배열의 0번째 값에 현재의 state(initNumber)값이 들어간다.
  var number = numberState[0];
  // class component의 setState처럼 상태를 바꾸려면 배열의 1번째 데이터를 바꾼다.
  var setNumber = numberState[1];

  // var dateState = useState((new Date()).toString());
  // var _date = dateState[0];
  // var setDate = dateState[1];
  // 바로 위 3줄로 나눠서 쓴 것과 똑같이 동작하는 축약형 코드
  var [_date, setDate] = useState((new Date()).toString());

  // 함수형 컴포넌트에서 useEffect는 클래스형 컴포넌트의 componentDidMount, componentDidUpdate와 같은 역할
  // useEffect의 effect는 side effect
  // Main effect는 return() 안에 작성한 화면 렌더링
  // side effect(useEffect)는 이미 렌더링된 후에 값을 변경하는 것
  // useEffect는 여러 개 설치 가능
  useEffect(function() {
    console.log('%cfunc => useEffect (componentDidMount) A' + (++funcId), funcStyle);
    document.title = number;
    // useEffect가 한번 실행된 후 다시 실행될 때 이전에 실행했던 값을 정리해주는 것이 clean up
    // 예를 들면 입장할 때 구독하고 퇴장할 때 구독취소를 하는 것
    // 이 effect는 부모 컴포넌트에서 이 함수 컴포넌트를 삭제하는 경우에 clean-up(unmount)을 하게 된다.
    return function() {
      console.log('%cfunc => useEffect return (componentWillUnmount) B' + (++funcId), funcStyle);
    }
  // 빈 배열을 넣으면 처음 한 번만 실행되고 그 후로는 실행되지 않는다.(componentDidMount만 하도록)
  }, []);

  useEffect(function() {
    console.log('%cfunc => useEffect number (componentDidMount & componentDidUpdate) A' + (++funcId), funcStyle);
    document.title = number;
    // useEffect가 한번 실행된 후 다시 실행될 때 이전에 실행했던 값을 정리해주는 것이 clean up
    // 예를 들면 입장할 때 구독하고 퇴장할 때 구독취소를 하는 것
    return function() {
      console.log('%cfunc => useEffect number return (componentDidMount & componentDidUpdate) B' + (++funcId), funcStyle);
    }
    // number만 변경된 것을 감지
  }, [number]);

  useEffect(function() {
    console.log('%cfunc => useEffect _date (componentDidMount & componentDidUpdate) A' + (++funcId), funcStyle);
    document.title = _date;
    // useEffect가 한번 실행된 후 다시 실행될 때 이전에 실행했던 값을 정리해주는 것이 clean up
    // 예를 들면 입장할 때 구독하고 퇴장할 때 구독취소를 하는 것
    return function() {
      console.log('%cfunc => useEffect _date return (componentDidMount & componentDidUpdate) B' + (++funcId), funcStyle);
    }
    // _date만 변경된 것을 감지
  }, [_date]);

  // useState()를 쓰면 무조건 2개의 값으로 이루어진 배열이 리턴됨
  // console.log('numberState', numberState);
  console.log('%cfunc => render' + (++funcId), funcStyle);
  return (
    <div className="container">
      <h2>Function style component</h2>
      <p>Number : {number}</p>
      <p>Date : {_date}</p>
      <input type="button" value="random" onClick={
        function() {
          setNumber(Math.random());
        }
      }></input>
      <input type="button" value="date" onClick={
        function() {
          setDate((new Date()).toString());
        }
      }></input>
    </div>
  );
}
var classStyle = 'color:red';
class ClassComp extends React.Component {
  state = {
    number:this.props.initNumber,
    date:(new Date()).toString()
  }
  componentWillMount() {
    console.log('%cclass => componentWillMount',classStyle);
  }
  componentDidMount() {
    console.log('%cclass => componentDidMount',classStyle);
  }
  shouldComponentUpdate(nextProps, nextState) {
    console.log('%cclass => shouldComponentUpdate',classStyle);
    return true;
  }
  componentWillUpdate(nextProps, nextState) {
    console.log('%cclass => componentWillUpdate',classStyle);
  }
  componentDidUpdate(nextProps, nextState) {
    console.log('%cclass => componentDidUpdate',classStyle);
  }
  componentWillUnmount() {
    console.log('%cclass => componentWillUnmount',classStyle);
  }
  render() {
    console.log('%cclass => render',classStyle);
    return (
      <div className="container">
        <h2>Class style component</h2>
        <p>Number : {this.state.number}</p>
        <p>Date : {this.state.date}</p>
        <input type="button" value="random" onClick= {
          function() {
            this.setState({number:Math.random()})
          }.bind(this)
        }></input>
        <input type="button" value="date" onClick= {
          function() {
            this.setState({date:(new Date()).toString()})
          }.bind(this)
        }></input>
      </div>
    )
  }
}

export default App;- 함수형 컴포넌트를 숨겼을 때 라이프 사이클
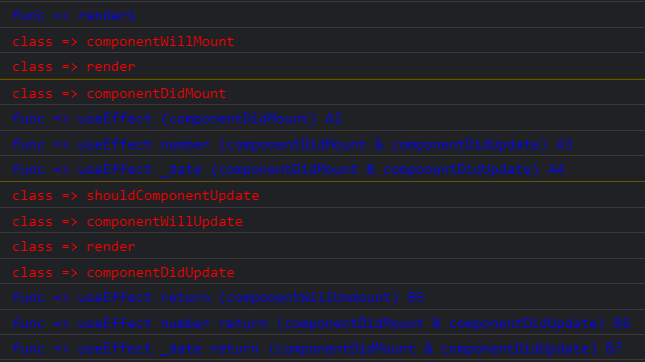
- 클래스형 컴포넌트를 숨겼을 때 라이프 사이클


👩🎓 완강 후기
일하면서 수강하다보니 시작한 지는 꽤 됐는데 이제야 완강했다. 업무에 사용하려고 공부하기 시작한 리액트인데 실제 업무에 적용해보지는 못했지만(😥) 함수형 컴포넌트와 클래스형 컴포넌트의 차이점과 동작 방식에 대해 좀 더 잘 알게 된 것 같다.
리액트를 실제로 써먹을 날은 언제 올지 모르겠지만... 계속 공부해야지!

함께 나아가는 개발자💪