react-redux 공식 문서 정리
React-Redux 라이브러리 소개
React Redux is the official React binding for Redux. It lets your React components read data from a Redux store, and dispatch actions to the store to update data.
Why use React Redux?
리덕스는 state 관리를 도와주는 라이브러리이다. 그럼 이 변한 state를 UI에 뿌려줘서 내가 원하는 앱을 만들어야 되는데, 이 state를 UI에 뿌려주려면 subscribe를 해서 작업을 해야 한다. 문서에는 다음 스텝들을 거쳐야 된다고 적혀있다.
- Create a Redux store
- Subscribe to updates
- Inside the subscription callback:
i. Get the current store state.
ii. Extract the data needed by this piece of UI.
iii. Update the UI with the data. - If necessary, render the UI with initial state.
- Respond to UI inputs by dispatching Redux actions.
위와 같은 과정을 대신 해주는것이 바로 React-Redux 라이브러리 이다.
Basic Tutorial
베이직 튜토리얼을 통해 React-Redux 사용법을 알아보자.
간단한 TodoApp에 사용해 볼건데 자세한 TodoApp의 스펙은 여기서 읽어봐도 되는데, 이전 Redux 튜토리얼에서 만들었던 앱과 동일하다고 생각하면 된다.
Providing the Store
먼저 우리가 만든 TodoApp에 store를 연결해야 한다. 사용해야 하니까.
다음과 같이 연결하면 된다. Context API 와 비슷한 느낌으로..
// index.js
import React from 'react'
import ReactDOM from 'react-dom'
import TodoApp from './TodoApp'
import { Provider } from 'react-redux'
import store from './redux/store'
const rootElement = document.getElementById('root')
ReactDOM.render(
<Provider store={store}>
<TodoApp />
</Provider>,
rootElement
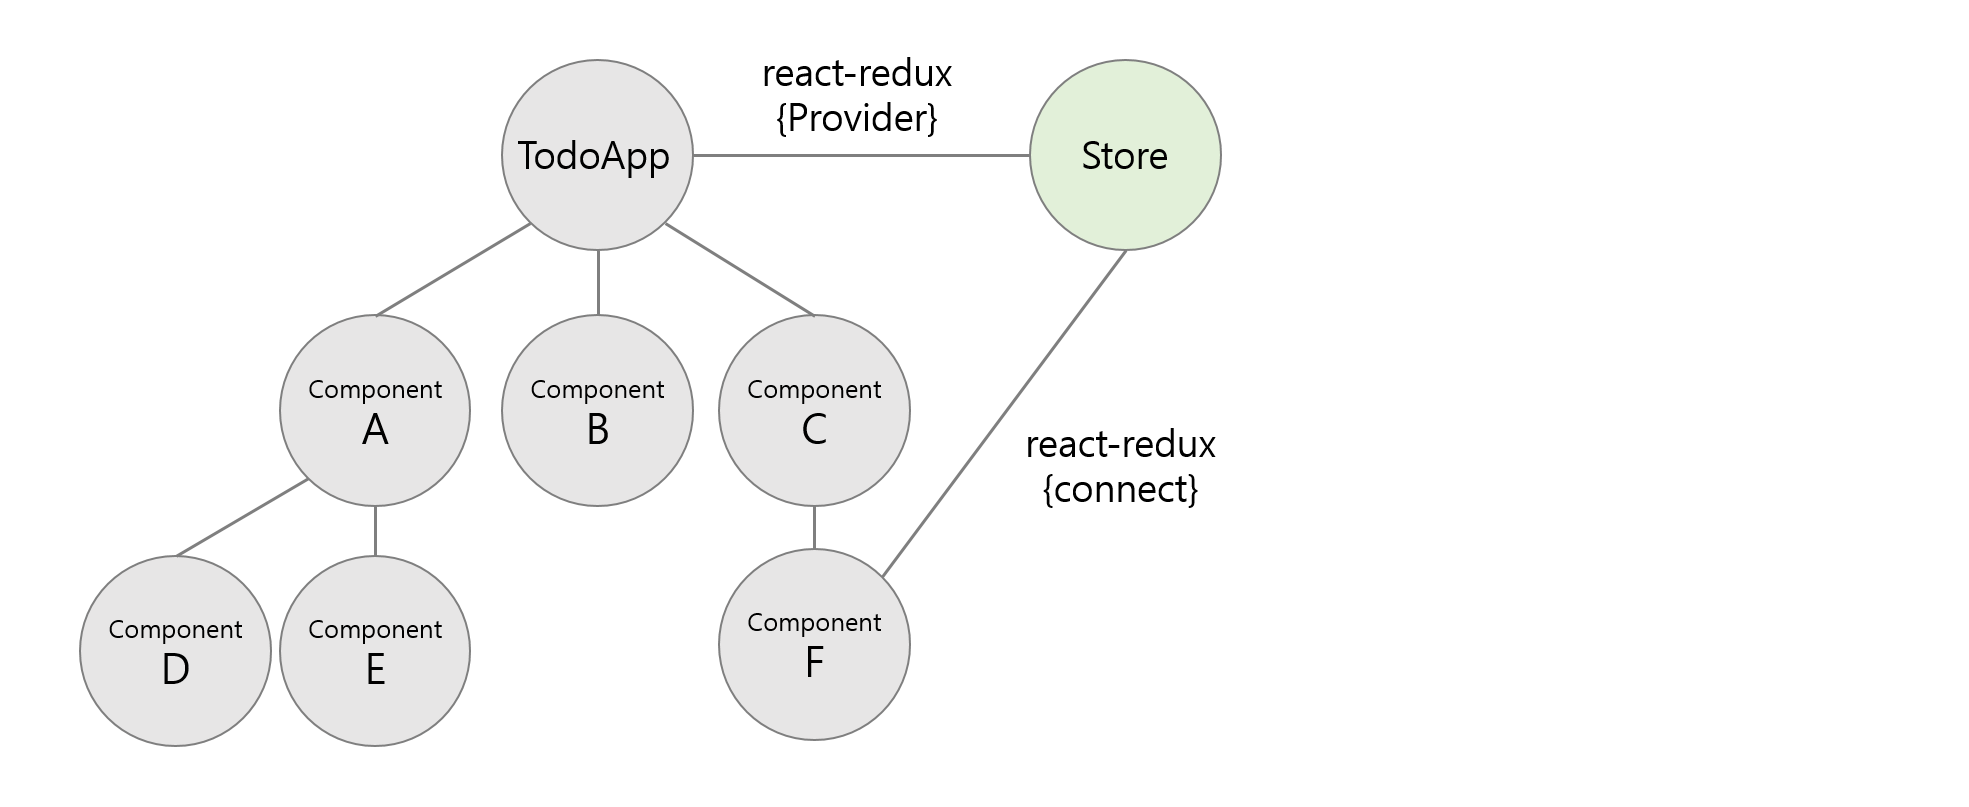
)이제 우리의 앱에 store가 생겼다. 그럼 리액트의 트리구조를 생각해보자.
원하는 컴포넌트에서 어떻게 이 store를 사용할 수 있을까?
Connecting the Components
당연히 컴포넌트에서 store에 연결을 해야 한다. 이 연결을 react-redux의 connect()가 도와준다. 다음 트리 구조 이미지를 보면 정리가 된다.
그럼 connect()는 어떻게 사용할까?
const mapStateToProps = (state, ownProps) => ({
  // ... computed data from state and optionally ownProps
})

const mapDispatchToProps = {
  // ... normally is an object full of action creators
}

connect(
  mapStateToProps,
  mapDispatchToProps
)(Component)connect()는 Higher-Order Component 이다. 인자로 mapStateToProps, mapDispatchToProps 등을 받아서 Component를 감싸준다.
타입은 다음과 같다.
- mapStateToProps?: Function
- mapDispatchToProps?: Function | Object
mapStateToProps 는?
이건 말 그대로 store에 들어있는 state들을 props로 넘겨줘서 사용할 수 있게끔 만들어 준다. mapStateToProps는 함수이며, 직접 구현해 주어야 한다.
function mapStateToProps(state, ownProps?)첫번째 인자로 state를 받고, 두번째 인자는 선택적으로 현재 ownProps를 갖는다.
보통의 경우 이 mapStateToProps는 object 를 리턴한다. 정확히는 state.
function mapStateToProps(state){
  return state;
}
이렇게 사용해도 되는데, 이렇게 사용하면 컴포넌트에 state전체를 props로 전달하게 된다. 따라서 보통은 이렇게 사용하지 않고 적절하게 컨트롤하여 필요한 state만 가져온다. 이때 조건중에 현재 props를 사용해야 하는 경우 ownProps를 두 번째 인자로 넘겨준다.
튜토리얼에 있는 예제 코드를 봐보자.
// TodoList.js

function mapStateToProps(state, ownProps) {
  const { visibilityFilter } = state
  const { id } = ownProps
  const todo = getTodoById(state, id)

  // component receives additionally:
  return { todo, visibilityFilter }
}

// Later, in your application, a parent component renders:
<ConnectedTodo id={123} />
이렇게 하면 현재 id에 해당하는 todo만 가지고 올 수 있게 된다. 이렇게 mapStateToProps에서 return 된 object는 connect로 감싸진 Component에 props로 전달되어 사용할 수 있게 된다.
mapDispatchToProps 는?
mapStateToProps가 스토어로부터 state를 가져온 것이라면 mapDispatchToProps는 컴포넌트가 스토어의 스테이트를 변경할 수 있게 하는 것이다. 정확히는 리덕스에서 dispatch(action)을 Component에서 호출하여 store의 state를 새롭게 업데이트 할수 있게 한다.
dispatch를 컴포넌트에서 사용해보자.
import { connect } from 'react-redux'
import { myAction } from './actions'

class SomeComponent extends React.Component {
  constructor(props){
    super(props)
  }

  dispatchSomething = () => {
    //dispatch를 전달받아서 사용가능하게 된다.
    this.props.dispatch(myAction);
  }

  render(){
    return(
      <button onClick={this.dispatchSomething}>
        Dispatch Action To My Store
      </button>
    )
  }
}

export default connect(null, null)(SomeComponent)
//this equivalent to
//export default connect()(SomeComponent)
connect()에 별다른 인자를 안집어 넣어도 기본적으로 props로 dispatch를 전달해 주기 때문에 컴포넌트에서 dispatch를 사용할 수 있게 된다.
그럼 mapDispatchToProps는 무엇을 해줄까?
일단 mapDispatchToProps를 만들어 두번째 인자로 전달하게 되면, 더이상 컴포넌트로 dispatch가 전달되지는 않는다. 그럼 어떻게 dispatch 할까?
두 가지 방법이 있다.
첫 번째 방법은 mapDispatchToProps를 함수로 만드는 것이다.
import { connect } from 'react-redux'
import { myAction } from './actions'

class SomeComponent extends React.Component {
  constructor(props){
    super(props)
  }

  render(){
    return(
      <button onClick={this.props.dispatchSomething}>
        Dispatch Action To My Store
      </button>
    )
  }
}

const mapDispatchToProps = dispatch => {
  return {
    dispatchSomething: () => dispatch(myActions)
  }
}

export default connect(null, mapDispatchToProps)(SomeComponent)
이렇게 하면 () => dispatch(myActions)를 dispatchSomething 에 담아서 props로 전달해준다. mapDispatchToProps를 함수로 만들게 되면 좀더 Customization 을 할 수 있게 되고, ownProps를 사용할 수도 있게 된다는 장점이 있다.
두 번째 방법은 Object로 넘겨주는 것이다.
We recommend always using the “object shorthand” form of mapDispatchToProps, unless you have a specific reason to customize the dispatching behavior.
import { connect } from 'react-redux'
import { myAction } from './actions'

class SomeComponent extends React.Component {
  constructor(props){
    super(props)
  }

  render(){
    return(
      <button onClick={this.props.dispatchSomething}>
        Dispatch Action To My Store
      </button>
    )
  }
}


export default connect(null, { myAction })(SomeComponent)
이렇게만 보내면 connect에서 bindActionCreators를 이용해 dispatch까지 넣어서 만들어 준다. 즉,
export default connect(null, { myAction })(SomeComponent)위 코드 한줄은 다음과 같다
const mapDispatchToProps = dispatch => {
  return {
    myAction: () => dispatch(myAction)
  }
}

export default connect(null, mapDispatchToProps)(SomeComponent)mapDispatchToProps를 object로 보내는게 직관적이므로 이걸 권유한다.
We recommend always using the “object shorthand” form of
mapDispatchToProps, unless you have a specific reason to customize the dispatching behavior.
결론
이렇게 store를 만들어 provider로 앱에 스토어를 연결하고, 액션들을 컴포넌트에서 사용할 수 있도록 connect만 하면 리액트에서 손쉽게 리덕스를 사용할 수 있다.
다음에 Hooks를 리액트 리덕스에서 어떻게 사용하는지 알아보자. 그리고, 무엇보다 중요한건 토이프로젝트를 간단하게 기획해서 react, redux, react-redux를 사용해보자.