벨로퍼트와 함께하는 모던 자바스크립트
React로 넘어가기 전에 빠르게 JavaScript를 복습해본다.
1장 자바스크립트 입문
05. 함수
화살표 함수
항상 화살표 함수가 어색하다. 그래도 자주 써서 익숙해지자.
✔️ 함수의 파라미터 => 코드 블록 : 꼴로 쓴다.
여기서 (a, b)는 2개의 입력 인자를 받는다는 것이다. 한개만 받았다면 바로 a만 쓴다.
const add = (a, b) => {
  return a+b;
};

console.log(add(1,2));
여기에서도 코드 블록 내부에서 바로 return 한다면 다음과 같이 줄일 수 있다.
const add = (a, b) => a+b;
//여기서 {a+b} 하면 바로 return 하는게 아니다.

console.log(add(1,2));
이를 활용해보면 다음과 같이 사용할 수 있다.
const getGrade = score => {
  if (score == 100){
    return 'A+';
  }
  else {
    return 'B';
  }
};

const grade = getGrade(90);
06. 객체
함수에서 객체를 파라미터로 받기
✔️ 함수에서 객체를 받을 때, ${파라미터}로 받는다.
const INK = {
  name : 'Ariadne',
  age : 23
}

function Print(person){
  const text = `${person.name}의 나이는 ${person.age}이다.`;
  console.log(text);
}

Print(INK);	//결과 : Ariadne의 나이는 23이다.
객체 비구조화 할당
위에서는 파라미터로 받아온 person의 내부의 값을 조회할 때, .을 통해 접근하였는데 다음과 같이 객체 구조를 분해하여 접근할 수도 있다.
function Print2(person){
  const {age, name} = person;
  //person에 있는 정보를 추출하여 age와 name에 저장한다.
  const text = `${name}의 나이는 ${age}이다.`;
  console.log(text);
}
이 과정을 파라미터 단계에서 실행할 수도 있다.
function Print3({age, name}){
  const text = `${name}의 나이는 ${age}이다.`;
  console.log(text);
}
객체 안에 함수 넣기
const CAT = {
  name : '고먐미',
  sound : '야옹',
  say : function say(){
//say : function(){
//다음과 같이 선언할 때 함수의 이름이 없어도 된다.
    console.log(this.sound)
  }
}

CAT.say()
다만 여기서 화살표 함수는 사용할 수 없는데 화살표 함수는 this가 자신이 속한 객체를 가리키지 않기 때문이다.
Getter 함수와 Setter 함수
Getter
const num = {
  a : 1,
  b : 2,
  get sum() {
    console.log("sum 함수 실행");
    return this.a + this.b;
  }
};

console.log(num.sum);	// 1+2 = 3
num.b = 5;
console.log(num.sum); // 1+5 = 6num.sum()이 아닌 num.sum을 조회해도 함수가 실행된 결과를 받게 된다.
✔️ Getter 함수는 특정 값을 조회할 때 설정한 함수로 연산된 값을 반환한다.
참고 getter, setter
윗 예시가 이해가 잘 안되어 다음 부분을 추가한다.
getter와 setter에게는 private 개념이 따라온다.
✔️ private 변수를 지정한 후, 이 변수에 접근하기 위해 getter, setter를 이용한다.
class Person{
  constructor(name, age){
    this._name = name;
    this._age = age;
  }

  get name(){
    return this._name.toUpperCase();
  }

  set name(newName){
    if(newName){
      this._name = newName;
    }
  }
}

let man = new Person('ink',23);
console.log(man.name, man.age);

man.name = 'ariadne';
man.age = 17;
console.log(man.name, man.age);
let man = new Person('ink',23); 까지만 실행하면 다음과 같은 결과를 얻는다.
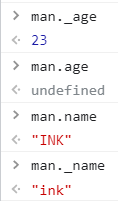
중요한 것은 이것. 나는 이름을 얻고자 했을 뿐인데 이미 대문자화 되어 있는 == 함수가 실행된 상태의 이름을 얻는다. 단순히 사용자는 이름을 얻을 뿐, 얻는 과정에 있는 내부적인 일은 알지 않아도 된다. 이러한 원리가 캡슐화의 이점인 정보 은닉이 된다.
07. 배열
객체 배열을 선언할 때,
const object = [{a : 1}, {b : 2}];

//접근은
console.log(object[1]);
📌 새 항목을 추가할 때는 .push(객체)
📌 배열의 크기를 알고자 할 때, .length
08. 반복문
객체를 위한 반복문 for...in
참고로 for...of는 배열에 관한 반복문을 돌리기 위한 반복문이다.
✔️ Object.entries: [[키, 값], [키, 값]] 형태의 배열로 변환
✔️ Object.keys: [키, 키, 키] 형태의 배열로 변환
✔️ Object.values: [값, 값, 값] 형태의 배열로 변환
09. 배열 내장함수
forEach
배열 안에 있는 요소를 element로 받아와 실행할 수 있게 한다. for문으로 접근할 수 있는 것을 내장함수로 실행하는 것.
const level = ['a','b','c','d','e','f','g'];

level.forEach(element => {
  console.log(element);
});
map
map 함수의 파라미터로 변화를 주는 변화함수를 전달한다.
const array = [1,2,3,4,5,6,7,8];

const square = n => n*n;

const squared = array.map(square);
또는
const squared = array.map(n=>n*n);이렇게 전달해도 된다.
그 외 함수들
✔️ 배열 안에 있는 값이 숫자, 문자열, 또는 불리언이라면 찾고자하는 항목이 몇번째 원소인지 알아내려면 indexOf 를 사용
✔️ 객체 속의 값을 찾으려면 findIndex 사용
const index = todos.findIndex(todo => todo.id === 3);todos에 있는 객체를 todo로 꺼내와서 todo.id에 접근하는 것
✔️ 여기서 Index의 값이 아니라 찾는 값 자체를 반환하고 싶다면 find를 쓴다.
✔️ filter 함수는 배열에서 특정 조건을 만족하는 값들만 따로 추출하여 새로운 배열을 만든다.
✔️ splice는 특정 항목을 제거할 때 사용한다. 사용은 다음과 같다. splice(어떤 인덱스부터 지울지, 그 인덱스로부터 몇개를 지울 것인지)
✔️ slice(어디서부터 지울지, 어디까지 지울지)
✔️ shift는 첫번째 원소를 배열에서 제거한다.
✔️ unshift는 배열의 맨 앞에 원소를 추가
✔️ 배열.reduce((누적값, 현잿값, 인덱스, 요소) => { return 결과 }, 초깃값);
참고 - javascript의 reduce 함수
function countBiggerThanTen(numbers) {
  return numbers.reduce((arr, cur) => {
    if (cur > 10){
      return arr+1;
    }else{
      return arr;
    }
  },0);
}

const count = countBiggerThanTen([1, 2, 3, 5, 10, 20, 30, 40, 50, 60]);
console.log(count); // 5

export default countBiggerThanTen;
10. 프로토타입과 클래스
class 개념이 추가되었다.
class Animal{
  constructor(type, name, sound){
    this.type = type;
    this.name = name;
    this.sound = sound;
  }
  say(){
    console.log(this.sound);
  }
}

const cat = New Animal("고", "야", '옹');
상속 extends는 다음과 같다.
✔️ constructor에서 사용하는 super() 함수는 상속받은 클래스의 생성자를 가르킨다.
class Dog extends Animal {
  constructor(name, sound){
    super("개", name, sound)
  }
}