Previously on 홈쿠...
지난 글 에서는 Hyper-V와 kubeadm을 통해 1master-2node 쿠버네티스 클러스터를 구축해봤습니다. 뭐 대단하지는 않아도 뭔가 해봤다는 느낌?은 드는 작업이었죠. 근데 구축하자 마자 고민이 몰려옵니다. 내 로컬 컴퓨터에서 어떻게 이 클러스터에 접속하느냐? 하는 고민이 몰려오죠. 가장 간단한 방법은 마스터 VM에서 설정 파일을 냅다 복사하는 거지만... 그거 보다 조금 더 나은 방법이 있지 않을까요? 함 가봅시다!
참고자료
- Configure Local Kubectl to Access Remote Kubernetes Cluster
- 시작하세요! 도커/쿠버네티스 10장
인증서 만들기
자! 우선 호스트 VM에 접속해봅시다. 혹시 접속 방법이 기억이 안나시나요? 요렇게 했었죠. __ssh {계정}@{서버 주소}
> ssh onlifecoding@192.168.0.30자 첫번째로 할 일은 하위 인증서의 비밀키와 인증서 사인 요청 파일을 생성하는 겁니다.
onlifecoding@onlifecoding-k8s-master:~$ openssl genrsa -out onlifecoding.key 2048
onlifecoding@onlifecoding-k8s-master:~$ openssl req -new -key onlifecoding.key -out onlifecoding.csr -subj "/O=onlifecoding-org/CN=onlifecoding"
위 명령 중에 O=onlifecoding-org 는 쿠버네티스의 유저 그룹, CN=onlifecoding 은 쿠버네티스 유저 이름이 됩니다.
하위 인증서??
우리가 생성한 비밀키와 사인 요청 파일은 그 자체로는 아무 의미가 없습니다. 쿠버네티스의 루트 인증서를 통해 이 비밀키와 사인 요청 파일을 서명하면 쿠버네티스가 이 인증서를 통해 유저를 식별할 수 있게 됩니다. 그래서 유저를 식별하기 위한 인증서를 루트 인증서의 하위 인증서 라고 부릅니다. 루트 인증서는 /etc/kubernetes/pki/ 폴더에서 확인할 수 있습니다.onlifecoding@onlifecoding-k8s-master:~/.kube$ ls /etc/kubernetes/pki/ apiserver-etcd-client.crt apiserver-kubelet-client.key ca.crt front-proxy-ca.crt front-proxy-client.key apiserver-etcd-client.key apiserver.crt ca.key front-proxy-ca.key sa.key apiserver-kubelet-client.crt apiserver.key etcd front-proxy-client.crt sa.pub위 목록 중에서 ca.crt 가 루트 인증서, ca.key 는 루트 인증서의 비밀키입니다.
이제 쿠버네티스에 인증서에 대한 사인요청을 생성할 차례입니다.
onlifecoding@onlifecoding-k8s-master:~$ vi onlifecoding-csr.yaml그리고 다음과 같이 입력합니다.
apiVersion: certificates.k8s.io/v1
kind: CertificateSigningRequest
metadata:
  name: onlifecoding-csr
spec:
  groups:
  - system:authenticated
  request: <CSR>
  usages:
  - digital signature
  - key encipherment
  - client auth
위 파일에서 <CSR> 부분에 조금 전에 생성한 사인요청 파일의 내용을 base64로 인코딩하여 입력하게 됩니다.
onlifecoding@onlifecoding-k8s-master:~$ export CSR=$(cat onlifecoding.csr | base64 | tr -d '\n')
onlifecoding@onlifecoding-k8s-master:~$ sed -i -e "s/<CSR>/$CSR/g" onlifecoding-csr.yaml
onlifecoding@onlifecoding-k8s-master:~$ cat onlifecoding-csr.yaml
base64로 인코딩 된 내용이 잘 입력된 것을 확인하고, 쿠버네티스에 인증서 사인요청을 보냅니다.
onlifecoding@onlifecoding-k8s-master:~$ kubectl apply -f onlifecoding-csr.yaml
onlifecoding@onlifecoding-k8s-master:~$ kubectl get csr
NAME               AGE   SIGNERNAME                     REQUESTOR          CONDITION
onlifecoding-csr   17s   kubernetes.io/legacy-unknown   kubernetes-admin   Pending
아직 관리자가 승인을 하지 않았기 때문에 요청이 Pending 상태인데요, 승인해버립시다!
onlifecoding@onlifecoding-k8s-master:~$ kubectl certificate approve onlifecoding-csr
onlifecoding@onlifecoding-k8s-master:~$ kubectl get csr
NAME               AGE   SIGNERNAME                     REQUESTOR          CONDITION
onlifecoding-csr   41s   kubernetes.io/legacy-unknown   kubernetes-admin   Approved,Issued
이제 루트 인증서로 서명이 완료되었으므로, 하위 인증서를 추출합니다.
onlifecoding@onlifecoding-k8s-master:~$ kubectl get csr onlifecoding-csr -o jsonpath='{.status.certificate}' | base64 -d > onlifecoding.crt하위 인증서로 유저 & 컨텍스트 등록
드디어 하위 인증서를 통해 쿠버네티스 유저를 등록할 수 있습니다.
onlifecoding@onlifecoding-k8s-master:~$ kubectl config set-credentials onlifecoding-x509-user --client-certificate=onlifecoding.crt --client-key=onlifecoding.key
User "onlifecoding-x509-user" set.
onlifecoding-x509-user 라는 이름으로 새 유저가 생성된 것을 확인할 수 있습니다. 이 유저로 접속할 수 있는 컨텍스트를 생성합니다.
onlifecoding@onlifecoding-k8s-master:~$ kubectl config get-clusters
NAME
kubernetes
onlifecoding@onlifecoding-k8s-master:~$ kubectl config set-context onlifecoding-x509-context --cluster kubernetes --user
 onlifecoding-x509-user
Context "onlifecoding-x509-context" created.
kubernetes 라는 이름의 클러스터에 대해서 onlifecoding-x509-user 로 접속하는 컨텍스트를 onlifecoding-x509-context 라는 이름으로 생성하였습니다. 이제 이 컨텍스트를 이용해서 로컬 컴퓨터에서 접속할 준비를 해볼까요?
로컬에서 마스터VM의 클러스터에 접속하기
kubectl 설치
쿠버네티스에 접속하기 위해서는 kubectl 을 설치해야 하는데요, 공식 가이드 문서를 확인하여 설치를 진행합니다.
쿠버네티스 설정 파일 및 하위 인증서 복사
로컬 컴퓨터에서 다음과 같이 마스터 VM의 쿠버네티스 설정 파일 및 하위 인증서를 복사합니다. 만약 다른 쿠버네티스에 대한 설정이 이미 존재한다면 먼저 백업해두세요!
> cd $HOME/.kube
> scp -r onlifecoding@192.168.0.30:~/.kube .
> scp -r onlifecoding@192.168.0.30:/home/onlifecoding/onlifecoding.crt .
> scp -r onlifecoding@192.168.0.30:/home/onlifecoding/onlifecoding.key .
config 파일에는 쿠버네티스 클러스터와 유저 정보 그리고 어떤 유저를 통해 어떤 클러스터에 접속할 것인지를 나타내는 컨텍스트 정보가 담겨있습니다. 우리는 어드민 계정이 아니라 유저 계정을 사용할 것이므로 config파일을 열어 다음과 같이 유저 관련된 정보만 남기고 모두 삭제합니다. 그리고 하위인증서와 비밀키 경로 역시 수정합니다.
apiVersion: v1
clusters:
- cluster:
    certificate-authority-data: ...생략...
    server: https://192.168.0.30:6443
  name: kubernetes
contexts:
- context:
    cluster: kubernetes
    user: onlifecoding-x509-user
  name: onlifecoding-x509-context
current-context: onlifecoding-x509-context
kind: Config
preferences: {}
users:
- name: onlifecoding-x509-user
  user:
    client-certificate: ./onlifecoding.crt
    client-key: ./onlifecoding.key
자 이제 컨텍스트를 onlifecoding-x509-context 를 통해 마스터 노드에 접근을 할 차례입니다!
> kubectl config use-context onlifecoding-x509-context
Switched to context "onlifecoding-x509-context".

> kubectl get nodes
Error from server (Forbidden): nodes is forbidden: User "onlifecoding" cannot list resource "nodes" in API group "" at the cluster scope
컨텍스트는 변경했지만, 아무런 권한을 주지 않았기 때문에 onlifecoding 계정으로는 할 수 있는게 아무 것도 없습니다. node 목록 조차 못 가져오죠. 😱
유저에 권한 부여하기
자 그럼 뭐! 권한 줍시다! 마스터 VM으로 가서 파일을 하나 작성합니다.
onlifecoding@onlifecoding-k8s-master:~$ vi onlifecoding-role.yaml다음과 같이 내용을 작성합니다.
apiVersion: rbac.authorization.k8s.io/v1
kind: ClusterRole
metadata:
  name: kubernetes-user
  namespace: default
rules:
- apiGroups: [""]
  resources:
  - nodes
  - nodes/proxy
  - services
  - endpoints
  - pods
  verbs: ["*"]
---
apiVersion: rbac.authorization.k8s.io/v1
kind: Role
metadata:
  name: kubernetes-user
  namespace: default
rules:
- apiGroups: [""]
  resources:
  - services
  - endpoints
  - pods
  verbs: ["*"]
---
apiVersion: rbac.authorization.k8s.io/v1
kind: ClusterRoleBinding
metadata:
  name: kubernetes-user
  namespace: default
roleRef:
  apiGroup: rbac.authorization.k8s.io
  kind: ClusterRole
  name: kubernetes-user
subjects:
- kind: User
  name: onlifecoding
---
apiVersion: rbac.authorization.k8s.io/v1
kind: RoleBinding
metadata:
  name: kubernetes-user
  namespace: default
roleRef:
  apiGroup: rbac.authorization.k8s.io
  kind: Role
  name: kubernetes-user
subjects:
- kind: User
  name: onlifecoding
클러스터 단위로 필요한 권한은 ClusterRole 로 정의하고 ClusterRoleBinding 으로 적용하고, 네임스페이스 단위로 필요한 권한은 Role 로 정의하고 RoleBinding 으로 적용합니다.
권한 목록을 보면 뭐 대충 노드, 서비스, 파드 등에 대해서 모든 권한을 준 상태입니다. 자 그럼 이 권한을 적용해야 겠죠?
onlifecoding@onlifecoding-k8s-master:~$ kubectl apply -f onlifecoding-role.yaml
role.rbac.authorization.k8s.io/kubernetes-user created
rolebinding.rbac.authorization.k8s.io/kubernetes-user created
자 이제 유저 권한 설정도 모두 끝났습니다! 😎
유저로 쿠버네티스 둘러보기
지금까지 하던 대로 kubectl 을 통해 계속 쿠버네티스를 둘러보고 제어할 수 도 있겠지만요... 저는 손가락이 쿠쿠다스 급으로 약하기 때문에 그렇게는 몬하겠습니다. 😑
그래서 저는 k9s를 사용할 겁니다. 공식 가이드의 설치 방법 외에 다른 방법으로 설치하시려면 한방 설치를 확인하세요!
설치 후 다음과 같이 k9s를 실행합니다.
> k9s쨔쟌~!
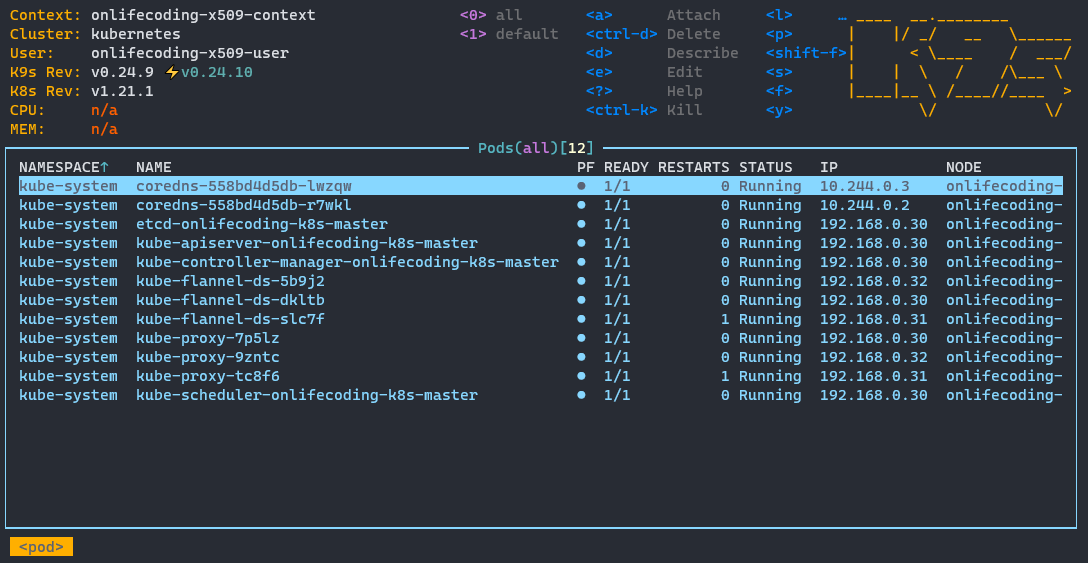
VM에서 동작 중인 Pod의 목록을 보여줍니다. 여기서 :node 를 입력해볼까요?
이제 노드의 목록이 나오네욥!
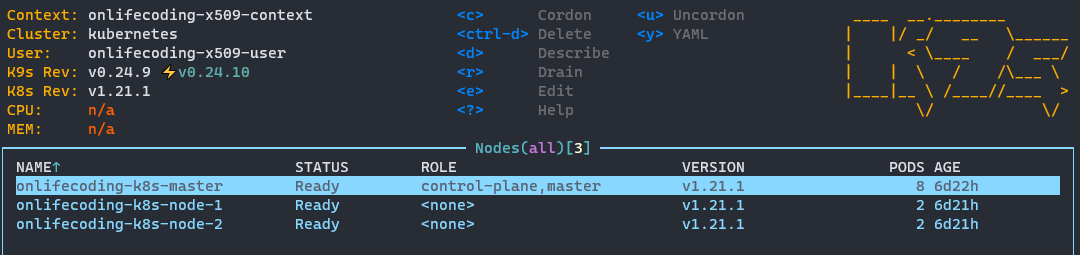
다시 Pod 목록으로 돌아가려면 :pod , 서비스 목록을 보려면 :svc , k9s를 종료하려면 :quit 을 입력하면 됩니다.
일단 마무리!
와! 이제 클러스터 구축에 연결까지 해봤습니다. 이제 실제로 뭔가를 클러스터에 올려서 돌려봐야겠죠??? 뭔가를 준비 중이긴 한데요... 시간이 좀 더 걸릴 것 같스빈다...😘