
🎀 시작하기
📌 src/main.js
import { createApp } from "vue";
import App from "./App.vue";
import router from "./router.js";
import store from "./store.js";
import axios from "axios";
import { createI18n } from "vue-i18n";
import lang from "@/locales/index";
import { getUppercasePrefix } from "./shared/util/getUppercasePrefix";

const app = createApp(App);

...

export const i18n = createI18n({
  legacy: false,
  locale:
    localStorage.getItem("lang") || getUppercasePrefix(navigator.language),
  fallbackLocale: "EN",
  messages: lang,
});

app.use(i18n);
...
app.mount("#app");
우선 vue-i18n를 vue 전역에서 사용할 수 있도록
main.js 파일에서 설정을 해주었다.
왜 export const로 i18n을 export 해주는지는 아래 트러블 슈팅에서 다루겠음!
🎀 사용하기
👉 1. 언어 파일을 만든다.
src/locales라는 폴더를 생성하고
하위에 필요한 언어 폴더를 생성해 주었다.
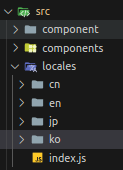
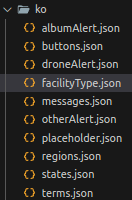
그리고 각각 필요한 언어들을 json 객체로 감싸 관리하였다.
겹치는 단어가 워낙 많기 때문에, 여러 종류의 객체로 관리하는 걸 추천한다.
{
  "facilityType": {
    "bridge": "교량",
    "structure": "건물",
    "incline": "사면",
    "tunnel": "터널",
    "other": "기타",
    "all": "모든 건물"
  }
}
마지막으로
src/locales/index.js 라는 파일을 만들었고
그 곳에서 각각 언어의 객체들을 합쳐주었다.
import koMessages from "@/locales/ko/messages.json";
import koRegions from "@/locales/ko/regions.json";
...

export default {
  KO: {
    ...koMessages,
    ...koRegions,
    ...koTerms,
    ...koStates,
    ...koFacilityType,
    ...koButtons,
    ...koAlbumAlert,
    ...koOtherAlert,
    ...koPlaceholder,
    ...koDroneAlert,
  },
  EN: {
    ...enMessages,
    ...enRegions,
    ...enTerms,
    ...enStates,
    ...enFacilityType,
    ...enButtons,
    ...enAlbumAlert,
    ...enOtherAlert,
    ...enPlaceholder,
    ...enDroneAlert,
  },
    ...
};
이런 느낌..!!
각각 파일이 나눠진 객체들을 언어에 맞게 합쳐주는 느낌이다.
여기까지 잘 따라왔다면, 끝이다.
👉 2. 실제로는 이렇게 쓴다.
📌 vue template 안에서
<p>{{ $t("term.fullName") }}</p><input :placeholder="$t('placeholder.inputName')"/>📌 vue파일 내 methods 안에서
this.$t("otherAlert.valueExceedLimitNotAllowed")👉 3. 응용하기
📌 외부 값을 텍스트에 넣어주기
만약,
'밍밍이님' 반갑습니다와 같이 유동적으로 값을 변경해 줘야하는 텍스트의 경우에는
// ko
  "message": {
    "greeting": "{fullName}님, 반갑습니다.",
      ...
}

// en
  "message": {
    "greeting": "Welcome, {fullName}",
      ...
}
와 같이 외부 값이 들어가는 곳을 {}로 감싸준다.
<h2>{{ $t('message.greeting', { fullName: user.fullName }) }}</h2>그리고 vue template 내에서 위와 같이 사용할 수 있다.
📌 만약 텍스트 안에 html 태그가 있다면?
html 태그를 넣어서 특정 단어만 스타일을 적용해 주고 싶을 수 있다.
// ko
  "message": {
    "greeting": "<strong style='color:#01fafe'>{fullName}</strong>님, 반갑습니다.",
      ...
  }
// en
  "message": {
    "greeting": "Welcome, <strong style='color:#01fafe'>{fullName}</strong>",
      ...
  }
그럴 땐 아래와 같이 v-html로 해결 가능하다.
<h2 v-html="$t('message.greeting', { fullName: user.fullName })"></h2>🎀 트러블 슈팅
👉 js 파일에서 사용되지 않는 문제 해결
util 함수에서 i18n을 사용해야하는 일이 있었다.
하지만 js에서는 i18n을 인식하지 못했고, $t관련 오류가 계속 떴다.
해결법은 앞서 알려드린 것 처럼 src/main.js에서
i18n 관련 코드를 export 해주는 것이다.
export const i18n = createI18n({
  legacy: false,
  locale:
    localStorage.getItem("lang") || getUppercasePrefix(navigator.language),
  fallbackLocale: "EN",
  messages: lang,
});
이렇게만 해주어도 vue 전역에서 해당 코드를 가져와 사용 할 수 있게 된다.
src/shared/util/somthing.js
import { i18n } from "@/main";

export const something = () => {
	...
    return i18n.global.t("facilityType.structure");
}
i18n.global.t("...");
이렇게 사용할 수 있따.