요즘 위코드를 수료하고, 원티드 프리온보딩 코스도 수료하고
이것 저것 찾아보고 첨삭 받아가며 이력서도 만들고,
면접 질문에 준비하기 위해 CS 지식도 공부하고,
부족하다고 느낀 자바스크립트 동작원리도 채워넣으며 살다보니
너무 오랜만에 블로그를 쓴다.
📍 그래서 뭐함?
최근에 이력서를 완성하고 원티드에 기업 채용공고를 읽어보니 느낀점은
- 의외로
Vue를 사용하는 회사가 많다. - 프롭테크 스타트업이 많다 (부동산 관련)
- 또한 관련 업계에서는 시각화 라이브러리, 지도 라이브러리를
많이 사용하고 있다.
- 또한 관련 업계에서는 시각화 라이브러리, 지도 라이브러리를
그래서 어제 MDN의 Vue 튜토리얼을 보고 따라만든게 있다.
프레임워크 또는 개발 언어를 처음 접할 때 가장 러닝커브가 좋은 방법이다.
📌 바로 To-Do List 구현
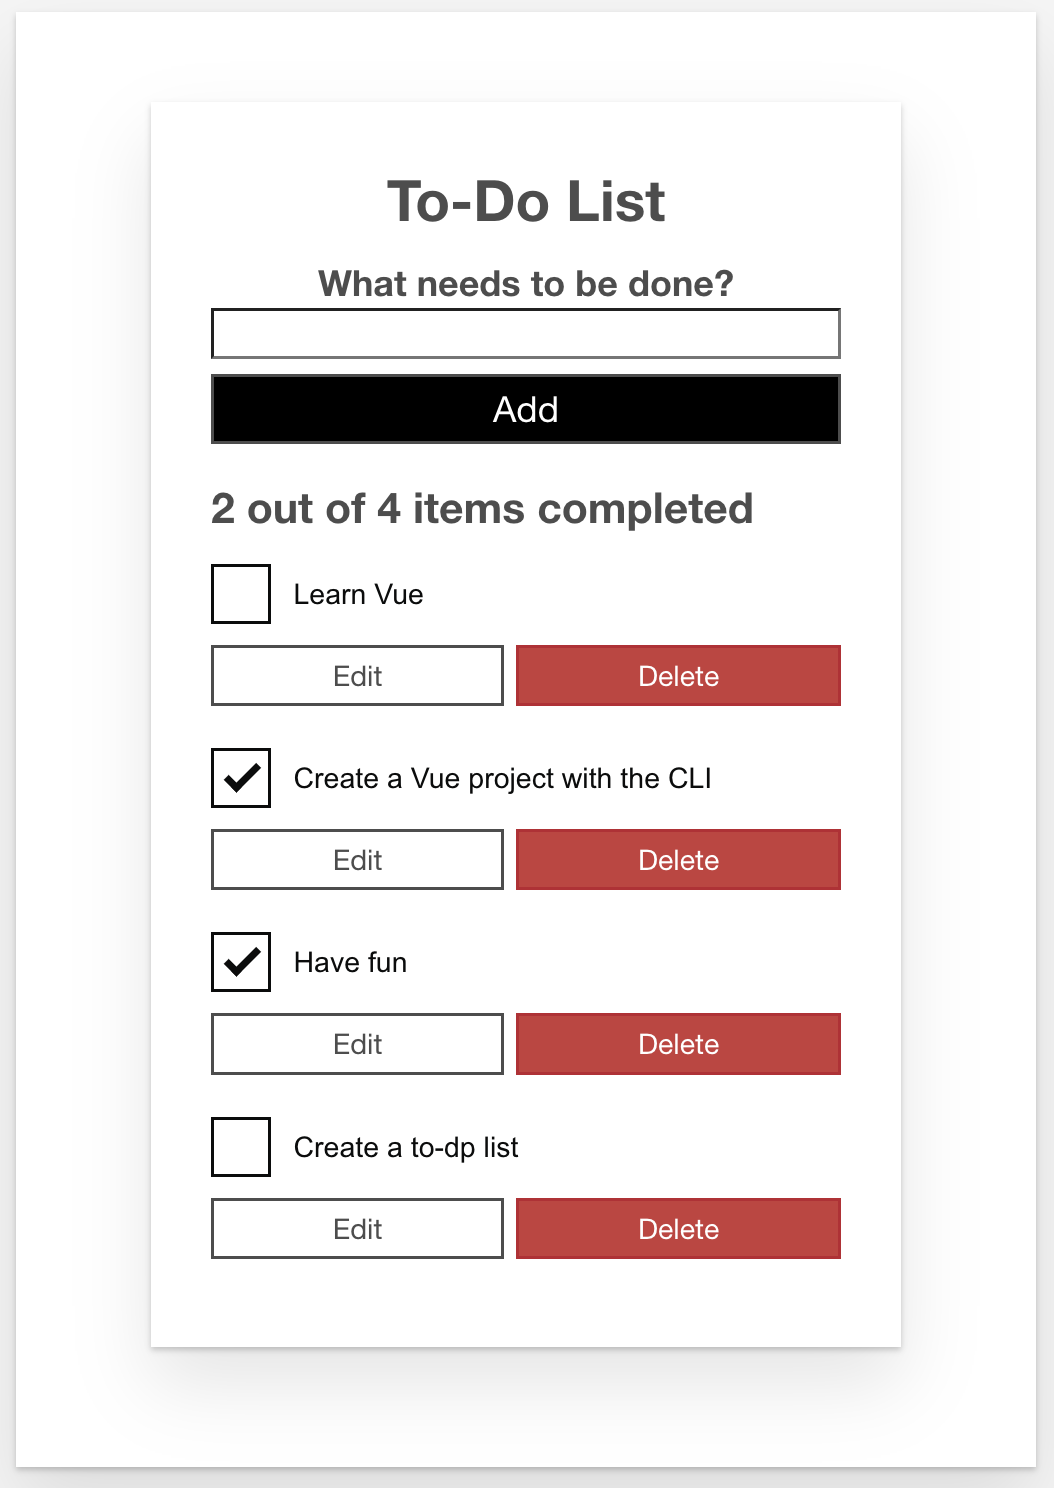
4시간 정도 걸려서 만들었는데 style 관련 소스를 MDN에서 제공해줘서
스타일링에 시간을 뺏기지 않고
프레임워크를 이해하는데 온전히 시간을 쓸 수 있어서 좋았다.
📌 그럼 Vue가 어떻게 구성되어 있는지 알아보자.
먼저 Vue는 크게 3가지 단위로 구성된다.
template- 만들고자 하는 형태의 JSX 태그를 입력하는 영역이다.
- script에서 다른 컴포넌트를 import 하여
components 객체 안에 기입해주면
불러온 컴포넌트를 해당 파일에서 사용할 수 있다. - 예시)
          <template>
            <HelloWorld></HelloWorld>
          </template>
          <script>
            import HelloWorld from './components/HelloWorld';

            export default {
              components: {
                HelloWorld
              }
            }
</script>script- 컴포넌트, 에셋, css, 라이브러리 등등 import 구문은 여기에 작성한다.
- components, methods, data(), computed, 생명주기 메서드 등이 여기에 속한다.
style- 해당 태그로 스타일을 지정하던, style in js 라이브러리를 사용하던, css 파일로 분리하여 assets 폴더에 넣고 import를 하던 상관 없다
중요한건 스타일을 관리하는 태그라는것, 인라인으로 스타일을 줘도 된다.
- 해당 태그로 스타일을 지정하던, style in js 라이브러리를 사용하던, css 파일로 분리하여 assets 폴더에 넣고 import를 하던 상관 없다
이렇게 보면 리액트와 비슷해보인다 리액트의 함수 컴포넌트를 예로 들자면
- template은 return() 구문 안쪽을 담당하는 것 같고.
- script는 return() 구문 바깥쪽을 담당하는 것 같고.
- style은 거의 비슷하게 동작하는 것 같다.
📌 그럼 컴포넌트 업데이트는 어떻게 하는데?
Vue가 컴포넌트를 업데이트 해야하는지 알게 해주려면
script 구문의 하위요소인 data()를 이용하면 된다.
export default {
  data() {
    return {
      isData: true
    };
  }
}
이게 리액트로 비유하면 state를 선언한 것과 같다.
그럼 setState는 어디있지?
그건 computed 속성을 통해서 구현할 수 있다.
코드를 조금이라도 짜본 사람은 자주 접하는 상황이 있다.
여러 값이 상호 유기적으로 얽혀 있어서 코드가 길어지고 구현부의 가독성이
떨어지는 현상을 접해봤을 것이다.
이럴 때 사용하는 Vue의 속성이 computed 이다.
computed 는 앞서 언급한 data()에 선언된 상태 값에 의존하여
해당 값이 변화되는 것을 감지하고 짜여진 로직에 의해
즉시 계산을 실행하고 화면을 업데이트 한다.
예를 들어서
<div @click="onClick">{{doubleCount}}</div>
.
.
.
method:{
  onClick(){
  	this.count += 1;
  }
},
data(){
  return{
    count: 1
  }
},
computed: {
  doubleCount(){
    console.log("doubleCount : ", this.count * 2);
    return this.count * 2;
  }
}

// output: "doubleCount : 2"
위의 코드의 실행 순서를 설명하면
-
div를 클릭하면 클릭 이벤트가 발생하고 해당 이벤트에 할당된
onClick 메소드가 실행된다. -
메소드가 실행되어 this.count 의 값이 증가한다.
-
computed속성에 정의된 doubleCount가 의존하고있는 this.count의 값이 변화되었기 때문에 해당 사항을 감지한다.
-
div 태그 안에서 사용된 doubleCount가 업데이트 되고 상태가 변화된 것을 감지하여 리렌더링 한다.
데이터를 어떻게 선언하고 값을 바꾸는지 알아봤는데,
그럼 어딘가에서 값을 받아와야 하는 경우는 어떻게 해야하나?
📌 Props를 사용하는 방법
꽤나 간단하다.
export default {
  props: {
    foo: string
  }
}
사용하고자 하는 컴포넌트의 script 영역에 위와 같이 props를 선언한다.
<component foo="this is props"></component>그리고 해당 props를 넘겨줄 컴포넌트에서 위처럼 명시해주면 된다.
만약 data()를 넘겨주고 싶다면
<component :foo="fooData"></component>
.
.
.
<script>
	export default {
  		data(){
    		return{
     			fooData: "this is props"
    		}
 		 }
	}
</script>
위와 같이 넘겨주고자 하는 props의 이름 앞에 : 를 달아주면 데이터를 넘겨줄 수 있다.
그럼 상태를 관리하는 방법까지는 알았는데
혹시 조건에 따라서 또는 반복되는 데이터를 사용해서 구현하기 위한 방법이 뭘까?
v-if v-else v-for in
해당 코드는 Vue 의 조건부 렌더링 기법이다.
-
v-if: 조건식의 값이 true라면 해당 태그를 렌더링. -
v-else: 상단의 v-if의 조건식 결과값이 false라면 해당 태그를 렌더링 -
v-for element in Array: 배열을 인자로 받아서
해당 태그를 반복해서 생성.
해당 기법이 적용된 To-Do List 코드를 첨부한다.
App.vue
<template>
  <div id="app">
    <h1>To-Do List</h1>
    <ToDoForm @todo-added="addToDo"></ToDoForm>
    <h2 id="list-summary" ref="listSummary" tabindex="-1">{{ listSummary }}</h2>
    <ul aria-labelledby="list-summary" class="stack-large">
      <li v-for="item in ToDoItems" :key="item.id">
        <ToDoItem
          :label="item.label"
          :done="item.done"
          :id="item.id"
          @checkbox-changed="updateDoneStatus(item.id)"
          @item-deleted="deleteToDo(item.id)"
          @item-edited="editToDo(item.id, $event)"
        ></ToDoItem>
      </li>
    </ul>
  </div>
</template>

<script lang="ts">
import { defineComponent } from 'vue';
import ToDoItem from './components/ToDoItem.vue';
import ToDoForm from './components/ToDoForm.vue';
import uniqueId from 'lodash.uniqueid';

export default defineComponent({
  name: 'App',
  components: {
    ToDoItem,
    ToDoForm
  },
  data() {
    return {
      ToDoItems: [
        {
          id: uniqueId('todo-') as string,
          label: 'Learn Vue',
          done: false
        },
        {
          id: uniqueId('todo-') as string,
          label: 'Create a Vue project with the CLI',
          done: true
        },
        {
          id: uniqueId('todo-') as string,
          label: 'Have fun',
          done: true
        },
        {
          id: uniqueId('todo-') as string,
          label: 'Create a to-dp list',
          done: false
        }
      ]
    };
  },
  methods: {
    addToDo(toDoLabel: string) {
      this.ToDoItems.push({
        id: uniqueId('todo-'),
        label: toDoLabel,
        done: false
      });
    },
    updateDoneStatus(toDoId: string) {
      const toDoToUpdate = this.ToDoItems.find((item) => item.id === toDoId);
      if (toDoToUpdate) toDoToUpdate.done = !toDoToUpdate.done;
    },
    deleteToDo(toDoId: string) {
      const itemIndex = this.ToDoItems.findIndex((item) => item.id === toDoId);
      this.ToDoItems.splice(itemIndex, 1);
      const currentRef = this.$refs.listSummary as HTMLDivElement;
      currentRef.focus();
    },
    editToDo(toDoId: string, newLabel: string) {
      const toDoToEdit = this.ToDoItems.find((item) => item.id === toDoId);
      if (toDoToEdit) toDoToEdit.label = newLabel;
    }
  },
  computed: {
    listSummary(): string {
      const numberFinishedItems = this.ToDoItems.filter(
        (item) => item.done
      ).length;
      return `${numberFinishedItems} out of ${this.ToDoItems.length} items completed`;
    }
  }
});
</script>
ToDoItem.vue
<template>
  <div class="stack-small" v-if="!isEditing">
    <div class="custom-checkbox">
      <input
        type="checkbox"
        class="checkbox"
        :id="id"
        :checked="isDone"
        @change="$emit('checkbox-changed')"
      />
      <label :for="id" class="checkbox-label">{{ label }}</label>
    </div>
    <div class="btn-group">
      <button
        type="button"
        class="btn"
        ref="editButton"
        @click="toggleToItemEditForm"
      >
        Edit <span class="visually-hidden">{{ label }}</span>
      </button>
      <button type="button" class="btn btn__danger" @click="deleteToDo">
        Delete <span class="visually-hidden">{{ label }}</span>
      </button>
    </div>
  </div>
  <ToDoItemEditFormVue
    v-else
    :id="id"
    :label="label"
    @item-edited="itemEdited"
    @edit-cancelled="editCancelled"
  ></ToDoItemEditFormVue>
</template>

<script lang="ts">
import ToDoItemEditFormVue from './ToDoItemEditForm.vue';
import { defineComponent } from 'vue';

export default defineComponent({
  props: {
    label: { required: true, type: String },
    done: { default: false, type: Boolean },
    id: { required: true, type: String }
  },
  data() {
    return {
      isEditing: false
    };
  },
  methods: {
    deleteToDo() {
      this.$emit('item-deleted');
    },
    toggleToItemEditForm() {
      console.log(this.$refs.editButton);
      this.isEditing = true;
    },
    itemEdited(newLabel: string) {
      this.$emit('item-edited', newLabel);
      this.isEditing = false;
      this.focusOnEditButton();
    },
    editCancelled() {
      this.isEditing = false;
      this.focusOnEditButton();
    },
    focusOnEditButton() {
      this.$nextTick(() => {
        const editBittonRef = this.$refs.editButton as HTMLDivElement;
        editBittonRef.focus();
      });
    }
  },
  components: {
    ToDoItemEditFormVue
  },
  computed: {
    isDone() {
      return this.done;
    }
  }
});
</script>
그리고 최상단에서 언급한 구글맵 API도 한번 사용해봤다... 정말 별건 없다.
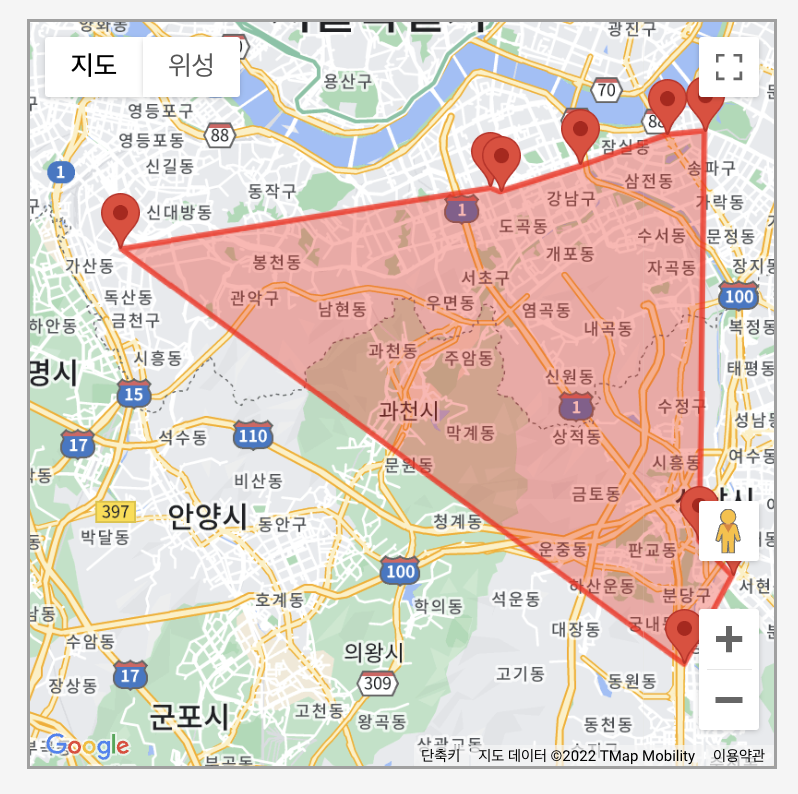
이게 어떤 사진이냐 하면, 개발자라면 누구나 가고싶어 한다는
네카라쿠배당토직야 의 위도 경도를 구글 맵을 통해 얻어낸 뒤
해당 지점을 polygon을 이용해서 영역화 한것이다.
아마 해당 영역의 중앙 부근에 거주하고 계시는 개발자 분이라면
따로 이사갈 필요 없이 원활하게 출퇴근이 가능할 것이라고 생각된다
해당 파일의 코드도 첨부한다.
App.vue
<template>
  <GoogleMap
    id="map"
    apiKey="Your google API key"
    libraries="geometry,drawing,places"
    :options="{
      center: { lat: 37.439, lng: 127 },
      zoom: 11.3
    }"
    :markers="[
      {
        position: { lat: 37.3591, lng: 127.1048 },
        title: '네이버',
        draggable: false
      },
      {
        position: { lat: 37.3957, lng: 127.1105 },
        title: '카카오',
        draggable: false
      },
      {
        position: { lat: 37.3853, lng: 127.1231 },
        title: '라인',
        draggable: false
      },
      {
        position: { lat: 37.5158, lng: 127.0989 },
        title: '쿠팡',
        draggable: false
      },
      {
        position: { lat: 37.5168, lng: 127.1128 },
        title: '배민',
        draggable: false
      },
      {
        position: { lat: 37.4821, lng: 126.8953 },
        title: '당근마켓',
        draggable: false
      },
      {
        position: { lat: 37.5, lng: 127.0329 },
        title: '토스',
        draggable: false
      },
      {
        position: { lat: 37.4987, lng: 127.0366 },
        title: '직방',
        draggable: false
      },
      {
        position: { lat: 37.5067, lng: 127.0662 },
        title: '야놀자',
        draggable: false
      }
    ]"
    :polygons="[
      {
        paths: [
          //토스
          { lat: 37.5, lng: 127.0329 },
          //직방
          { lat: 37.4987, lng: 127.0366 },
          //야놀자
          { lat: 37.5067, lng: 127.0662 },
          //쿠팡
          { lat: 37.5158, lng: 127.0989 },
          //배민
          { lat: 37.5168, lng: 127.1128 },
          //카카오
          { lat: 37.3957, lng: 127.1105 },
          //라인
          { lat: 37.3853, lng: 127.1231 },
          // 네이버
          { lat: 37.3591, lng: 127.1048 },
          //당근마켓
          { lat: 37.4821, lng: 126.8953 }
        ],
        strokeColor: '#ff0000',
        strokeOpacity: 0.8,
        strokeWeight: 3,
        fillColor: '#ff0000',
        fillOpacity: 0.35
      }
    ]"
  />
</template>
<script lang="ts">
import { defineComponent } from 'vue';
import { GoogleMap } from 'google-map-ts-vue3';

export default defineComponent({
  name: 'MapExample',
  components: {
    GoogleMap
  }
});
</script>

<style>
#map {
  margin: calc(50% - 150px) auto;
  border: 2px solid #a0a0a0;
}
</style>
google-map-ts-vue3 라이브러리를 이용해서 구현해봤다.
코드를 잘 보면 구글 맵스 플랫폼 API 키가 필요한데
해당 과정은 이 블로그 링크 를 참고하여 발급받고 진행했다.
평소에 라멘에 관심이 많아서 라멘 맛집 지도를 물색해서
해당 지도를 가지고 라멘 맛집 추천 프로젝트를 기획중이었는데
아무래도 실제 식당을 기반으로 한 프로젝트기 때문에 지도 API를 활용해야 했다.
이번에 한번 사용해보게 되면서 어느정도 갈피가 잡힌 것 같다.
이후에는 그래픽 시각화 라이브러리를 한번 시도해볼 생각이다.
그럼 여기서 마치겠다!