shortcuts
- 한줄 삭제 : cmd + shift + k
- 폴더에 파일 생성 : cmd + n
- 파일 열기 : cmd + p ->원하는 파일 명
- 탭 바꾸기 : ctrl + tab
npx create-react-app my-app
cd my-app
npm start
Structure
public
ㄴ index.html
src
ㄴ Index.js
ㄴ App.js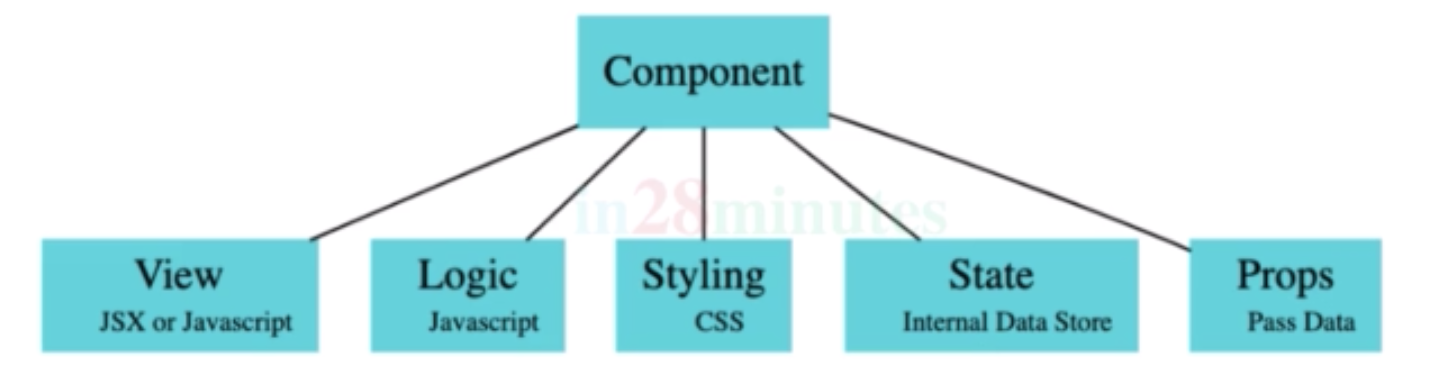
event
Computed Property name
[ ] 안에 있는 어떤 표현이든 String으로 만든다. 보통 프로퍼티 이름으로 사용된다. ES6에 추가되었다
this.setState({
	userId:e.target.userId,
	passwd:e.target.passwd
})

-> this.setState({[e.target.name]:e.target.value})
{this.state.showLoginMessage ? <div>로그인 성공</div> : <div>로그인 실패</div>}
----------------------------->
<ShowInvalidCredential isLoginFailed={this.state.isLoginFailed}/>
<ShowLoginMessage showLoginMessage={this.state.showLoginMessage}/>
function ShowInvalidCredential(props){
if(props.isLoginFailed)
return <div>로그인 실패</div>
return null;
}
function ShowLoginMessage(props){
if(props.showLoginMessage)
return <div>로그인 성공</div>
return null;
}
----------------------------->
{this.state.isLoginFailed && <div>로그인 실패</div>}
{this.state.showLoginMessage && <div>로그인 성공</div>}react-router-dom
npm add react-router-domimport
import { BrowserRouter as Router, Route} from 'react-router-dom'
<div>
	<Router>
    	<Switch>
    		<Route exact path="/" component={Login}/>
			<Route path="/login" component={Login}/>
			<Route path="/welcome/:name" component={Main}/>
        	<Route component={Error404}/>
        </Switch>
	</Router>
</div>
send to another page
this.props.history.push(`/welcome/${this.state.userId}`)welcome {this.props.match.params.name} history (react)
history package (javascript)
show list
  <tbody>
                        {this.state.contents.map( content =>
                            <tr key={content.id}>
                                <td>{content.id}</td>
                                <td>{content.title}</td>
                                <td>{content.description}</td>
                            </tr>
                        )}
                    </tbody>
add link
import {Link} from 'react-router-dom'<Link to='content'></Link>Bootstrap unpkg
bootstrap.css
@import url(https://unpkg.com/bootstrap@4.3.1/dist/css/bootstrap.min.css)App.js
import './bootstrap.css'Login Cookie
sessionStrage의 유저 정보만 가지고 일단 프론트에서 판단하게 만듦
모든 유저 로그인 정보에 관한 method는 AuthenticationService.js에 담아 관리할 예정
AuthenticationService.js
class AuthenticationService {
	registerSuccessfulLogin(username, password){
        sessionStorage.setItem('authenticatedUser',username)
    }
}

export default AuthenticationService()
Login.jsx
import AuthenticationService from './utils/AuthenticationService'clickLogin()
AuthenticationService.registerSuccessfulLogin(userId)sessionStorage에 유저정보확인
withRouter
어느 history 오브젝트의 프로퍼티와 withRouter의 높은 우선순위의 컴포넌트를 통해 가장 가까운 <Router>의 match에 접근가능하다. 업데이트된 match,location,history props에서 감싸진 컴포넌트로 렌더링 될 때마다 지나간다.
<Route path="/movies" component={MoviesIndex} />MoviesIndex컴포넌트는 this.props.history에 접근하고 this.props.history.push로 인해 컴포넌트로 이동된다.
주로 header 컴포넌트는 매 요청마다 불려진다. 그래서 <Router>에 포함되지 않는다. 그래서 헤더는 유저를 다른 페이지로 이동시키지못한다. 그래서 헤더는 withRouter에 감싸질 수 있다.
export default withRouter(Header)헤더 컴포넌트가 this.props.history에 접근하도록 만든다. 즉 헤더도 유저를 다른 페이지로 이동시킬수 있다.
주로 Router로 페이지를 이동할 때 헤더에서 console.log를 찍으면 페이지를 이동해도 확인이 안되는데 this.props.history에 접근하지 못해 history 정보가 없기 때문이다. 페이지가 계속 바껴도 헤더는 가만히 있는 것이라 생각하면 된다. 하지만 withRouter에 감싸서 export하면 this.props.history에 접근 가능하기 때문에 Router에 의해 이동이 되면 함께 이동되기에 console.log를 매 이동마다 확인할 수 있다고 이해하련다.
AuthenticatedRoute
let values = [1,2,3]
function sum(a,b,c) { return a+b+c }
sum(45,60,90)
-> sum(values[0],values[1],values[2])
-> sum(...values)
...values를 사용하면 1 -> a,2 -> b,3 -> c에 각각 매핑된다.
AuthenticatedRoute.jsx
export default class AuthenticatedRoute extends Component {
    render() {
        if(AuthenticationService.isUserLoggedIn()){
            return <Route {...this.props}/>
        } else {
            return <Redirect to="/login"/>
        }
    }
}
editx.jsx
<AuthenticatedRoute path="/welcome/:name" component={Main}/>포트변경
 "scripts": {
    "start": "PORT=4000 react-scripts start",
Axios
Promise 기반의 브라우저와 node를 위한 HTTP 클라이언트
브라우저에서 요청을 보내면 동기적/순서대로 요청보내고 응답을 기다림. 하지만 비동기적으로 요청을 보내고 싶을 때 사용 (Ajax 통신)
npm install axiosHelloWorldService.js
import Axios from "axios";

class HelloWorldService{
    executeHelloWorldPathVariableService(name){
        return Axios.get(`http://localhost:8080/welcome/${name}`)
    }
}

export default new HelloWorldService()
get 메소드를 사용하면 return 값은 promise를 가져온다
get<T = any, R = AxiosResponse<T>>(url: string, config?: AxiosRequestConfig): Promise<R>;Main.jsx
retrieveWelcomeMessage=()=>{
HelloWorldService.executeHelloWorldPathVariableService(this.props.match.params.name)
.then(res => this.handleSuccessfulResponse(res))
}
handleSuccessfulResponse(response){
this.setState({welcomeMessage:response.data})
}
handleError(error){
console.log(error.response.data.message)
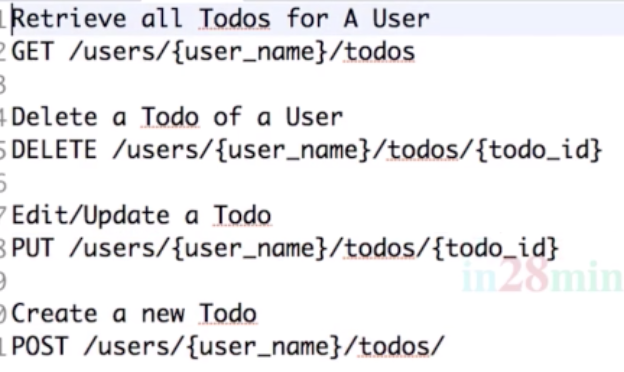
} WelcomeController.java
@CrossOrigin(origins = "http://localhost:4000")

@GetMapping("/{name}")
public String welcomePathVariable(@PathVariable String name){
	// throw new RuntimeException("Something went wrong");
	return "Hello, " + name;
}
Contents
constructor -> render -> componentDidMount -> render
setState 메소드는 호출되자마자 바로 작동하지 않는다. setState는 React에 의해 컨트롤 된다. 예를들어 shouldComponentUpdate에 false를 리턴하면 setState되어도 render시키지 않게 만든다.
Content.jsx
componentDidMount=()=>{
let user = AuthenticationService.getLoggedInUserId()
ContentService.retrieveAllContents(user)
.then(res => this.retrieveContentFromServer(res))
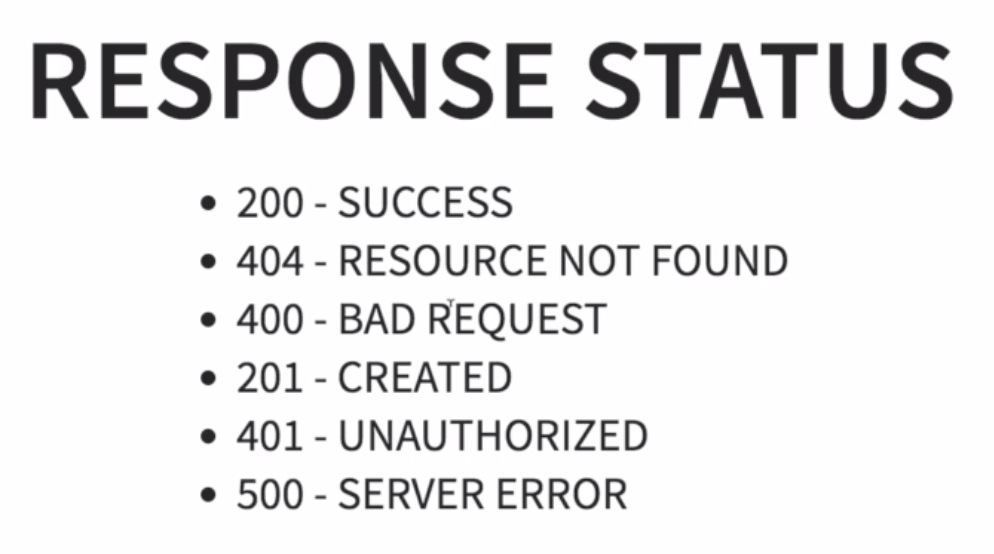
}ResponseEntity
ResponseEntity.noContent.build()
ResponseEntity.notFound.build()
ResponseEntity는 전체 HTTP 응답을 대표한다. 여기에 들어가는 모든 것 (status, header, body)를 컨트롤할 수 있다. @ResponseBody는 HTTP response body만 관리할 수 있고, @ResponseStatus는 HTTP 응답의 status코드를 관리한다. ResponseEntity가 @ResponseBody, @ResponseStatus 보다 많은 일을 하므로 사용된다.
스프링에서 제공하는 튜토리얼을 참조하면 좋을 것 같다.
스프링 공식 튜토리얼
튜토리얼 소스코드
다음과 같은 에러가 났을 때,
A component is changing a controlled input of type text to be uncontrolled. Input elements should not switch from controlled to uncontrolled (or vice versa). Decide between using a controlled or uncontrolled input element for the lifetime of the component.해석해보면 컴포넌트가 컨트롤된 input 타입에서 컨트롤 되지 않는 input 타입으로 바꿨다. input 안의 요소들은 컨트롤에서 컨트롤되지않는 타이브로 바뀔 수 없고 반대로 될 수 도 없다. 컨트롤된 요소를 쓸 것인지 아닌지 정하라 라는 뜻이된다.
조금 조사를 해보니 컨트롤 input의 의미는 value값이 있는, 컨트롤 되지 않는 input의 의미는 value값이 없는 이라는 뜻이라고 한다. 원래 게시판 작성 페이지를 새로 만드는 대신 게시판 업데이트 페이지를 재활용했고 업데이트 데이터는 처음에 서버로부터 데이터를 받아와 input의 value값으로 넣어놓았다. 즉 원래는 업데이트 페이지로 가면 value값이 input에 있는데 새로운 게시물 작성으로 하려고 서버에서 value값을 가져오지 않게 했다. 말그대로 원래 컨트롤 된(input의 value값이 있는) 업데이트 페이지를 컨트롤 되지 않는(input의 value값이 없는) 새로운 게시물 작성 페이지로 사용하려니 이런 에러를 발생 시키게 된 것이다.
<input value={value || ''}/>그래서 위와 같은 코드로 바꿔주면 잘 해결 됨을 알 수 있다.
switch문에 전략 패턴 적용
전역변수 설정하기
export는 함수, 오브젝트, 원시 값을 추출하기 위한 Javascript 모듈을 생성할 떄 사용된다. 그래서 import와 함께 다른 프로그램에서 사용될 수 있다.
Protocol.js
export const SERVER_URL = 'http://localhost:8080'ContentService.js
import {SERVER_URL} from "../protocol/Protocol";다른 컴포넌트에서 setState하기
컴포넌트에서 다른 컴포넌트로 Link를 통해 state 보내기
보낼 때
<Link to={{ pathname: '/tylermcginnis',
  			state: {fromNotifications: true }
		  }}>
받을 때
const { fromNotifications } = this.props.location.statepushState
this.history.pushState(selfLinkObject, "/my/url");
setState에 기존 객체에 set하기
this.setState(prevState => ({
    jasper: {                   // object that we want to update
        ...prevState.jasper,    // keep all other key-value pairs
        name: 'something'       // update the value of specific key
    }
}))
setState에 변수 보내기
간단하게 [] 쓰면된다.
If you're using an ES6 transpliler that supports computed property names (like Babel), you can do:
let name = e.target.name
        let value = e.target.value
        this.setState(prevState => ({content:{...prevState.content, [name]:value }}))
글을 수정/삭제 할 때, 로그인한 사용자가 글의 작성자인지 확인하는 작업이 필요
create-react-app 정적 페이지 build & deploy
- package.json이 있는 프로젝트 폴더로 가기
npm run build실행serve -s build -l 3000실행- 포트 번호가 3000번이라면
-l옵션으로 포트 번호 지정 (기본 5000번 포트)
- 포트 번호가 3000번이라면
리액트 개발/운영 환경 나누기
리액트 빌드-배포 자동화
리액트 빌드 자동화
사실 공식 홈페이지에는 매우 잘 나와있다. 세부적인 내용은 공식 홈페이지를 참조하자
Travis CI 를 이용하여 먼저 build를 자동화
프로젝트의 루트폴더에 .travis.yml 생성
travis.yml
language: node_js
node_js:
  - 10
branches:
  only:
    - master

cache:
  directory:
    - node_modules

script:
  - npm run build

notifications:
  email:
    recipients:
      - bgpark82@gmail.com
language
- react를 사용했으므로 node_js를 선언한다
node_js
- travis 서버에 올라갈 nodejs의 버전 정보를 알려준다
- 현재 10.16.3 버전을 사용하므로 10이라 표시
로컬호스트에서 도커 컨테이너로 파일 옮기기
로컬호스트 -> 도커 컨테이너
docker cp deploy.sh container:/deploy.sh도커 컨테이너 -> 로컬호스트
docker cp mycontainer:/foo.txt foo.txt자동 배포 스크립트
Step 9/16 : RUN npm install
---> Running in 098181ce0cec
deploy.sh
#!/bin/bash

echo "welcome to editx-front build process!"

echo "> editx-front 디렉토리로 이동"
cd editx-front

echo "> 프로젝트 git pull 시작"
git pull

echo "> 프로젝트 build 시작"
npm run build

echo "> 현재 진행중인 어플리케이션 PID"
CURRENT_PID=$(pgrep -f serve)
echo "$CURRENT_PID"

if [ -z $CURRENT_PID]
then
        echo "> 현재 실행중인 어플리케이션이 없습니다"
else
        echo "> 현재 어플리케이션이 구동 중입니다"
        echo "> 실행중인 어플리케이션을 종료합니다"
        kill -9 $CURRENT_PID
        sleep 5
fi

echo "> 프로젝트 deploy 시작"
serve -s build -l 3000
왜 로컬에다가 git pull하고 가상머신으로 옮기는지 알겠다
다 날라가네
build하는게 얼마나 오래걸리는지 알겠네
보통 30~35초
Cross origin
클라이언트 도커: 80:3000
서버 도커: 8080:8080
서버에서 CORS를 허락해야하는 url은 url:80 즉, 브라우저에서 넘어와서 서버로 가는 3000번 포트가 아니라, 브라우저에서 넘어오는 리퀘스트가 되어야 한다.
CORS Filter
@Component
public class SimpleCORSFilter implements Filter {

    private final Logger log = LoggerFactory.getLogger(SimpleCORSFilter.class);

    public SimpleCORSFilter() {
        log.info("SimpleCORSFilter init");
    }

    @Override
    public void doFilter(ServletRequest req, ServletResponse res, FilterChain chain) throws IOException, ServletException {

        HttpServletRequest request = (HttpServletRequest) req;
        HttpServletResponse response = (HttpServletResponse) res;

        response.setHeader("Access-Control-Allow-Origin", request.getHeader("Origin"));
        response.setHeader("Access-Control-Allow-Credentials", "true");
        response.setHeader("Access-Control-Allow-Methods", "POST, GET, OPTIONS, DELETE, PUT");
        response.setHeader("Access-Control-Max-Age", "3600");
        response.setHeader("Access-Control-Allow-Headers", "Content-Type, Accept, X-Requested-With, remember-me");

        chain.doFilter(req, res);
    }

    @Override
    public void init(FilterConfig filterConfig) {
    }

    @Override
    public void destroy() {
    }

}
Dockerfile -v2
지금까지는 EC2 안에 두개의 컨테이너를 만들어서 각각 같은 EC2의 IP에 다른 포트번호(80,8080)을 붙혀서 서로 통신이 가능하게 만들었다.
하지만 이런 방법은 좋지 않다. WAS서버는 데이터베이스 등 중요한 데이터들이 보관되어 있으므로 WebServer에서 컨테이너의 내부 아이피를 사용하여 보완을 강화시는 방법에 대해 살펴 볼 것이다.
이번에는 nginx의 reverse proxy 기능을 사용하여 WAS의 내부 IP와 통신하는 법을 살펴보자
즉, 80포트로 Webserver(123.35.343.34:80)에 들어오고 CRUD의 기능을 보낼 WAS 서버의 IP를 WAS 컨테이너의 내부 아이피(172.28.0.1:8080)로 바꾸어 API 통신을 하도록 한다.
nginx 설정파일
server 부분에 reverse proxy 시키고픈 주소:포트번호 proxy_pass에 추가
location /user {
		proxy_pass http://172.17.0.2:8080;
		proxy_set_header Host $host;
        }
# vi /etc/nginx/nginx.conf
server {
listen 80 default_server;
listen [::]:80 default_server;
server_name _;
root /usr/share/nginx/html;
# Load configuration files for the default server block.
include /etc/nginx/default.d/*.conf;
location / {
}
location /user {
proxy_pass http://172.17.0.2:8080;
proxy_set_header Host $host;
}
error_page 404 /404.html;
location = /40x.html {
}
error_page 500 502 503 504 /50x.html;
location = /50x.html {
}
}
FROM centos:latest
MAINTAINER Peter Park <bgpark82@gmail.com>

RUN yum install -y epel-release
RUN yum install -y nginx
RUN yum install -y git

ENV LANG ko_KR.UTF-8
ENV LC_ALL ko_KR.UTF-8

RUN sed -i '/^override_install_langs=/d' /etc/yum.conf
RUN yum reinstall -y glibc-common

RUN git clone https://github.com/pop8682/editx-front.git

WORKDIR editx-front/
RUN curl --silent --location https://rpm.nodesource.com/setup_10.x | bash -
RUN yum install -y nodejs
RUN npm install
RUN npm run build

WORKDIR /editx-front/build/
RUN yes | cp -af . /usr/share/nginx/html/
WORKDIR /etc/nginx
COPY nginx.conf .

EXPOSE 80

CMD ["/usr/sbin/nginx","-g","daemon off;"]
nginx를 run 커맨드로 돌리자마자 바로 실행하게 만들기
Dockerfile
FROM centos

RUN yum install -y epel-release
RUN yum update -y
RUN yum install -y nginx

ENTRYPOINT ["/usr/sbin/nginx","-g","daemon off;"]