Keras를 사용하여 간단하게 자음 이미지를 인식하는 모델을 만들어보자.
우선, 사용할 라이브러리를 추가한다.
from sklearn.model_selection import train_test_split
from tensorflow.keras.layers import Conv2D, Dropout, Dense, Flatten, MaxPooling2D
import matplotlib.pyplot as plt
from tensorflow.keras.models import Sequential
from glob import glob
import numpy as np
import cv2
학습에 사용할 이미지를 불러온 후, 모델이 학습할 수 있는 형태로 전 처리를 해준다.
categories는 분류하고자 하는 이미지의 라벨을 넣었으며, 이미지는 라벨 폴더 아래에 저장하였다.
예로, 'ㄱ'폴더 안에는 'ㄱ의 이미지' 'ㄴ'폴더 안에 'ㄴ의 이미지'를 넣었다.
label은 'ㄱ'부터 'ㅎ'까지 14개의 0으로 이루어진 리스트를 만든 후, categories에서 읽어온 correct에 해당하는 부분을 1로 하여 원-핫 인코딩을 해주었다.
categories에 해당하는 폴더를 읽어와 폴더 안에 있는 이미지를 불러온 후 64x64크기로 resize하였으며, BGR형식의 이미지를 흑백 이미지로 변환하였다.
scikit learn 라이브러리에 있는 train_test_split으로 학습 데이터와 검증 데이터를 분리한다. 테스트 데이터는 모델 학습 이후, 실제 데이터로 테스트 하였다.
path = '이미지 경로'
categories = ["ㄱ", "ㄴ", "ㄷ", "ㄹ", "ㅁ", "ㅂ", "ㅅ", "ㅇ", "ㅈ", "ㅊ", "ㅋ", "ㅌ", "ㅍ", "ㅎ"]
nb_categories = len(categories)
X = []
y = []

count = 0

for idx, correct in enumerate(categories):
    label = [0 for i in range(nb_categories)]
    label[idx] = 1
    files = glob(path + correct + '/*')

    for f in files:
        img = imread(f)
        img_resize = cv2.resize(img, (64, 64))
        img_cvtColor = cv2.cvtColor(img_resize, cv2.COLOR_BGR2GRAY)
        data = np.asarray(img_cvtColor)
        X.append(data)
        y.append(label)
        count += 1

X = np.array(X)
y = np.array(y)
X = X.reshape(count, 64, 64, 1)

X_train, X_test, y_train, y_test = train_test_split(X, y, test_size=0.2, shuffle=True, stratify=y, random_state=34)

X_train = X_train.astype('float32') / 255
X_test = X_test.astype('float32') / 255
주의 할 점은, opencv에서 cv2.imread()를 할 때 한글 경로를 인식하지 못 한다는 문제가 있다. 그래서 아래와 같이 imread()함수를 생성하여 이미지를 불러와야 한다.
def imread(filename, flags=cv2.IMREAD_COLOR, dtype=np.uint8):
    try:
        n = np.fromfile(filename, dtype)
        img = cv2.imdecode(n, flags)
        return img
    except Exception as e:
        print(e)
        return None
그 다음으로 keras 라이브러리에 있는 Sequential API를 사용하여 모델을 생성한다.
자음 이미지 학습을 위해 convolution layer에서 feature map을 추출 후, 인식하고자 하는 'ㄱ'부터 'ㅎ'까지 14개의 출력을 가진다.
model.summary()로 구조를 출력한다.
model = Sequential()
model.add(Conv2D(16, (5, 5), activation='relu', input_shape=(64,64,1)))
model.add(MaxPooling2D((2, 2)))

model.add(Conv2D(64, (3, 3), activation='relu'))
model.add(MaxPooling2D((2, 2)))

model.add(Conv2D(128, (2, 2), activation='relu'))
model.add(MaxPooling2D((2, 2)))
model.add(Flatten())

model.add(Dropout(0.4))
model.add(Dense(512, activation='relu'))
model.add(Dense(128, activation='relu'))
model.add(Dense(32, activation='relu'))
model.add(Dense(16, activation='relu'))
model.add(Dense(nb_categories, activation='sigmoid'))

model.summary()
model.compile(loss='categorical_crossentropy', optimizer='adam', metrics=['accuracy'])
history = model.fit(X_train, y_train, batch_size= 28, validation_data= (X_test, y_test), epochs= 20)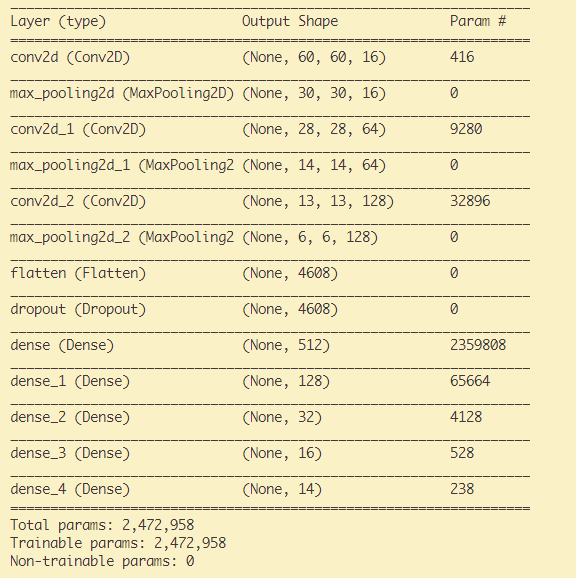
학습 결과를 그래프로 보여주는 코드는 아래와 같다.
fig, loss_ax = plt.subplots()

acc_ax = loss_ax.twinx()

loss_ax.plot(history.history['loss'],'y',label='train loss')
loss_ax.plot(history.history['val_loss'],'r',label='val loss')
acc_ax.plot(history.history['accuracy'],'b',label='train acc')
acc_ax.plot(history.history['val_accuracy'],'g',label='val acc')

loss_ax.set_xlabel('epoch')
loss_ax.set_ylabel('loss')
acc_ax.set_ylabel('accuracy')

loss_ax.legend(loc='upper left')
acc_ax.legend(loc='lower left')
plt.show()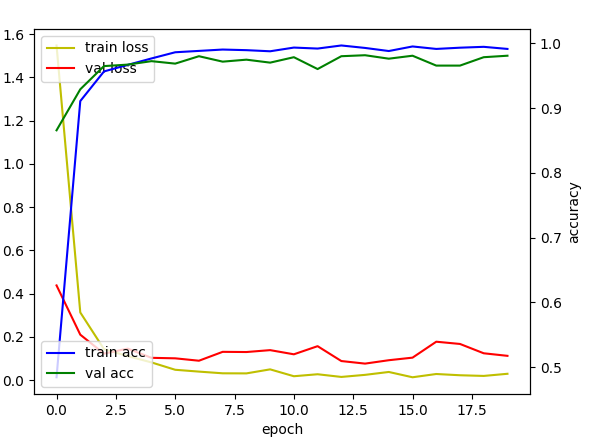
모델의 학습 결과는 학습 데이터셋 정확도 98.92% 검증 데이터셋 정확도 98.09%가 나왔다.
테스트를 위해 모델을 저장한다.
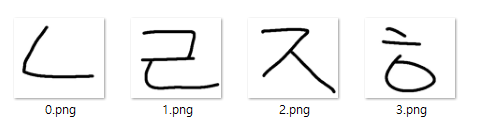
model.save('폴더명/모델명.h5')그림판으로 생성한, 아래와 같은 4개의 이미지로 모델이 인식을 정확히 하는 지 테스트해보자.
import numpy as np
import cv2
from tensorflow.keras.models import load_model
from glob import glob


def imread(filename, flags=cv2.IMREAD_COLOR, dtype=np.uint8):
    try:
        n = np.fromfile(filename, dtype)
        img = cv2.imdecode(n, flags)
        return img
    except Exception as e:
        print(e)
        return None

categories = ["ㄱ", "ㄴ", "ㄷ", "ㄹ", "ㅁ", "ㅂ",
        "ㅅ", "ㅇ", "ㅈ", "ㅊ", "ㅋ", "ㅌ", "ㅍ", "ㅎ"]

model = load_model('모델저장경로/모델명.h5')
path = '테스트 이미지 경로'
files = glob(path + '/*')

for idx, f in enumerate(files):
    A = []
    img = imread(f)
    img_resize = cv2.resize(img, (64, 64))
    img_cvtColor = cv2.cvtColor(img_resize, cv2.COLOR_BGR2GRAY)
    A.append(np.asarray(img_cvtColor))
    A = np.array(A)
    A = A.reshape(1, 64, 64, 1)
    A = A.astype('float32') / 255
    result = np.vsplit(A, 1)
    res1 = model.predict(result[0])
    res2 = np.where(res1 > 0.01)
    correct = np.argmax(res1)
    print("--------------------------------")
    print(idx,"번 이미지")
    for r in res2[1]:
        per = res1[0][r]*100
        per = round(per, 2)
        print(categories[r], " 확률: ", per, "%")
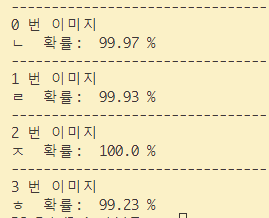 인식이 잘 되었음을 확인할 수 있다.