프론트엔드
구성순서
프론트엔드 인프라
- 0. Key-Pair
- 인스턴스에 접속하기 위한 'Key-Pair' 생성
- 1. VPC (모듈사용)
- 기타 서브넷, Nat GW, SG 등등
- 2. Security Group
- 3. EC2
- Bastion Host
- Autoscaling Group
- CloudFront 미디어 컨텐츠를 제공하는 웹 인스턴스 그룹
- 4. ALB
- 5. CloudFront
- 6. Route53
0. Key-Pair
key.tf
resource "aws_key_pair" "seunghyeon-bastion" {
  key_name = "seunghyeon-bastion"
  public_key = file("/home/sin/.ssh/project/seunghyeon-bastion.pub")
}

resource "aws_key_pair" "seunghyeon-ec2" {
  key_name = "seunghyeon-ec2"
  public_key = file("/home/sin/.ssh/project/seunghyeon-ec2.pub")
}
bastion host에 접속할 키 하나와
web ec2에 접속할 키 하나를 생성한다.
public_key에는 file 경로로 public_key를 참조하였는데 해당 키는 미리 생성이 되어 있어야 한다.
Bastion Host가 생성되면
ssh -i ~/.ssh/project/seunghyeon-bastion ec2-user@[ip-address] 로 접속할 수 있을 것이다.
1. VPC
vpc.tf
# VPC Module
module "vpc" {
  source = "git::https://github.com/SeungHyeonShin/terraform.git//modules/vpc?ref=v0.0.4"

  aws_vpc_cidr        = "10.0.0.0/16"
  aws_private_subnets = ["10.0.1.0/24"]
  aws_public_subnets  = ["10.0.11.0/24"]
  aws_region          = "ap-northeast-2"
  aws_azs             = ["ap-northeast-2a"]

  global_tags = "seunghyeon"
}
VPC는 모듈을 사용하여 생성한다.
웹 EC2가 존재할 private_subnet
Bastion_host, ELB, Nat_gateway가 존재할 public_subnets을 생성한다.
global_tags는 리소스 앞에 붙을 'string'을 지정한다.
현재 azs가 하나밖에 없지만 DR 구성을 위해서 최종적으로는 azs를 늘려줄 예정이다.
2. Security Group
sg.tf
# Bastion Host Security Group
resource "aws_security_group" "seunghyeon-bastion-sg" {
  name = "seunghyeon-bastion"
  vpc_id = module.vpc.aws_vpc_id

  ingress {
    from_port = 22
    protocol = "tcp"
    to_port = 22
    cidr_blocks = var.myip
  }

  egress {
    from_port = 0
    protocol = "-1"
    to_port = 0
    cidr_blocks = ["0.0.0.0/0"]
  }

  tags = {
    "Name" = "seunghyeon-bastion-sg"
  }
}

# EC2 Security Group
resource "aws_security_group" "seunghyeon-ec2-sg" {
  name = "seunghyeon-ec2"
  vpc_id = module.vpc.aws_vpc_id

  ingress {
    from_port = 8080
    to_port = 8080
    protocol = "tcp"
    cidr_blocks = ["0.0.0.0/0"]
  }

  ingress {
    from_port = 22
    to_port = 22
    protocol = "tcp"
    security_groups = [aws_security_group.seunghyeon-bastion-sg.id]
  }

  egress {
    from_port = 0
    protocol = "-1"
    to_port = 0
    cidr_blocks = ["0.0.0.0/0"]
  }

  tags = {
    "Name" = "seunghyeon-ec2"
  }
}

# NLB Security Group
resource "aws_security_group" "seunghyeon-nlb-sg" {
  name = "seunghyeon-nlb"
  vpc_id = module.vpc.aws_vpc_id

  ingress {
    from_port = 80
    to_port = 80
    protocol = "tcp"
    cidr_blocks = ["0.0.0.0/0"]
  }
  egress {
    from_port = 0
    protocol = "-1"
    to_port = 0
    cidr_blocks = ["0.0.0.0/0"]
  }

  tags = {
    "Name" = "seunghyeon-nlb"
  }
}
Bastion Host, 웹 EC2, NLB에 사용될 Security Group을 생성한다.
-
"aws_security_group" "seunghyeon-bastion-sg"Bastion Host는 사용자가 ssh 통신을 할 수 있어야 한다. 따라서 22번 포트를 '사용자의 IP'로 열어놓는다. -
"aws_security_group" "seunghyeon-ec2"웹 EC2에는 Bastion Host만 ssh 통신이 가능해야 하므로 22번 포트를 Bastion Host의Security Group은 접근할 수 있게 한다. (security_groups = [aws_security_group.seunghyeon-bastion-sg.id]) -
"aws_security_group" "seunghyeon-nlb-sg"nlb에는 사용자가 80번 포트로 접근을 해야하므로 80번 포트를 열어주었다.
3. EC2
ec2.tf
# Create Bastion Host
resource "aws_instance" "bastion" {
  ami = "ami-027ce4ce0590e3c98"
  instance_type = "t2.micro"
  subnet_id = element(module.vpc.public_subnets, 0)
  key_name = aws_key_pair.seunghyeon-bastion.id
  vpc_security_group_ids = [
    aws_security_group.seunghyeon-bastion-sg.id
  ]

  tags = {
    "Name" = "seunghyeon-BastionHost"
  }
}

# Create EC2 Autoscaling Groups
resource "aws_launch_configuration" "seunghyeon-lanch-config" {
  image_id = "ami-027ce4ce0590e3c98"
  instance_type = "t2.micro"
  key_name = aws_key_pair.seunghyeon-ec2.id
  security_groups = [aws_security_group.seunghyeon-ec2.id]
  user_data = <<-EOF
              #cloud-boothook
              #!/bin/bash
              sudo yum install httpd -y
              echo "<html><h1>webpage 1(whatever you want, give the page name here)</h1></html>" | sudo tee /var/www/html/index.html
              sudo sed -i '136s/80/8080/g' /etc/httpd/conf/httpd.conf
              sudo service httpd start
              sudo chkconfig httpd on
              EOF
  lifecycle {
    create_before_destroy = true #항상 기존 리소스가 삭제되기 전에 새로운 리소스를 생성한다.
  }
  # 설정안하면 없는 보안그룹의 ID가 설정됨
  depends_on = [aws_security_group.seunghyeon-ec2]
}

resource "aws_autoscaling_group" "seunghyeon-ec2" {
  launch_configuration = aws_launch_configuration.seunghyeon-lanch-config.id
  health_check_type = "ELB"
  vpc_zone_identifier = module.vpc.private_subnets

  max_size = 5
  min_size = 1

  tag {
    key     = "Name"
    value   = "seunghyeon-EC2"
    propagate_at_launch = true
  }
}-
aws_instanceBastion Host로 사용할 EC2를 생성하고 키페어, 보안그룹, 서브넷등을 지정해준다. -
aws_launch_configuration웹 EC2가 생성될 Autoscaling Group을 생성하는데 생성하기 전에 시작구성을 생성해야 한다. 시작구성에서 키페어, 보안그룹, user-data를 설정한다. [user-data 내용 추가예정] -
aws_autoscaling_groupAutoscaling Group에서 위에서 생성한 시작구성과 웹 EC2가 존재하는 서브넷(Private), 최소 최대 인스턴스 수를 지정한다.
참고사항
테라폼에서의 오토스케일링 Name tag 설정은 동적으로는 불가하다.
4. ELB
alb.tf
resource "aws_lb" "seunghyeon-lb" {
  name = "seunghyeon-alb"
  internal = false
  load_balancer_type = "network"
  subnets = module.vpc.public_subnets

  tags = {
    "Name" = "seunghyeon-lb"
  }
}

resource "aws_lb_listener" "seunghyeon-listener" {
  load_balancer_arn = aws_lb.seunghyeon-lb.arn
  port = "80"
  protocol = "TCP"

  default_action {
    target_group_arn = aws_lb_target_group.seunghyeon-target.arn
    type = "forward"
  }
}

resource "aws_lb_target_group" "seunghyeon-target" {
  name = "seunghyeon-target-group"
  port = 8080
  protocol = "TCP"
  vpc_id = module.vpc.aws_vpc_id
  target_type = "instance"

  health_check {
    port = "traffic-port"
    protocol = "TCP"
  }
}

# Attach the Instances to Load Balancer
## "Instances Data" is Using "data Resources"
resource "aws_lb_target_group_attachment" "seunghyeon-target-attach" {
  count = aws_autoscaling_group.seunghyeon-ec2.min_size

  target_group_arn = aws_lb_target_group.seunghyeon-target.arn
  target_id = element(data.aws_instances.test.ids, count.index)
  depends_on = [data.aws_instances.test]
}

# Load the aws_instances data
data "aws_instances" "test" {
  instance_tags = {
    "aws:autoscaling:groupName" = aws_autoscaling_group.seunghyeon-ec2.name
  }

  depends_on = [aws_launch_configuration.seunghyeon-lanch-config]
}-
aws_lb로 lb를 생성하고 인터넷/내부로 사용여부, 로드밸런서의 타입, 로드밸런서가 존재할 서브넷을 지정한다. -
aws_lb_listener에는 연결할 로드밸런서의 arn, 로드밸런서의 port 및 프로토콜, 타겟그룹을 지정하고 타입을 지정한다. -
aws_lb_target_group에서 로드밸런싱 대상의 port, 타겟타입, 헬스체크 여부 등을 설정한다. -
aws_lb_target_group_attachment에서 로드밸런싱할 인스턴스를 설정한다. 나는data로 ec2의 정보를 'list'로 받아 온 후에 element로 'string'으로 추출하였다. (count는 data의 length를 사용하려 했으나 'terraform apply' 과정에서 'apply'하기 전까지data의 값을 알지못해 안되는 현상이 있어서 수정함) -
data ""aws_instancesAutoscaling의 tag가 적힌 ec2의data만 받아온다.
즉, Autoscaling으로 생성된 EC2의 인스턴스만 받아옴
5. CloudFront
cloudfront는 작성해야 할 옵션들이 많으므로 공식docs를 참조해서 작성하자.
cloudfront.tf
# Create Cloud Front
resource "aws_cloudfront_distribution" "seunghyeon-cloudfront" {
  enabled = true
  default_cache_behavior {
    allowed_methods = ["GET", "HEAD"]
    cached_methods = ["GET", "HEAD"]
    target_origin_id = "seunghyeon-project"
    viewer_protocol_policy = "allow-all"
    forwarded_values {
      query_string = false
      headers = [
        "Origin",
        "Access-Control-Request-Headers",
        "Access-Control-Request-Method"
      ]
      cookies {
        forward = "none"
      }
    }
  }
  origin {
    domain_name = aws_s3_bucket.transcoded.bucket_domain_name
    origin_id = "seunghyeon-project"
    s3_origin_config {
      origin_access_identity = aws_cloudfront_origin_access_identity.seunghyeon-origin-access.cloudfront_access_identity_path
    }
  }

  restrictions {
    geo_restriction {
      restriction_type = "none"
    }
  }
  viewer_certificate {
    cloudfront_default_certificate = true
  }

  retain_on_delete = true
}

# Set S3 Bucket Policy to Access Cloud Front
data "aws_iam_policy_document" "s3_policy" {
  statement {
    actions = ["s3:GetObject"]
    resources = ["${aws_s3_bucket.transcoded.arn}/*"]
    effect = "Allow"
    principals {
      identifiers = ["*"]
      type = "*"
    }
  }
  statement {
    actions = ["s3:GetObject"]
    resources = ["${aws_s3_bucket.transcoded.arn}/*"]

    principals {
      identifiers = [aws_cloudfront_origin_access_identity.seunghyeon-origin-access.iam_arn]
      type = "AWS"
    }
  }
}
resource "aws_s3_bucket_policy" "example" {
  bucket = aws_s3_bucket.transcoded.id
  policy = data.aws_iam_policy_document.s3_policy.json
}
aws_cloudfront_distribution
enabled: (필수) 리소스 생성 후 enable/disable 여부default_cache_behavior: (필수) 기본적으로 동작할 캐시동작을 설정한다.allowed_methods: (필수) 허용할 메소드 설정cached_methods: (필수) 캐시될 메소드 설정target_origin_id: (필수) 사용할 origin ID를 적는다. (이 값으로 라우팅 된다.)viewer_protocol_policy: (필수)allow-all,https-only,redirect-to-https중 택1forwarded_valuesquery_string: (필수) 쿼리 문자열을 전달할지의 여부headers: 사용자가 접근가능한 헤더를 설정
(AWS에서의 'Cache Based on Selected Request Heders' 설정)
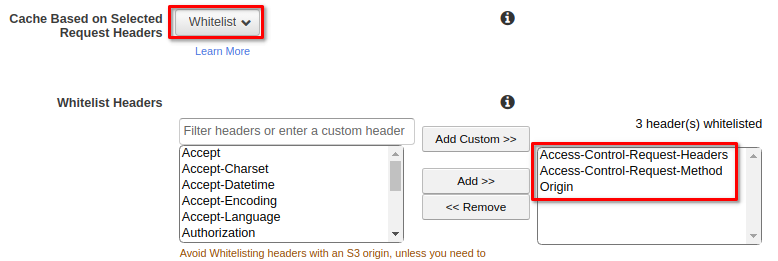
cookies(필수)forward: (필수) cookie를 요청자에게 전달할지의 여부all,none,whitelist중 택1
origindomain_name: (필수) cloudfront에 연결할 서비스의 도메인이름을 지정한다.origin_id: (필수) 연결된 서비스의 별명 (도메인네임)s3_origin_config: 우리는 S3에 Cloudfront를 연결하므로 해당값을 입력한다. 다른 서비스일 경우custom_origin_config를 사용하면 된다.origin_access_identity: S3 버킷 정책에 연결할 Cloudfront의 identity를 지정
restrictions(필수)geo_restrictionrestriction_type: (필수) 국가별로 콘텐츠를 제한할 때 사용none,whitelist,blacklist중 택1
viewer_certificate: (필수) SSL 구성cloudfront_default_certificate: 'true'일 시 HTTPS를 사용하여 객체를 요청한다. 추가로 도메인 사용 시acm_certificate_arn또는iam_certificate_id추가로 지정
retain_on_delete: 다음과 같은 이유 때문에 사용한다. 선택옵션임.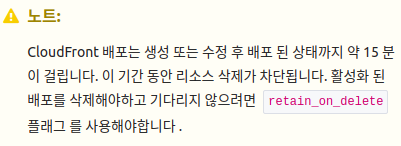
aws_cloudfront_origin_access_identity
cloudfront에 연결할 아이덴티티를 생성한다.
comment: 아이덴티티의 설명
data.aws_iam_policy_document
이 데이터 리소스는 S3에 업데이트 할 버킷을 데이터로 저장하는 역할이다.
여기서 cloudfront의 아이덴티티를 policy의 principals에 연결한다.
aws_s3_bucket_policy
'transcoded' 버킷의 정책을 위에서 생성한 데이터 리소스로 업데이트 한다.
6. Route53
route53.tf
resource "aws_route53_zone" "seunghyeon-route53" {
  name = "seunghyeon-project.com"

  tags = {
    "Name" = "seunghyeon-route53"
  }
}

resource "aws_route53_record" "seunghyeon-route53-record" {
  name = format("%s.%s", "cccr", aws_route53_zone.seunghyeon-route53.name)
  type = "A"
  zone_id = aws_route53_zone.seunghyeon-route53.id

  alias {
    evaluate_target_health = true
    name = format("%s.%s", "dualstack", aws_lb.seunghyeon-lb.dns_name)
    zone_id = aws_lb.seunghyeon-lb.zone_id
  }
}-
aws_route53_zoneroute53의 존을 생성한다. -
aws_route53_record레코드에서 dns의 타입, 그 타입에 어떤 서비스를 연결시킬 것인지 등등을 정의한다. 당연히 nlb를 가르켜야 하므로 nlb의zone_id를 지정한다.
