어제 포스트에선 위치를 받아와 state에 저장하고 렌더하는 과정에서 발생하는 버그에 대해 적었었다. 오늘은 함수들을 목적에 따라 좀 더 정리하고 리팩토링을 하였다.
-
먼저 현재 화면의 범위를 나타내는 좌표들의 집합인
currentBoundingBox를 할당해주는 action 함수가 있었지만,onRegionChangeComplete이 발생하면 bound 도 자연히 변경되기 때문에onRegionChangeComplete에 포함시켰다. -
또한 내 현재 위치로 돌아올 수 있는 커스텀 버튼이 있으면 좋겠다는 의견이 나왔는데,
requestMapPermission안에 존재하던navigator.geolocation.watchPosition을 독자적인 함수로 구분해내면 재활용을 할 수 있을 것 같아 리팩토링을 진행했다. -
그리고 현재 프로젝트에서 사용하는 지도 API 의 기능으로는
watchPosition만큼의 기능이 필요하지 않다고 판단되어getCurrentPosition으로 변경하기로 하였다.
위 세가지 내용을 합쳐 MainMap 의 componentDidMount 에서 실행시킬 requestMapPermission 의 리팩토링이 이루어졌다. 아래는 UserStore에 존재하는 함수들을 리팩토링한 코드이다.
requestMapPermission = async () => {
  try {
    const { status } = await Permissions.askAsync(Permissions.LOCATION);
    if (status === 'granted') {
      this.permissionState = true;
      this.getCurrentPosition();
    } else {
      console.log('not Granted');
      this.permissionState = false;
    }
  } catch (err) {
    console.warn(err);
  }
};

getCurrentPosition = () => {
  navigator.geolocation.getCurrentPosition(
    position => {
      const { latitude, longitude } = position.coords;
      this.onRegionChangeComplete({
        latitude,
        latitudeDelta: 0.005,
        longitude,
        longitudeDelta: 0.005,
      });
    },
    (error) => { Alert.alert(error.code, error.message); },
    { enableHighAccuracy: true, timeout: 15000, maximumAge: 10000 },
  );
}

onRegionChangeComplete = async region => {
  this.currentRegion = { ...region };
  this.currentBoundingBox = {
    NElatitude: region.latitude + region.latitudeDelta / 2, // northLat - max lat
    NElongitude: region.longitude + region.longitudeDelta / 2, // eastLng - max lng
    SWlatitude: region.latitude - region.latitudeDelta / 2, // southLat - min lat
    SWlongitude: region.longitude - region.longitudeDelta / 2, // westLng - min lng
  };
};
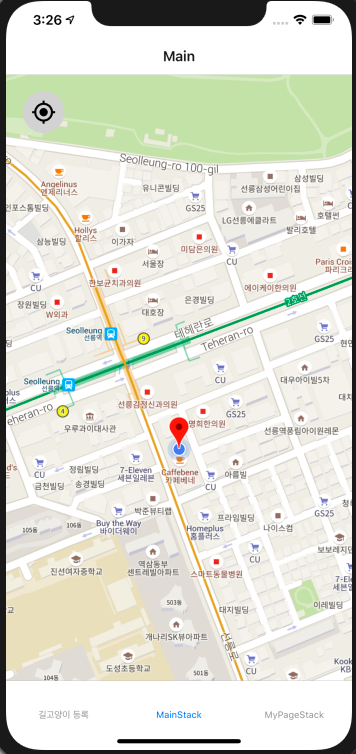
또한 MainMap 을 render 할 때 위치 권한이 허용되었는지만을 확인하는 if (permissionState === true) 이러한 조건이었지만, render가 제대로 이뤄지기 전과의 스크린을 구별하기 위해 if (permissionState === true && currentRegion.longitude !== 0) 처럼 조건을 추가하여 처음 지도가 render 될 때 위경도가 (0,0) 인 상태도 구분해주었다.
<TouchableOpacity
  onPress={() => getCurrentPosition()}
  style={{
    width: 50, height: 50, position: 'absolute', top: 20, left: 20, borderRadius: 30, backgroundColor: '#d2d2d2',
  }}
>
독자적인 함수로 구분해서 빼낸 getCurrentPosition도 current location button 을 구현할 때 사용되었다. 구현된 이미지는 아래와 같다.
그리고 오늘 새로 맡은 파트는 뉴스피드 같은 역할을 하는 CatPostList 이다. FlatList 이용하여 구현하였고, List, ScrollView 와 다른 점은 일반적인 어플의 뉴스피드에서 사용되는 Pull Down to Refresh(끌어당겨서 새로고침) 와 Infinite Scroll (화면 끝에 다다르면 새로운 요소 추가로 render) 구현이 쉽게 가능하다는 것이다. 일단 위 두 기능을 제외한 기본적인 형태는 아래와 같이 구현하였다.
import React from 'react';
import { StyleSheet, Text, View, FlatList, SafeAreaView } from 'react-native';
import CatPost from './CatPost';
import { inject, observer } from 'mobx-react';

const styles = StyleSheet.create({
  container: {
    flex: 1,
    backgroundColor: '#6772f1',
    alignItems: 'center',
    justifyContent: 'center',
  },
  radiusView: {
    flex: 1,
    width: '100%',
    backgroundColor: 'white',
    paddingTop: 50,
    borderTopLeftRadius: 50,
    borderTopRightRadius: 50,
    alignItems: 'center',
  },
});

class CatPostList extends React.Component {
  _renderItem = ({item}) => (
    <CatPost item={item}/>
  );

  render() {
    return (
    <View style={styles.container}>
      <SafeAreaView style={styles.radiusView}>
        <FlatList
          data={this.props.postList}
          renderItem={this._renderItem}
          keyExtractor={(item, index) => item.id}
          showsVerticalScrollIndicator={false}
        />
      </SafeAreaView>
    </View>
    );
  }
}


export default inject(({ cat }) => ({
  postList: cat.info.postList,
}))(
  observer(CatPostList),
);
작성한 코드의 이미지는 아래와 같다.
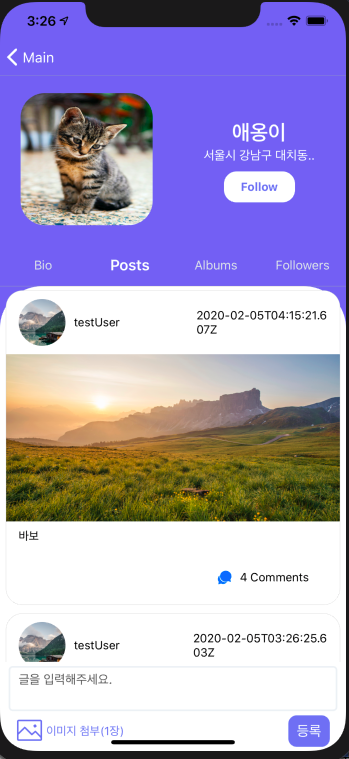
위의 사진처럼 아직은 일반적인 List, ScrollView 와 다르지 않아 보인다. 다음 포스트에서 추가된 기능으로 달라진 FlatList 에 대해 작성할 예정이다.