위젯의 속성
| 위젯 | 설명 |
|---|---|
| Button | 버튼 |
| EditText | 편집 가능 텍스트 |
| TextView | 편집 불가능 텍스트 |
| CheckBox | 체크박스 |
| RadioButton | 라디오 버튼 |
| ToggleButton | 토글 버튼 |
| Switch | 스위치 |
id
id : 뷰의 식별자
android:id="@+id/button1"match_parent vs wrap_content
match_parent : 가로 or 세로로 화면을 가득 채운다.
wrap_content : 본래 위젯의 크기로 설정한다.
android:layout_width="match_parent"
android:layout_height="wrap_content"
background vs backgroundTint
background : 레이아웃에서 배경색상을 지정할 때 사용
backgroundTint : 위젯에서 배경색상을 지정할 때 사용
android:background="#f000"
android:backgroundTint="#ff0000"
화면에 보이기 속성
| 상수 | 값 | 설명 |
|---|---|---|
| visible | 0 | 화면에 보이게 한다. 디폴트 값 |
| invisible | 1 | 표시되지 않는다. 그러나 배치에서 공간을 차지한다. |
| gone | 2 | 완전히 숨겨진다. |
android:visibility="visible"
android:visibility="invisible"
android:visibility="gone"
margin과 padding
margin : 화면과 객체와의 여백
padding : 객체 내부의 여백
android:layout_margin = "30dp"
android:padding = "10dp"
rotation 속성
rotation : 위젯을 돌림
android:rotation="45"텍스트 뷰의 속성
| XML 속성 | 설명 | 설정 메소드 |
|---|---|---|
| text | 표시할 텍스트 | setText(Char Sequence) |
| textColor | 텍스트 색상 | setTextColor(Color State List) |
| textSize | 텍스트의 크기 | setTextSize(float) |
| textStyle | 텍스트 스타일(bold, italic, bolditalic) | setTextStyle(Text Style) |
| typeface | 텍스트 폰트(normal, sans, serif, monospace) | setTypeface(Type face) |
| width | 픽셀 단위로 텍스튜 뷰의 길이 설정 | setWidth(int) |
| height | 픽셀 단위로 텍스트 뷰의 높이를 설정 | setHeight(int) |
| lines | 텍스트 뷰의 높이를 설정 | setLines(int) |
<EditText
android:text="text"
android:textColor="#ff0000"
android:textSize="20dp"
android:textStyle="bold"
android:typeface="sans"
android:width="100dp"
android:height="100dp"
android:lines="10"
/>
이미지 버튼
<ImageButton
	android:id="@+id/imageButton1"
    android:layout_width = "wrap_content"
    android:layout_height = "wrap_content"
    android:onClick = "onClick"
    android:src="@drawable/mybutton"
/>
이벤트 처리
1. xml을 이용한 이벤트 처리
android:onClick="sendMessage"public void sendMessage(View view) {
# 이벤트 처리 코드
}2. 익명 클래스를 이용한 이벤트 처리
button.setOnClickListener(new View.OnClickListener() {
	@Override
	public void onClick(View view) {
		// 처리 내용
	}
});
3. 람다식을 이용한 이벤트 처리
button.setOnclickListener((e) -> {
	// 내용 처리
});
리스너 인터페이스의 종류
| 리스너 | 콜백 메소드 |
|---|---|
| View.OnClickListener | onClick( ) |
| View.OnLongClickListener | onLongClick( ) |
| View.OnFocusChangeListener | onFocusChange( ) |
| View.OnKeyListener | onKey( ) |
| View.OnTouchListener | onTouch( ) |
익명 클래스로 이벤트 처리하기
Button b1;

b1 = (Button) findViewById(R.id.button1)

b1.setOnClickListener(new View.OnClickListener() {
	public void onClick(View view) {
    	// 여기에 작업 기술
    }
});
예제: 버튼을 누르면 토스트 메시지가 나오는 예시
<LinearLayout>
	<Button
    	android:id="@+id/button"
        android:layout_width="wrap_content"
        android:layout_height="wrap_content"
        android:padding="10dp"
        android:text="버튼을 눌러보세요"
    />
</LinearLayout>
public class MainActivity extends AppCompatActivity {
@Override
public void onCreate(Bundle savedInstanceState) {
Button button = (Button) findViewById(R.id.button);
super.onCreate(savedInstanceState);
setContentView(R.layout.activity_main);
button.setOnclickListener(new View.OnClickListener() {
public void onClick(View view) {
Toast.makeText(getApplicationContext(), "버튼이 눌러졌습니다.", Toast.LENGH_SHORT).show();
}
});
}
}에디트 텍스트
| 속성 | 설명 |
|---|---|
| android:autoText | 자동으로 타이핑 오류를 교정한다. |
| android:drawableButtom | 텍스트의 아래에 표시되는 이미지 리소스이다. |
| android:drawableRight | 텍스트 오른쪽에 표시된느 이미지 리소스이다. |
| android:editable | 편집가능 |
| android:text | 표시되는 텍스트이다. |
| android:singleLine | true이면 한 줄만 받음 |
| android:inputType | 입력의 종류 |
| android:hint | 입력 필드에 표시되는 힌트 메시지 |
<LinearLayout>
    <EditText>
        android:id="@+id/edittext"
        android:hint="여기에 텍스트를 입력하시오."
        android:inputType="text"
    />

    <TextView>
    	android:id="@+id/view"
        android:text="text"
    />
</LinearLayout>
EditText eText = (EditText) findViewById(R.id.edittext);
TextView view = (TextView) findViewById(R.id.view);
btn.setOnClickListener(new View.OnClickListener() {
public void onClick(View v) {
String str = eText.getText().toString();
view.setText(str);
}
});이미지뷰
| 속성 | 설정 메소드 | 설명 |
|---|---|---|
| android:adjustViewBounds | setAdjustViewBounds(boolean) | 종횡비 유지를 위해 이미지 뷰의 가로, 세로를 고정 |
| android:cropToPadding | true이면 패딩 안에 맞춰서 이미지를 자른다. | |
| android:maxHeight | setMaxHeight(int) | 이미지 뷰의 최대 높이 |
| android:maxWidth | setMaxWidth(int) | 이미지 뷰의 최대 너비 |
| android:scaleType | setScaleType(ImageView.ScaleType) | 이미지 뷰의 크기에 맞추어 어떻게 확대나 축소할 것인지 방법 선택 |
| android:src | setImageResource(int) | 이미지 소스 |
| android:tint | setColorFilter(int, PorterDuff.Mode) | 이미지 배경 색상 |
<ImageView
	android:id="@+id/icon"
    android:layout_width="match_parent"
    android:layout_height="match_parent"
    android:maxHeight="100dp"
    android:maxWidth="200dp"
    android:adjustViewBounds="true"
    android:tint="#80ff0000"
    android:src="@drawable/androids"
/>
코드로 텍스트 뷰 속성 변경
<LinearLayout>
	<TextView>
	android:id="@+id/textView"
    android:text="TextView"
	/>

    <TextView>
	android:id="@+id/textView2"
    android:text="TextView"
	/>

    <TextView>
	android:id="@+id/textView3"
    android:text="TextView"
	/>
</LinearLayout>
TextView view1 = (TextView) findViewById(R.id.textView);
TextView view2 = (TextView) findViewById(R.id.textView2);
TextView view3 = (TextView) findViewById(R.id.textView3);
view1.setText("자바 코드로 변경하였습니다.");
view2.setTextColor(Color.BLUE);
view2.setTextSize(60);
view3.setTypeface(Typeface.SERIF, Typeface.ITALIC);주사위 던지기
<ImageView
    android:id="@+id/image"
    android:layout_width="wrap_content"
    android:layout_height="wrap_content"
    android:src="@drawable/dice1"
    android:layout_gravity="center"
    android:layout_marginTop="30dp"
/>

<Button
    android:id="@+id/button"
    android:layout_width="wrap_content"
    android:layout_height="wrap_content"
    android:text="ROLL"
    android:layout_marginTop="50dp"
    android:layout_gravity="center"
/>
int n = (int)(Math.random() * 6);
button.setOnClickListener(new View.OnClickListener() {
@Override
public void onClick(View view) {
int n = (int)(Math.random()*6);
if (n == 0)
image.setImageResource(R.drawable.dice1);
else if (n == 1)
image.setImageResource(R.drawable.dice2);
else if (n == 2)
image.setImageResource(R.drawable.dice3);
else if (n == 3)
image.setImageResource(R.drawable.dice4);
else if (n == 4)
image.setImageResource(R.drawable.dice5);
else
image.setImageResource(R.drawable.dice6);
}
});레이아웃의 종류
| 레이아웃 클래스 | 설명 |
|---|---|
| LinearLayout | 자식들을 수직이나 수평으로 배치 |
| TableLayout | 자식들을 테이블 형태로 배치 |
| GridLayout | 자식들을 바둑판 모양으로 배치 |
| RelativeLayout | 자식들을 부모나 다른 자식에 상대적으로 배치 |
| ConstraintLayout | 자식들을 부모나 다른 자식에 상대적으로 배치 |
| TabLayout | 탭을 이용하여서 겹쳐진 자식 중에서 하나를 선택 |
| AbsoluteLayout | 절대 위치로 배치 |
| FrameLayout | 모든 자식들을 겹치게 배치 |
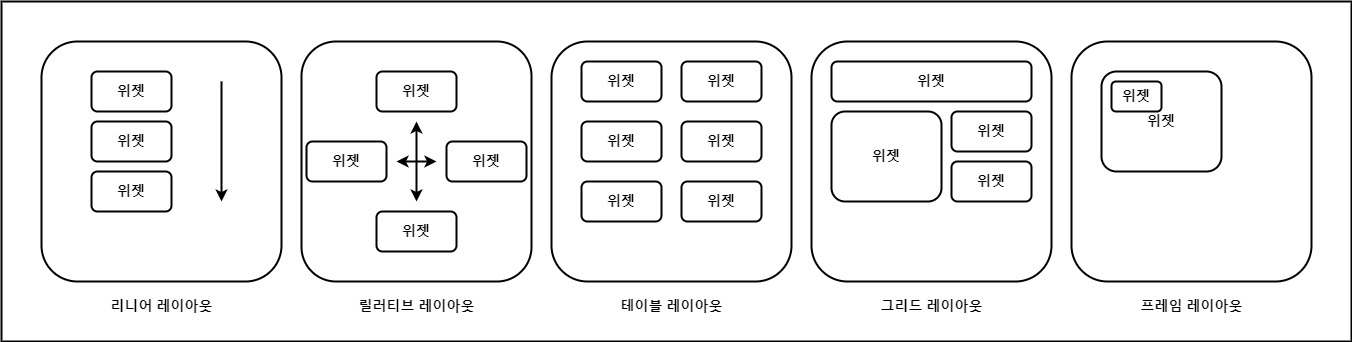
리니어 레이아웃
| 속성 | 관련 메소드 | 설명 |
|---|---|---|
| orientation | setOrientation(int) | "horizontal"은 수평으로, "vertical"은 수직으로 배치 |
| gravity | setGravity(int) | x축과 y축 상에 자식을 어떻게 배치할 것인지를 지정 |
| baselineAligned | setBaselineAligned(boolean) | false로 설정되면 자식뷰들의 기준선을 정렬하지 않는다. |
layout_gravity vs gravity
gravity ⇾ 내 자식들을 어디에 위치 시킬지
layout_gravity ⇾ 나를 부모의 어느 위치에 위치시킬지
android:gravity="top"
android:gravity="bottom"
android:gravity="left"
android:gravity="right"
android:gravity="center"
가중치 (weight)
weight 가 1, 2, 3 이면, 공간의 1/6, 2/6, 3/6 을 각각 차지
default option 은 0
<LinearLayout xmlns:android="http://schemas.android.com/apk/res/android"
    android:layout_width="match_parent"
    android:layout_height="match_parent"
    android:orientation="horizontal"
    android:layout_margin="10dp"
    >

    <Button
        android:layout_width="wrap_content"
        android:layout_height="wrap_content"
        android:text="Button 1"
        android:layout_weight="1"
        android:layout_marginRight="5dp"
    />

    <Button
        android:layout_width="wrap_content"
        android:layout_height="wrap_content"
        android:text="Button 2"
        android:layout_weight="3"
        android:layout_marginRight="5dp"
    />

    <Button
        android:layout_width="wrap_content"
        android:layout_height="wrap_content"
        android:text="Button 3"
        android:layout_weight="5"
        android:layout_marginRight="5dp"
    />

</LinearLayout>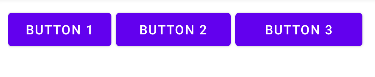
중첩 레이아웃
<LinearLayout xmlns:android="http://schemas.android.com/apk/res/android"
    android:layout_width="match_parent"
    android:layout_height="match_parent"
    android:orientation="vertical"
    android:background="#FFFFFF">

    <LinearLayout
        android:layout_width="match_parent"
        android:layout_height="344dp"
        android:background="#00FF00">
    </LinearLayout>

    <LinearLayout
        android:layout_width="match_parent"
        android:layout_height="387dp"
        android:orientation="horizontal">

        <LinearLayout
            android:layout_width="214dp"
            android:layout_height="match_parent"
            android:orientation="vertical"
            android:background="#0000FF">

            <LinearLayout
                android:layout_width="match_parent"
                android:layout_height="195dp"
                android:background="#FF0000">
            </LinearLayout>

        </LinearLayout>
    </LinearLayout>
</LinearLayout>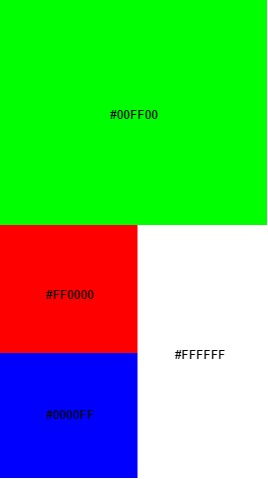
테이블 레이아웃
자식 뷰들을 테이블 형태로 배치
하나의 테이블은 여러 개의 TableRow 객체로 이루어지고 하나의 TableRow 안에는 여러 개의 셀(cell) 들이 들어가 있습니다.
<TableLayout xmlns:android="http://schemas.android.com/apk/res/android"
    android:layout_width="match_parent"
    android:layout_height="match_parent"
    android:padding="10dp">

    <TableRow
        android:gravity="center">
        <Button
            android:text="Button"
            android:layout_marginRight="10dp"/>
        <Button
            android:text="Button"
            android:layout_marginRight="10dp"/>
        <Button
            android:text="Button"
            android:layout_marginRight="10dp"/>
    </TableRow>

</TableLayout>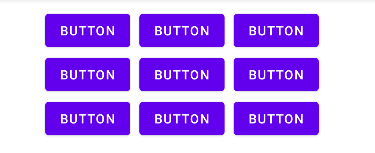
테이블 레이아웃으로 계산기 만들기
<TableLayout xmlns:android="http://schemas.android.com/apk/res/android"
    android:layout_width="match_parent"
    android:layout_height="match_parent"
    android:padding="10dp">

    <EditText
        android:layout_width="match_parent"
        android:layout_height="wrap_content"
        />

    <TableRow
        android:layout_weight="1">
        <Button
            android:layout_width="0dp"
            android:layout_height="fill_parent"
            android:text="1"
            android:layout_weight="1"
            android:layout_marginRight="10dp"
            />

        <Button
            android:layout_width="0dp"
            android:layout_height="fill_parent"
            android:text="2"
            android:layout_weight="1"
            android:layout_marginRight="10dp"
            />

        <Button
            android:layout_width="0dp"
            android:layout_height="fill_parent"
            android:text="3"
            android:layout_weight="1"
            android:layout_marginRight="10dp"
            />
    </TableRow>

    <TableRow
        android:layout_weight="1">
        <Button
            android:layout_width="0dp"
            android:layout_height="fill_parent"
            android:text="4"
            android:layout_weight="1"
            android:layout_marginRight="10dp"
            />

        <Button
            android:layout_width="0dp"
            android:layout_height="fill_parent"
            android:text="5"
            android:layout_weight="1"
            android:layout_marginRight="10dp"
            />

        <Button
            android:layout_width="0dp"
            android:layout_height="fill_parent"
            android:text="6"
            android:layout_weight="1"
            android:layout_marginRight="10dp"
            />
    </TableRow>

    <TableRow
        android:layout_weight="1">
        <Button
            android:layout_width="0dp"
            android:layout_height="fill_parent"
            android:text="1"
            android:layout_weight="1"
            android:layout_marginRight="10dp"
            android:visibility="invisible"
            />

        <Button
            android:layout_width="0dp"
            android:layout_height="fill_parent"
            android:text="0"
            android:layout_weight="1"
            android:layout_marginRight="10dp"
            />

        <Button
            android:layout_width="0dp"
            android:layout_height="fill_parent"
            android:text="CLEAR"
            android:layout_weight="1"
            android:layout_marginRight="10dp"
            />
    </TableRow>

    <Button
        android:layout_width="match_parent"
        android:layout_height="wrap_content"
        android:text="OK"
        />

</TableLayout>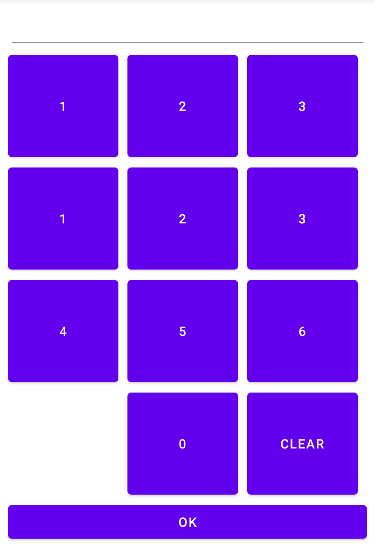
상대적 레이아웃
자식 뷰의 위치를 부모 뷰나 다른 자식 뷰들에 상대적으로 지정하는 방법
| 속성 | 설명 |
|---|---|
| layout_above | 만약 true이면 현재 뷰의 하단을 기준 뷰의 위에 일치시킨다. |
| layout_below | 현재 뷰의 상단을 기준 뷰의 하단에 위치시킨다. |
| layout_centerHorizontal | 수평으로 현재 뷰의 중심을 부모와 일치시킨다. |
| layout_centerInParent | 부모의 중심선에 현재 뷰를 위치시킨다. |
| layout_centerVertical | 수직으로 현재 뷰의 중심을 부모와 일치시킨다. |
| layout_toLeftOf | 현재 뷰의 우측단을 기준 뷰의 좌측단에 위치시킨다. |
| layout_toRightOf | 현재 뷰의 좌측단을 기준 뷰의 우측단에 위치시킨다. |
<RelativeLayout xmlns:android="http://schemas.android.com/apk/res/android"
    android:layout_width="match_parent"
    android:layout_height="match_parent"
    android:padding="10dp">

    <TextView
        android:id="@+id/address"
        android:layout_width="match_parent"
        android:layout_height="wrap_content"
        android:text="주소를 입력하세요"
        android:layout_alignParentTop="true"/>

    <EditText
        android:id="@+id/input"
        android:layout_width="match_parent"
        android:layout_height="wrap_content"
        android:layout_below="@id/address"/>

    <Button
        android:id="@+id/cancel"
        android:layout_width="wrap_content"
        android:layout_height="wrap_content"
        android:text="취소"
        android:layout_below="@id/input"
        android:layout_alignParentRight="true"
        android:layout_marginLeft="10dp"/>

    <Button
        android:layout_width="wrap_content"
        android:layout_height="wrap_content"
        android:text="확인"
        android:layout_toLeftOf="@id/cancel"
        android:layout_alignBaseline="@id/cancel"/>

</RelativeLayout>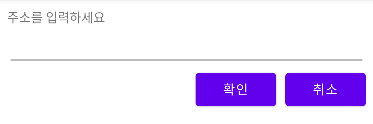
<RelativeLayout xmlns:android="http://schemas.android.com/apk/res/android"
    android:layout_width="match_parent"
    android:layout_height="match_parent"
    android:layout_margin="5dp">

    <Button
        android:id="@+id/center"
        android:layout_width="wrap_content"
        android:layout_height="wrap_content"
        android:text="중"
        android:layout_centerVertical="true"
        android:layout_centerHorizontal="true"
        />

    <Button
        android:id="@+id/north"
        android:layout_width="wrap_content"
        android:layout_height="wrap_content"
        android:text="북"
        android:layout_centerHorizontal="true"
        />

    <Button
        android:id="@+id/west"
        android:layout_width="wrap_content"
        android:layout_height="wrap_content"
        android:text="서"
        android:layout_centerVertical="true"
        />

    <Button
        android:id="@+id/east"
        android:layout_width="wrap_content"
        android:layout_height="wrap_content"
        android:text="동"
        android:layout_alignParentRight="true"
        android:layout_centerVertical="true"
        />

    <Button
        android:id="@+id/south"
        android:layout_width="wrap_content"
        android:layout_height="wrap_content"
        android:text="남"
        android:layout_alignParentBottom="true"
        android:layout_centerHorizontal="true"
        />
</RelativeLayout>
<RelativeLayout xmlns:android="http://schemas.android.com/apk/res/android"
    android:layout_width="match_parent"
    android:layout_height="match_parent"
    android:layout_margin="5dp">

    <TextView
        android:id="@+id/base"
        android:layout_width="200dp"
        android:layout_height="150dp"
        android:background="#673AB7"
        android:layout_centerHorizontal="true"
        android:layout_centerVertical="true"
        android:text="Base"
        android:textSize="40dp"
        android:gravity="center"
        />

    <Button
        android:id="@+id/b1"
        android:layout_width="wrap_content"
        android:layout_height="wrap_content"
        android:text="1"
        android:layout_toLeftOf="@id/base"
        android:layout_alignTop="@id/base"
        />

    <Button
        android:id="@+id/b2"
        android:layout_width="wrap_content"
        android:layout_height="wrap_content"
        android:text="2"
        android:layout_toLeftOf="@id/base"
        android:layout_below="@id/b1"
        />

    <Button
        android:layout_width="wrap_content"
        android:layout_height="wrap_content"
        android:text="3"
        android:layout_toLeftOf="@id/base"
        android:layout_below="@id/b2"
        />

    <Button
        android:layout_width="wrap_content"
        android:layout_height="wrap_content"
        android:text="4"
        android:layout_alignRight="@id/base"
        android:layout_above="@id/base"
        />

    <Button
        android:layout_width="wrap_content"
        android:layout_height="wrap_content"
        android:text="5"
        android:layout_alignRight="@id/base"
        android:layout_below="@id/base"
        />

</RelativeLayout>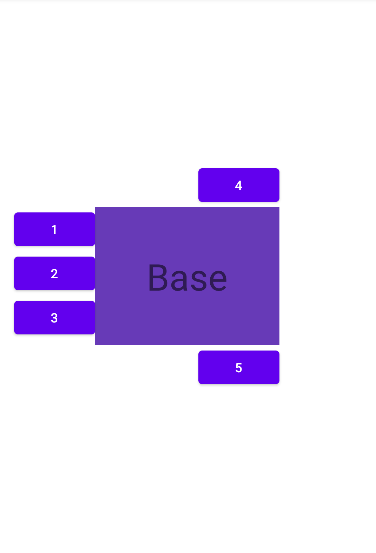
<RelativeLayout xmlns:android="http://schemas.android.com/apk/res/android"
    android:layout_width="match_parent"
    android:layout_height="match_parent"
    android:layout_margin="5dp">

    <Button
        android:id="@+id/b1"
        android:layout_width="wrap_content"
        android:layout_height="wrap_content"
        android:text="1"
        />

    <Button
        android:id="@+id/b2"
        android:layout_width="wrap_content"
        android:layout_height="wrap_content"
        android:text="2"
        android:layout_below="@id/b1"
        android:layout_alignParentRight="true"
        />

    <Button
        android:id="@+id/b4"
        android:layout_width="wrap_content"
        android:layout_height="wrap_content"
        android:text="4"
        android:layout_centerVertical="true"
        android:layout_alignParentRight="true"
        />

    <Button
        android:id="@+id/b3"
        android:layout_width="wrap_content"
        android:layout_height="wrap_content"
        android:text="3"
        android:layout_above="@id/b4"
        android:layout_toRightOf="@id/b1"
        />
</RelativeLayout>
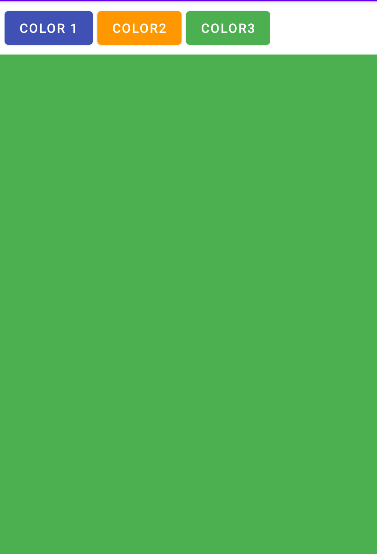
프레임 레이아웃
자식 뷰들은 등장하는 순서대로 화면에 표시됩니다.
만약 자식 뷰가 어러 개이면 이전에 추가된 자식 위에 새로운 자식이 중첩되어 그려집니다.
<LinearLayout xmlns:android="http://schemas.android.com/apk/res/android"
    android:layout_width="match_parent"
    android:layout_height="match_parent"
    android:orientation="vertical">

    <LinearLayout
        android:layout_width="wrap_content"
        android:layout_height="wrap_content"
        android:orientation="horizontal"
        android:layout_margin="5dp">

        <Button
            android:id="@+id/b1"
            android:layout_width="wrap_content"
            android:layout_height="wrap_content"
            android:onClick="onClick"
            android:backgroundTint="#3F51B5"
            android:text="COLOR 1"
            android:layout_marginRight="5dp"
            />

        <Button
            android:id="@+id/b2"
            android:layout_width="wrap_content"
            android:layout_height="wrap_content"
            android:onClick="onClick"
            android:backgroundTint="#FF9800"
            android:text="COLOR2"
            android:layout_marginRight="5dp"
            />

        <Button
            android:id="@+id/b3"
            android:layout_width="wrap_content"
            android:layout_height="wrap_content"
            android:onClick="onClick"
            android:backgroundTint="#4CAF50"
            android:text="COLOR3"
            />

    </LinearLayout>

    <FrameLayout
        android:layout_width="match_parent"
        android:layout_height="match_parent">

        <TextView
            android:id="@+id/view1"
            android:layout_width="match_parent"
            android:layout_height="match_parent"
            android:background="#3F51B5"/>

        <TextView
            android:id="@+id/view2"
            android:layout_width="match_parent"
            android:layout_height="match_parent"
            android:background="#FF9800"/>

        <TextView
            android:id="@+id/view3"
            android:layout_width="match_parent"
            android:layout_height="match_parent"
            android:background="#4CAF50"/>

    </FrameLayout>

</LinearLayout>
public class MainActivity extends AppCompatActivity {
TextView tv1, tv2, tv3;
@Override
protected void onCreate(Bundle savedInstanceState) {
super.onCreate(savedInstanceState);
setContentView(R.layout.activity_main);
tv1 = findViewById(R.id.view1);
tv2 = findViewById(R.id.view2);
tv3 = findViewById(R.id.view3);
}
public void onClick(View view){
tv1.setVisibility(View.INVISIBLE);
tv2.setVisibility(View.INVISIBLE);
tv3.setVisibility(View.INVISIBLE);
switch (view.getId()) {
case R.id.b1:
tv1.setVisibility(View.VISIBLE);
break;
case R.id.b2:
tv2.setVisibility(View.VISIBLE);
break;
case R.id.b3:
tv3.setVisibility(View.VISIBLE);
break;
}
}
}