1. 개요
프로그래밍에 있어 보안은 기본적인 사항이면서도 가장 중요한 사항일 것이다. 특정 기능들은 어플리케이션 요구 사항에 따라 구현을 할 수도, 하지 않을 수도 있지만 보안 사항을 빼고 개발하는 경우는 드물다.
보안은 중요한만큼 사용자 인증, 메세지 암호화, 무결성 등 다양한 관점에서 다룰 수 있지만, 이 포스팅에서는 REST API 대해 OAuth2.0을 이용한 사용자 인증 방식을 적용하는 것을 다룬다.
- OAuth - Open Authorization
이 포스팅에서는 OAuth2.0의 권한 코드 승인 방식에 대해서만 다룰 것이다.
사용자 인증 방식 종류
인증 방식은 여러 종류가 있지만 일반적으로 아래 두 가지 방식을 많이 사용한다.
1. API Key
API 인증에 대한 가장 기초적인 방식으로 사용자에게 발급한 API Key(고유한 식별 문자열)를 제공하여 유효한 API Key를 가진 사용자에게만 리소스(API)를 제공하는 방식이다.
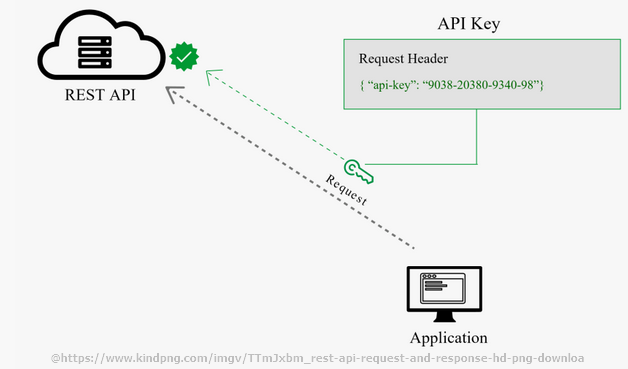
한번 API key가 노출되면 전체 API가 뚫리기 때문에 높은 보안 인증을 요구하는 경우에는 권장하지 않는다.
2. OAuth
인증 서버(자체구축, Google, Facebook, Kakao, Naver 등)를 통해 인증 받은 Token을 이용해 검증된 사용자에게만 리소스(API)를 제공하는 방식이다.
OAuth는 아래의 토큰 전송 방법을 지정하는 권한 부여 인증 프레임워크이다.
1. 권한 승인 코드
2. 암시적 승인 코드
3. 비밀번호 자격 증명
4. 클라이언트 자격 증명
OAuth2.0에서 사용하는 토큰의 종류는 크게 2가지 이다.
- Bearer Token
- Json Web Token
토큰에 대한 자세한 내용은 아래 구현부에서 다루겠다.

API Key보다 안전하고 명확한 사용자 인증이 가능하지만 구현 난이도는 더 높다. 현재는 OAuth2.0이 최신 버전이며 해당 버전의 사용을 권장한다.
2. 구현 코드
Google, Facebook 등의 이미 잘 구현된 Service Provider를 사용한 OAuth 적용 예제는 잘 설명된 블로그가 많기 때문에 생략하고 Service Provider(인증서버/리소스서버)를 자체 구축하는 방법에 대해 알아보려고 한다.
물론 현업에서는 가능한 제공되는 Service Provider를 사용하는 것을 추천한다.
이 포스팅에서 자체 구축하는 이유는 Token의 제어 동작 과정에 대한 세부 사항을 직접 코딩함으로써 전체 아키텍처에 대한 이해도를 높이기 위함이다.
전체 소스 코드는 아래 Github를 참고하고 여기서는 필수 코드들만 설명할 것이다.
전체 소스 코드
https://github.com/skysoo/oauth2-authentication-resource-client.git
2-1. 필수 Maven Dependency
아래 모두 이번 포스팅에 있어 필요한 라이브러리들이지만 인증 서버를 구축하는데 있어 가장 중요한 라이브러리는 spring-security-oauth2 이다.
        <dependency>
            <groupId>org.springframework.security.oauth</groupId>
            <artifactId>spring-security-oauth2</artifactId>
            <version>2.3.8.RELEASE</version>
        </dependency>

        <dependency>
            <groupId>org.springframework.security</groupId>
            <artifactId>spring-security-jwt</artifactId>
            <version>1.1.1.RELEASE</version>
        </dependency>
물론 이 외에도 DB관련, 개발 편의성을 위한 Lombok, Gson 등의 라이브러리를 추가하지만, 그 부분은 각자의 개발 환경에 따라 구축하길 바란다.
2-2. 인증 정보 DB 테이블
각자 사용하는 DB에 아래 테이블들을 생성한다.
create table oauth_client_details (
                                      client_id VARCHAR(256) PRIMARY KEY,
                                      resource_ids VARCHAR(256),
                                      client_secret VARCHAR(256),
                                      scope VARCHAR(256),
                                      authorized_grant_types VARCHAR(256),
                                      web_server_redirect_uri VARCHAR(256),
                                      authorities VARCHAR(256),
                                      access_token_validity INTEGER,
                                      refresh_token_validity INTEGER,
                                      additional_information VARCHAR(4096),
                                      autoapprove VARCHAR(256)
);

create table oauth_client_token (
                                    token_id VARCHAR(256),
                                    token BYTEA,
                                    authentication_id VARCHAR(256) PRIMARY KEY,
                                    user_name VARCHAR(256),
                                    client_id VARCHAR(256)
);

create table oauth_access_token (
                                    token_id VARCHAR(256),
                                    token BYTEA,
                                    authentication_id VARCHAR(256) PRIMARY KEY,
                                    user_name VARCHAR(256),
                                    client_id VARCHAR(256),
                                    authentication BYTEA,
                                    refresh_token VARCHAR(256)
);

create table oauth_refresh_token (
                                     token_id VARCHAR(256),
                                     token BYTEA,
                                     authentication BYTEA
);

create table oauth_code (
                            code VARCHAR(256), authentication BYTEA
);

create table oauth_approvals (
                                 userId VARCHAR(256),
                                 clientId VARCHAR(256),
                                 scope VARCHAR(256),
                                 status VARCHAR(10),
                                 expiresAt TIMESTAMP,
                                 lastModifiedAt TIMESTAMP
);


-- customized oauth_client_details table
create table ClientDetails (
                               appId VARCHAR(256) PRIMARY KEY,
                               resourceIds VARCHAR(256),
                               appSecret VARCHAR(256),
                               scope VARCHAR(256),
                               grantTypes VARCHAR(256),
                               redirectUrl VARCHAR(256),
                               authorities VARCHAR(256),
                               access_token_validity INTEGER,
                               refresh_token_validity INTEGER,
                               additionalInformation VARCHAR(4096),
                               autoApproveScopes VARCHAR(256)
);


create table user_info (
                                          uid VARCHAR(256) PRIMARY KEY,
                                          password VARCHAR(256),
                                          name VARCHAR(256),
                                          provider VARCHAR(256),
                                          roles VARCHAR(256)
);
2.3 인증 서버 Config
@Configuration
@RequiredArgsConstructor
@EnableAuthorizationServer
public class Oauth2AuthorizationServer extends AuthorizationServerConfigurerAdapter {

    private final DataSource dataSource;
    private final PasswordEncoder passwordEncoder;
    private final CustomUserDetailService userDetailsService;
    private final CommonConfiguration commonConfiguration;

    @Value("${spring.security.oauth2.jwt.signkey}")
    private String signKey;

    // 요청 사용자의 인증 정보를 DB에서 검증
    @Override
    public void configure(ClientDetailsServiceConfigurer clients) throws Exception {
    	clients.jdbc(dataSource).passwordEncoder(passwordEncoder);
    }

    /**
     * 단순 Baerer 방식 / Baerer + JWT 방식

     * Baerer 방식 : 단순 문자열 토큰 발급 -> DB 저장
     * JWT 방식 : Json String이 암호화된 문자열 토큰으로 토큰안에 특정 정보(사용자 정보)를 같이 셋팅한다.

     * JWT 방식은 토큰에 사용자 정보가 있으므로 DB에서 토큰 유효성을 검증할 필요가 없기 때문에 DB는 사용하지 않는다.

     **/
    @Override
    public void configure(AuthorizationServerEndpointsConfigurer endpoints) throws Exception {
        switch (valueOf(commonConfiguration.getTokenType())){
            case BEARER:
                endpoints.tokenStore(new JdbcTokenStore(dataSource));
                break;
            case JWT:
                super.configure(endpoints);
                endpoints.accessTokenConverter(jwtAccessTokenConverter())
                        .userDetailsService(userDetailsService);
                break;
            default:
                throw new IllegalStateException("Unexpected value: " + valueOf(commonConfiguration.getTokenType()));
        }
    }

    // jwt converter를 빈 등록
    @Bean
    public JwtAccessTokenConverter jwtAccessTokenConverter() {
        JwtAccessTokenConverter converter = new JwtAccessTokenConverter();
        converter.setSigningKey(signKey);
        return converter;
    }
}
2.4 Spring Security Config
@Configuration
@EnableWebSecurity
public class SecurityConfiguration extends WebSecurityConfigurerAdapter {
    private final CustomAuthenticationProvider customAuthenticationProvider;

    public SecurityConfiguration(CustomAuthenticationProvider customAuthenticationProvider) {
        this.customAuthenticationProvider = customAuthenticationProvider;
    }

    @Override
    protected void configure(AuthenticationManagerBuilder auth) throws Exception {
    	auth.authenticationProvider(customAuthenticationProvider);
    }

    @Override
    protected void configure(HttpSecurity http) throws Exception {
        http
                .csrf().disable()
                .headers().frameOptions().disable()
                .and()
                .authorizeRequests().antMatchers("/oauth/**",
                "/oauth/token",
                "/oauth2/callback",
                "/h2-console/*").permitAll()
                .and()
                .formLogin().and()
                .httpBasic();
    }
}
2.5 token 제어 컨트롤러
@Log4j2
@RequiredArgsConstructor
@RestController
@RequestMapping("/oauth2")
public class Oauth2Controller {

    private final Gson gson;
    private final RestTemplate restTemplate;
    private final CommonConfiguration commonConfiguration;

    /**
     * 인증 서버로부터 Token을 발급 받는 로직
     **/
    @GetMapping(value = "/callback")
    public OAuthToken accessToken(@RequestParam String code) {

        // clientId와 clientSecret 으로 신원을 구분하는데, 필자는 해당 값을 config 로 빼놓았다.
        // 뒤에 application.yml 파일에서 확인하자.
        String credentials = commonConfiguration.getClientId() + ":" + commonConfiguration.getClientSecret();
        String encodedCredentials = new String(Base64.encodeBase64(credentials.getBytes()));

        HttpHeaders headers = new HttpHeaders();
        headers.setContentType(MediaType.APPLICATION_FORM_URLENCODED);
        headers.add("Authorization", "Basic " + encodedCredentials);

        // 인증 서버로부터 Access Token 을 발급 받기 위해 필요한 파라미터 생성
        MultiValueMap<String, String> params = new LinkedMultiValueMap<>();
        params.add("code", code); // 승인 코드
        params.add("grant_type", "authorization_code"); // 권한 코드 승인 방식을 사용
        params.add("redirect_uri", "http://localhost:8080/oauth2/callback");
        HttpEntity<MultiValueMap<String, String>> request = new HttpEntity<>(params, headers);

        // Access Token 발급 요청
        ResponseEntity<String> response = restTemplate.postForEntity("http://localhost:8080/oauth/token", request, String.class);

        if (response.getStatusCode() == HttpStatus.OK) {
            return gson.fromJson(response.getBody(), OAuthToken.class);
        }
        return null;
    }


    /**
     * refresh Token 을 사용하여 새 Token을 발급 받는 로직
     * 권한 코드 승인 방식에서 사용한다.
     **/
    @GetMapping(value = "/token/refresh")
    public OAuthToken refreshToken(@RequestParam String refreshToken) {
        String credentials = commonConfiguration.getClientId() + ":" + commonConfiguration.getClientSecret();
        String encodedCredentials = new String(Base64.encodeBase64(credentials.getBytes()));

        HttpHeaders headers = new HttpHeaders();
        headers.setContentType(MediaType.APPLICATION_FORM_URLENCODED);
        headers.add("Accept", MediaType.APPLICATION_JSON_VALUE);
        headers.add("Authorization", "Basic " + encodedCredentials);

        MultiValueMap<String, String> params = new LinkedMultiValueMap<>();
        params.add("refresh_token", refreshToken);
        params.add("grant_type", "refresh_token");
        HttpEntity<MultiValueMap<String, String>> request = new HttpEntity<>(params, headers);
        ResponseEntity<String> response = restTemplate.postForEntity("http://localhost:8080/oauth/token", request, String.class);
        if (response.getStatusCode() == HttpStatus.OK) {
            return gson.fromJson(response.getBody(), OAuthToken.class);
        }
        return null;
    }
}
2.6 application.yml
# springboot
server:
  port: 8080

# SPRING 설정
spring:
  datasource:
    url: jdbc:postgresql://<DB IP:PORT>/postgres
    driver-class-name: org.postgresql.Driver
    username: <DB USER>
    password: <DB PW>
  security:
    oauth2:
      jwt:
        signkey: 123!@#

common:
  # token-type : JWT or BEARER
  token-type: BEARER
  client-id: testClientId
  client-secret: testSecret
2.7 인증 Client 정보 생성
2.7.1 client_secret 컬럼에 들어갈 PW 값의 인코딩 값을 만든다.
아래에서 출력되는 passwordEncoder 값({bcrypt}2a$10H2oQgFY7qCRHWqkvAV4P6ONy2v74wfr3fQv.xERw3BJYSqh/Gcgrq)을 2.7.2의 DB Insert시, client_secret 컬럼 값으로 사용한다.
    @Test
    void contextLoads() {
        PasswordEncoder passwordEncoder = PasswordEncoderFactories.createDelegatingPasswordEncoder();
        System.out.println(passwordEncoder.encode("testSecret : " + passwordEncoder.encode("testSecret")));
    }
2.7.2 인증시에 사용할 Client info 값을 Insert 한다.
insert into oauth_client_details(client_id, resource_ids,client_secret,scope,authorized_grant_types,web_server_redirect_uri,authorities,access_token_validity,refresh_token_validity,additional_information,autoapprove)
values('testClientId',null,'{bcrypt}$2a$10$H2oQgFY7qCRHWqkvAV4P6ONy2v74wfr3fQv.xERw3BJYSqh/Gcgrq','read,write','authorization_code,refresh_token','http://localhost:8080/oauth2/callback','ROLE_USER',36000,50000,null,null);
2.8 인증 User 정보 생성
로그인시 사용할 인증 정보를 생성하여 DB에 Insert 한다.
이 때, 비밀번호는 반드시 Encoding 값을 사용하고 roles은 "ROLE_" 로 시작하는 값을 넣어야 한다.
    @Test
    public void insertUserTest() throws Exception {
        UserVo userVo = UserVo.builder()
                .uid("skysoo1111@test.com")
                .password(passwordEncoder.encode("1234"))
                .name("pss")
                .roles("ROLE_USER")
                .build();

        userMapper.insertData(userVo);
    }
여기까지하면 인증 서버 구축을 완료한 것이다. 이제 작성한 프로그램을 기동해서 인증 서버를 올려서 테스트해보자.
2.9 인증 서버 기동 1 - Bearer Token 방식
application.yml 파일에서 아래 값을 BEARER로 설정
common.token-type: BEARER2.9.1 Access Token 얻기
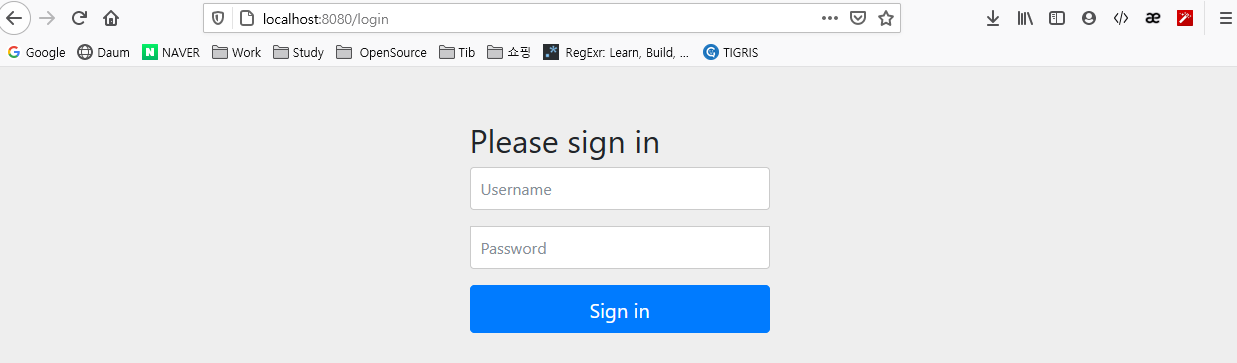
인증 서버를 기동하고 아래 url을 호출하면 아래와 같이 로그인 폼이 나온다.
여기서 유효한 사용자 정보(DB에 들어있는 User 정보)로 로그인을 하면
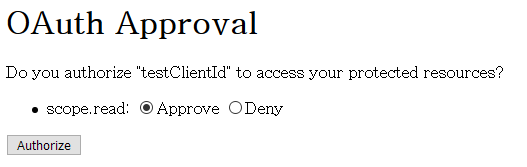
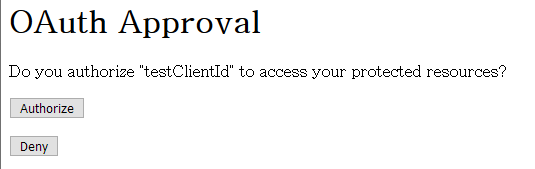
아래와 같이 권한 승인 여부를 묻는다.
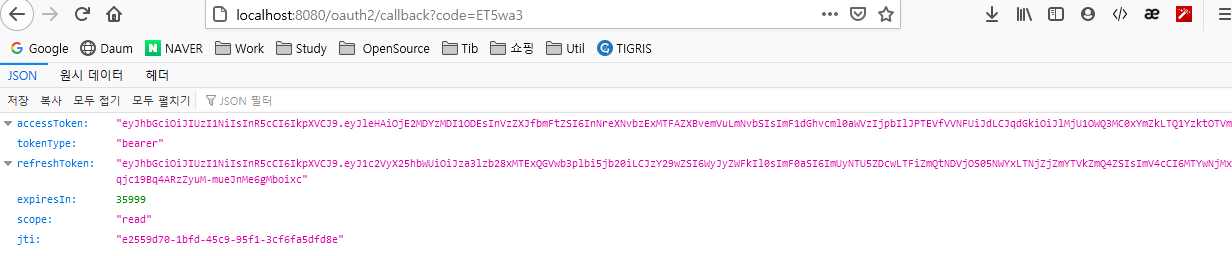
권한 승인을 하면 아래처럼 token 값을 얻을 수 있다.

Url을 보면 code값이 찍혀있는데, 이는 우리가 인증 승인 종류 중 권한 코드 승인 방식으로 구현했기 때문이다.
Resource Owner는 저 코드 값으로 토큰을 발급 받는 것이다.
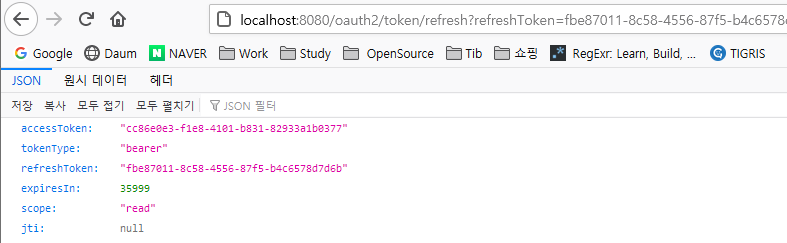
2.9.2 Refresh Token 얻기
위 AccessToken을 발급 받을 때, 같이 받은 Refresh Token을 이용하여 새로운 Access Token을 받아보자.
요청 Url은 아래와 같다.
http://localhost:8080/oauth2/token/refresh?refreshToken=fbe87011-8c58-4556-87f5-b4c6578d7d6b
아래 처럼 새로운 Access Token을 얻은 것을 확인할 수 있다.
2.10 인증 서버 기동 2 - JWT 방식
application.yml 파일에서 아래 값을 JWT로 설정
common.token-type: JWT2.9.1 Access Token 얻기
Token 얻는 방식은 Bearer Token 방식과 똑같이 아래 Url을 호출하면 되지만 권한 승인 폼이 다른 것을 확인할 수 있다.
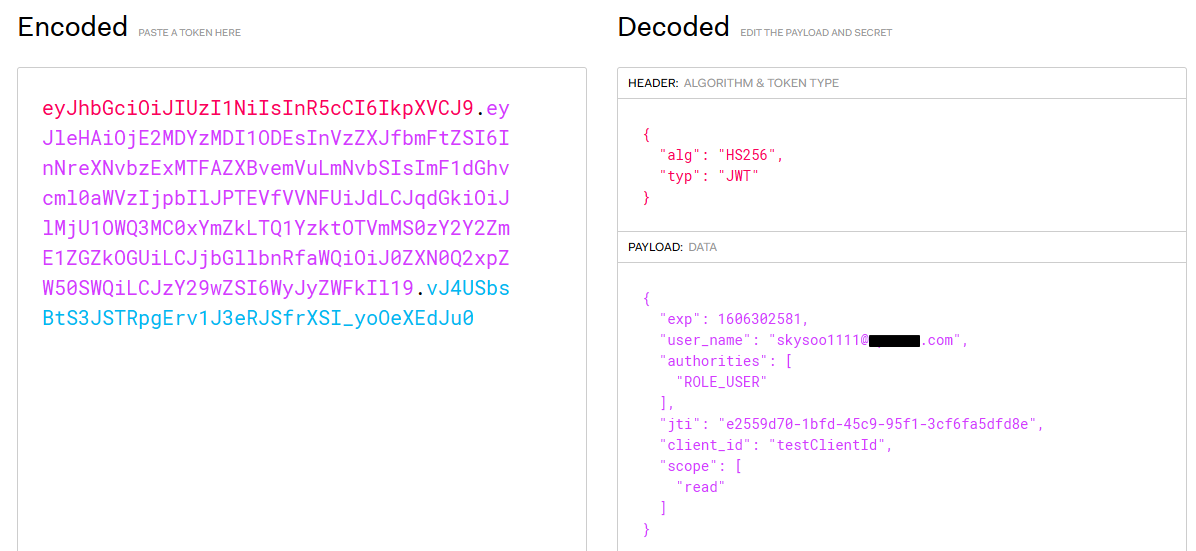
또한 Access Token이 더 커진 것을 확인 할 수 있는데, 이는 JWT 안에는 사용자 정보가 같이 포함되어 있기 때문이다.
그렇다면 JWT Token을 안의 Json 데이터를 복호화해 보자.
JWT 복호화 사이트에 접속
https://jwt.io/
Access Token을 복호화하면 아래와 같이 사용자 정보를 얻을 수 있다.
2.9.2 Refresh Token 얻기
Refresh Token 역시 위, Bearer 방식과 똑같다.
http://localhost:8080/oauth2/token/refresh?refreshToken=fbe87011-8c58-4556-87f5-b4c6578d7d6b
3. 정리
3.1 토큰 발급은 Bearer 방식이 아닌 JWT 방식을 사용하자
Bearer 토큰 방식은 아무런 정보가 없는 무기명 문자열로 발급된 토큰을 검증하는 절차가 필요하기 때문에 사용자가 많아질수록 OAuth2 서버로의 잦은 요청이 발생하고 결국 인증 서버에 오버헤드 발생 가능성이 존재한다.
하지만 JWT는 이름(Json Web Token)처럼 토큰 자체에 사용자 정보를 Json 형태로 담고 있으므로 OAuth2 서버로의 추가 검증 요청이 필요하지 않아 오베헤드를 줄일 수 있다.
또한 JWT는 디지털 서명을 통해 무결성 검증이 가능하다.
쉽게 정리하면 Bearer Token은 토큰에 대한 검증을 인증 서버로 위임하는 것이고,
JWT는 토큰에 대한 검증을 리소스 서버로 위임하는 것이다.
더 자세한 JWT 관련 정보는 아래에서 확인하자. 잘 정리되어 있다.
https://www.letmecompile.com/api-auth-jwt-jwk-explained/
3.2 커스텀해서 사용할 수 있는 다양한 인터페이스들을 활용하자
아래처럼 UserDetailsService, AuthenticationProvider 의 인터페이스를 활용하여 요청 사용자 정보와 그 인증 처리등을 커스텀할 수 있다. 그 밖에도 OAuth2AuthorizedClientService, OAuth2UserService 등의 인터페이스도 있으니 적극 활용하자.
@Service
public class CustomUserDetailService implements UserDetailsService {
    @Autowired
    private UserDao userDao;

    @SneakyThrows
    @Override
    public UserDetails loadUserByUsername(String s) throws UsernameNotFoundException {
        return userDao.selectDataById(s);
    }
}
@Log4j2
@Component
@RequiredArgsConstructor
public class CustomAuthenticationProvider implements AuthenticationProvider {
private final PasswordEncoder passwordEncoder;
private final UserDao userDao;
@Override
public Authentication authenticate(Authentication authentication) throws AuthenticationException {
String name = authentication.getName();
String password = authentication.getCredentials().toString();
UserVo userVo = null;
try {
userVo = userDao.selectDataById(name);
} catch (Exception e) {
log.error(e);
}
if (!passwordEncoder.matches(password, userVo.getPassword()))
throw new BadCredentialsException("password is not valid");
return new UsernamePasswordAuthenticationToken(name, password, userVo.getAuthorities());
}
@Override
public boolean supports(Class<?> authentication) {
return authentication.equals(UsernamePasswordAuthenticationToken.class);
}
}참고자료
https://daddyprogrammer.org/post/1239/spring-oauth-authorizationserver/
