Nest.js 시작하기
npx create-next-app -my-appnpm i react, react-dom, nextnpm run dev서버 스타트npm run biuld빌드npm start
주요 기능
- Hot Code Reloading
디스크에 어떤 변화가 감지 될 때 페이지를 재로드한다. - Automatic Routing
pages 폴더에 있는 파일에 대해 어떤 URL이라도 파일 시스템에 매핑된다. - Single File Components
styled-jsx를 사용할 수 있다. - Server Side Rendering (= pre-render)
클라이언트로 HTML을 보내기 전에 서버 사이드에서 리액트 컴포넌트를 랜더링 할 수 있다. - Ecosystem Compatibility
자바스크립트, Node, 리액트 생태계에서 잘 작동한다. - Automatic Code Splitting
페이지를 로딩하면 해당 페이지에 필요한 자바스크립트를 로드한다. - Prefetching
Link 컴포넌트는 백그라운드에서 자동으로 페이지 리소스를 prefetch한다. - Dynamic Components
자바스크립트 모듈과 리액트 컴포넌트를 동적으로 import할 수 있다. - Static Exports
next export명령어를 통해 모든 정적 사이트를 앱에 export할 수 있게 해준다. - TypeScript suppport
1. Routes
Automatic Routing: Pages are associated with a route based on their file name.
next/link components
pages 내부에 products 파일 생성 후 index.js에서
<Link href="/products">로 감싸주게 되면 products 페이지로 이동할 수 있다.
-> pages/products/[id].js 는 products/1, products/2로 파라미터를 받아 이동할 수 있다.
import Link from 'next/link'

// jsx
<Link href="/"><a>이동하기</a></Link>
{ useRouter } from 'next/router'
router.push(url, as, options)내부 경로로 이동
import { useRouter } from 'next/router'

function ActiveLink() {
  const router = useRouter()

  const handleClick = (e) => {
    e.preventDefault()
    router.push('/')
  }
router.replace(url, as, options)router.prefetch(url, as)router.back()브라우저 뒤로 이동router.reload()브라우저 새로고침router.events.on('event', func)라우터 이벤트
useEffect(() => {
  const handleRouteChange = () => {
    // ...
  }
  router.events.on('routeChangeStart', handleRouteChange)
  return () => {
    router.events.off('routeChangeStart', handleRouteChange)
  }
}, [])
2. next/image
자동 이미지 최적화 이미지 컴포넌트
Unhandled Runtime Error
Error: Invalid src prop (http://) onnext/image, hostname "assets.example.com" is not configured unter images in yournext.config.js
// next.config.js

module.exports = {
  images: {
    domains: ['assets.example.com'],
  },
}
3. Static Generation: getStaticProps / getStaticPaths
HTML이 빌드 시 생성된다.
function Blog({ posts }) {

  return (
    <ul>
      {posts.map((post) => (
        <li>{post.title}</li>
      ))}
    </ul>
  )
}

// This function gets called at build time
export async function getStaticPaths() {
  // Call an external API endpoint to get posts
  const res = await fetch('https://.../posts')
  const posts = await res.json()

  // Get the paths we want to pre-render based on posts
  const paths = posts.map((post) => ({
    params: { id: post.id },
  }))

  // We'll pre-render only these paths at build time.
  // { fallback: false } means other routes should 404.
  return { paths, fallback: false }
}

// This function gets called at build time
export async function getStaticProps({ params }) {
  // params contains the post `id`.
  // If the route is like /posts/1, then params.id is 1
  const res = await fetch(`https://.../posts/${params.id}`)
  const posts = await res.json()

  // By returning { props: { posts } }, the Blog component
  // will receive `posts` as a prop at build time
  return {
    props: {
      posts,
    },
  }
}

export default Blog
4. Server-side Rendering.
빌드시간이 아닌 사용자의 요청에 의해 HTML이 생성된다.
function Page({ data }) {
  // Render data...
}

// This gets called on every request
export async function getServerSideProps() {
  // Fetch data from external API
  const res = await fetch(`https://.../data`)
  const data = await res.json()

  // Pass data to the page via props
  return { props: { data } }
}

export default Page
5. api
pages/api Next.js로 API를 빌드할 수 있다!
6. next/babel
react 애플리케이션 및 서버 측 코드를 컴파일하는 데 필요한 모든 것이 포함 된 앱 사전 설정이 포함되어 있다.
기본 Babel 구성을 확장하려는 경우 아래와 같이 정의할 수 있다.
// .babelrc
{
  "presets": ["next/babel"],
  "plugins": ["styled-components",
              {
                "ssr": true,
                "displayName": true,
                "preprocess": false
              }
             ]
}
Styled-component 사용하기
1.npm i --save-dev babel-plugin-styled-components
2..baelrc설정
3._document.js설정
// _document.js

import React from "react";
import Document, { Html, Head, Main, NextScript } from "next/document";
import { ServerStyleSheet } from "styled-components";

class MyDocument extends Document {
  static async getInitialProps(ctx) {
    const sheet = new ServerStyleSheet();
    const originalRenderPage = ctx.renderPage;

    try {
      ctx.renderPage = () =>
        originalRenderPage({
          enhanceApp: App => props => sheet.collectStyles(<App {...props} />),
        });

      const initialProps = await Document.getInitialProps(ctx);
      return {
        ...initialProps,
        styles: (
          <>
            {initialProps.styles}
            {sheet.getStyleElement()}
          </>
        ),
      };
    } finally {
      sheet.seal();
    }
  }

  render() {
    return (
      <Html>
        <Head />
        <body>
          <Main />
          <NextScript />
        </body>
      </Html>
    );
  }
}

export default MyDocument;
7. Next.js + Redux
Next Redux wrapper가 필요한 이유
npm i redux react-redux next-redux-wrapper
- Next.js는 유저가 요청할때마다 redux store를 새로 생성
- Next.js가 제공하는 getInitialProps, getServerSideProps등에서 리덕스 스토어에 접근할 수 있어야 한다. next-redux-wrapper가 없다면 이것이 불가능하다.
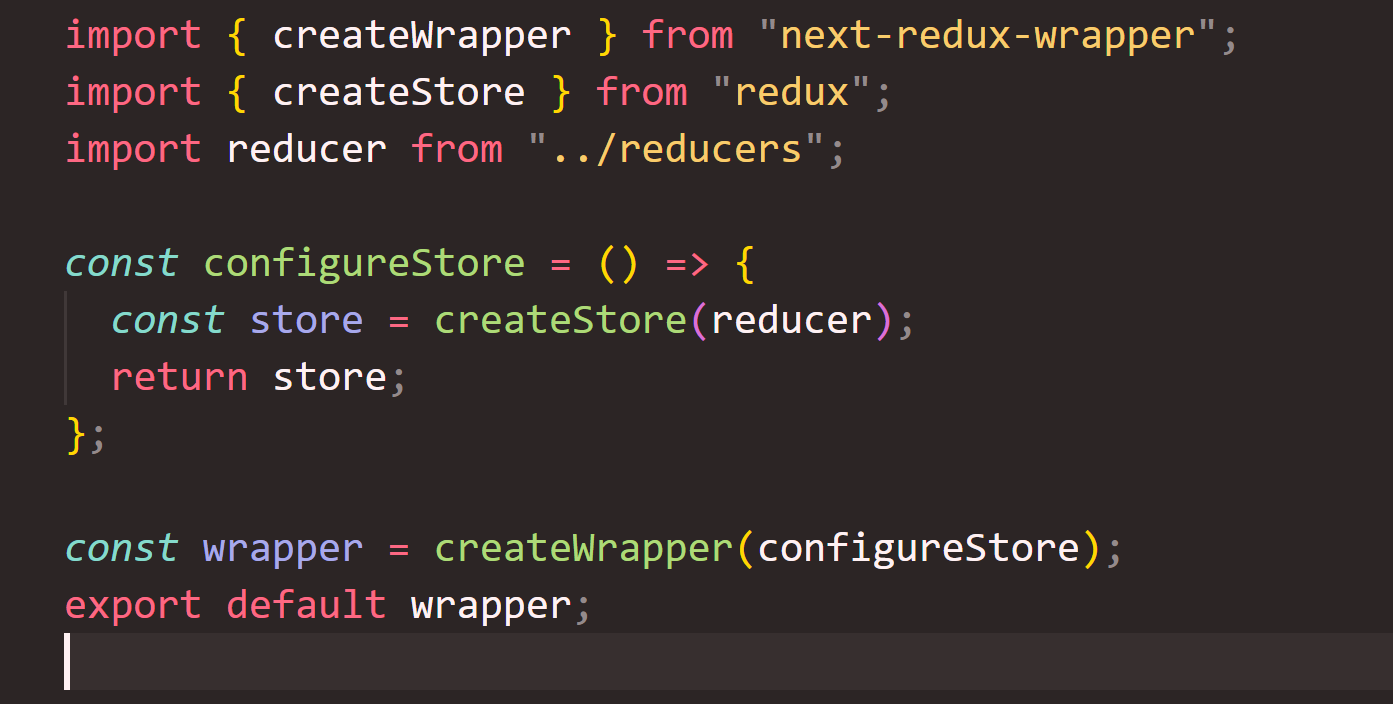
- redux/configureStore.js
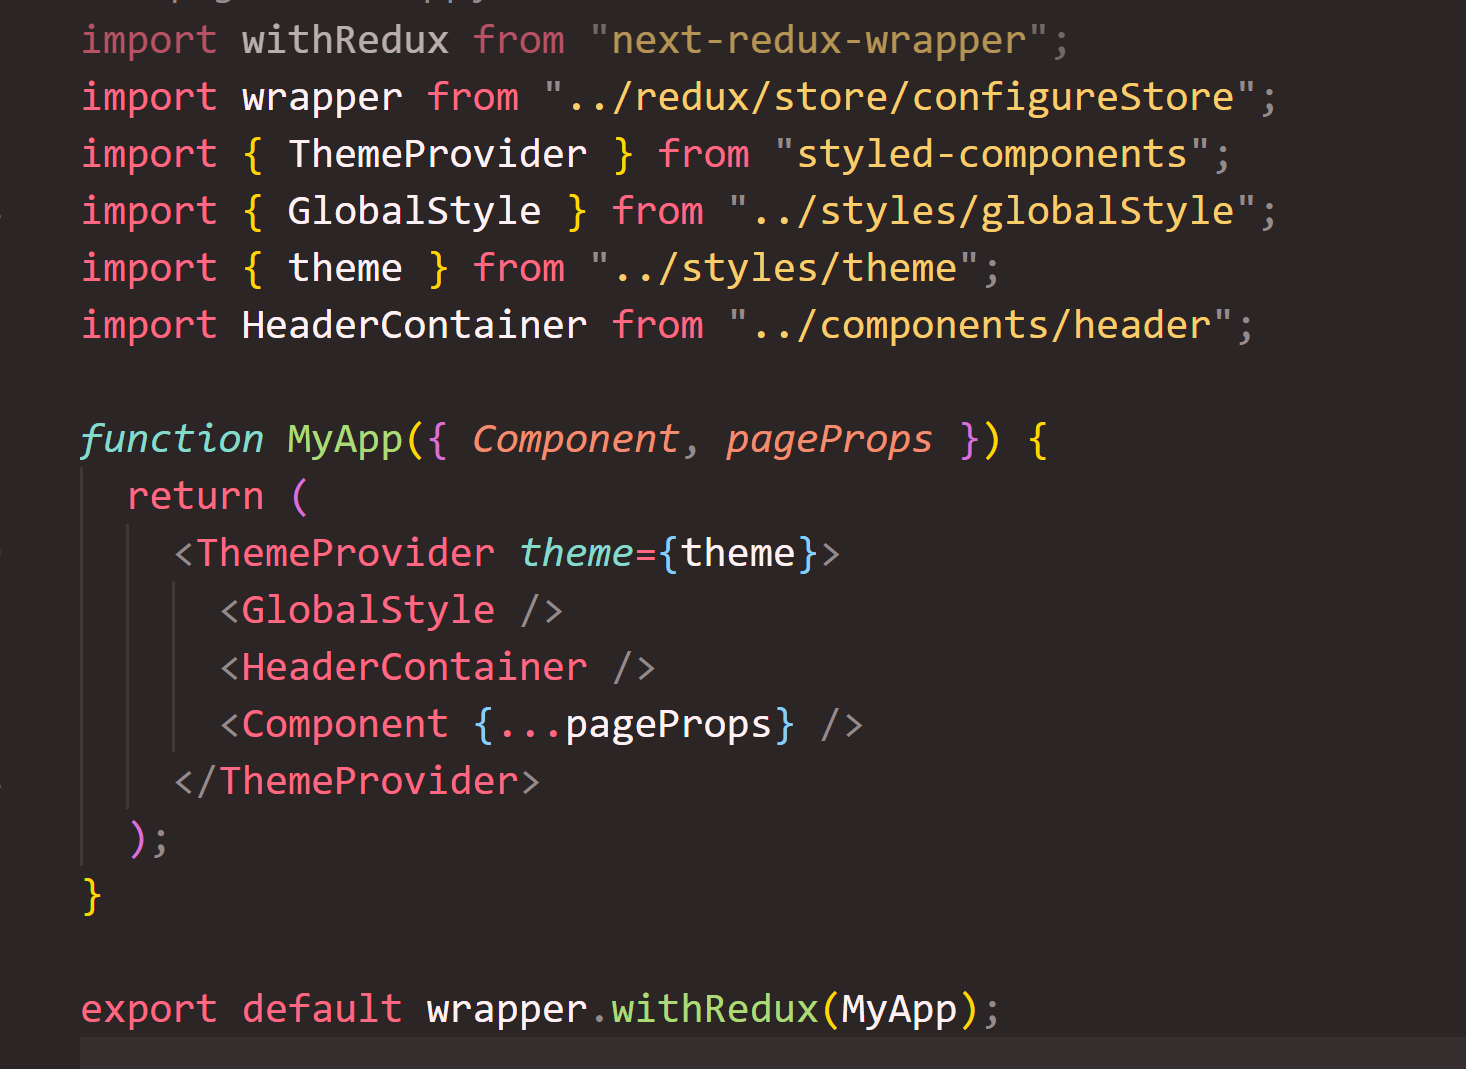
- pages/_app.js
Reference