
WebGL 이란?
Javascript 를 이용하여 웹에서 사용이 가능한 그래픽 라이브러리 ( Web Graphics Library )
특징
- HTML Canvas element 상에서 3D 그래픽을 나타낸다.
- state machine 이므로 이전 상태를 기억하고 있다.
- OpenGL 과 동일한 그래픽스 파이프라인을 따라간다.
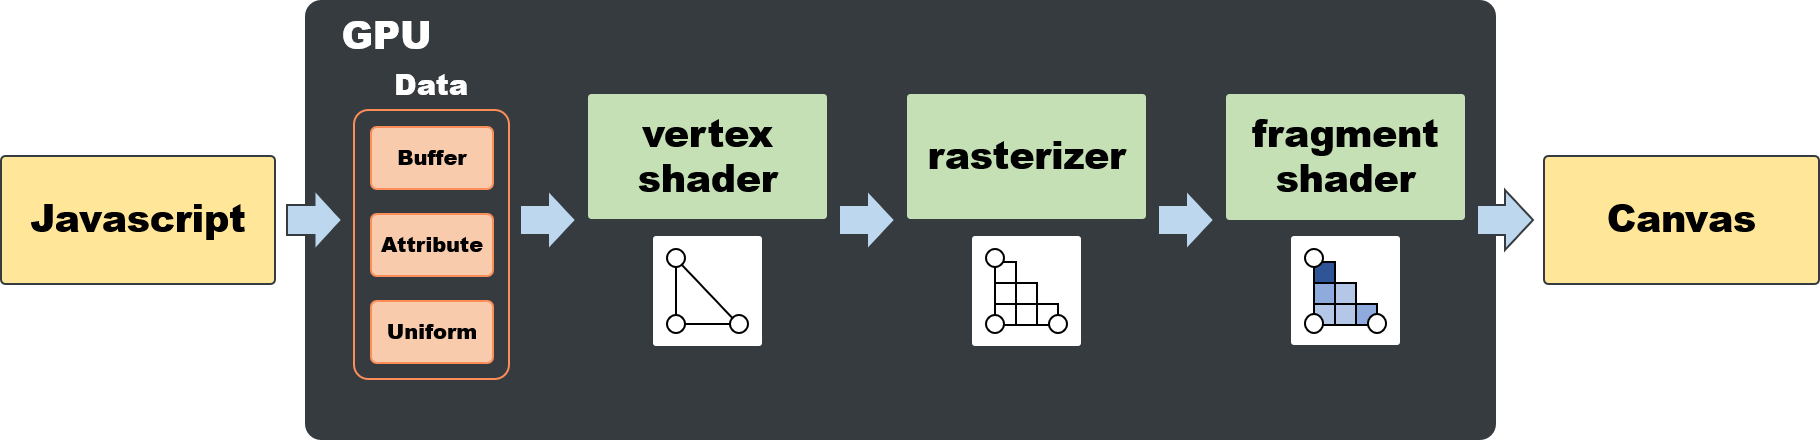
- shader : 렌더링 효과를 계산해주는 명령어 집합 또는 함수
- vertex shader : 정점의 위치를 계산하여 좌표계에 나타낸다.
- rasterizer : 계산된 정점을 픽셀화 한다.
- fragment shader : 픽셀에 색, 텍스처 등을 입힌다.
WebGL 구현해보기
구현 순서
- webpack + typescript 프로젝트 생성
- canvas element 추가 및 gl context 설정
- 표현할 데이터 생성
- vertex shader / fragment shader 생성
- 데이터와 shader 로 하나의 파이프라인 ( 프로그램 ) 생성
- 그리기
전체 코드는 여기서 확인 가능
1. canvas element 추가 및 gl context 설정
- 미리 설정해 둔 index.html 에 canvas element를 하나 추가한다.
<canvas id='glCanvas'></canvas>- 이후 해당 element를 불러와 gl context 를 설정해준다.
const canvas = <HTMLCanvasElement>document.getElementById("glCanvas");
const gl =
canvas.getContext("webgl") || <WebGLRenderingContext>canvas.getContext("experimental-webgl");
2. 표현할 데이터 생성
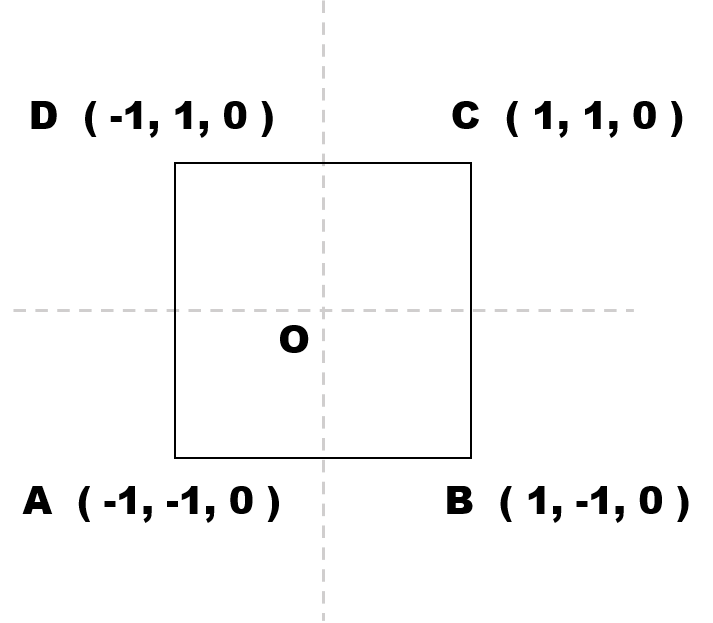
- 하나의 정사각형을 그린다면 정사각형 네 정점의 좌표를 생성해준다.
//  x,    y,   z
const positions = [
  -1.0, -1.0, 0.0, // A
   1.0, -1.0, 0.0, // B
   1.0,  1.0, 0.0, // C
  -1.0,  1.0, 0.0, // D
]
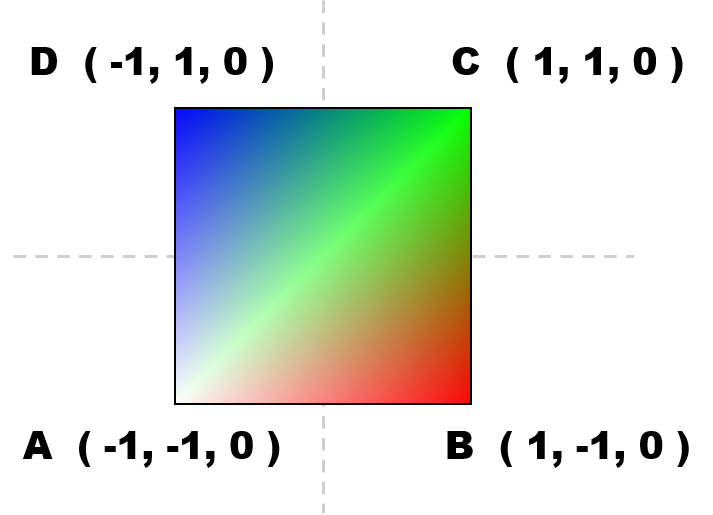
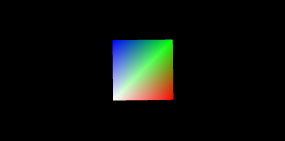
- 이후 각 정점의 색깔 데이터를 생성해준다.
//  r,    g,   b,   a ( 0.0 ~ 1.0 사이의 값 )
const colors = [
  1.0, 1.0, 1.0, 1.0, // A - white
  1.0, 0.0, 0.0, 1.0, // B - red
  0.0, 1.0, 0.0, 1.0, // C - green
  0.0, 0.0, 1.0, 1.0, // D - blue
];
- 마지막으로 정점의 순서 데이터를 생성해준다.
const indices = [
  0, 1, 2, // A - B - C 삼각형
  0, 2, 3  // A - C - D 삼각형
];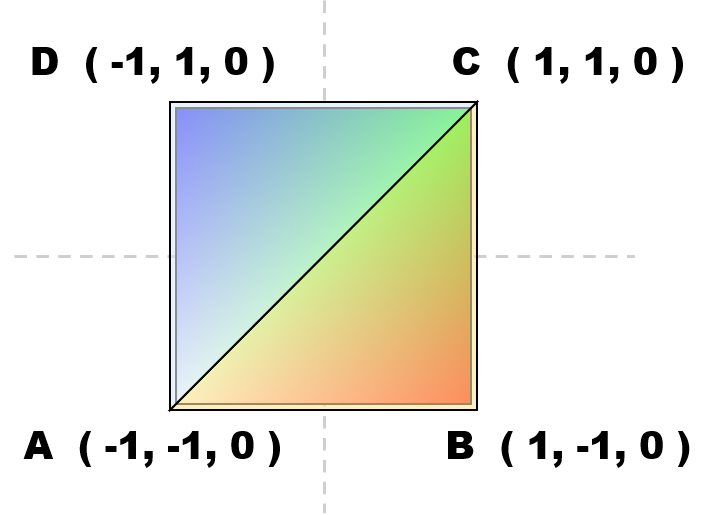
2-1. 도형을 삼각형으로 나누어 그리는 이유
-
계산의 편의를 위해 모든 객체의 면은
polygon( 한 평면에 존재하는 다각형 ) 이여야 한다.
ex) 평면의 법선벡터가 일정하다면 빛 계산을 한번만 해도 된다. -
3개의 점은 어느 위치에 있더라도 한 평면 위에 존재한다.
-
따라서 polygon의 정의를 만족하기 위해선 3개의 점이 최소가 된다.
-
그렇기 때문에 위의 예시에서 A - B - C / A - C - D 삼각형으로 나누어 그리게 된다.
2-2. 정점의 순서를 결정해 주는 이유
-
삼각형으로 나누어 그리게 되면서 A, C 정점이 중복되는 것을 볼 수 있다.
-
그렇기 때문에 정점의 위치는 미리 선언해 놓고 순서만 바꾸어 그리면 저장공간을 절약할 수 있다.
3. vertex shader / fragment shader 생성
3-1. 각 쉐이더에 맞는 쉐이더 소스 생성
- 쉐이더 소스를 설정하기 위해서는 쉐이더 언어인 GLSL ( GL Shading Language )을 기반으로 작성해야한다.
- vertexShaderSource
const vertexShaderSource = `
  // attribute : vertex shader 내부에서 사용되는 변수로 js에서 해당 변수로 값 전달
  // vecN : N 차원 형식의 데이터 타입
  attribute vec4 aVertexPosition; // 정점의 포지션을 저장하는 변수
  attribute vec4 aVertexColor;    // 정점의 색깔을 저장하는 변수 ( vertex shader )

  // uniform : 읽기 전용의 전역 변수 ( 쉐이더끼리 공유가 가능 )
  // matN : N x N 형식의 데이터 타입
  uniform mat4 uModelViewMatrix;  // 모델 좌표계 - 정점의 좌표를 나타냄
  uniform mat4 uProjectionMatrix; // 투영 좌표계 - 카메라의 좌표를 나타냄

  // varying : vertex shader 에서 fragment shader로 넘겨주는 값
  // lowp : 데이터의 정밀도를 나타냄 ( lowp -> mediump -> highp 순 )
  varying lowp vec4 vColor;       // 정점의 색깔을 저장하는 변수 ( fragment shader )

  void main(void) {
    gl_Position = uProjectionMatrix * uModelViewMatrix * aVertexPosition; // 정점의 위치를 나타냄

    vColor = aVertexColor; // 받아온 정점의 색깔을 fragment shader로 념겨줌
  }
`;-
좌표계
- 모델 좌표계 : 그리고 싶은 물체 ( 모델 ) 의 정점의 위치를 나타내는 좌표계
- 투영 좌표계 : 그린 물체를 투영한 카메라가 위치한 좌표계
-
fragmentShaderSource
const fragmentShaderSource = `
  varying lowp vec4 vColor;  // vertex shader 에서 받아온 정점의 색깔 값

  void main(void) {
    gl_FragColor = vColor;   // 정점의 색깔을 설정해 줌
  }
`;
3-2. 쉐이더 생성
function createShader(gl: WebGLRenderingContext, type: number, shaderSource: string) {
  const shader = gl.createShader(type);   // gl context를 이용해 쉐이더 객체를 생성

  gl.shaderSource(shader, shaderSource);  // 해당 객체에 쉐이더 소스를 추가

  gl.compileShader(shader);               // glsl 쉐이더 소스를 바이너리 데이터로 컴파일

  return shader;
};

...

const vertexShader = createShader(gl, gl.VERTEX_SHADER, vertexShaderSource);
const fragmentShader = createShader(gl, gl.FRAGMENT_SHADER, fragmentShaderSource);
4. 데이터와 shader 로 하나의 파이프라인 ( 프로그램 ) 생성
4-1. shader 프로그램 객체 생성 및 저장 + glsl 변수 위치 저장
function createShaderProgram(
  gl: WebGLRenderingContext,
  vertexShader: WebGLShader,
  fragmentShader: WebGLShader
) {
  const shaderProgram = gl.createProgram();         // webgl program 객체 생성
  gl.attachShader(shaderProgram, vertexShader);     // 해당 객체에 쉐이더를 연결
  gl.attachShader(shaderProgram, fragmentShader);
  gl.linkProgram(shaderProgram);                    // 쉐이더 완료 및 GPU 준비

  return {
    program: shaderProgram,
    attribLocations: {
      // 프로그램 내부 attribute 타입의 특정 이름을 가진 변수의 위치를 저장
      // 이후 해당 위치에 값을 저장하면 GLSL 변수로 전달됨
      vertexPosition: gl.getAttribLocation(shaderProgram, "aVertexPosition"),
      vertexColor: gl.getAttribLocation(shaderProgram, "aVertexColor"),
    },
    uniformLocations: {
      // 프로그램 내부 uniform 타입의 특정 이름을 가진 변수의 위치를 저장
      // 마찬가지로 해당 위치에 값을 저장하면 GLSL 변수로 전달
      projectionMatrix: gl.getUniformLocation(shaderProgram, "uProjectionMatrix"),
      modelViewMatrix: gl.getUniformLocation(shaderProgram, "uModelViewMatrix"),
    },
  };
}

...

const programInfo = createShaderProgram(gl, vertexShader, fragmentShader);
4-2. 정점의 데이터를 저장할 버퍼 생성 및 초기화
function createBuffer(
  gl: WebGLRenderingContext,
  target: number,
  vertexArray: Float32Array | Uint16Array
) {
  const buffer = gl.createBuffer();      // 버퍼 객체 생성

  gl.bindBuffer(target, buffer);         // 해당 버퍼를 target에 bind 해준다.

  gl.bufferData(target, vertexArray, gl.STATIC_DRAW);  // 버퍼에 데이터를 저장

  return buffer;
};

...

const positionBuffer = createBuffer(gl, gl.ARRAY_BUFFER, new Float32Array(positions));

const colorBuffer = createBuffer(gl, gl.ARRAY_BUFFER, new Float32Array(colors));

const indexBuffer = createBuffer(gl, gl.ELEMENT_ARRAY_BUFFER, new Uint16Array(indices));
5. 그리기
requestAnimationFrame()프레임별로 장면을 초기화하여 그림으로써 움직이는 것 처럼 보이게 만든다.
function render() {
  initScene(gl, programInfo, positionBuffer, colorBuffer, indexBuffer);
  requestAnimationFrame(render);
}

requestAnimationFrame(render);- initScene
interface ProgramInfo {
  program: WebGLProgram;
  attribLocations: {
    vertexPosition: number;
    vertexColor: number;
  };
  uniformLocations: {
    projectionMatrix: WebGLUniformLocation;
    modelViewMatrix: WebGLUniformLocation;
  };
}

function initScene(
  gl: WebGLRenderingContext,
  { program, attribLocations, uniformLocations }: ProgramInfo,
  positionBuffer: WebGLBuffer,
  colorBuffer: WebGLBuffer,
  indexBuffer: WebGLBuffer
) {
  gl.clearColor(0.0, 0.0, 0.0, 1.0);
  gl.clearDepth(1.0);
  gl.enable(gl.DEPTH_TEST);
  gl.depthFunc(gl.LEQUAL);

  gl.clear(gl.COLOR_BUFFER_BIT | gl.DEPTH_BUFFER_BIT);

  const fieldOfView = (45 * Math.PI) / 180;
  const aspect = gl.canvas.width / gl.canvas.height;
  const zNear = 0.1;
  const zFar = 100.0;
  const projectionMatrix = mat4.create();

  mat4.perspective(projectionMatrix, fieldOfView, aspect, zNear, zFar);

  const modelViewMatrix = mat4.create();

  // 모델 좌표계 변환 부분
  mat4.translate(modelViewMatrix, modelViewMatrix, [-0.0, 0.0, -6.0]);
  mat4.rotate(modelViewMatrix, modelViewMatrix, 0, [0, 0, 1]);
  mat4.rotate(modelViewMatrix, modelViewMatrix, 0, [0, 1, 0]);
  // 해당 부분을 건드려서 원하는 모델을 그릴 수 있다.

  {
    const numComponents = 3;
    const type = gl.FLOAT;
    const normalize = false;
    const stride = 0;
    const offset = 0;
    gl.bindBuffer(gl.ARRAY_BUFFER, positionBuffer);
    gl.vertexAttribPointer(attribLocations.vertexPosition, numComponents, type, normalize, stride, offset);
    gl.enableVertexAttribArray(attribLocations.vertexPosition);
  }

  {
    const numComponents = 4;
    const type = gl.FLOAT;
    const normalize = false;
    const stride = 0;
    const offset = 0;
    gl.bindBuffer(gl.ARRAY_BUFFER, colorBuffer);
    gl.vertexAttribPointer(attribLocations.vertexColor, numComponents, type, normalize, stride, offset);
    gl.enableVertexAttribArray(attribLocations.vertexColor);
  }

  gl.bindBuffer(gl.ELEMENT_ARRAY_BUFFER, indexBuffer);

  gl.useProgram(program);

  gl.uniformMatrix4fv(uniformLocations.projectionMatrix, false, projectionMatrix);

  gl.uniformMatrix4fv(uniformLocations.modelViewMatrix, false, modelViewMatrix);

  {
    const vertexCount = 6;
    const type = gl.UNSIGNED_SHORT;
    const offset = 0;
    gl.drawElements(gl.TRIANGLES, vertexCount, type, offset);
  }
};
실행 결과
결론
- 파이프라인을 이해하고 해당 파이프라인에 맞추어 차근차근 구현해 보는게 재미있었다.
- 이것을 기반으로 폴더구조를 좀 더 보기쉽게 정리해 보는 것도 재미있었다.
- 이후에 좀 더 심화적인 내용을 다루거나 three.js를 사용해봐도 좋을 것 같다.
- 소스코드 출처 : https://developer.mozilla.org/en-US/docs/Web/API/WebGL_API/Tutorial/Creating_3D_objects_using_WebGL

FE개발자