자료형 값 복사
자료형 = 타입
arr1=[1,2,3,4]
arr2=arr1 //새로운 배열 셍상
arr2=[1,2,3,4]
arr2[3]=0 //0
arr2 =[1,2,3,0] >> 참조된 값을 바꿈(arr값까지 변함)
new Array(1,2,3,4) 인 것
- 원시자료형 - 값을 복사한다.
undefined
Null
Boolean
Number
String
BigInt
Symbol (ECMAScript 6에 추가됨) - 나머지 값 할당
참조 - 메모리 주소
자료형의 값 복사
자바스크립트는 기본 자료형의 값을 복사할 때 값을 완전히 복사한다.
=을 이용하여 값 복사
var a=100;
var b= a;
a=200;
alert(a); //200
alert(b); //100
객체의 참조 복사
? array[ ] /object/ 함수
객체에 변수를 저장
실제 값을 저장하는 것이 아니라 객체를 메모리 어딘가에 만들고, 객체의 참조(위치 값)를 저장하게 된다.
인자를 통해 변수를 제어할 수 있다.
"파선아실"
파라미터
함수 선언 시 초기 값
인자
함수 호출 시 전달된 값
iterable 객체
반복 가능한(iterable)객체는 배열을 일반화한 객체. 이터러블이라는 개념을 사용하면 어떤 객체에든 for ..of반복문을 적용할 수 있다.
배열은 대표적인 이터러블. 배열 외에도 다수의 내장 객체가 반복 가능
object는 반복x => map 나옴!
객체 :객체 또는 object는 클래스에서 정의한 것을 토대로 메모리에 할당된 것으로 데이터 또는 식별자에 의해 참조되는 공간.
-객체지향 프로그래밍에서 객체는 클래스의 인스턴스이다.
클래스 객체는 자료와 그 자료를 다루는 명령의 조합을 포함하여 객체가 메시지를 받고 자료를 처리하며 메시지를 다른 객체로 보낼 수 있도록 한다.
프로토타입 기반 객체지향> js
js > 클래스 개념 (2015) 새로생김 [ES6]
new : 함수를 생성자 함수로 만듬
new 결과물 = 인스턴스
js에서는 new = 타입생성자 라고 함.
다른 언어 class라고 부름.
객체는 자료와 그 자료를 다루는 명령의 조합.
할당 연산자(=) 를 이용하면 할당
키워드없이 변수 선언하면 자동으로 var 로 생성
- hello 객체 안에 뭐가 들어있는지?
Object.getOwnPropertyDescriptors('hello');
(객체이기 때문에 깔 수 있다.)
js에 있는 모든 것들은 객체이다.
'hello' => 인스턴스, 객체 ,원시값, 리터럴
'hello'[0] ='h'
'hello'.length =5
객체라서 내장함수 .찍어서 값이 나온다.
- literal : 인간이 쓰는 모든 표현
- js로 함수 만들때, 레시피 어떻게 할지 짜고 코드화하기.
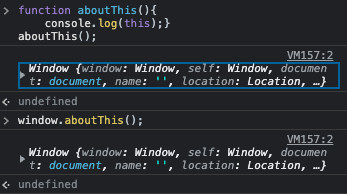
this: 함수를 호출하는 객체를 가리킨다.
this.함수명(); 으로 생각하면 됨
만약
window 전역객체 - 최상 존재하는 전역 객체.
함수 -전역객체 안에 있는것.
this는 자기를 호출한 객체를 찾는다. 그래서 윈도우를 가리키고 있는것.
hello 객체 안에 뭐가 들어있는지
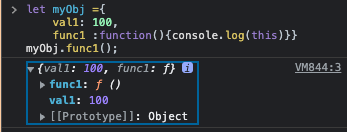
console.log(this) 했을때 myObj가 아닌지 의문!?
콘솔에 출력된 {val1: 100, func1: f} 자체가 myObj 자체이다!
func1()의 this는 myObj이다.
scope: 변수 생존 범위
- 전역
- 함수
- 블럭
closure :폐쇄된 공간의 데이터에 접근하기 위한 테크닉!
- 폐쇄된 공간에 접근할 수 있는 함수 : 클로저 함수
- 변수를 보호하기 위해 함수를 이용했다. (변수가 혼동되지 않도록)
= 함수 안에서만 쓸 수 있음. - 함수에서 객체도 return이 된다!.
값을 함수에 담아서, 이 값을 이용하여 함수 안에 있는 값에 접근할 수 있다. - memoery efficient , encapsulation 의 이득이 있다.
- ( css 부모넣고, 스타일하기 위한 요소 넣는 방법 상요함.
객체에 담으면 원할때마다 불러오기 편하기 때문에!. - 같은 스코프 안에 있으면 접근 가능하다!.
math.random() js에서는 랜덤 만들어서 사용해야한다.
0이상 1미만의 랜덤 변수! 1은 절대로 나오지 않는다!
Math.random()10;
올림이나 반올림은 확률에 차이가 생긴다. -> floor로 버리면 깔끔하게 정리 가능.
Math.floor(Math.random()10);
10을 곱했더니 10 미만의 수가 나온다.
만약 5보다 작은 수 원하면 Math.floor(Math.random()*5); 이용할 것 //0~4
+2 를 하면 범위는 2~6 나올 것.
랜덤한 숫자를 만드는 함수로.!
구하고 싶은 숫자의 범위 지정.
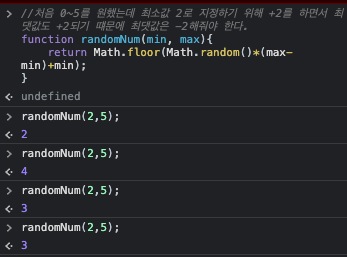
원하는 범위 숫자를 마음대로 뽑을 수 있다.
어떤 숫자 이상의 수를 뽑고 싶다.
연산자
|| : 마지막 폴시(falsy) 값 혹은 처음 만난 투루시(truthy) 값을 반환합니다.
&& : 마지막 투루시(truthy) 값 혹은 처음 만난 마지막 폴시(falsy) 값을 반환합니다.
false : 0, '', null, undefined, NaN
논리연산자 순서 NOT > AND > OR
로또번호 뽑기
 function randomNum(min, max){
    return Math.floor(Math.random()*(max-min)+min);
}

function tryLotto(...input) {
    if (input.length !== 6) {
      console.log('숫자를 6개 입력해야 합니다.');
      return;
    } else if (input.length !== new Set(input).size) {
      console.log('숫자를 중복되지 않게 입력해야 합니다.');
      return;
    } else if (input.some(v => !Number.isInteger(v) || v > 45 || v < 1)) {
      console.log('1부터 45까지 숫자 중 하나를 입력해야 합니다.');
      return;
    }

    const selected = [];
    let count = 0;
    while (count < 7) {
        const selectedNum = randomNum(1, 46);
        if (!selected.includes(selectedNum)) {
            count++;
            selected.push(selectedNum);
        }
    }
    console.log(`당첨번호: ${selected.slice(0, 6).join(' ')} | 보너스: ${selected[6]}`);
    const nums = input.filter(v => selected.slice(0, 6).includes(v));
    switch (nums.length) {
        case 0: case 1: case 2:
            console.log('꽝!');
            break;
        case 3:
            console.log('★ 5등 당첨! ★');
            break;
        case 4:
            console.log('★★ 4등 당첨! ★★');
            break;
        case 5:
            if (input.includes(selected[6])) {
              console.log('★★★★ 2등 당첨!! ★★★★');
              nums.push(`보너스 ${selected[6]}`);
            } else console.log('★★★ 3등 당첨!! ★★★');
            break;
        case 6:
            console.log('★★★★★ 1등 당첨!!! ★★★★★');
    }
    if (nums.length > 0) console.log(`내가 맞춘 번호: ${nums.join(' ')}`);
> }- 변수에 false값으로 저장
// 랜덤 숫자 뽑는함수
function randomFunc(min, max) {
    return Math.floor(Math.random() * (max - min) + min);
}
// 뽑은 번호 담을 배열 준비
let lottoArr = [];
// 6개 뽑아서 lottoArr에 담는함수
function lottoGenerator() {
    // 배열이 꽉차기 전까지 반복 (6개 까지)
    while (lottoArr.length < 6) {
        let result = randomFunc(1, 46);
        // 중복 판단하기위해 필요한 변수
        let isGot = false;

        // 중복 판단
        // lottoArr 의 요소를 순회
        lottoArr.forEach((element) => {
            // 요소가 result 와 같다면 중복!
            if (element === result) {
                // 중복됐다고 표시!
                isGot = true;
            }
        });

        // 중복이 안되었다면 배열에 뽑은숫자 추가 (중복이 되었다면 if문에 못들어가서 추가하지않음)
        if (!isGot) {
            lottoArr.push(result);
        }
    }
    // 여기에 도달했을땐 배열이 꽉~채워짐
    return lottoArr;
}
console.log(lottoGenerator());
- include방법은 인터넷 EI에서 안된다.
function randomFunc(min, max) {
    return Math.floor(Math.random() * (max - min) + min);
}

function lottoGenerator() {
    let lottoArr = [];
    while (lottoArr.length < 6) {
        let result = randomFunc(1, 46);
        // 중복 판단, 다만 include는 IE지원안됨
        // 중복되는 숫자가 없다면
        if(!lottoArr.includes(result)) {
            lottoArr.push(result);
        }
    }
    return lottoArr;
}
console.log(lottoGenerator());-
Size방법
// let lottoArr = [];
let lottoSet = new Set();
function lottoGenerator() {while (lottoSet.size < 6) { let result = randomNum(1, 46); // let isGot = false; lottoSet.add(result); // 중복 판단 // lottoArr.forEach(element => { // if (element === result) { // isGot = true; // } // }); // 중복이 없다면 배열에 추가 // if (!isGot) { // lottoArr.push(result); // } // if (!lottoArr.includes(result)) { // lottoArr.push(result); // } } return lottoSet;}
array: length, push
set: size, add
- 크롬 콘솔에러 ㅠ ㅠ 다시 찍어봐야 한다.
DOM
HTML문서의 내용을 트리형태로 구조화하여 웹페이지와 프로그래밍 언어를 연결시켜주는 역할
이때 각각의 요소와 속성, 콘텐츠 표현 단위를 노드(node)라 한다.
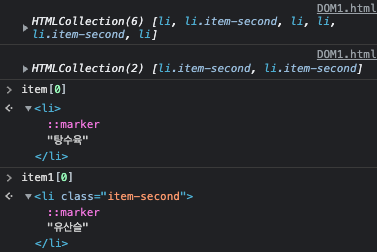
- 유사배열객체 (배열에 저장되는 것은 아니다. 배열과 마찬가지로 접근은 가능)
arraylike => 배열은 아니지만 배열같은 것.
DOM 트리에 접근하기
document 객체를 통해 HTML문서에 접근 가능. document는 브라우저가 불러온 웹페이지를 나타내며, DOM트리의 진입점 역할 수행.
- 옛날에 쓰던 방식 기억삭제..
//해당하는 Id를 가진 요소에 접근하기
document.getElementById();
//해당하는 모든 요소에 접근하기
document.getElementsByTagName();
//해당하는 클래스를 가진 모든 요소에 접근하기
document.getElementsByClassName();  ex) 'li'
- 최근 방식 but, querySelector IE9부터 지원.(높은 버전이라 못쓰는 경우 생김)
요즘은 이것 씀.// 해당하는 클래스를 가진 모든 요소에 접근하기
document.getElementsByClassName();
// css 선택자로 단일 요소에 접근하기
document.querySelector(“selector”);
// css 선택자로 여러 요소에 접근하기
document.querySelectorAll(“selector”);
=> jQuery 사용
이 클래스를 가진 요소 선택
$(".myClass").css()
이벤트
js이벤트설명
토글이란 하나의 설정 값으로부터 다른 값으로 전환하는 것
리팩토링 > 중복되는 문장 간결하게.
DOM Control

<!DOCTYPE html>
<html lang="ko">

<head>
    <meta charset="UTF-8">
    <meta http-equiv="X-UA-Compatible" content="IE=edge">
    <meta name="viewport" content="width=device-width, initial-scale=1.0">
    <title>Document</title>
    <link rel="stylesheet" href="reset.css">
    <style>
        .canvas {
            width: 500px;
            height: 500px;
            margin: 0 auto;
            background-color: black;
        }

        .canvas.red {
            background-color: red;
        }

        .canvas.yellow {
            background-color: yellow;
        }

        .canvas.green {
            background-color: green;
        }

        ul {
            display: flex;
            justify-content: space-around;
            width: 500px;
            margin: 50px auto 0;
        }
    </style>
</head>

<body>
    <div class="canvas"></div>
    <ul>
        <li><button type="button" class="btn-red">빨강</button></li>
        <li><button type="button" class="btn-yellow">노랑</button></li>
        <li><button type="button" class="btn-green">초록</button></li>
    </ul>
    <script>
        const canvas = document.querySelector('.canvas');
        const btnRed = document.querySelector('.btn-red');
        const btnYellow = document.querySelector('.btn-yellow');
        const btnGreen = document.querySelector('.btn-green');

        let btnArr = [btnRed,btnGreen,btnYellow];
        btnArr.forEach((item)=>{
            item.addEventListener('click', () => {
                //방법2개 지우기
            //canvas.classList = 'canvas';
            item.classList.remove('red','yellow','green');
            //조건문
            if (item.className==='btn-red') {
                canvas.classList.add('red');
            }else if (item.className==='btn-yellow') {
                canvas.classList.add('yellow');
            }else { canvas.classList.add('green');
        }
        })})


    </script>
</body>
</html>
회고
오늘 github에 올릴 것
1. 로또번호 랜덤뽑기 사이트 - > github올리기
2.
