개요
기본적인 네트워크 아키텍처를 구성하고, 이를 구현해봅니다.
0. 목표 및 설정 정보
목표
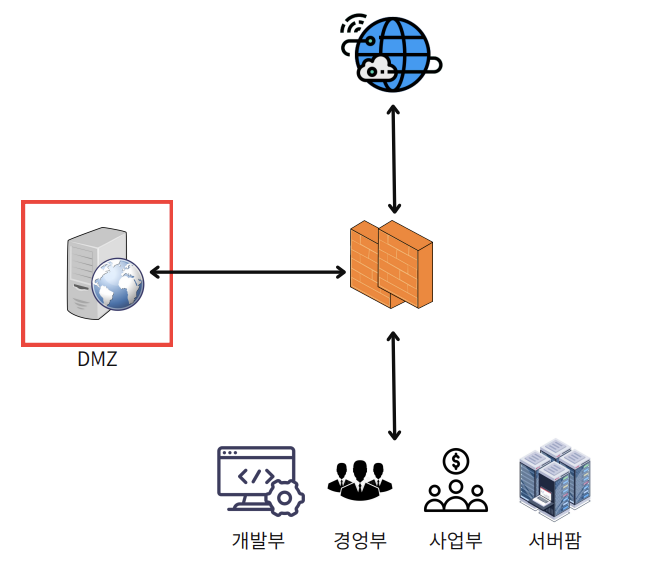
- 웹서비스를 운영하는 10~20인 소규모 사무실
- DMZ에 Web Server 배치
- 개발부, 경영부, 사업부, 서버팜이 별도의 VLAN 사용
- Firewall과 DMZ를 사용한 보안 강화
- 이중화를 통해 전체 네트워크의 가용성 확보
사용 기술
- Link Aggregation
- FHRP(HSRP)
- VLAN
- Rapid PVST +
- ACL
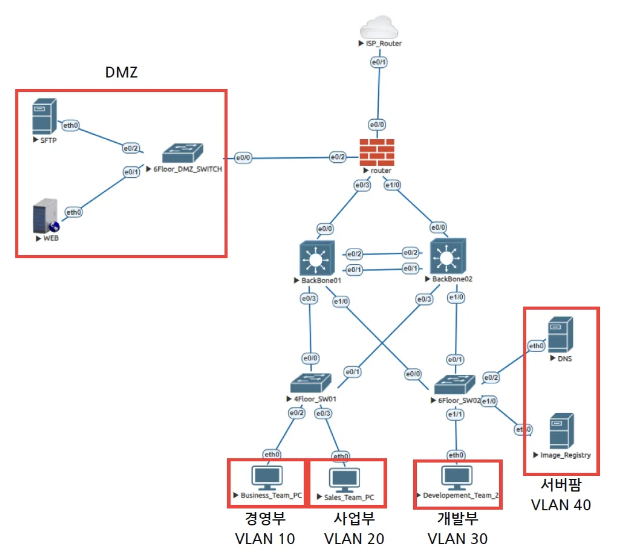
전체 토폴로지
- (참고를 위한 이미지)
- (Packet Tracer의 실제 이미지)
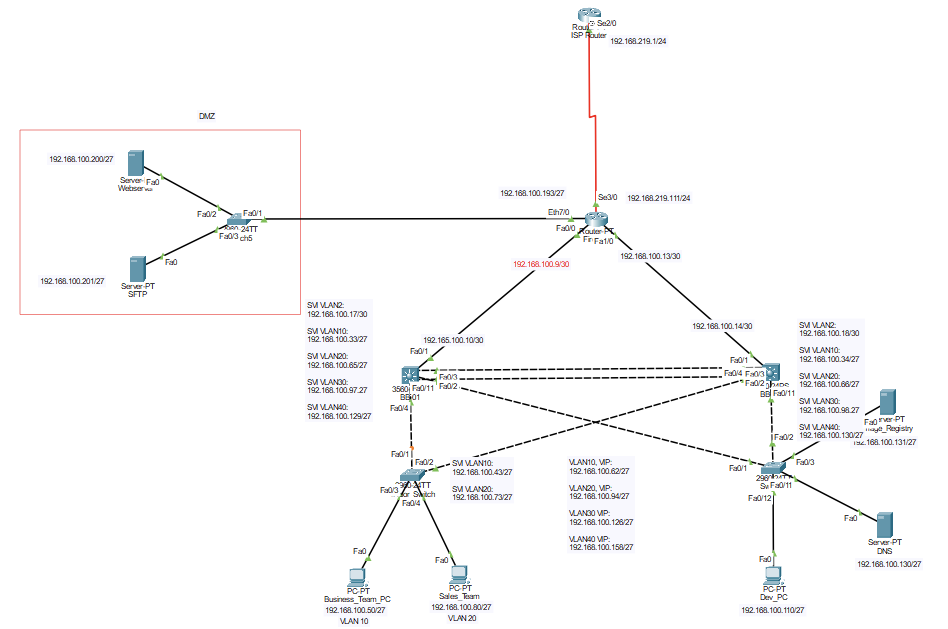
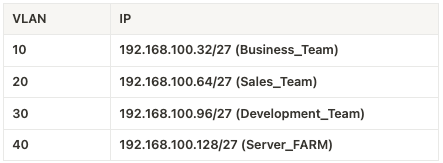
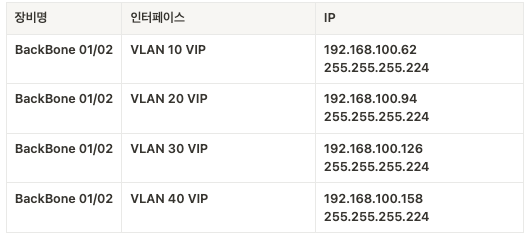
VLAN 정보
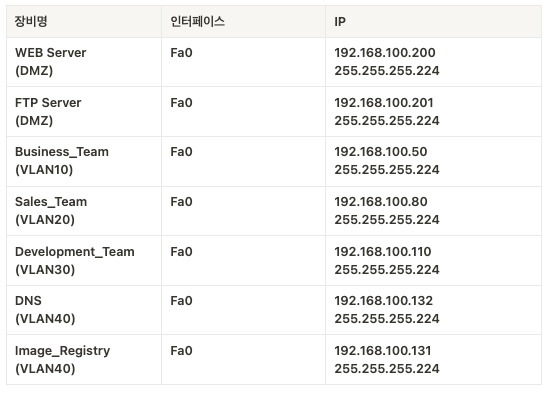
인터페이스 정보
1. VPC Setting
VPC. 즉 End Point Device, Host 들의 IP Setting을 해줍니다.
이 때, BackBone 내부의 기기들의 기본 Gateway는 HSRP로 생성한 VIP를 지정해줍니다.
Business_Team_PC IP Setting
set pcname Busin_Team
ip 192.168.100.50/27 192.168.100.62(VLAN10 VIP)
save
Sales_Team_PC IP Setting
set pcname Sales_Team
ip 192.168.100.80/27 192.168.100.94(VLAN20 VIP)
save
Development_Team_PC
set pcname Dev_Team
ip 192.168.100.110/27 192.168.100.126(VLAN30 VIP)
save
Web_Server
set pcname Dev_Team
ip 192.168.100.200/27 192.168.100.193
save
SFTP
set pcname SFTP_Server
ip 192.168.100.201/27 192.168.100.193
save
DNS
set pcname DNS
ip 192.168.100.132/27 192.168.100.158
save
Image_Registry
set pcname Image_Regi
ip 192.168.100.131/27 192.168.100.158
save
2. Switch Setting
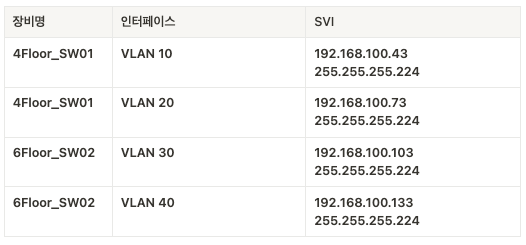
2.1. 4Floor_SW01 설정
-
기본 설정하기
enable # privileged EXEC mode로 진입
configure terminal # global configuration mode로 진입
no service config # autoinstall 기능을 비활성화
hostname 4Floor_SW01 # Switch Host 이름 지정
enable secret cisco # 특권 모드 비밀번호 설정
exit
copy running-config startup-config # 현재 설정을 시작 설정으로 지정
-
VLAN 생성하기
vlan 10
name Business
exit

vlan 20
name Sales
exit
-
VLAN 설정하기
enable configure terminal # VLAN 10 인터페이스 설정 interface vlan 10 description Business_VLAN ip address 192.168.100.43 255.255.255.224 # SVI(Switch Virtual Interface) 설정 no shutdown exit # VLAN 20 인터페이스 설정 interface vlan 20 description Sales_VLAN ip address 192.168.100.73 255.255.255.224 no shutdown exit -
물리적 포트에 VLAN 할당하기
enable
configure terminal
spanningtree mode rapid-pvst # 스위치간 빠른 연결을 위해 RSTP 모드로 설정

interface fa0/4
switchport mode access
switchport access vlan 10
spanning-tree portfast
# end device이므로 portfast로 빠르게 port를 forwarding 상태로 설정
spanning-tree bpduguard enable
# end device이므로 bpdu가 들어오면 error-disabled 상태로 변하게 설정
no shutdown
exit

interface fa0/11
switchport mode access
switchport access vlan 20
spanning-tree portfast
spanning-tree bpduguard enable
no shutdown
exit
저장하기
end copy running-config startup-config -
BackBone01과 연결된 port설정
enable configure terminal interface fa0/1 no shutdown # 인터페이스 shutdown 해제 switchport trunk encapsulation dot1q # IEEE 802.1Q 표준의 VLAN 태깅 방식으로 캡슐화 방식 설정 switchport mode trunk # switch port mode를 trunk mode로 설정 switchport trunk allowed vlan 10,20 # Trunk Port를 통과할 수 있는 vlan을 10,20으로 제한 (Privileged Mode) copy running-config startup-config -
BackBone02와 연결된 port 설정
enable
configure terminal

interface fa0/2
no shutdown # 인터페이스 shutdown 해제
switchport trunk encapsulation dot1q # IEEE 802.1Q 표준의 VLAN 태깅 방식으로 캡슐화 방식 설정
switchport mode trunk # switch port mode를 trunk mode로 설정
switchport trunk allowed vlan 10,20 # Trunk Port를 통과할 수 있는 vlan을 10,20으로 제한
spanning-tree cost 10

(Privileged Mode)
copy running-config startup-config
2.2. 6Floor_SW02 설정
-
기본 설정(Host Name, 특권 모드 비밀번호 설정)
enable configure terminal no service config hostname 6Floor_Switch enable secret cisco exit copy running-config startup-config -
VLAN 생성
enable configure terminal vlan 30 name Development exit vlan 40 name ServerFarm exit -
VLAN 인터페이스 설정
enable configure terminal interface vlan 30 description Development_VLAN ip address 192.168.100.103 255.255.255.224 no shutdown exit interface vlan 40 description ServerFarm_VLAN ip address 192.168.100.133 255.255.255.224 no shutdown exit copy running-config startup-config -
물리적 포트에 VLAN 할당하기
enable configure terminal interface fa0/12 # switchport mode access # access mode로 설정. 단일 VLAN 트래픽만 처리하게 한다 switchport access vlan 30 # 해당 access port를 VLAN 30에 할당 spanning-tree portfast # 스패닝 트리 PortFast기능을 활성화하여, 포트가 즉시 포워딩 상태로 전환할 수 있도록 하여 연결 지연을 줄인다 spanning-tree bpduguard enable # BPDU(Bridge Protocol Data Unit) 가드를 활성화 하여 예기치 않은 BPDU를 수신하는 경우 포트를 비활성화 하여 네트워크 루프를 방지한다 no shutdown # 인터페이스를 활성화한다. exit interface fa0/3 # switchport mode access # access mode로 설정. 단일 VLAN 트래픽만 처리하게 한다 switchport access vlan 40 # 해당 access port를 VLAN 30에 할당 spanning-tree portfast # 스패닝 트리 PortFast기능을 활성화하여, 포트가 즉시 포워딩 상태로 전환할 수 있도록 하여 연결 지연을 줄인다 spanning-tree bpduguard enable # BPDU(Bridge Protocol Data Unit) 가드를 활성화 하여 예기치 않은 BPDU를 수신하는 경우 포트를 비활성화 하여 네트워크 루프를 방지한다 no shutdown # 인터페이스를 활성화한다. exit interface fa0/11 # in switchport mode access # access mode로 설정. 단일 VLAN 트래픽만 처리하게 한다 switchport access vlan 40 # 해당 access port를 VLAN 30에 할당 spanning-tree portfast # 스패닝 트리 PortFast기능을 활성화하여, 포트가 즉시 포워딩 상태로 전환할 수 있도록 하여 연결 지연을 줄인다 spanning-tree bpduguard enable # BPDU(Bridge Protocol Data Unit) 가드를 활성화 하여 예기치 않은 BPDU를 수신하는 경우 포트를 비활성화 하여 네트워크 루프를 방지한다 no shutdown # 인터페이스를 활성화한다. exit -
BackBone 01와 연결된 Port 설정
enable configure terminal interface fa0/2 no shutdown Description #### BB 01 #### switchport trunk encapsulation dot1q switchport mode trunk switchport trunk allowed vlan 30,40 #VLAN 30,40을 위한 Trunk port (Priviliged Mode) copy running-config startup-config # 저장 -
BackBone 02 와 연결된 Port 설정
enable
configure terminal

interface fa0/1
no shutdown
Description #### BB 02 ####
switchport trunk encapsulation dot1q
switchport mode trunk
switchport trunk allowed vlan 30,40 #VLAN 30,40을 위한 Trunk port
spanning-tree cost 10

(Priviliged Mode)
copy running-config startup-config # 저장
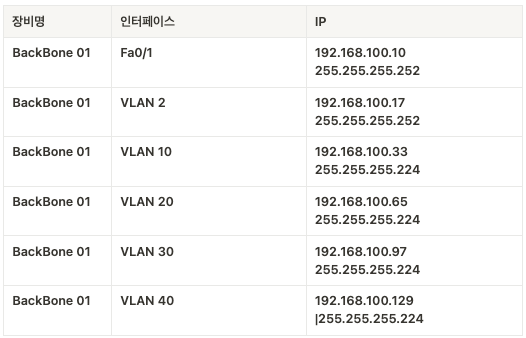
3. Backbone Setting
Backbone을 설정해줍니다.
HSRP를 설정할 때, 우선순위를 조절합니다.
이를 통해 VLAN 10, 20이 사용하는 Physical Backbone은 BB-01(좌측).
VLAN 30,40이 사용하는 Physical Backbone은 BB-02(우측)이 되게 합니다.
3.1. BackBone 01 설정하기
-
STP Root Bridge 설정
# 빠른 연결을 위해 RSTP 모드로 변경
spanningtree mode rapid-pvst

# Bridge 선정을 위한 우선순위 낮추기
! spanningtree vlan 10,20,30,40 priority 4096
-
VLAN 데이터 생성
vlan 10
name Business
vlan 20
name Sales
vlan 30
name Development
vlan 40
name Server_FARM
-
VLAN 인터페이스 생성
packet tracer의 경우 hsrp를 사용해야함.
https://www.packettracernetwork.com/tutorials/hsrp-configuration-new.html
위 페이지 참고
vlan 생성 -> SVI 생성 -> VRRP(HSRP) 설정 (VIP 생성)

int vlan 10
des ### Business ###
ip add 192.168.100.33 255.255.255.224
no ip proxy-arp # ARP 프록시 기능 off
no ip redirects # 공격자의 가짜 redirect 메시지를 막기 위한 설정
no ip unreachables # ICMP unreachable 메시지는 패킷이 목적지에 도달할 수 없을 때, 라우터나 호스트가 발신자에 보내는 에러
# 공격자는 ICMP unreachable 응답을 통해 네트워크 구조를 파악하고 어떤 포트가 열려있는지 확인 가능하다

hsrp 10 ip 192.168.100.62
# hsrp 그룹 10 생성, ip 할당
# hsrp 10의 gateway의 VIP 설정
# hsrp 그룹은 여러 라우터를 하나의 가상 라우터처럼 동작하게 묶은 집합

# 백업 라우터가 마스터의 광고 간격의 학습
# 모든 라우터가 동일한 타이밍으로 동작하도록 보장
# 타임아웃 간격을 확인하기위해 필수적
10 preempt delay minimum 10
# 우선순위가 높은 라우터 복구 시 마스터 역할을 다시 가져오는 기능
# 복구 후 10초 대기한 뒤 마스터 역할을 가져옴
hsrp 10 priority 200
# 우선순위 지정
# 기본 = 100
# 숫자가 클수록 우선순위가 높음

int vlan 20
des ### Sales ###
ip add 192.168.100.65 255.255.255.224
no ip proxy-arp
no ip redirects
no ip unreachables
hsrp 20 ip 192.168.100.94
hsrp 20 timers learn
hsrp 20 preempt delay minimum 10
hsrp 20 priority 200

int vlan 30
des ### Development ###
ip add 192.168.100.97 255.255.255.224
no ip proxy-arp
no ip redirects
no ip unreachables
hsrp 30 ip 192.168.100.126
hsrp 30 timers learn

int vlan 40
des ### Server FARM ###
ip add 192.168.100.129 255.255.255.224
no ip proxy-arp
no ip redirects
no ip unreachables
hsrp 40 ip 192.168.100.158
hsrp 40 timers learn
-
BackBone01 - Switch Interface 설정
int e0/3 # 4F Switch
no shut
switchport trunk encapsulation dot1q # IEEE 802.1Q 표준의 VLAN 태깅 방식으로 캡슐화 방식 설정
switchport mode trunk
switchport trunk allowed vlan 10,20

int e1/0 # 6F Switch
no shut
switchport trunk encapsulation dot1q # IEEE 802.1Q 표준의 VLAN 태깅 방식으로 캡슐화 방식 설정
switchport mode trunk
switchport trunk allowed vlan 30,40

ip routing # ip routing 명령어로 BackBone 스위치를 L3 기능을 할 수 있게 하여 Inter-VLAN 기능을 수행할 수 있게 한다
-
BackBone01 - 방화벽 Interface 설정
int fa1/0
desc #### Fortinet (Gi0/0) ####
no switchport # L3 mode로 설정
ip add 192.168.100.10 255.255.255.252
no ip proxy-arp
no ip redirects
no ip unreachables
exit

ip route 0.0.0.0 0.0.0.0 192.168.100.9 # UpLink 방향으로 Default Routing 걸기
-
BackBone01 - BackBone02 인터페이스 설정
vlan 2
name BB_LACP

int vlan 2
desc #### BB-02 LACP ####
switchport trunk encapsulation dot1q
switchport mode trunk
switchport trunk allowed vlan 2,10,20,30,40
ip add 192.168.100.17 255.255.255.252
no ip proxy-arp
no ip redirects
no ip unreachables
no shut
-
Port Channel 생성
int port-channel 1 # port-channel은 여러 물리 네트워크 포트를 하나의 포트로 묶는 기술
des #### LACP ####
switchport trunk encapsulation dot1q
switchport mode trunk
switchport trunk allowed vlan 2,10,20,30,40

int range e0/1-2 # BB1 - BB2 연결 포트번호
channel-group 1 mode active # LACP를 active하게 사용
channel-protocol lacp
exit
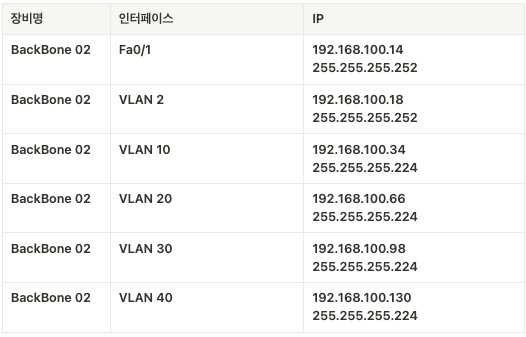
3.2. BackBone 02 설정하기
-
STP Root Bridge 설정
# 빠른 연결을 위해 RSTP 모드로 변경
spanningtree mode rapid-pvst

# Bridge 선정을 위한 우선순위 낮추기
spanningtree vlan 10,20,30,40 priority 8192
-
VLAN 데이터 생성
vlan 10
name Business
vlan 20
name Sales
vlan 30
name Development
vlan 40
name Server_FARM
-
VLAN Interface 생성
int vlan 10 des ### Business ### ip add 192.168.100.34 255.255.255.224 no ip proxy-arp no ip redirects no ip unreachables hsrp 10 ip 192.168.100.62 hsrp 10 timers learn int vlan 20 des ### Sales ### ip add 192.168.100.66 255.255.255.224 no ip proxy-arp no ip redirects no ip unreachables hsrp 20 ip 192.168.100.94 hsrp 20 timers learn int vlan 30 des ### Development ### ip add 192.168.100.98 255.255.255.224 no ip proxy-arp no ip redirects no ip unreachables hsrp 30 ip 192.168.100.126 hsrp 30 timers learn hsrp 30 preempt delay minimum 10 hsrp 30 priority 200 int vlan 40 des ### Server FARM ### ip add 192.168.100.130 255.255.255.224 no ip proxy-arp no ip redirects no ip unreachables hsrp 40 ip 192.168.100.158 hsrp 40 timers learn hsrp 40 preempt delay minimum 10 hsrp 40 priority 200 -
BackBone2 - Switch Interface 설정
int fa0/3 # 4F Switch no shut switchport trunk encapsulation dot1q switchport mode trunk switchport trunk allowed vlan 10,20 int fa0/11 # 6F Switch no shut switchport trunk encapsulation dot1q switchport mode trunk switchport trunk allowed vlan 30,40 -
BackBone2 - 방화벽 Interface 설정
int fa0/1 desc #### Fortinet (Gi0/0) #### no switchport # L3 mode로 설정 ip add 192.168.100.14 255.255.255.252 no ip proxy-arp no ip redirects no ip unreachables exit ip route 0.0.0.0 0.0.0.0 192.168.100.13 # UpLink 방향으로 Default Routing 걸기 -
BackBone2 - BackBone1 Interface 설정
vlan 2 name BB_LACP int vlan 2 desc #### BB-02 LACP #### ip add 192.168.100.18 255.255.255.252 switchport trunk encapsulation dot1q switchport mode trunk switchport trunk allowed vlan 2,10,20,30,40 no ip proxy-arp no ip redirects no ip unreachables no shut -
PortChannel 생성
int port-channel 1
des #### LACP ####
switchport mode trunk
switchport trunk allowed vlan 2,10,20,30,40

int range e0/1-2 # BB1 - BB2 연결 포트번호
channel-group 1 mode active
channel-protocol lacp
exit
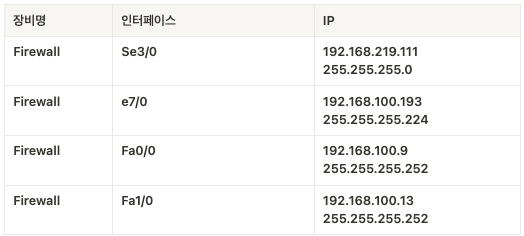
4. Firewall Setting
-
인터페이스 설정하기
enable
configure terminal
enable password cisco

int Se3/0
no shutdown
ip address 192.168.219.111 255.255.255.0

int se2/0
no shutdown
ip address 192.168.100.193 255.255.255.224

int fa0/0
no shutdown
ip address 192.168.100.9 255.255.255.252

int fa1/0
no shutdown
ip address 192.168.100.13 255.255.255.252
ㅑㅔ
-
라우팅
ip route 192.168.100.32 255.255.255.224 192.168.100.10
ip route 192.168.100.64 255.255.255.224 192.168.100.10
ip route 192.168.100.96 255.255.255.224 192.168.100.10
ip route 192.168.100.128 255.255.255.224 192.168.100.10

ip route 192.168.100.32 255.255.255.224 192.168.100.14
ip route 192.168.100.64 255.255.255.224 192.168.100.14
ip route 192.168.100.96 255.255.255.224 192.168.100.14
ip route 192.168.100.128 255.255.255.224 192.168.100.14
라우팅을 해야 Business_Team → Firewall(router) 통신이 가능하다.
ping이 router에 도착하면, router는 Business_Team에서 보낸 ping의 목적지 IP, 출발지 IP를 바꿔서 reply한다.이 때, Router에서 Routing 정보가 없으면 해당 IP로(송신자의 IP)어떻게 가야하는 지 모른다.
때문에 정적 라우팅을 설정해주게 되면, Business_Team → Router간에 통신이 가능해진다.
위 코드를 보면 같은 목적지에 대한 다음 hop ip를 이중화했다(192.168.100.10, 192.168.100.14)
이렇게 해주지 않으면, 만약 하나의 백본이 죽었을 때 외부로 통신이 안된다.(ex. 192.168.100.32 - VLAN 10의 PC들에 대한 다음 hop을 하나의 백본 192.168.100.10으로 지정한다면, 해당 백본이 죽을 경우 통신이 안된다)
- ACL 설정
웹서버를 직접 만들지는 않았기 때문에, 테스트를 위해 ICMP(Ping)을 기준으로 ACL을 설정.
cisco ping 명령어
! 인터넷 -> 내부(VLAN 10,20,30,40) 로는 ping 불가 내부 -> 인터넷 (
access-list 100 permit icmp any any echo-reply

int fa1/0
ip access-group 100 out

int fa0/0
ip access-group 100 out
해당 설정을 하게 되면, 백본 내부로는 ping 응답만 들어갈 수 있기 때문에, 외부에서 (DMZ, ISP) 접근할 수 없다.
반면, Firewall에서 백본 Interface에 inbound ACL은 걸지 않았으므로 백본 내부에서 외부(DMZ, ISP)로는 통신이 가능하다.
결론적으로
1. DMZ <-> ISP 통신 가능
2. 백본 내부 -> DMZ 통신 가능
3. 백본 내부 -> ISP 통신 가능
4. DMZ -> 백본 내부 통신 불가
5. ISP -> 백본 내부 통신 불가