여러 2d image processing 중 blur 연산에 대해 알아보겠습니다.
앞서 기본적으로 2d image processing이 어떻게 연산되는지 알아봅시다.
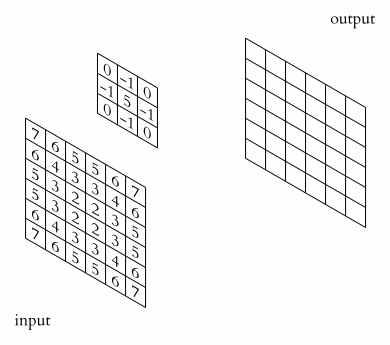
Kernel
원본 이미지의 pixel을 처리할 때 사용하는 행렬입니다.
2d image processing을 할 때 결과 pixel을 얻기 위해 원본 pixel과 주변 pixel들을 연산해 얻어냅니다.

해당 연산을 convolution이라고 하며, 저기에 사용되는 행렬이 kernel입니다.
kernel의 크기는 3x3일수도 있고 5x5일수도 있습니다. 해당 선택은 상황에 따라 스스로 선택하게 됩니다.
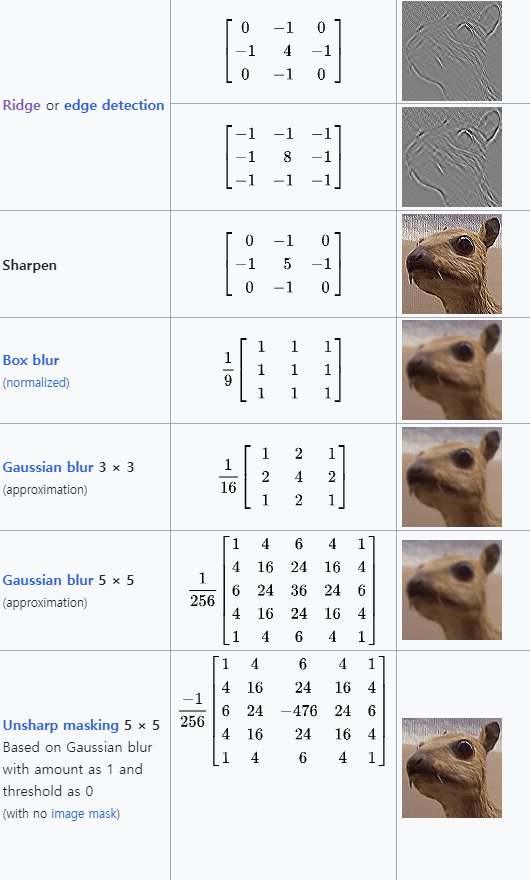
wikipedia의 글을 참조하면, 아래와 같은 효과를 낼 수 있는 kernel들이 있습니다.
Box blur
Box blur는 주변 pixel들의 색의 평균을 내어 부드럽게 만드는 방식입니다.
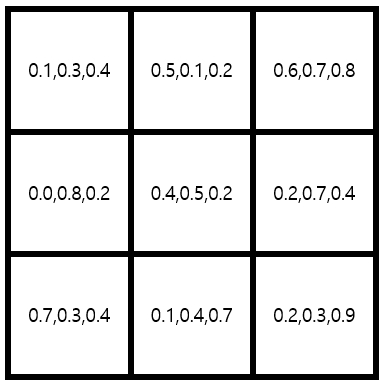
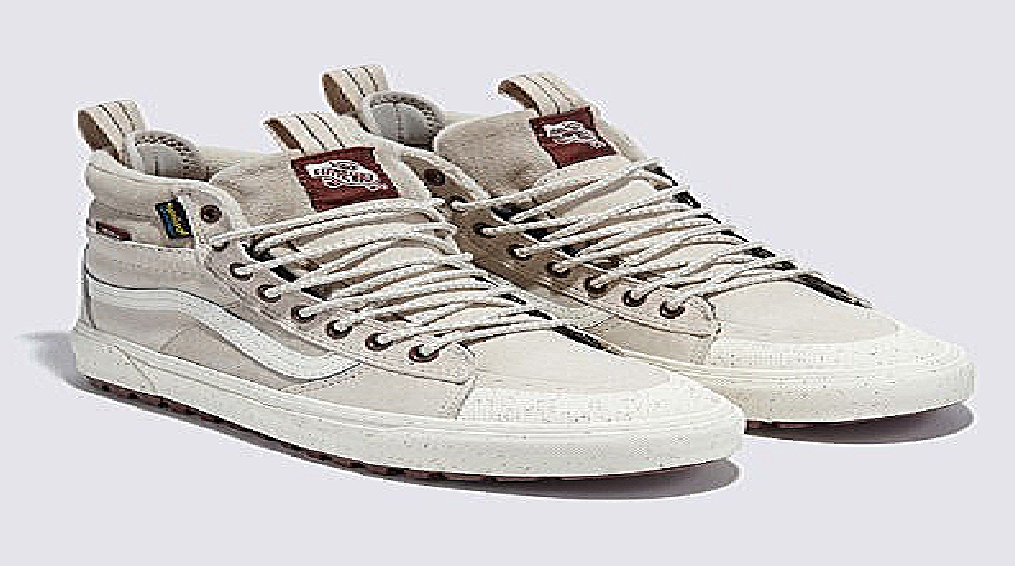
위 이미지를 예시로 들면 3x3 크기의 pixel들의 rgb 각각 평균을 내어 pixel의 결과값을 낼 수 있습니다.
Box blur의 kernel은 하단과 같습니다.
3x3의 경우 모든 pixel값을 더해 로 나누어 평균을 냅니다.
해당 방식을 그대로 구현한 코드는 하단과 같습니다.
for (int j = 0; j < this->height; j++)
{
	for (int i = 0; i < this->width; i++)
	{
		Vec4 result{ 0.0f,0.0f,0.0f,1.0f };

		for (int sj = -1; sj <= 1; sj++)
			for (int si = -1; si <= 1; si++)
			{
				Vec4 neighborPixel = GetPixel(i + si, j + sj);
				result.x += neighborPixel.x;
				result.y += neighborPixel.y;
				result.z += neighborPixel.z;
			}

		result.x /= 9;
		result.y /= 9;
		result.z /= 9;

        SetPixel(i + this->width * j, result);
	}
}
그러나 해당 box blur는 비효율적입니다. Two-dimentional한 방식을 One-dimentional한 방식을 두번 계산해 연산량을 줄일 수 있습니다.
Separable box blur
위에서 봤던 box blur의 kernel을 다음과 같이 분리할 수 있습니다.
실제로 1280x720 크기의 image에 5x5 Two-dimentional boxblur를 연산하면 23,040,000번의 연산량이 나오고 5x5 Separable boxblur를 연산하면 1,640,002번의 연산량이 나왔습니다.
물론 연산량을 계산할 때 오차가 있을 수 있지만 이를 무마할 만큼 그 연산량의 차이가 어마어마함을 알 수 있습니다.
해당 방식의 코드는 다음과 같습니다.
for (int j = 0; j < this->height; j++)
{
	for (int i = 0; i < this->width; i++)
	{
		Vec4 result{ 0.0f,0.0f,0.0f,1.0f };
		for (int s = 0; s < 5; s++)
		{
			Vec4 neighborPixel = GetPixel(i + s - 2, j);
			result.x += neighborPixel.x;
			result.y += neighborPixel.y;
			result.z += neighborPixel.z;
		}
		result.x *= 0.2f;
		result.y *= 0.2f;
		result.z *= 0.2f;

		SetPixel(i + this->width * j, result);
	}
}

for (int j = 0; j < this->height; j++)
{
	for (int i = 0; i < this->width; i++)
	{
		Vec4 result{ 0.0f,0.0f,0.0f,1.0f };
		for (int s = 0; s < 5; s++)
		{
			Vec4 neighborPixel = GetPixel(i, j + s - 2);
			result.x += neighborPixel.x;
			result.y += neighborPixel.y;
			result.z += neighborPixel.z;
		}
		result.x *= 0.2f;
		result.y *= 0.2f;
		result.z *= 0.2f;

		SetPixel(i + this->width * j, result);
	}
}
Gaussian blur
gaussian blur는 box blur와 같이 주변 pixel들을 이용해 계산하는 것은 동일하지만, 각각의 pixel들에 대해 weight값을 적용해 계산합니다.
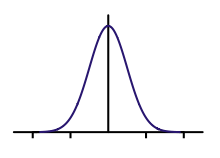
이와 같이 가우시안 함수를 이용해 가까워질수록 weight 값이 높아져 영향을 미치는 정도가 올라갑니다.
이를 통해 boxblur보다 원본 형태를 유지하며 부드럽게 만들 수 있습니다.
Gaussian blur의 kernel은 하단과 같습니다.
해당 방식을 그대로 구현한 코드는 하단과 같습니다.
	const int weight[25] = { 1,4,6,4,1,4,16,24,16,4,6,24,36,24,6,1,4,6,4,1,4,16,24,16,4 };

	for (int j = 0; j < this->height; j++)
	{
		for (int i = 0; i < this->width; i++)
		{
			Vec4 result{ 0.0f,0.0f,0.0f,1.0f };

			for (int sj = 0; sj < 5; sj++)
				for (int si = 0; si < 5; si++)
				{
					Vec4 neighborPixel = GetPixel(i + si - 2, j + sj - 2);
					result.x += neighborPixel.x * weight[sj * 5 + si];
					result.y += neighborPixel.y * weight[sj * 5 + si];
					result.z += neighborPixel.z * weight[sj * 5 + si];
				}

			result.x /= 256;
			result.y /= 256;
			result.z /= 256;

			SetPixel(i + this->width * j, result);
		}
	}
Gaussian blur 또한 separable하게 만들어 효율적으로 구현할 수 있습니다.
Separable gaussian blur
기존 Gaussian blur의 kernel을 다음과 같이 분리할 수 있습니다.
	const float weights[5] = { 0.0545f, 0.2442f, 0.4026f, 0.2442f, 0.0545f };
	for (int j = 0; j < this->height; j++)
	{
		for (int i = 0; i < this->width; i++)
		{
			Vec4 result{ 0.0f,0.0f,0.0f,1.0f };
			for (int s = 0; s < 5; s++)
			{
				Vec4 neighborPixel = GetPixel(i + s - 2, j);
				result.x += neighborPixel.x * weights[s];
				result.y += neighborPixel.y * weights[s];
				result.z += neighborPixel.z * weights[s];
			}

			SetPixel(i + this->width * j, result);
		}
	}
	for (int j = 0; j < this->height; j++)
	{
		for (int i = 0; i < this->width; i++)
		{
			Vec4 result{ 0.0f,0.0f,0.0f,1.0f };
			for (int s = 0; s < 5; s++)
			{
				Vec4 neighborPixel = GetPixel(i, j + s - 2);
				result.x += neighborPixel.x * weights[s];
				result.y += neighborPixel.y * weights[s];
				result.z += neighborPixel.z * weights[s];
			}

			SetPixel(i + this->width * j, result);
		}
	}
이외 kernel
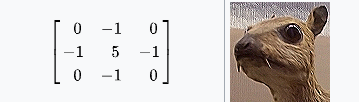
Ridge
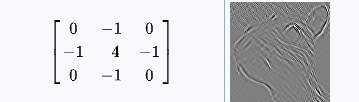
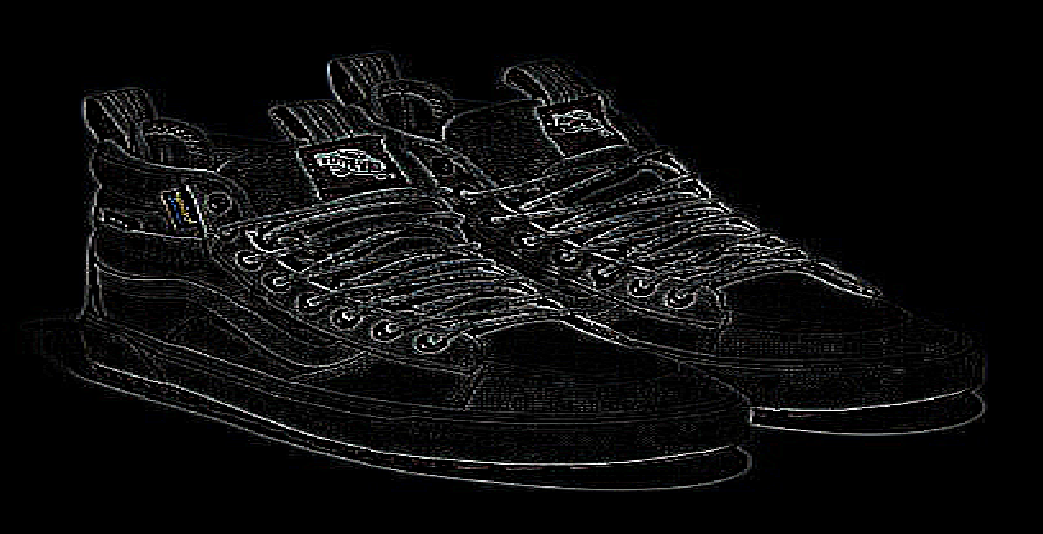
Edge detection
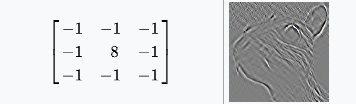
Sharpen
해당 코드들은 직접 작성한 코드의 일부를 가져온 것이기에 그대로 넣는다고 해도 작동이 되지 않을 가능성이 높습니다. 코드의 구조를 보고 이해한 후 자신이 작성중인 코드에 맞게 직접 작성하시는 것을 추천드립니다.
해당 내용은 홍정모 그래픽스 새싹코스를 수강하며 학습한 내용은 정리한 것이며, 잘못된 내용이 있을 수 있으니 혹시라도 잘못된 부분이 있다면 지적 부탁드립니다.
