1. 고정 아이피 설정
/etc/sysconfig/network-scripts/ifcfg
경로의 인터페이스 이름의 파일을 vi로 수정해 주어야한다.
1-1 :
$ ls- l /etc/sysconfig/network-scripts로 파일 목록을 확인
1-2
$ vi /etc/sysconfig/network-scripts/ifcfg-ens33로 열어보기
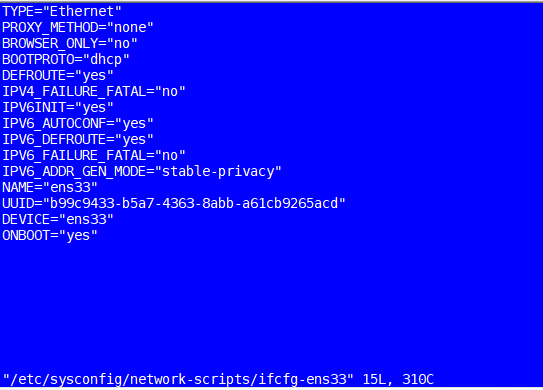
기본 DHCP가 설정되어 있을 때의 설정 값
TYPE="Ethernet" = 인터페이스의 타입(종류)
PROXY_METHOD="none" = proxy server 설정
BROWSER_ONLY="no"
BOOTPROTO="dhcp"
= 서버가 가동 되었을 때 IP를 받는 방법, ex) static, none(고정 IP 사용 시 값), dhcp
DEFROUTE="yes"
= 디폴트 라우팅 설정이 되어있는 인터페이스, 게이트웨이가 여러 개일 경우 metric 우선 순위 값
IPV4_FAILURE_FATAL="no"
IPV6 관련
{
IPV6INIT="yes"
IPV6_AUTOCONF="yes"
IPV6_DEFROUTE="yes"
IPV6_FAILURE_FATAL="no"
IPV6_ADDR_GEN_MODE="stable-privacy"
}
NAME="ens33" = 해당 장치에 표기되는 이름
UUID="b99c9433-b5a7-4363-8abb-a61cb9265acd" = 장치의 고유한 이름, 해당 시스템에서 중복이 되지 않음
DEVICE="ens33" = 장치명
ONBOOT="yes" = 부팅 시 자동 시작 여부
고정 IP 설정 시 설정 값
TYPE="Ethernet"
DEVICE="ens33"
BOOTPROTO="static"
HWADDR=MAC주소(실제 물리 인터페이스와 동일하지 않아도 됨)
ONBOOT="yes"
UUID="b99c9433-b5a7-4363-8abb-a61cb9265acd"
IPVAINIT="no"
IPADDR="192.168.255.30"
BROADCAST"192.168.255.255"
NETMASK="255.255.255.0"
GATEWAY="192.168.255.2"
DNS1="8.8.8.8"
DNS2="168.126.63.1"
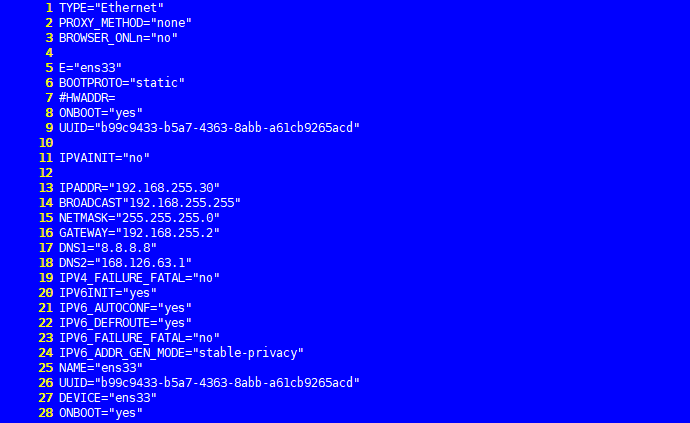
(수정 후 저장)
1-3 설정 완료 후 설정 값 적용
$ sudo systemctl restart network
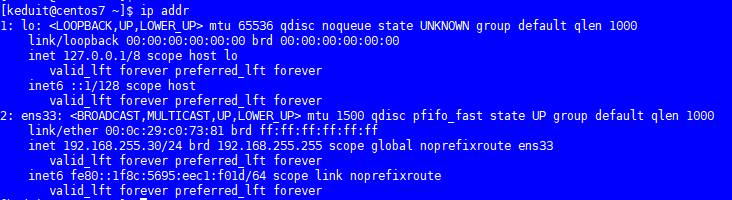
1-4 적용 후 IP 확인
$ ip addr
2. HostName 설정
$ sudo hostnamectl set-hostname 호스트이름
$sudo reboot
재부팅

변경 확인
3. repository 추가
(yum으로 네트워크를 통해 외부로부터 프로그램을 설치할 수 있도록 도화주는 네트워크 저장소)
네트워크 저장소에는 여러가지 공식 비공식 저장소가 존재한다.
3-1 EPEL repo 추가 (RHEL 공식 확장 repository)
$ sudo yum install epel-release
--인터넷이 되지 않는경우--
$ wget https://dl.fedoraproject.org/pub/epel/epel-release-latest-7.noarch.rpm
(rpm을 다운로드 받아 rpm manager를 이용한 설치 방법)
4. selinux (security linux) 해제
(보안성은 증대되나, 활성화 되면 실제 서버 운영 시 제약사항이 많아지며, 서비스 실행 시 예외처리를 전부 해줘야하는 불편함 발생)
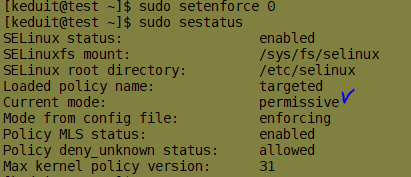
4-1 $ sudo sestatus
(상태 확인 명령)
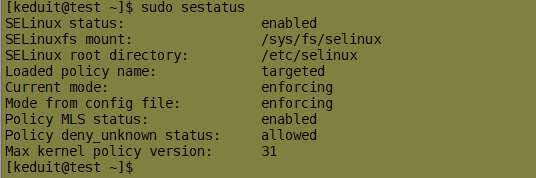
SELinux status: enabled = (selinux 현재 가동 중)
SELinuxfs mount: /sys/fs/selinux
SELinux root directory: /etc/selinux
Loaded policy name: targeted
Current mode: enforcing = (가동 중이며 강제 적용 중)
Mode from config file: enforcing = (config 파일에 설정된 값
Policy MLS status: enabled
Policy deny_unknown status: allowed
Max kernel policy version: 31
-selinux 임시 해제 명령 (리부트 시 다시 돌아옴)
$ sudo setenforce 0
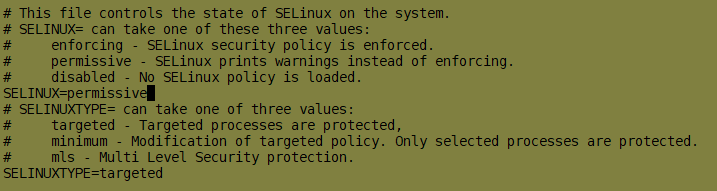
-selinux 영구 해제 명령
$ sudo vi /etc/sysconfig/selinux 진입 후 SELINUX 부분을 enforcing -> permissive로 변경
(추후 사용할 일이 아예 없을 경우 disabled로 설정, 재부팅 必)

5. ssh 접속 설정
5-1 미 설치 시 (openssh 설치)
$ sudo yum install openssh*
5-2 openssh-server (sshd 설정)
$ sudo vi /etc/ssh/sshd_config
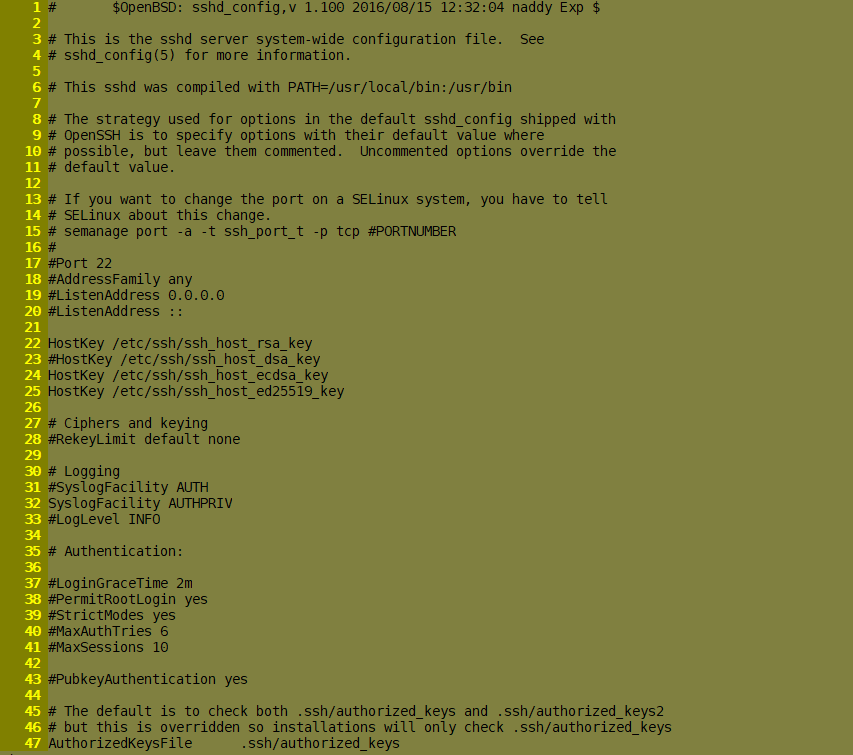
 17 #Port 22 : 다른 포트로 변경하는 것을 보안상 추천 (49152 ~ 65535)
 18 #AddressFamily any
 19 #ListenAddress 0.0.0.0
 20 #ListenAddress ::

 22 HostKey /etc/ssh/ssh_host_rsa_key : SSH에서 사용할 암호키의 경로 설정
 23 #HostKey /etc/ssh/ssh_host_dsa_key
 24 HostKey /etc/ssh/ssh_host_ecdsa_key
 25 HostKey /etc/ssh/ssh_host_ed25519_key

 37 #LoginGraceTime 2m  : 세션 연결 후 로그인 화면 유지 시간
 38 #PermitRootLogin yes : root로 로그인 가능 여부, 보안상 no로 설정 권장
 39 #StrictModes yes : 로그인을 허용가 전, 임시파일 및 사용자 홈 디렉토리의 권한과 원격 호스트 파일들을 sshd 체크할 수 있도록 하는 기능
 40 #MaxAuthTries 6 : 로그인 시 비밀번호 최대 인증 시도 횟수
 41 #MaxSessions 10 : ssh 최대 세션 수량
 43 #PubkeyAuthentication yes : ssh version2에서 사용할 공개키 인증 설정
ssh 포트 변경 시 방화벽에서 해당 포트를 해제 해야한다.
$ sudo firewall-cmd --permanent --zone=public --add-port=5555/tcp
$ sudo firewall-cmd --reload
모든 설정이 변경된 후
$ sudo systemctl restart sshd
6. NTP 시간 동기화
6-1 NTP client 설치
$ sudo yum install ntp -y
6-2 NTP peer 설정
$ sudo vi /etc/ntp.conf
  1 # For more information about this file, see the man pages
  2 # ntp.conf(5), ntp_acc(5), ntp_auth(5), ntp_clock(5), ntp_misc(5), ntp_mon(5).
  3
  4 driftfile /var/lib/ntp/drift
  5
  6 # Permit time synchronization with our time source, but do not
  7 # permit the source to query or modify the service on this system.
  8 restrict default nomodify notrap nopeer noquery
  9
 10 # Permit all access over the loopback interface.  This could
 11 # be tightened as well, but to do so would effect some of
 12 # the administrative functions.
 13 restrict 127.0.0.1
 14 restrict ::1
 15
 16 # Hosts on local network are less restricted.
 17 #restrict 192.168.1.0 mask 255.255.255.0 nomodify notrap
 18
 19 # Use public servers from the pool.ntp.org project.
 20 # Please consider joining the pool (http://www.pool.ntp.org/join.html).
 21 server 0.centos.pool.ntp.org iburst
 22 server 1.centos.pool.ntp.org iburst
 23 server 2.centos.pool.ntp.org iburst
 24 server 3.centos.pool.ntp.org iburst
 25
 26 #broadcast 192.168.1.255 autokey        # broadcast server
 27 #broadcastclient                        # broadcast client
 28 #broadcast 224.0.1.1 autokey            # multicast server
 29 #multicastclient 224.0.1.1              # multicast client
 30 #manycastserver 239.255.254.254         # manycast server
 31 #manycastclient 239.255.254.254 autokey # manycast client
 32
 33 # Enable public key cryptography.
 34 #crypto
 35
 36 includefile /etc/ntp/crypto/pw
 37
 38 # Key file containing the keys and key identifiers used when operating
 39 # with symmetric key cryptography.
 40 keys /etc/ntp/keys
 41
 42 # Specify the key identifiers which are trusted.
 43 #trustedkey 4 8 42
 44
 45 # Specify the key identifier to use with the ntpdc utility.
 46 #requestkey 8


 22 server time.bora.net
 23 server time.kornet.net

 추가 후 저장
6-3 ntpd를 시작 프로그램에 등록 및 서비스 시작
$ sudo systemctl enable ntpd.service
$ sudo systemctl start ntpd.service
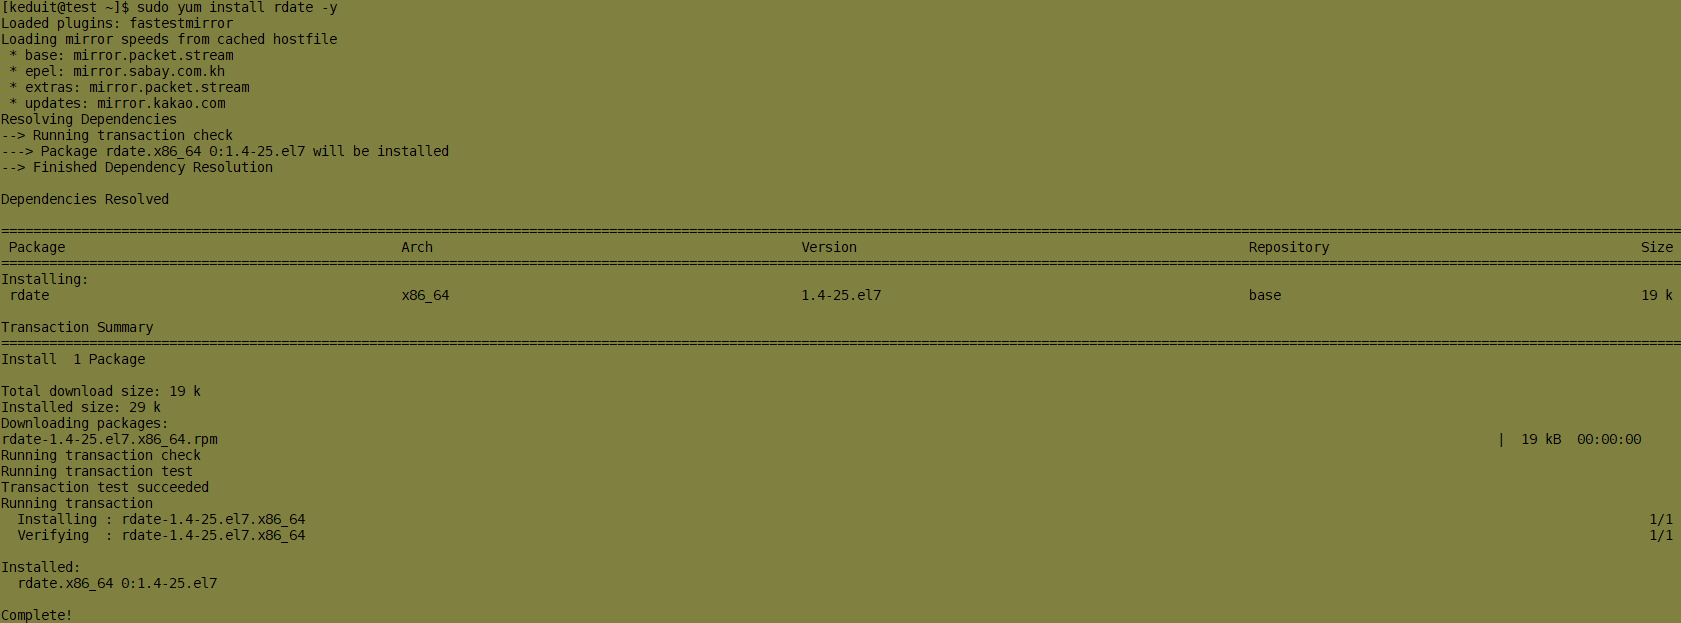
6-4 rdate (시간 동기화 시 사용하는 프로그램)을 활용한 시간 동기화
$ sudo yum install rdate -y
하드웨어 시간 확인 (컴퓨터 종료 시에도 CMOS에 시간이 계속 설정이 되어있음)
$ sudo hwclock -r

운영체제 시간 확인
$ sudo date

운영체제 시간 값을 활용한 하드웨어 시간 동기화
$ sudo hwclock -w
rdate를 활용 운영체제 시간과 ntp 서버 시간을 동기화
$ sudo rdate -s ntp서버주소
time 서버의 시간 확인
$ sudo rdate -p ntp서버주소

- crontab을 통해 정해진 시간마다 시간 동기화 명령을 예약하는 방법을 활용할 수 있음
7. 문자셋 확인
현재 시스템에 설치된 문자셋 확인
$ echo $LANG
8. update 진행
$ sudo yum update -y