[Vue3실강] 9강 NoN-prop속성과 vue-router

NoN-prop속성과 vue-router
🐥Non-prop속성
non-props란?
컴포넌트 non-prop 속성은 컴포넌트에 전달되지만, props나 emits에 정의된 특성을 지니고 있지 않은 속성 또는 이벤트 리스너를 의미합니다. 이에 대한 일반적인 예로 class, style, id 속성이 있습니다. 이러한 속성들은 $attrs 프로퍼티를 통해 접근할 수 있습니다.
정리하자면 props라는 옵션에 적용하지 않은 설정은 non-props속성이 되며 최상위 컴포넌트가 하나인 경우 자동으로 모두 최상위 컴포넌트로 들어가게 됩니다.
단, 최상위컴포넌트가 두개 이상인 경우에는 설정을 해주어야합니다.
1. 최상위 요소가 1개인 경우
Non-prop속성은 모두 최상위컴포넌트로 들어갑니다.
App.vue
<template>
  <HelloWorld
    message="HelloHEROPY"
    class="active" />
</template>

<script>
import HelloWorld from '~/components/HelloWorld.vue'

export default {
  components: {
    HelloWorld
  }
}
</script>
HelloWorld
<template>
  <div>{{ message }}</div>
</template>

<script>
export default {
  props: {
    message: {
      type: String,
      default: ''
    }
  }
}
</script>

<style lang="scss" scoped>
  .active {
    color: red;
  }
</style>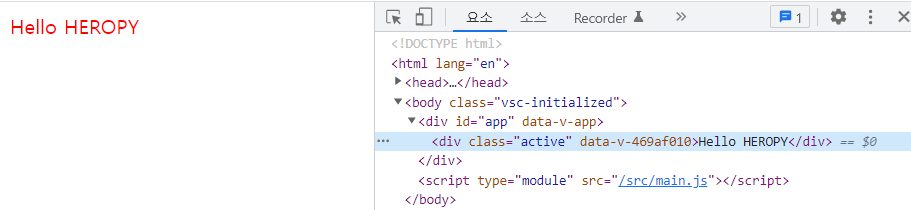
최상위 컴포넌트가 하나인 경우 자동으로 props가 상속되는 것을 확인할 수 있습니다.
참고로 vue2에서는 최상위코드는 1개만 존재를 해야했습니다. 그렇지만 vue3버전부터는 하나의 컴포넌트가 다중의 최상위 컴포넌트를 가질 수 있게되었습니다.
2. 최상위 속성이 2개인경우
v-bind:이름 , v-bind=""
최상위요소가 두개인 경우 v-bind="$attrs"를통해 nonprop속성이 붙을 부분을 정해줘야합니다.
주의해야할 부분은 v-bind:이 아니라 v-bind=라는 점입니다.
<template>
  <div>{{ message }}</div>
  <div v-bind="$attrs">✅
    123
  </div>
</template>
App.vue
<template>
  <HelloWorld
    :message="message"
    good="123"
    class="active"
    @click="message=message.split('').reverse().join('')" />
</template><script>
import HelloWorld from '~/components/HelloWorld.vue'
export default {
components: {
HelloWorld
},
data() {
return {
message: 'Hello HEROPY!'
}
}
}
</script>
HelloWorld.vue
<template>
  <div>{{ message }}</div>
  <h1
    v-bind="$attrs">
    12
  </h1>
</template>
<script>
export default {
  props: {
    message: {
      type: String,
      default: ''
    }
  }
}
</script>

<style lang="scss" scoped>
  .active {
    color: red;
  }
  [good="123"] {
    font-weight: bold;
  }
</style>
🐥vue-router
vue-router를 설치해서 연결하게 되면, 내부적으로 전역등록이 되어 router-link를 전역적으로 사용을 할 수가 있습니다.
1. router설치
$ npm i vue-router아울러 vue-router에서는 router-link와 router-view두가지의 컴포넌트를 제공합니다.
- router-link
- 내부페이지 이동:
router-link- 외부페이지 이동: a태그
- router-view
- 페이지가 바뀌었을 때 어디에 렌더링이 될지를 정해주는 컴포넌트
2. 라우터 연결
routes>index.js
import { createRouter } from 'vue-router'

export default createRouter({

})
main.js
import { createApp } from 'vue'
import App from './App.vue'
import router from './routes'

createApp(App)
  .use(router)
  .mount('#app')
3. 라우터 옵션
3-1. history옵션
Hash모드와 history모드로 구분되어 있습니다.
Hash모드:
- 특정한 주소의 검색페이지로 이동하고 싶은 경우 도메인 뒤쪽에 #/를 붙여서 접근하는 모드입니다. ex)https://google.com/#/search
- 해시모드를 사용해야지만 특정페이지에서 새로고침을 했을 때 페이지를 찾을 수 없다는 메세지를 방지할 수 있습니다.
- 해시모드를 사용하지 않기 위해서는 history모드를 사용해야합니다. 이경우 기본적으로 서버에 세팅을 해야합니다.
3-2. routes옵션
페이지를 구분해주는 용도로 사용됩니다. 배열을 받습니다.
path 옵션: 페이지를 구분해주는 각각의 경로를 의미합니다. '/'의 경우 가장 메인페이지로 이동합니다.
component 옵션: path옵션에서 정해진 경로에 접근 했을 때 vue.js의 어떠한 component를 연결해서 사용할 것인지를 명시해줍니다.
vite.js의 경우 따로 서버세팅을 해주지 않아도 괜찮지만 webpack은 해줘야합니다. 단, 실제로 배포를 할 때는 서버세팅을 해줘야합니다.
import { createRouter, createWebHistory } from 'vue-router'

export default createRouter({
  // 해시모드or히스토리 모드 지정
  history: '',
  routes: ''
})
import { createRouter, createWebHistory } from 'vue-router'
import Home from './Home.vue'
import About from './About.vue'
export default createRouter({
// 해시모드or히스토리 모드 지정
history: createWebHistory(),
routes: [
{
path: '/',
component: Home
},
{
path: '/about',
component: About
},
]
})App.vue
App.vue에 routerView를 통해 연결해줘야합니다.
<template>
  <RouterView />
</template>
3-3 컴포넌트 연결
components > TheHeader.vue
<template>
  <header>
    <RouterLink to="/">
      Home..
    </RouterLink>
    <RouterLink to="/about">
      About..
    </RouterLink>
  </header>
</template>
App.vue
<template>
  <TheHeader />
  <RouterView />
</template><script>
import TheHeader from '~/components/TheHeader.vue'
export default {
components: {
TheHeader
}
}
</script>3-4 routerlink active
TheHeader.vue
<template>
  <header>
    <RouterLink
      to="/"
      active-class="active">
      Home..
    </RouterLink>
    <RouterLink
      to="/about"
      active-class="active">
      About..
    </RouterLink>
  </header>
</template>
router-link-active라는 클래스를 위와 같이 수정해 사용을 할 수 있습니다.
또한 이를 이용해 스타일 지정을 할 수도 있습니다.
<style lang="scss" scoped>
.active {
  color: red;
  font-weight: bold;
}
</style>
3-5 $router, $route
vue.js에서는 $으로 시작하는 두개의 객체를 제공합니다.
$router
명령들이 들어있는 객체로, 대표적으로 push()라는 메소드가 있습니다.
$route
현재 페이지에 대한 정보가 들어있습니다.
TheHeader.vue
<script>
export default {
  mounted() {
    console.log('this.$router', this.$router)
    console.log('this.$route', this.$route)
  }
}
</script>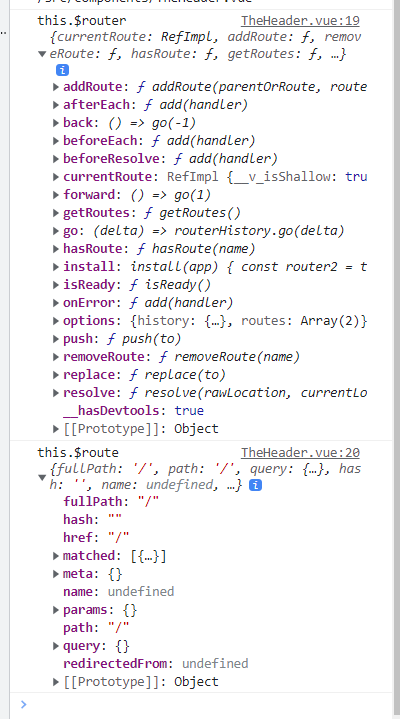
4. Dynamic Route Matching
Dynamic Route Matching with Parmas
동적페이지 주소를 parmas와 연결시킵니다.
const User = {
  template: '<div>User</div>',
}

// these are passed to `createRouter`
const routes = [
  // /:id 동적 주소가 들어갈 자리
  { path: '/users/:id', component: User },
]
어떤 값이 들어올지 모르지만 그값을 id라는 값으로 받아서 처리하겠다는 의미입니다.
실습
routes>index.js
    {
      path: '/about/:heropy',
      component: About
    },
404 Not Found
    {
      path: '/:heropy(.*)*',
      component: NotFound
    },