Assembly란?
Assembly or Assembler language indicates a low-level programming language that can be converted to machine code by using assembler. Assembly language is tied to either physical or a virtual machine as their implementation is an instruction set, and these instructions tell the CPU to do that fundamental task like adding two numbers.
뭐 low-level에 프로그래밍 언어로 기계어로 변형될 수 있고..이런 설명은 딱히 와닿지 않으므로 요즘 핫한 chatGPT에게 설명해달라고 하자!

즉 assembly를 사용하면 솔리디티 자체로 명령하기 어려운 것들을 직접적으로 명령할 수 있다. memory 혹은 storage에 접근해서 데이터를 가져온다든지, 해당 데이터의 위치를 불러온다든지 등등 EVM의 내부에 직접 명령을 내린다고 보면 될 것 같다. 보통 라이브러리에서 많이 쓰인다.
EVM
EVM을 흔히 Stack Machine이라고 부른다. Stack은 push와 pop만 가능한 데이터 구조를 말한다. 가장 마지막에 들어간 데이터가 가장 빨리 나오는 Last in, First out (LIFO)구조다. Stack Machine에서 사용하는 Opcode는 역폴란드식 표기법을 따른다. 우리가 흔히 아는 연산 표시는 숫자 사이에 연산자가 들어가지만, 역폴란드식은 연산자가 가장 마지막에 온다.
a + b      // Standard Notation (Infix)
a b add    // Reverse Polish Notation
Inline Assembly & Standalone Assembly
솔리디티에서 사용하는 assembly는 두 가지 타입으로 나눌 수 있다. 보통 솔리디티 안에서 사용하는 Inline Assembly를 자주 볼 것이다.
- Inline Assembly : 솔리디티 안에서 사용 가능
- Standalone Assembly : 솔리디티 밖에서 사용 가능
Syntax
function addAssembly(uint x, uint y) public pure returns (uint) {
     assembly {
          let result := add(x, y)   // x + y
          mstore(0x0, result)       // store result in memory
          return(0x0, 32)           // return 32 bytes from memory
     }
 }
솔리디티로 작성한 컨트랙트 내에서 assembly{ .. } 블록을 만들어주고, 그 안에 opcodes를 작성하는 형식이다. 하나의 블록은 다른 블록과 상호작용할 수 없다. 즉 위 블록에서 result에 데이터를 할당했다면, 다른 블록에서 result 변수를 사용한다고 해도 그 안에 데이터는 없을 것이다. 위 예시를 좀 더 자세히 살펴보자.
function addition(uint x, uint y) public pure returns (uint) {

    assembly {
        // 변수 result를 만들고
        //     -> `add` opcode를 활용해 `x + y` 를 계산한다.
        //     -> 결과를 result에 할당한다.
        let result := add(x, y)

        // `mstore` opcode를 사용해서
        //     -> 변수 result를 memory 주소 0x0에 저장한다.
        mstore(0x0, result)

        // memory 주소 0x0에서 32 bytes를 리턴한다.
        return(0x0, 32)

    }
}
변수에 값을 할당할 때 :=를 사용한다. let은 stack에 새로운 slot을 만들고 해당 slot을 변수가 사용할 수 있도록 예약한다. 블록이 끝나면 자동으로 slot을 삭제한다.
assembly {
    let a := 0x123             // Hexadecimal
    let b := 42                // Decimal
    let c := "hello world"     // String

    let d := "very long string more than 32 bytes" // Error
}
// TypeError: String literal too long (35 < 32)
// let d := "really long string more than 32 bytes"
//           ^------------------------------------^
string 타입의 데이터를 할당할 때는 32바이트 까지만 가능하다.
function assembly_local_var_access() public pure {
    uint b = 5;

    assembly {               // defined outside an assembly block
        let x := add(2, 3)
        let y := mul(x, b)
    }
}
함수 내에 정의된 변수를 assembly 블록 안에서 사용할 수 있다.
반복문
function for_loop_solidity(uint n, uint value) public pure returns(uint) {

    for ( uint i = 0; i < n; i++ ) {
        value = 2 * value;
    }
    return value;
}
솔리디티의 반복문을 다음과 같이 assembly로 표현할 수 있다.
function for_loop_assembly(uint n, uint value) public pure returns (uint) {

     assembly {

       for { let i := 0 } lt(i, n) { i := add(i, 1) } {
           value := mul(2, value)
       }

       mstore(0x0, value)
       return(0x0, 32)

   }

}
assembly {
let x := 0
let i := 0
for { } lt(i, 0x100) { } { // while(i < 256), 100 (hex) = 256
x := add(x, mload(i))
i := add(i, 0x20)
}
}while문은 따로 없지만 위와 같이 표현할 수 있다.
if문
assembly {
    if slt(x, 0) { x := sub(0, x) }  // Ok

    if eq(value, 0) revert(0, 0)    // Error, curly braces needed
}
else를 사용하려면 중괄호를 사용해야 한다.
switch문
assembly {
    let x := 0
    switch calldataload(4)
    case 0 {                     //calldataload(4) 값이 0일 경우
        x := calldataload(0x24)
    }
    default {                    //calldataload(4) 값이 아무것도 해당 안 될 경우
        x := calldataload(0x44)
    }
    sstore(0, div(x, 2))
}
여러 조건들을 사용해야 한다면 switch를 사용하는 것이 좋다. 모든 케이스가 포함될 경우, default는 사용할 수 없다.
assembly {

    let x := 34

    switch lt(x, 30)
    case true {
        // do something
    }
    case false {
        // do something els
    }
    default {
        // this is not allowed
    }

}
함수
assembly {

    function allocate(length) -> pos {
        pos := mload(0x40)
        mstore(0x40, add(pos, length))
    }
    let free_memory_pointer := allocate(64)
}
파라미터의 타입을 따로 지정할 필요가 없다. 또한 솔리디티에서 사용했던 public, pure 등을 사용할 필요 없다. 어차피 블록 안에서만 사용 가능하기 때문. 또한 assembly 함수 밖에서 선언한 변수는 함수 내에서 사용할 수 없다.
return이라는 opcode가 있다. assembly 함수 내에서 값을 리턴하려고 return을 사용하면 해당 assembly 함수 결과 값을 리턴하지 않고 assembly 전체를 리턴하고 끝낼 것이다. 대신 return과 같은 기능을 하는 leave를 사용하자.
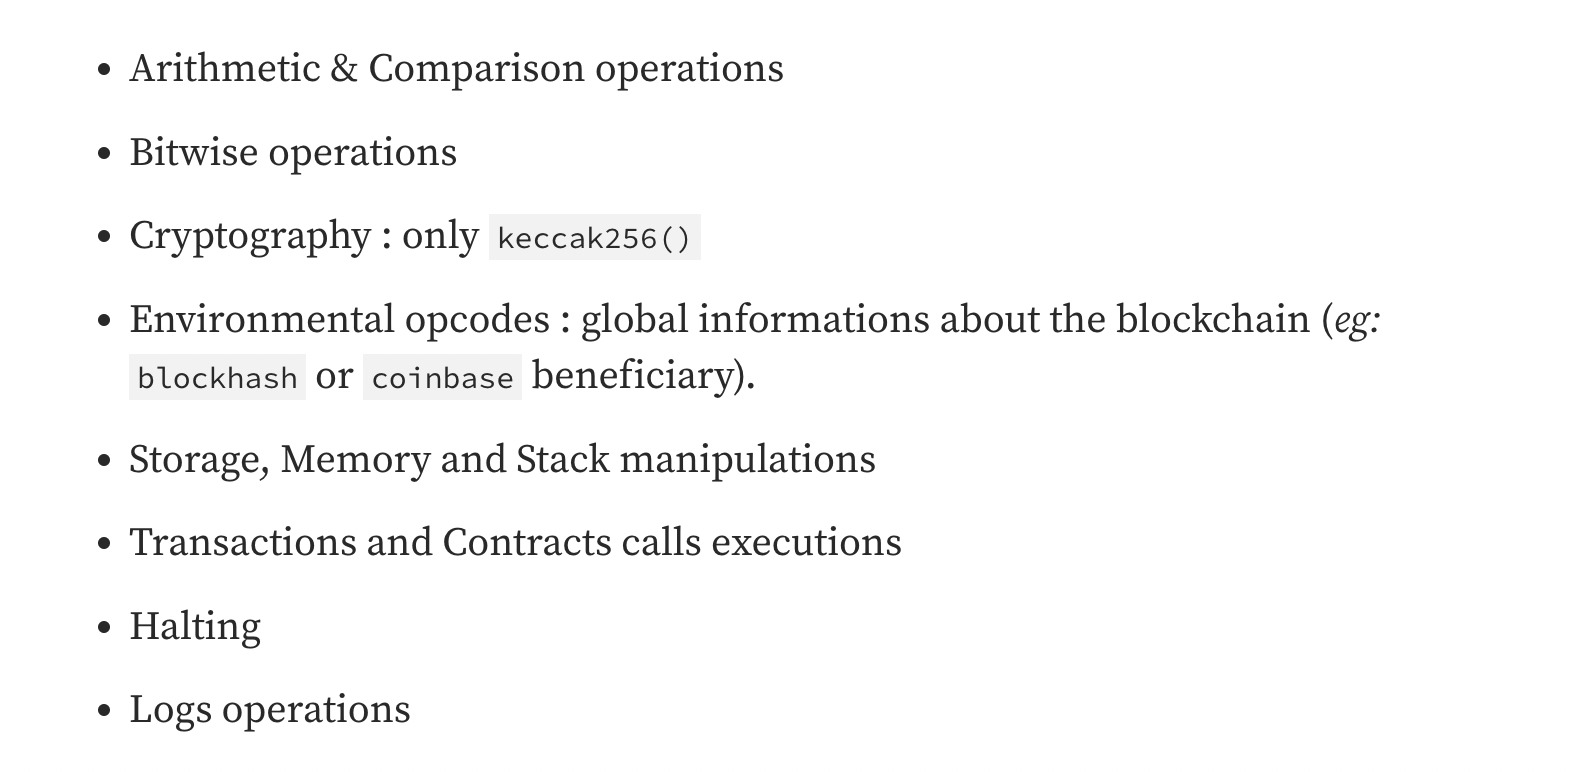
opcodes
가장 핵심인 opcodes의 대분류는 다음과 같다.
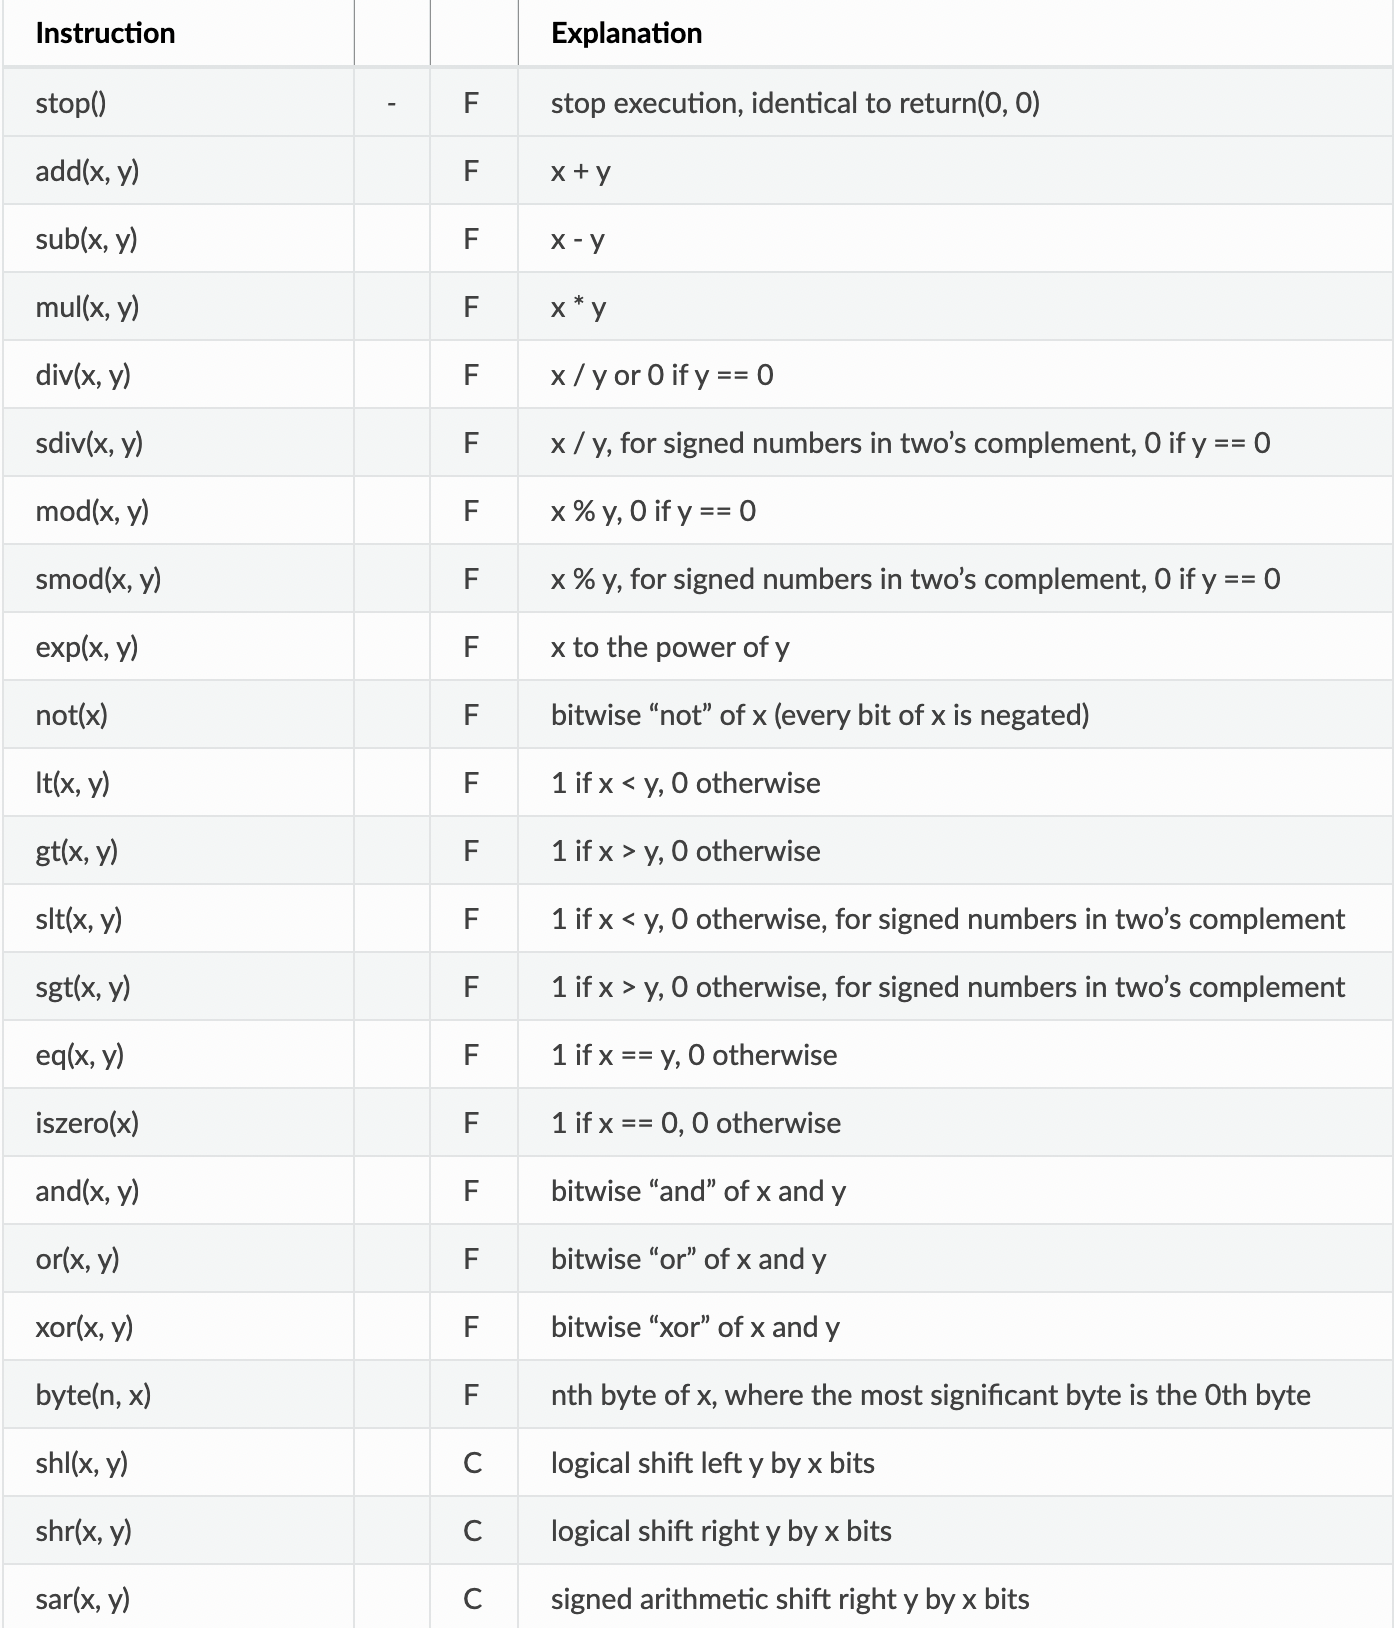
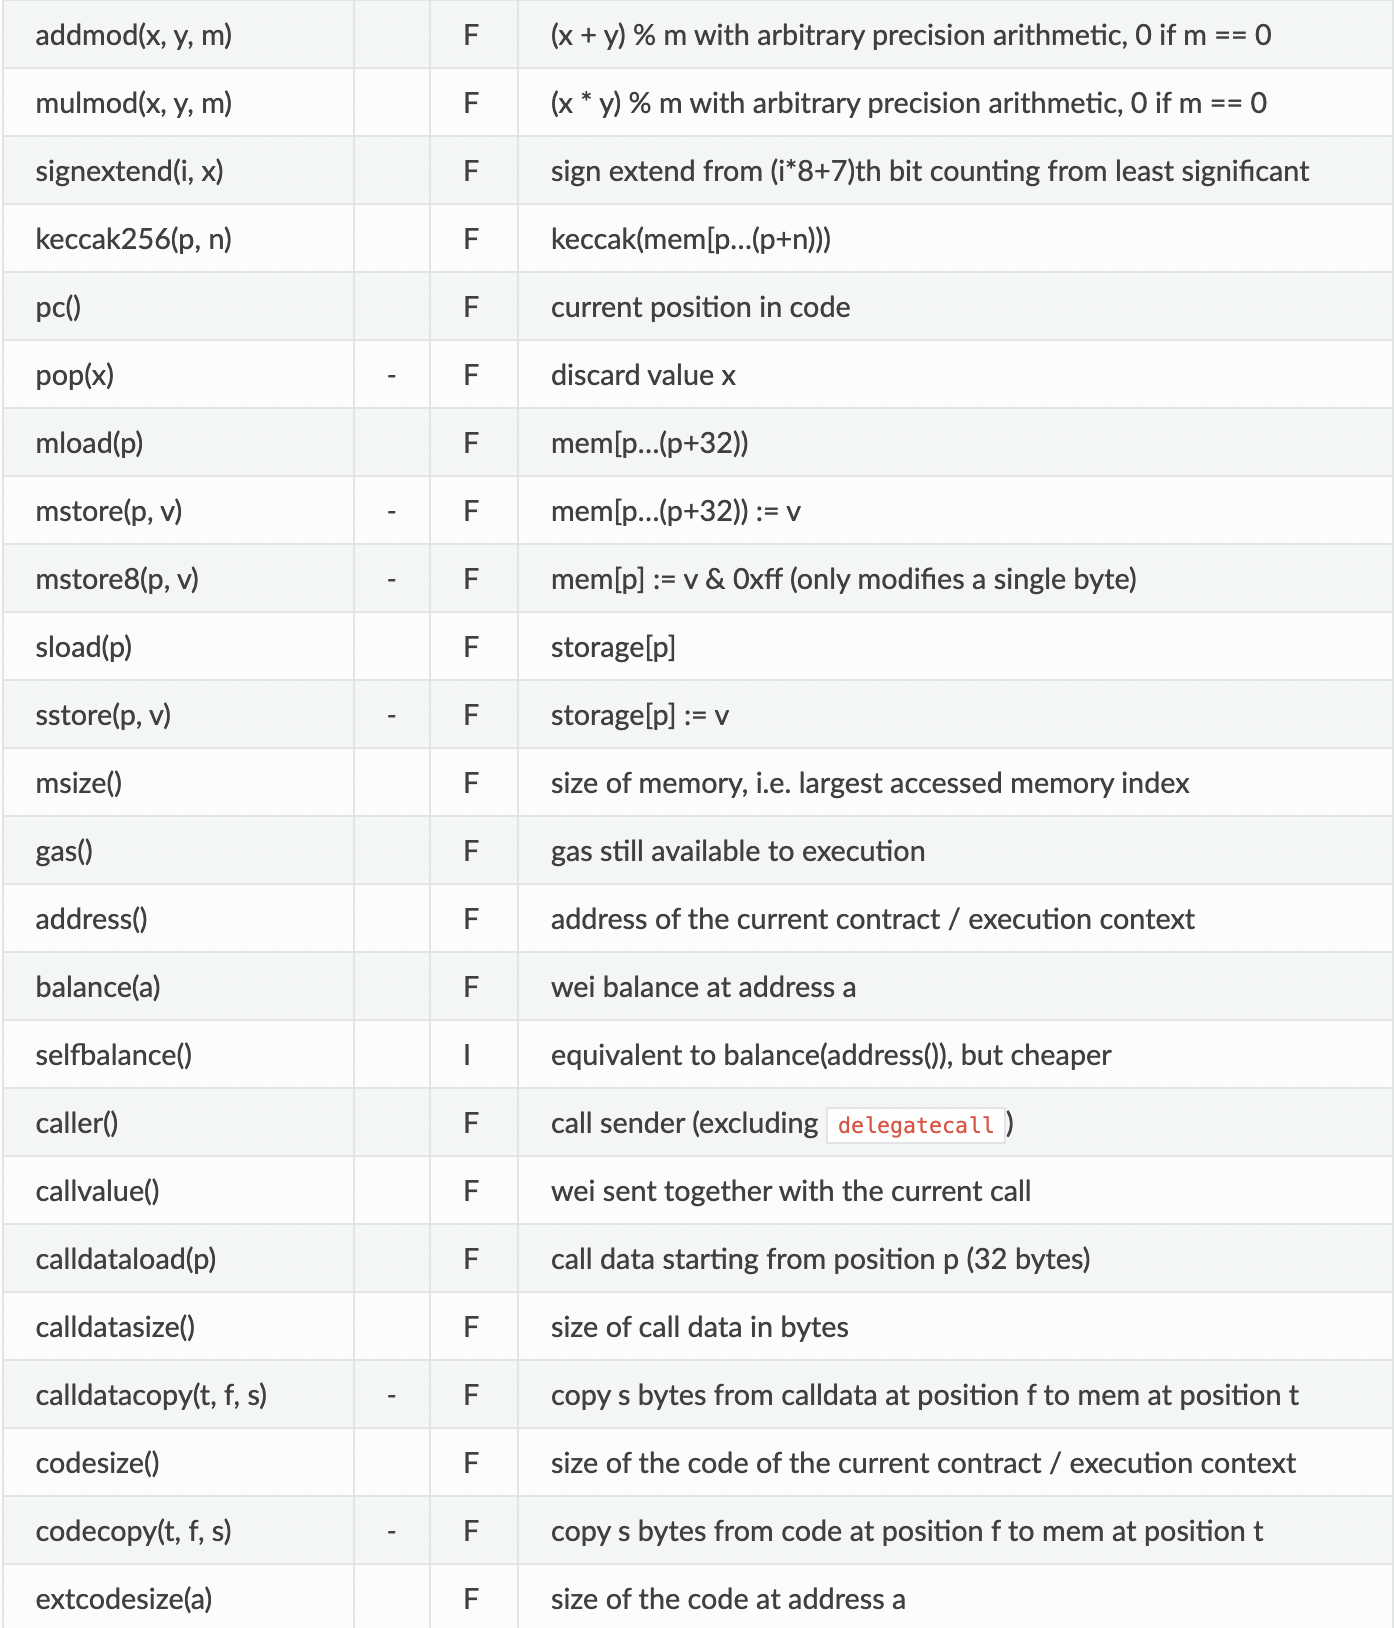
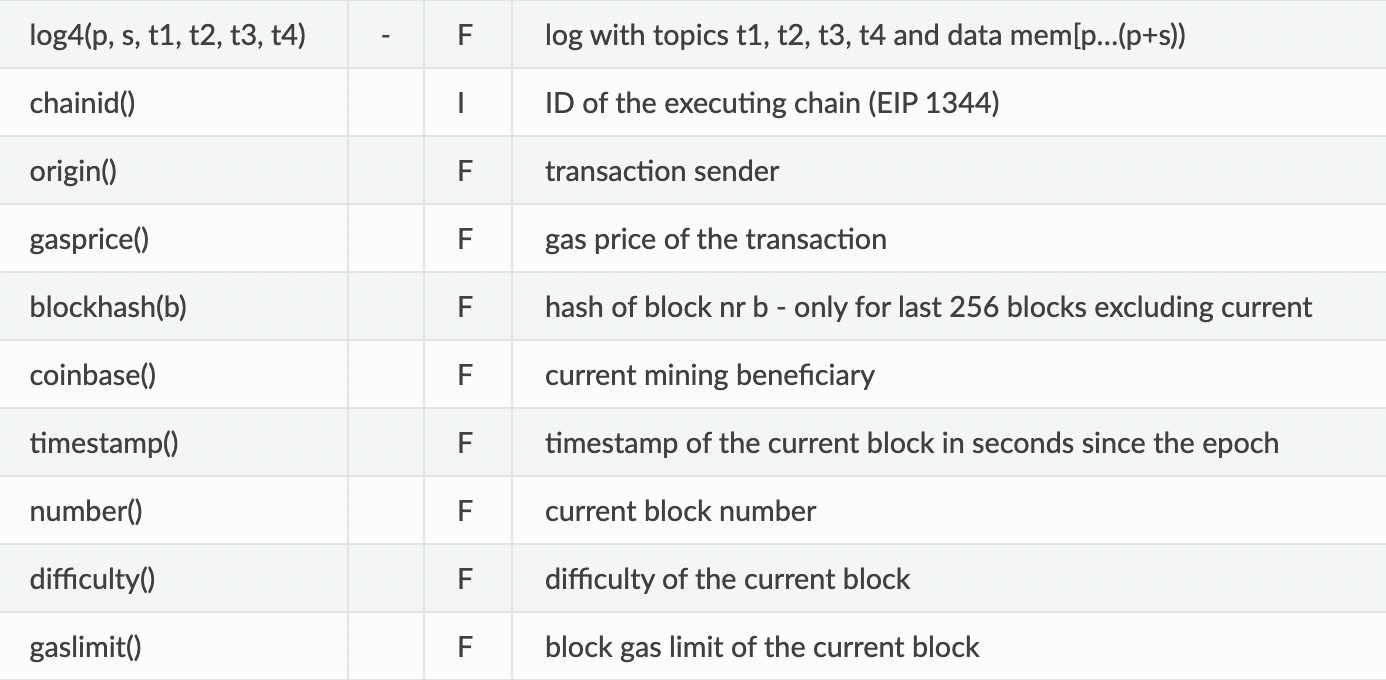
다음은 세세한 항목들이다. 두 번째 줄의 - 표시는 stack에 데이터를 넣지 않는다는 표시다. opcode는 항상 stack에 있는 가장 마지막 데이터를 가져오니 주의하자.

이 외에 Standalone assembly에서 사용하는 dup, swap, jump 등이 있다.
dup: stack의 value를 복사
swap: stack의 value를 교환
jump: 해당 항목으로 이동
opcodes를 읽을 때 순서가 반대라서 이해하기 어렵다. 아래 그림을 본다면 쉽게 이해할 수 있을 것이다.
mstore(0x80, add(mload(0x80), 3))          // Functional style
3 0x80 mload add 0x80 mstore               // Non-Functional style

// Layout of the stack after each instructions
 empty    PUSH 3   PUSH 0x80   MLOAD      ADD    PUSH 0x80   MSTORE
                    |_0x80| > |__5__|             |_0x80|
|_____| > |__3__| > |__3__| > |__3__| > |__8__| > |__8__| > |_____|
출처 및 참고자료